
The double crochet stitch is one of the most useful basic stitches to learn when starting crochet. It creates a taller fabric than single crochet and works beautifully in blankets, scarves, shawls, granny squares, garments, bags, and many other projects. Once you understand how to wrap the yarn, pull up loops, and complete the stitch in two stages, you can use this versatile technique to create a wide variety of handmade items.
1. Tutorial Overview
- Skill level: Beginner
- Approximate practice time: 20–45 minutes to learn the stitch and make a small swatch
- Materials: Medium-weight yarn, a suitable crochet hook, scissors, and a tapestry needle
- What you will learn: How to make a double crochet, work into a foundation chain, crochet subsequent rows, count stitches, and keep your edges straight
- Practice result: A small rectangular swatch made from several rows of double crochet stitches
Your practice time will depend on how quickly you become comfortable holding the hook, controlling the yarn, and identifying individual stitches. It is normal for the first few rows to look uneven.
2. Materials and Supplies
Gather the following supplies:
- Smooth, medium-weight yarn: Choose a light or clearly visible color so you can see the loops and stitch tops easily.
- Crochet hook: Check the yarn label for its recommended hook size. A 5 mm hook is a common starting point for medium-weight yarn.
- Scissors: For cutting the yarn.
- Tapestry needle: For weaving in yarn ends.
- Stitch markers (optional): Helpful for marking the first or last stitch of a row.
- Ruler or measuring tape (optional): Useful for measuring your practice swatch.
Avoid very dark, fuzzy, or highly textured yarn when learning. Smooth yarn makes it easier to see where the hook enters the stitch and how many loops remain on it.
Your hook size and tension affect the final fabric. A larger hook generally creates more open stitches, while a smaller hook usually produces a denser fabric. Neither is automatically better; choose a comfortable hook that works well with your yarn.
3. US Crochet Abbreviations
| Abbreviation | Meaning |
|---|---|
| ch | Chain |
| dc | Double crochet |
| sc | Single crochet |
| sl st | Slip stitch |
| st(s) | Stitch(es) |
| rep | Repeat |
| RS | Right side |
| WS | Wrong side |
Important: This tutorial uses US crochet terminology. A US double crochet is not the same stitch as a UK double crochet. The US double crochet corresponds to the UK treble crochet, while the UK double crochet corresponds to the US single crochet.
4. Understanding the Double Crochet Stitch
A US double crochet stitch creates a vertical post with a small V-shaped top. It is taller than a single crochet because you begin with a yarn over and pull the yarn through the loops on your hook in two stages.
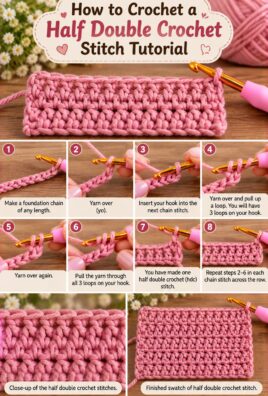
Every completed double crochet follows the same basic sequence:
- Yarn over.
- Insert the hook into a stitch or space.
- Yarn over and pull up a loop.
- Yarn over and pull through two loops.
- Yarn over and pull through the remaining two loops.
After pulling up the first loop, you should have three loops on the hook. After the first pull-through, you should have two loops. After the final pull-through, only one loop remains.
That final loop is the working loop for your next stitch.
5. Before You Begin
Hold the crochet hook comfortably
You can hold your hook like a pencil or like a knife. Choose whichever grip feels natural and allows your wrist and fingers to move comfortably.
Avoid gripping the hook too tightly. A relaxed grip makes it easier to insert the hook into stitches and pull the yarn through smoothly.
Control the working yarn
The working yarn is the strand connected to the yarn ball. The yarn tail is the short strand left after making a slip knot or fastening off.
Guide the working yarn over one or more fingers of your non-hook hand to maintain gentle, consistent tension. The yarn should slide easily without becoming so loose that the stitches develop oversized loops.
Make a slip knot
- Make a loop with the yarn.
- Pull a section of the working yarn through the loop.
- Place the new loop on your hook.
- Gently pull the yarn tail to tighten the knot around the hook.
The loop should fit comfortably around the hook and slide along it without falling off.
Make a foundation chain
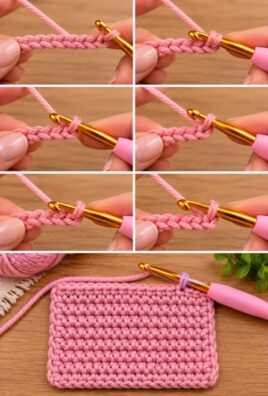
Yarn over and pull the yarn through the loop already on your hook. This creates one chain stitch.
Repeat until you have the required number of chains. Keep the chain loose enough that you can insert your hook into its loops without struggling.
Identify the top loops of a chain
Look at the foundation chain from above. Each chain resembles a small V. For this tutorial, you will insert the hook under the two top loops of the selected chain unless otherwise specified.
Count carefully, and remember that the loop already on your hook does not count as a chain stitch.
6. How to Crochet a Double Crochet Stitch Step by Step
Once you have a foundation chain or a completed row, follow these five actions to make a US double crochet stitch.
Step 1: Yarn over
Bring the working yarn over the hook from back to front, allowing the hook to catch the strand.
You now have the original working loop and the new yarn strand on the hook. Keep the yarn relaxed so the next steps are easy to complete.
Step 2: Insert the hook
Insert the hook into the designated stitch or space.
When working into a foundation chain, insert the hook under the two top loops of the chosen chain. When working into a normal row, insert the hook beneath the two top loops of the stitch unless your pattern instructs you to use a different placement.
Make sure you have identified the correct stitch before inserting the hook.
Step 3: Yarn over and pull up a loop
Wrap the working yarn over the hook again.
Pull the yarn back through the stitch or chain. You should now have three loops on your hook.
Keep the loops on the shaft of the hook rather than squeezing them tightly around its tip. This helps the yarn slide through in the next steps.
Step 4: Yarn over and pull through two loops
Yarn over once more.
Carefully pull the yarn through the first two loops nearest the hook tip. You should now have two loops remaining on the hook.
If the yarn catches, rotate the hook slightly so its tip passes through the loops without splitting the yarn.
Step 5: Yarn over and pull through the remaining two loops
Yarn over again and pull the yarn through both remaining loops.
You should now have one loop on your hook. Your double crochet stitch is complete.
The finished stitch has a V-shaped top and a vertical post beneath it. The post contributes to the height of the fabric.
Repeat the same five actions for every double crochet stitch.
7. Practice Double Crochet into a Foundation Chain
Let’s make a small practice swatch using a foundation chain of 22 stitches.
For this tutorial, the turning chain of three chains counts as a stitch. Keeping this convention consistent will help you maintain straight edges.
Step A: Make the foundation
- Make a slip knot and place it on your hook.
- Chain 22.
- Count the chains carefully, excluding the loop on your hook.
Step B: Work the first row
- Yarn over.
- Count four chains back from the hook, skipping the three chains closest to the hook.
- Insert your hook into the fourth chain from the hook.
- Complete one double crochet using the five steps described above.
- Work one double crochet into each remaining chain.
You should make 19 actual double crochet stitches. The three skipped chains count as the first stitch, so the row has 20 stitches in total.
Chain 3 and turn your work to prepare for the next row.
Why skip the first three chains?
The three chains at the beginning provide the height of a double crochet stitch. In this pattern, they also count as a stitch. If you worked another double crochet into the same starting area without accounting for that chain, you could accidentally increase the stitch count.
Step C: Count the first row
Look along the top of the row for the V-shaped stitch tops. Count the turning chain as one stitch, then count the 19 actual double crochet stitches.
If you have fewer than 20 stitches, check whether you missed a chain. If you have more than 20, check whether you accidentally worked twice into a chain or counted the working loop on your hook.
8. How to Crochet the Next Row
Once you have completed the first row, you can continue building a rectangular swatch.
Step A: Make the turning chain
Chain 3 and turn your work.
Because the turning chain counts as a stitch in this tutorial, it forms the first stitch of the new row. Do not work an additional double crochet into the first stitch at the base of the chain.
Step B: Work across the row
Skip the first stitch of the previous row.
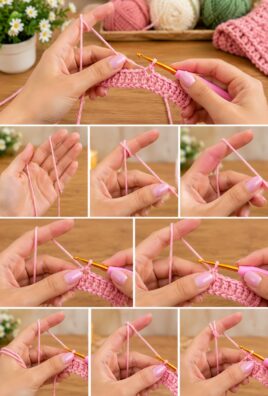
Yarn over, insert your hook under the two top loops of the next stitch, yarn over and pull up a loop, then complete the double crochet by pulling through two loops twice.
Continue working one double crochet into each remaining stitch across the row.
At the far edge, work the final double crochet into the top of the previous row’s turning chain. This prevents the edge from becoming shorter as you add rows.
Your new row should again contain 20 stitches, including the turning chain.
Step C: Continue the swatch
For each following row:
- Chain 3.
- Turn your work.
- Skip the first stitch.
- Work one double crochet into each stitch across.
- Work the final stitch into the top of the previous turning chain.
- Count your stitches before starting the next row.
Repeat until you have five or six rows. The swatch should begin to look like a small rectangle.
If the edges slope inward or outward, check the first and last stitches carefully. These are the most common places to lose or add stitches accidentally.
9. Recognizing a Completed Double Crochet
Learning to recognize a stitch is just as important as learning to make one.
Each completed double crochet has two main features:
- The top V: Two small strands at the top of the stitch. These are usually where you insert your hook for the next row.
- The vertical post: The taller section of the stitch directly below the top V.
When looking for the next stitch, focus on the V-shaped tops along the upper edge of the fabric. Insert your hook beneath both strands for a standard double crochet row.
The turning chain can look like a tall stitch at the edge. In this tutorial, it counts as a stitch, so remember to work the last stitch of the next row into its top.
Do not confuse the space between two posts with the actual stitch top. Working into a gap by mistake can create an uneven edge or an unintended increase.
10. Common Mistakes and How to Fix Them
| Problem | Likely cause | How to fix it |
|---|---|---|
| Pulling the yarn too tightly | The working yarn is held too firmly | Relax your grip and keep the loops on the shaft of the hook. |
| Accidentally skipping a chain | The foundation chain is difficult to see or count | Count backward carefully from the hook and use stitch markers if needed. |
| Working into the turning chain incorrectly | The turning chain is mistaken for a space or ignored | Remember that the chain 3 counts as a stitch in this tutorial. |
| Having too many or too few stitches | An extra stitch was made or an edge stitch was missed | Count after every row and inspect both edges. |
| Pulling through the wrong number of loops | The hook catches too many or too few loops | After pulling up a loop, check for three loops; after the first pull-through, check for two. |
| Uneven stitch heights | Tension changes or loops are pulled too high or too low | Keep the loops at a consistent height on the hook shaft. |
| Confusing US and UK terminology | Patterns use different naming systems | Check whether the pattern uses US or UK terms before beginning. |
| Loose or oversized loops | The working yarn is not controlled consistently | Guide the yarn gently with your non-hook hand and avoid pulling the loop too high. |
| Losing track of the first or last stitch | The edge stitches are hard to recognize | Mark the first or last stitch and check the turning chain at every row end. |
11. Practice Exercises
Practice makes the movements more natural. Try these short exercises before moving on to a larger project.
Exercise 1: Make a short row
Chain 12, then work double crochet stitches starting in the fourth chain from the hook. Count the turning chain as a stitch. You should have 10 stitches in total.
Focus on making every stitch with the same sequence rather than working quickly.
Exercise 2: Work several rows
Continue for five rows, using chain 3 as the turning chain each time. Keep the stitch count consistent.
Exercise 3: Identify the edges
Before beginning each new row, locate the first stitch and the top of the previous turning chain. Practice recognizing where the first and last stitches belong.
Exercise 4: Compare tension
Make one small section with relaxed, even tension and another with stitches that are too tight. Compare how easily the hook moves through the fabric and how flexible each section feels.
Return to the relaxed tension that feels comfortable and produces an even fabric.
Exercise 5: Make a small rectangle
Continue crocheting until the swatch is approximately 4 inches wide and 4 inches tall, or until it is large enough to inspect clearly.
Lay it flat and check that both sides remain reasonably straight. If the edges change shape, count the stitches in each row and correct any missed or extra stitches.
12. Uses for the Double Crochet Stitch
The double crochet stitch is useful for many kinds of crochet projects.
- Blankets and throws: Its height helps fabric grow more quickly than single crochet.
- Scarves and shawls: It creates a flexible fabric that can drape nicely.
- Granny squares: Double crochet stitches are commonly used to build square motifs with spaces and color changes.
- Garments: The stitch can be used for cardigans, tops, vests, and other wearable projects.
- Bags and accessories: It is useful for many decorative and everyday designs, although a dense stitch pattern or lining may be needed when firm structure is important.
- Decorative projects: It works well for cushions, home decor, and colorful crochet motifs.
The final texture and fabric density depend on the yarn, hook size, stitch tension, and the overall pattern. A double crochet fabric with gaps may suit a light shawl, while a tighter fabric may be more appropriate for a bag or cushion cover.
13. Compact Quick-Reference Instructions
To make one US double crochet stitch:
- Yarn over.
- Insert the hook into the target stitch.
- Yarn over and pull up a loop. You should have three loops on the hook.
- Yarn over and pull through two loops. You should have two loops remaining.
- Yarn over and pull through the final two loops. One loop remains on the hook.
For a practice swatch, chain 22, work the first double crochet into the fourth chain from the hook, and continue across. The three skipped chains count as the first stitch, giving you 20 stitches in the first row.
For subsequent rows, chain 3 and turn, skip the first stitch, work across, and place the last stitch into the top of the previous turning chain. Keep 20 stitches in each row.
14. Frequently Asked Questions
1. What is a US double crochet stitch?
It is a basic crochet stitch made by yarning over, inserting the hook, pulling up a loop, and working through the loops in two stages. It creates a taller stitch than single crochet.
2. How many loops should be on the hook after pulling up a loop?
There should be three loops on the hook. After pulling through the first two, two loops remain. After the final pull-through, one loop remains.
3. Why does a double crochet stitch have more height than a single crochet?
A double crochet begins with a yarn over and uses a taller stitch structure. This gives it more height than a US single crochet.
4. How many turning chains are usually used for a double crochet row?
Three turning chains are commonly used. The pattern should specify whether they count as a stitch, because this affects stitch placement and counting.
5. Does the turning chain count as a stitch?
In this tutorial, yes. The three-chain turning chain counts as the first stitch of the row. The same rule is used throughout the practice swatch.
6. Why are my double crochet stitches uneven?
Uneven tension, inconsistent loop height, or pulling the yarn too tightly can affect stitch height. Practice keeping the loops at a consistent height on the hook.
7. How can I keep the edges straight?
Count every row, chain 3 consistently, skip the first stitch, and work the last stitch into the top of the previous turning chain. Marking the edge stitches can help.
8. What is the difference between US and UK double crochet?
A US double crochet corresponds to the UK treble crochet. A UK double crochet corresponds to the US single crochet. Always check the terminology used by a pattern.
9. Can beginners learn double crochet easily?
Yes. The stitch has a repeatable five-step sequence. Beginners can learn it by practicing slowly and checking the number of loops on the hook at each stage.
10. What projects can I make with double crochet stitches?
You can use double crochet in blankets, scarves, shawls, granny squares, garments, bags, cushions, and many other crochet projects.
15. Conclusion
The double crochet stitch is a useful foundation for countless crochet projects. Practice the yarn-over sequence, keep your tension relaxed, and count your stitches at the end of each row. With time, your stitches will become more even, your edges easier to manage, and your crochet work more consistent.
Leave a Comment