
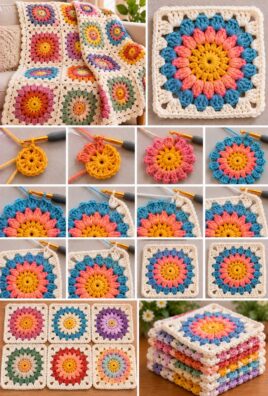
A rainbow granny square is a cheerful crochet motif featuring bright color transitions, classic square corners, and familiar double crochet clusters. It is a wonderful project for beginners who want to practice working in rounds, changing colors, and creating consistent stitch patterns. Use your finished squares to make blankets, cushion covers, bags, garments, or other colorful handmade projects.
1. Project Overview
- Skill level: Beginner
- Approximate completion time: 1–2 hours
- Approximate finished size: 6–7 inches square after six rounds
- Construction: Worked in joined rounds from the center outward
- Main stitch: Double crochet clusters
- Color sequence: Red, orange, yellow, green, blue, and purple
- Suggested uses: Blankets, cushions, bags, garments, and decorative panels
The finished dimensions and completion time are approximate. Your results will depend on yarn weight, hook size, stitch tension, and the number of rounds you work.
2. Materials and Supplies
Gather these supplies before starting:
- Yarn: Six coordinated colors—red, orange, yellow, green, blue, and purple. Approximately 10–20 yards of each color is a reasonable starting estimate for one medium-sized square, although actual use will vary.
- Crochet hook: A 5 mm hook is a common starting point for medium-weight yarn.
- Scissors
- Tapestry needle
- Measuring tape
- Stitch markers, optional
For the most consistent square, choose yarns of similar weight and fiber content. Smooth, medium-weight yarn makes it easier to see the top loops, chain spaces, and double crochet clusters.
You can simplify the design by using three colors or make it larger by adding more rounds. Larger squares require more yarn, especially in the outer colors.
3. US Crochet Abbreviations
| Abbreviation | Meaning |
|---|---|
| ch | Chain |
| sl st | Slip stitch |
| dc | Double crochet |
| st(s) | Stitch(es) |
| sp | Space |
| rep | Repeat |
| rnd | Round |
| FO | Fasten off |
A granny cluster in this pattern means three double crochet stitches worked into the same chain space. The chain spaces between clusters help form the open texture of a traditional granny square.
4. Skills Needed Before Starting
This project uses a small set of basic crochet skills:
- Making a slip knot and foundation chain.
- Working double crochet stitches.
- Working three double crochet stitches into one space.
- Crocheting chain spaces between clusters.
- Joining rounds with a slip stitch.
- Changing yarn colors.
- Counting clusters and corner spaces.
- Fastening off and weaving in yarn ends.
If you are new to granny squares, practice making a small square with one color first. Once you can identify the four corner spaces and the spaces along each side, adding rainbow colors becomes much easier.
5. Understanding the Rainbow Granny Square
A traditional granny square grows outward from a small center. Each round adds clusters along the sides while keeping four corner spaces in place.
This pattern uses six rainbow rounds:
- Round 1: Red center.
- Round 2: Orange.
- Round 3: Yellow.
- Round 4: Green.
- Round 5: Blue.
- Round 6: Purple.
The first round establishes four corner spaces. In the next round, each corner receives two clusters separated by a chain space. A chain-1 space between the corners creates the locations for side clusters in later rounds.
As the square grows, each corner continues to receive two clusters, while additional clusters are worked into the spaces along each side. This consistent structure keeps the motif square rather than round.
6. Gauge and Finished Size
Gauge affects the size of a granny square, especially when you plan to join multiple squares into a blanket or another larger project.
For this pattern, a 5 mm hook and medium-weight yarn may produce a square approximately 6–7 inches wide after six rounds. This is only a guide; your tension and yarn may produce a different result.
To measure your square, lay it flat without stretching and measure from one edge to the opposite edge. Check both the width and height. A balanced square should have approximately equal measurements on both sides.
To make a smaller square, use finer yarn and a suitable smaller hook. To make a larger square, add more rounds using the established corner and side pattern.
If you plan to join multiple squares, use the same yarn weight, hook size, color sequence, and tension for every motif. Measure the squares as you go, because even a small difference can affect the finished project.
7. Complete Step-by-Step Crochet Pattern
Round 1: Create the Center
Begin with red yarn.
- Make a slip knot and chain 4.
- Join the first and last chains with a slip stitch to create a small loop.
- Chain 3. This chain counts as the first double crochet of the round.
- Work 2 double crochet stitches into the center of the loop.
- Chain 2 to create the first corner space.
- Work 3 double crochet stitches into the center of the loop, then chain 2.
- Repeat the previous step twice more.
You should now have four groups of three double crochet stitches, with four chain-2 spaces separating the groups.
Join with a slip stitch to the top of the beginning chain-3.
Round 1 count: Four clusters and four corner spaces.
Pull the starting yarn tail gently to close the center hole. Do not pull so tightly that the stitches become distorted.
Round 2: Establish the Square
Fasten off the red yarn and attach orange yarn in any corner chain-2 space.
- Chain 3. This counts as the first double crochet.
- Work 2 double crochet stitches into the same corner space.
- Chain 2.
- Work 3 double crochet stitches into that same corner space. You have now made the two clusters for the first corner.
- Chain 1.
- In the next corner chain-2 space, work 3 double crochet stitches, chain 2, then 3 more double crochet stitches.
- Chain 1.
Repeat the corner sequence around the square until all four corners have two clusters each, separated by a chain-2 space. Place one chain-1 space between each pair of corners.
Join with a slip stitch to the top of the beginning chain-3.
Round 2 count: Eight clusters, four corner spaces, and four side spaces.
At this stage, the square may look slightly rounded. The following rounds add clusters along the sides to make the square more clearly defined.
Round 3: Add the Yellow Band
Fasten off the orange yarn and attach yellow yarn in any corner chain-2 space.
Work the corner sequence as follows:
- Chain 3, then work 2 double crochet stitches into the corner space.
- Chain 2.
- Work 3 double crochet stitches into the same corner space.
- Chain 1.
Now work the side section:
- Work 3 double crochet stitches into the next chain-1 side space.
- Chain 1.
In the next corner chain-2 space, work 3 double crochet stitches, chain 2, and 3 more double crochet stitches. Chain 1, then work 3 double crochet stitches into the next side space and chain 1.
Continue around the square, working one side cluster into each side space and two clusters separated by chain 2 into each corner space.
Join with a slip stitch to the top of the beginning chain-3.
Round 3 count: Twelve clusters in total, including eight corner clusters and four side clusters. There are four corner spaces and eight chain-1 spaces along the sides.
Round 4: Add the Green Band
Fasten off the yellow yarn and attach green yarn in any corner chain-2 space.
Work the first corner as follows:
- Chain 3 and work 2 double crochet stitches into the corner space.
- Chain 2.
- Work 3 double crochet stitches into the same corner space.
- Chain 1.
For the side section, work 3 double crochet stitches into each chain-1 side space from the previous round, placing chain 1 between adjacent clusters.
When you reach the next corner chain-2 space, work 3 double crochet stitches, chain 2, and 3 more double crochet stitches. Chain 1 and continue along the next side.
Repeat this arrangement around all four sides. Each corner receives two clusters, and each available side space receives one cluster.
Join with a slip stitch to the top of the beginning chain-3.
Round 4 count: Sixteen clusters in total, including eight corner clusters and eight side clusters. There are four corner spaces and twelve chain-1 spaces along the sides.
Round 5: Add the Blue Band
Fasten off the green yarn and attach blue yarn in any corner chain-2 space.
Repeat the established corner and side pattern:
- In each corner space, work 3 double crochet stitches, chain 2, and 3 more double crochet stitches.
- Chain 1 after each corner group.
- Along each side, work 3 double crochet stitches into every chain-1 side space from the previous round, with chain 1 between adjacent clusters.
Continue around all four sides, keeping the corner spaces open and working only one cluster into each side space.
Join with a slip stitch to the top of the beginning chain-3.
Round 5 count: Twenty clusters in total, including eight corner clusters and twelve side clusters. There are four corner spaces and sixteen chain-1 spaces along the sides.
Round 6: Add the Purple Band
Fasten off the blue yarn and attach purple yarn in any corner chain-2 space.
Work the corner sequence:
- Chain 3 and work 2 double crochet stitches into the corner space.
- Chain 2.
- Work 3 double crochet stitches into the same corner space.
- Chain 1.
Along each side, work 3 double crochet stitches into every chain-1 space from the previous round, placing chain 1 between adjacent clusters.
At every corner, work two clusters separated by chain 2. Continue until all four sides and corners are complete.
Join with a slip stitch to the top of the beginning chain-3.
Round 6 count: Twenty-four clusters in total, including eight corner clusters and sixteen side clusters. There are four corner spaces and twenty chain-1 spaces along the sides.
Fasten off the purple yarn. Your six-round rainbow granny square is now complete, apart from optional edging.
8. Changing Colors Between Rounds
Changing colors at the beginning of a corner makes it easier to keep the rainbow bands consistent.
Follow these steps:
- Complete the round and join with a slip stitch.
- Cut the previous color, leaving a tail long enough to weave in.
- Pull the tail through the loop to secure it.
- Insert your hook into a corner chain-2 space.
- Make a slip knot with the new color and place it on your hook.
- Join the yarn in the corner space with a slip stitch.
- Begin the next round with chain 3, followed by the corner sequence.
Keep the joining point consistent from round to round. This gives the square a more polished appearance and makes the color changes easier to manage.
Weave in the yarn tails on the wrong side using a tapestry needle. Thread each tail through several stitches, change direction, and trim the excess. Avoid tight knots or bulky bundles of yarn, which can make the center and corners uncomfortable or uneven.
9. Stitch Counts and Round Reference
The table summarizes the main structure of the six-round pattern.
| Round | Color | Total clusters | Side clusters | Corner spaces | Approximate size |
|---|---|---|---|---|---|
| 1 | Red | 4 | 0 | 4 | About 1–2 inches |
| 2 | Orange | 8 | 0 | 4 | About 2–3 inches |
| 3 | Yellow | 12 | 4 | 4 | About 3–4 inches |
| 4 | Green | 16 | 8 | 4 | About 4–5 inches |
| 5 | Blue | 20 | 12 | 4 | About 5–6 inches |
| 6 | Purple | 24 | 16 | 4 | About 6–7 inches |
The dimensions are approximate and depend on your yarn, hook, and tension.
Each corner always contains two clusters separated by a chain-2 space. From Round 3 onward, each new round adds one cluster to every existing side space. This is why the number of side clusters increases as the square grows.
10. Optional Border
A simple border can frame the rainbow colors and give the square a neat outer edge. Cream or white creates contrast, while purple or another rainbow shade gives a more unified appearance.
To add the border:
- Attach the border yarn in any corner chain-2 space.
- Chain 1. This chain does not count as a stitch.
- Work 2 single crochet stitches into the same corner space.
- Work 1 single crochet into each double crochet stitch along the side.
- Work 1 single crochet into each chain-1 space between clusters.
- At the next corner chain-2 space, work 3 single crochet stitches.
- Continue around all four sides, placing 3 single crochet stitches into each corner space.
- Join with a slip stitch to the first single crochet.
Along the sides, distribute the stitches evenly without adding unnecessary extras. The three single crochet stitches at each corner help the square turn neatly.
If the border pulls the square inward, your stitches may be too tight or too few. If the edge ripples, you may have added too many stitches. Adjust the tension and stitch placement as needed.
11. Finishing the Square
After completing the final round:
- Fasten off securely.
- Weave in all yarn ends on the wrong side.
- Check that all four corners are defined and that the edges lie flat.
- Measure the square from edge to edge.
- Compare the measurements with any other squares you plan to join.
Blocking can help the corners become more even and the edges lie flat. Use a blocking method suitable for your yarn fiber and follow the yarn manufacturer’s care instructions. Avoid applying high heat to fibers that may be damaged by it.
If you are making multiple squares, block or measure them consistently before joining. Matching dimensions make the final project look neater.
12. Customization Ideas
Traditional rainbow
Use red, orange, yellow, green, blue, and purple in the order shown in the pattern.
Pastel rainbow
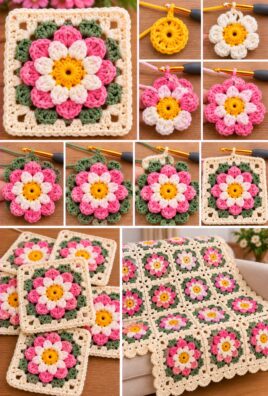
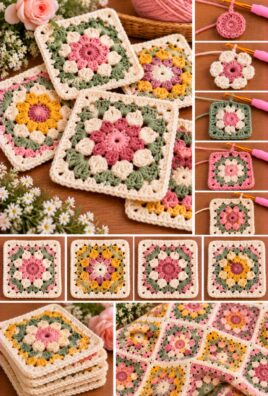
Choose soft pink, peach, pale yellow, mint, light blue, and lavender. The same six-round structure works with these gentler colors.
White or cream center
Use cream for the first round, then add the rainbow colors in the remaining rounds. This gives the motif a light center and emphasizes the colored bands.
Dark contrasting border
Finish with navy, charcoal, or another darker shade. A dark border can frame the colors, especially when the square will be used in a blanket or cushion cover.
Three-color design
Choose three colors and repeat them in a planned sequence. You can use two rounds per color for a six-round square or arrange the colors differently while keeping the corner pattern unchanged.
Larger square
Continue adding rounds after Round 6. Attach the next color in a corner space, work two clusters separated by chain 2 into each corner, and work 3 double crochet stitches into every side space with chain 1 between clusters.
Each additional round adds one side cluster to each side compared with the previous round. Continue until the square reaches your preferred dimensions.
Rainbow blanket
Make multiple squares using the same color sequence, hook size, and tension. You can arrange the motifs with matching colors aligned or rotate some squares for a more varied design.
Changing yarn weight, hook size, color order, or the number of rounds will affect the appearance and finished dimensions.
13. Troubleshooting Common Problems
| Problem | Likely cause | Practical correction |
|---|---|---|
| The square curls inward | The hook may be too small, tension too tight, or stitches missing | Check your stitch placement and try a larger hook if the fabric is too dense. |
| The edges become wavy | Too many stitches or chain spaces were added | Check the side-space repeats and keep one cluster in each side space. |
| The corners look rounded | The chain-2 corner spaces are too tight or unclear | Keep the chain-2 space open and work two clusters into each corner. |
| The side clusters are uneven | A chain space was skipped or used twice | Count the side spaces and place one cluster in each. |
| The stitch count changes accidentally | A cluster was missed or an extra cluster was added | Check each side and confirm the corner sequence before joining. |
| Color joins look bulky | Yarn tails or knots are concentrated at the same point | Weave in ends separately and avoid bulky knots. |
| Gaps appear between rounds | Tension is inconsistent or joins are loose | Tighten the joining slip stitch gently and maintain even tension. |
| The square is not square | Corner increases or side clusters are inconsistent | Confirm that every corner has two clusters and every side space receives one cluster. |
| Multiple squares have different dimensions | Gauge or tension varies between motifs | Use the same hook and yarn, check dimensions regularly, and block consistently. |
14. Joining Rainbow Granny Squares
Rainbow granny squares can be joined to create blankets, cushion covers, bags, and garments.
Before joining, measure each square and make sure the dimensions are consistent. Blocking may help correct minor differences, but significant differences are better corrected before assembly.
Two common joining methods are:
Sewn join: Place two squares together and use a tapestry needle to sew through corresponding edge stitches. Keep the tension even so the seam does not pucker.
Crochet join: Place the squares together and use slip stitches or single crochet along the edges. This creates a visible seam that can become a decorative feature.
For a blanket, decide whether you prefer a subtle seam or a raised, textured join. For bags and garments, consider whether the seams will be comfortable and whether the project needs a lining.
Arrange the squares before joining to check how the colors look together. A consistent layout can create a coordinated rainbow effect, while rotating or rearranging the motifs can make the finished project more playful.
15. Compact Written Pattern
Materials: Medium-weight yarn in red, orange, yellow, green, blue, and purple; a suitable hook; scissors; tapestry needle.
Round 1 — Red: Chain 4 and join into a ring. Chain 3, work 2 dc into the ring, ch 2. Repeat 3 dc into the ring, ch 2 three times more. Join to the top of the beginning ch-3. Four clusters and four corner spaces.
Round 2 — Orange: In a corner space, work ch 3, 2 dc, ch 2, 3 dc. Ch 1. Repeat the corner sequence in each remaining corner space, placing ch 1 between corners. Join. Eight clusters and four corner spaces.
Round 3 — Yellow: Work two 3-dc clusters separated by ch 2 in each corner space. Work 3 dc into each side ch-1 space, with ch 1 between clusters. Join. Twelve clusters total.
Round 4 — Green: Repeat the corner sequence and work 3 dc into every side ch-1 space, with ch 1 between clusters. Join. Sixteen clusters total.
Round 5 — Blue: Repeat the established corner and side-space pattern. Join. Twenty clusters total.
Round 6 — Purple: Repeat the established corner and side-space pattern. Join. Twenty-four clusters total.
Optional border: Work sc evenly along each side, with 3 sc in each corner space. Join, fasten off, and weave in all ends.
Finish: Measure the square and block gently if appropriate for the yarn.
16. Frequently Asked Questions
1. Is a rainbow granny square suitable for beginners?
Yes. The pattern uses basic double crochet clusters, chain spaces, and joined rounds. Beginners may find it easier to practice a single-color square first.
2. Which yarn works best?
Smooth medium-weight yarn is a practical choice because the stitches are easy to see. Use yarns of similar weight and fiber for a more consistent square.
3. How many colors should I use?
This pattern uses six colors. You can use fewer colors or repeat shades, as long as you keep track of the round sequence.
4. How do I change colors neatly?
Finish the round, fasten off, and join the next color in a corner space. Weave in the yarn tails securely on the wrong side.
5. How can I make the square larger?
Add more rounds using the same corner sequence and side-space repeat. Each new round expands all four sides.
6. Why does my granny square curl?
Tight tension, an unsuitable hook size, or incorrect stitch placement can cause curling. Check your stitch counts and try a larger hook if the fabric is too dense.
7. How do I keep all four corners even?
Work two clusters separated by chain 2 into every corner space. Check that each corner has the same construction throughout the square.
8. Is a border necessary?
No. The square can be finished after Round 6. A border is optional and can help frame the colors or make the edges look more polished.
9. How do I make multiple squares the same size?
Use the same yarn weight, hook size, round count, and tension. Measure each square and block them consistently before joining.
10. What can I make with rainbow granny squares?
You can join them into blankets, cushion covers, bags, garments, and decorative panels. Individual squares can also be used as part of larger crochet designs.
17. Conclusion
A rainbow granny square is a classic crochet project that lets you practice clusters, corner spaces, joined rounds, and color changes while creating a bright, versatile motif. Follow the same corner sequence in every round, keep your tension consistent, and experiment with different palettes and sizes. Once you have made your first square, you can create a collection of matching motifs for a beautiful handmade project.
Leave a Comment