
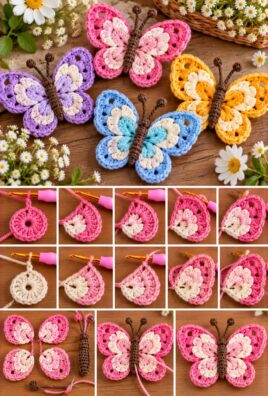
A handmade crochet butterfly is a lovely way to celebrate spring. With colorful wings, a neat central body, and delicate antennae, this cheerful motif can brighten blankets, bags, garlands, cushions, and seasonal decorations. This beginner-friendly pattern uses simple stitches and separately crocheted wings, making it easy to customize with your favorite spring colors.
1. Project Overview
All measurements and times are approximate.
- Skill level: Beginner
- Completion time: 1–2 hours
- Finished size: Approximately 4.5 inches wide and 3.5 inches tall
- Construction: Four crocheted wing pieces joined around a separate central body
- Main stitches: Chain, slip stitch, single crochet, half double crochet, double crochet, and treble crochet
- Suggested uses: Appliqués, garlands, wall decorations, gift wrapping, bags, cushions, and spring-themed blankets
The butterfly has two matching upper wings and two matching lower wings. The upper wings are slightly larger and rounded, while the lower wings are smaller with softly curved edges. A narrow crocheted body joins the wings, and two chain-stitch antennae complete the shape.
The finished size depends on your yarn weight, hook size, stitch tension, and any adjustments you make to the wing pattern.
2. Materials and Supplies
- Yarn: Small amounts of smooth, medium-weight yarn in three or four spring colors, such as lavender, pink, yellow, turquoise, green, or white.
- Crochet hook: A 4 mm or 4.5 mm hook suitable for your yarn.
- Scissors: For trimming yarn.
- Tapestry needle: For sewing the wings together and weaving in ends.
- Stitch markers: Optional, to mark the beginning of a round.
- Embroidery thread: Optional, for decorative dots or facial details.
- Blocking supplies: Optional pins and a suitable blocking surface.
Choose yarns of similar thickness if you want to combine several colors. Smooth yarn makes it easier to identify stitches and insert the hook accurately. Cotton or acrylic yarn works well for decorative butterflies, but always check the care instructions before washing or blocking the finished motif.
3. US Crochet Abbreviations
| Abbreviation | Meaning |
|---|---|
| ch | Chain |
| sl st | Slip stitch |
| sc | Single crochet |
| hdc | Half double crochet |
| dc | Double crochet |
| tr | Treble crochet |
| st(s) | Stitch(es) |
| sp | Space |
| rep | Repeat |
| FO | Fasten off |
Special stitch: Magic ring
A magic ring creates an adjustable loop for crocheting into a circle. If you prefer not to use one, chain 4 and join with a slip stitch to form a small ring.
Special stitch: Treble crochet
Yarn over twice, insert the hook into the indicated stitch or space, yarn over and pull up a loop, then yarn over and pull through two loops at a time until one loop remains. A treble crochet is taller than a double crochet and helps create a rounded wing edge.
4. Skills to Know Before Starting
Before making your butterfly, practice these basic techniques if you are unfamiliar with them.
- Slip knot: Make an adjustable loop on the hook to begin crocheting.
- Chain stitch: Yarn over and pull through the loop on the hook.
- Single crochet: Insert the hook into a stitch, yarn over and pull up a loop, then yarn over and pull through both loops.
- Half double crochet: Yarn over, insert the hook, pull up a loop, then yarn over and pull through all three loops.
- Double crochet: Yarn over, insert the hook, pull up a loop, then yarn over and pull through two loops twice.
- Increasing: Work two or more stitches into the same stitch or space to widen a section.
- Joining: Use a slip stitch or sewing needle to connect crocheted pieces.
- Changing colors: Complete the final yarn-over of a stitch with the new color when possible.
- Fastening off: Cut the yarn, leaving a tail, and pull the tail through the final loop.
- Weaving in ends: Thread each tail through nearby stitches on the wrong side of the work.
The wings in this pattern are worked in rows, so you will turn the work at the end of each row. The body is crocheted separately and sewn over the center where the wings meet.
5. Understanding the Butterfly Design
The butterfly consists of five crocheted pieces: two upper wings, two lower wings, and one central body. Two antennae are added with chain stitches after assembly.
The upper wings have a broad, rounded shape. The lower wings are narrower and shorter, creating a recognizable butterfly silhouette. Each pair is made using the same instructions so the left and right sides match.
The wings are joined at their narrow inner edges. The central body covers the joining point without hiding the colorful outer edges.
For the sample design, use one color for the upper wings, another for the lower wings, and a third for the body. You can also make each wing a different color or add contrasting edging after assembly.
6. Gauge and Finished Size
Gauge is not essential for this decorative project, but consistent tension helps the four wings remain balanced.
For this sample, each upper wing should measure approximately 2.25 inches long and 1.75 inches wide. Each lower wing should measure approximately 1.5 inches long and 1.25 inches wide. The finished butterfly should measure about 4.5 inches across and 3.5 inches from the top of the antennae to the bottom of the wings.
To measure the butterfly, lay it flat without stretching it. Measure from the outermost edge of one wing to the opposite wing, then measure vertically from the antenna tips to the bottom of the lower wings.
If your butterfly is too small, try a larger hook or thicker yarn. If it is too large, use a smaller hook or lighter yarn. Keep the hook size and yarn weight consistent across all four wings.
7. Complete Step-by-Step Crochet Pattern
Part A: Crochet the Upper Wings
Make two identical upper wings using the same yarn color.
Each upper wing begins with a short chain and grows wider through increases. The combination of single, half double, double, and treble crochet creates a gently curved outer edge.
Make two upper wings.
Row 1: Ch 8. Starting in the second ch from the hook, work 1 sc in each ch across. You will have 7 sc. Ch 1 and turn.
Row 2: Work 1 sc in the first st, 1 hdc in the next st, 2 dc in the next st, 2 tr in the next st, 2 dc in the next st, 1 hdc in the next st, and 1 sc in the last st. You will have 10 stitches. Ch 1 and turn.
Row 3: Work 1 sc in the first st, 1 hdc in the next st, 1 dc in each of the next 2 sts, 2 dc in the next st, 2 tr in the next st, 2 dc in the next st, 1 dc in each of the next 2 sts, and 1 hdc in the last st. You will have 12 stitches. Ch 1 and turn.
Row 4: Work 1 sc in the first st, 1 hdc in the next st, 1 dc in each of the next 3 sts, 2 dc in the next st, 2 tr in the next st, 2 dc in the next st, 1 dc in each of the next 3 sts, and 1 hdc in the last st. You will have 14 stitches. FO, leaving a sewing tail.
The increases around the outer portion create a fan-like shape. The chain edge and the first stitches form the inner edge that will be attached to the butterfly body.
Make the second upper wing exactly the same way. Compare the two pieces before continuing; they should have matching row counts, stitch counts, and dimensions.
Part B: Crochet the Lower Wings
Make two identical lower wings in a contrasting color. These pieces are shorter and narrower than the upper wings.
Make two lower wings.
Row 1: Ch 6. Starting in the second ch from the hook, work 1 sc in each ch across. You will have 5 sc. Ch 1 and turn.
Row 2: Work 1 sc in the first st, 1 hdc in the next st, 2 dc in the next st, 2 dc in the next st, and 1 sc in the last st. You will have 7 stitches. Ch 1 and turn.
Row 3: Work 1 sc in the first st, 1 hdc in the next st, 1 dc in each of the next 2 sts, 2 dc in the next st, 1 dc in the next st, and 1 sc in the last st. You will have 8 stitches. FO, leaving a sewing tail.
The double crochet increases give the lower wing a softly rounded outer edge. The single crochets at the ends keep the inner edge relatively narrow.
Repeat the instructions to make the second lower wing. Lay both pieces side by side to check that their shapes match.
Part C: Assemble the Wings
Place the wings on a flat surface with the right sides facing up.
- Position the upper wings at the top, with their inner edges facing one another.
- Place the lower wings beneath them, angling them slightly downward and outward.
- Bring all four inner edges close together to create a small central junction.
- Use the tapestry needle and the sewing tails to secure the inner edges with small stitches.
- Sew through the inner edges only, avoiding the broad outer sections of the wings.
The upper wings should be larger and more prominent than the lower wings. Adjust the angle of the lower wings until both sides look balanced.
Avoid pulling the sewing yarn too tightly. A little flexibility at the center allows the wings to retain their curved shape.
Part D: Crochet the Central Body
The body is crocheted separately as a narrow strip.
Body pattern:
Row 1: Ch 9. Starting in the second ch from the hook, work 1 sc in each ch across. You will have 8 sc.
Row 2: Ch 1 and turn. Work 1 sc in each st across. You will have 8 sc.
FO, leaving a long sewing tail.
Fold the strip lengthwise so it forms a narrow body approximately 1 inch long. Sew along the folded edge with small stitches to hold the shape.
Place the body vertically over the junction of the four wings. Sew it securely in place, stitching through the body and the central joining area. Keep the top and bottom ends visible enough to distinguish the butterfly’s head and abdomen.
If you want a more defined head, use a few small embroidery stitches at the upper end of the body. This is optional.
Part E: Add Antennae
Make two antennae using a contrasting yarn color.
Antenna pattern:
- Attach the yarn at the top of the body with a slip stitch.
- Ch 5.
- FO, leaving a short tail.
- Repeat on the opposite side of the body to make the second antenna.
Use the tapestry needle to secure both ends on the back of the butterfly. Position the antennae so they curve gently outward from the head.
Each antenna should be about half the length of the body. If you prefer shorter antennae, use a chain of 3 or 4 stitches.
For a decorative piece intended for adults, chain antennae are simple and lightweight. For items intended for young children, avoid loose or detachable pieces, and do not assume that a decorative crochet motif is safe as a toy. Secure all yarn ends carefully and follow appropriate product-safety guidance.
Part F: Add Decorative Details
Decorative details are optional. Keep them light so they do not distort the wings.
Contrasting edging: Attach a new color to the outer edge of a wing and work a row of slip stitches or single crochet stitches around the edge. Use the same edging on matching wings.
Embroidered dots: Thread a tapestry needle with a small amount of contrasting yarn or embroidery thread. Add two or three small dots to each wing, keeping the placement similar on both sides.
Color stripes: Make stripes by changing yarn color between rows when crocheting the wings. Complete the final yarn-over of the last stitch in the old color with the new color, then continue in the new color.
Decorative stitches: Add a few small surface stitches along the wing edges or near the center. Avoid pulling them tightly, as this can cause the fabric to pucker.
8. Stitch Counts and Construction Reference
| Component | Quantity | Stitch count | Approximate dimensions |
|---|---|---|---|
| Upper wings | 2 | Rows: 7, 10, 12, 14 stitches | 2.25 × 1.75 inches each |
| Lower wings | 2 | Rows: 5, 7, 8 stitches | 1.5 × 1.25 inches each |
| Central body | 1 | 8 sc per row, 2 rows | About 1 inch long when folded |
| Antennae | 2 | 5 chains each | About 0.5 inch each |
| Finished butterfly | 1 | 5 crocheted pieces plus antennae | About 4.5 × 3.5 inches |
Dimensions are estimates and may vary with yarn, hook size, tension, and assembly angle.
9. Color Changes and Spring Variations
Spring colors make this butterfly especially cheerful. Try one of these combinations:
- Lavender and yellow: Lavender upper wings, pale yellow lower wings, and a white body.
- Pink and white: Pink upper wings, white lower wings, and a soft pink body.
- Blue and turquoise: Blue upper wings, turquoise lower wings, and a white body.
- Peach and cream: Peach upper wings, cream lower wings, and a warm beige body.
- Rainbow butterfly: Use a different color for each wing or alternate colors between rows.
To change colors neatly, begin the final stitch of a row with the old color. When two loops remain on the hook for a single crochet, or two loops remain for a double crochet’s final step, use the new color for the final yarn-over and pull-through. This helps the new color appear cleanly at the edge.
For separately crocheted wings, fasten off each color and weave in the ends on the wrong side. If changing colors between rows, carry the unused yarn only when it will not show through the fabric or make the wing bulky.
10. Finishing and Shaping
Once the wings, body, and antennae are attached, inspect the butterfly carefully.
- Secure all ends. Weave each tail through several stitches on the back of the piece. Trim excess yarn only after the tail is secure.
- Align the wings. Check that the upper wings are the same size and that the lower wings angle outward evenly.
- Secure the center. Add a few small stitches if any wing edges feel loose.
- Shape the edges. Gently arrange the outer edges with your fingers to emphasize the rounded shape.
- Block if necessary. If the wings curl or look uneven, blocking may help.
For cotton yarn, damp blocking may be appropriate if the yarn’s care instructions allow it. For acrylic yarn, use caution with heat because excessive heat can permanently damage the fibers. Follow the manufacturer’s care instructions and avoid aggressive steaming or ironing.
Let the butterfly dry completely if you block it. Before using it, check that the wings remain balanced and the body is firmly attached.
11. Troubleshooting Common Problems
The wings are different sizes.
The most likely cause is inconsistent tension or a missed stitch. Compare the row counts and dimensions of the matching wings. If necessary, remake the smaller or larger piece.
The upper wings curl.
Tight tension, a small hook, or the tall stitches along the outer edge can cause curling. Try a slightly larger hook, relax your tension, or gently block the finished wing if the yarn permits it.
The lower wings look too narrow.
Check that the increases in Rows 2 and 3 are worked in the correct stitches. You can also try a slightly looser tension, but keep the same approach for both lower wings.
The butterfly looks unbalanced.
Reposition the wings before sewing the body permanently. The upper wings should sit above the lower wings, with both pairs extending evenly from the center.
The body hides too much of the wings.
Place the body only over the central junction. Use smaller stitches when attaching it, and avoid extending the body too far down the lower wings.
The antennae unravel.
Secure the yarn tails on the back with a tapestry needle. Weave them through several stitches rather than relying on a single knot.
Color changes leave visible gaps.
Keep the yarn tension steady and complete the last yarn-over of a stitch with the new color. Weave in the ends carefully on the back.
The motif becomes stiff or distorted.
Too much sewing tension, heavy embroidery, or thick yarn can make the wings rigid. Remove unnecessary stitches and secure the pieces with small, relaxed sewing stitches.
The finished butterfly does not lie flat.
Check for uneven wing sizes, overly tight edging, and a body sewn too tightly over the center. Adjust the assembly and block the wings gently if the yarn allows.
12. Creative Ways to Use the Butterfly
Your finished butterfly can decorate many crochet and craft projects.
- Crochet appliqué: Sew it onto a blanket, scarf, cardigan, or cushion using small stitches that match the yarn.
- Garland decoration: Make several butterflies in different colors and attach them to a chain or ribbon. Space them evenly for a spring display.
- Wall decoration: Sew the butterfly to a fabric-covered hoop or a suitable backing for a seasonal wall accent.
- Gift embellishment: Attach it to a gift bag, handmade card, or wrapped present.
- Bag or cushion decoration: Sew it securely to the surface, checking that the attachment method suits the fabric.
- Spring blanket or bunting: Make a collection of matching butterflies and arrange them in a repeating color pattern.
For items that will be handled frequently, use secure stitching rather than relying only on glue. Decorative crochet pieces are not automatically suitable for children’s toys or clothing, especially when they have loose antennae, small embellishments, or detachable parts.
13. Compact Written Pattern
Upper wings — make 2: Ch 8. Row 1: 7 sc. Row 2: sc, hdc, 2 dc in next st, 2 dc in next st?
For the complete and unambiguous pattern, follow the detailed upper-wing instructions above: Row 2 is sc, hdc, 2 dc in the next st, 2 tr in the next st, 2 dc in the next st, hdc, sc, for 10 stitches. Row 3 and Row 4 follow the stated stitch sequences and counts of 12 and 14 stitches.
Lower wings — make 2: Ch 6. Row 1: 5 sc. Row 2: sc, hdc, 2 dc in each of the next two stitches, sc, for 7 stitches. Row 3: sc, hdc, dc in each of the next two stitches, 2 dc in the next stitch, dc, sc, for 8 stitches.
Body — make 1: Ch 9. Row 1: 8 sc. Row 2: ch 1, turn, 8 sc. Fold lengthwise and sew the strip into a narrow body.
Assembly: Arrange two upper wings above two lower wings, with the inner edges meeting at the center. Sew the inner edges together, then sew the body over the junction.
Antennae: Attach yarn at the top of the body, ch 5, fasten off, and repeat for the second antenna. Secure the ends on the back.
Optional edging: Work slip stitches or single crochet around the wing edges, using the same edging on matching pieces.
Finishing: Weave in all ends, check the wing alignment, and gently shape or block the motif if suitable for the yarn.
14. Frequently Asked Questions
1. Is this spring butterfly suitable for beginners?
Yes. The pattern uses basic stitches and separately crocheted pieces. Beginners can work on one wing at a time and compare matching pieces before assembling them.
2. Which yarn works best for a butterfly motif?
Smooth cotton or acrylic yarn is a good choice because the stitches are easy to see. Use similar yarn weights for all the colors in one butterfly.
3. How do I make both wings the same size?
Follow the same row instructions for each matching pair, count the stitches at the end of every row, and compare the pieces before assembly.
4. Can I make a butterfly in one color?
Yes. A single-color butterfly looks elegant and makes a good addition to neutral blankets, bags, and cushions. You can add texture with embroidered details if desired.
5. How do I change colors neatly?
Complete the final yarn-over of the last stitch in the old color with the new color. Weave in the tails on the back so they do not show through the wings.
6. How do I keep the wings from curling?
Check your tension, try a slightly larger hook if necessary, and avoid pulling the edging or sewing stitches too tightly. Gentle blocking may help when suitable for your yarn.
7. Can I make the butterfly smaller or larger?
Yes. A smaller hook and lighter yarn generally create a smaller motif, while a larger hook and thicker yarn create a larger one. Keep all matching pieces consistent.
8. How do I attach the butterfly to a blanket or garland?
Use a tapestry needle and matching yarn to sew through the central body and several secure points on the wings. For a garland, attach each butterfly to the chain or ribbon through the central body.
9. Can I add embroidered details?
Yes. Small dots, lines, or simple patterns can make each butterfly unique. Keep the embroidery loose enough to avoid puckering the wings, and secure the ends on the back.
10. How should I clean and care for the finished motif?
Follow the yarn label’s washing instructions. If the butterfly is sewn onto a larger item, follow the care instructions for that item. Avoid excessive heat, which can damage some synthetic fibers.
15. Conclusion
This colorful crochet spring butterfly is a cheerful project for practicing basic stitches, shaping, and simple assembly. Experiment with lavender, pink, yellow, turquoise, or rainbow shades to create butterflies that suit your style. Make a single motif for a small decoration or crochet a whole collection to brighten your spring projects.

Leave a Comment