
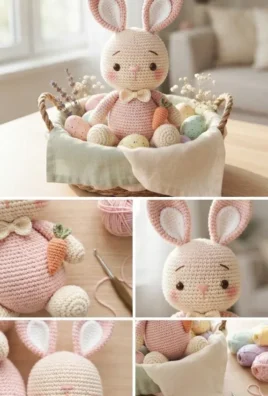
A handmade crochet Easter bunny plush is a delightful, heartwarming project that brings spring cheer, cozy textures, and charming detail to any seasonal basket or nursery display. Featuring long upright ears with cream inner patches, a plump round body in soft pink and cream, embroidered sleepy-sweet facial features, a tiny bow tie, and a miniature carrot companion, this amigurumi bunny is as fun to craft as it is to gift.
Following your preferences, this pattern is completely text-based with zero images and zero tables, providing clear, descriptive, and structured instructions from start to finish.
1. Project Overview
All measurements and times are approximate:
- Skill level: Intermediate
- Completion time: 6 to 10 hours
- Finished size: Approximately 10 to 11 inches tall from the base to the tips of the ears
- Construction: Worked mainly in continuous spiral rounds for the head, body, and limbs, with separately made ears, inner ear patches, a bow tie, and a tiny carrot accessory that are sewn together
- Main stitches: Magic ring, chain, slip stitch, single crochet, increase, and invisible decrease
- Suggested uses: Easter basket centerpiece, spring nursery decor, children’s keepsake toys, and holiday photo props
The final dimensions will depend on your yarn weight, hook size, and personal stitch tension.
2. Materials and Supplies
- Yarn: Soft medium worsted weight yarn (Category 4) or DK yarn in smooth cotton or anti-pilling acrylic:
- Color A (Body & Outer Ears): Soft Dusty Pink (approx. 100 g)
- Color B (Head, Muzzle & Paws): Cream / Off-White (approx. 80 g)
- Color C (Inner Ears & Nose Embroidery): Pastel Pink (approx. 20 g)
- Color D (Carrot Body & Tops): Bright Orange and Sage Green (small scraps)
- Crochet hook: 3.0 mm (US C/2) or 3.25 mm to maintain a dense, tight fabric that keeps fiberfill securely enclosed
- Safety eyes: One pair of 8 mm or 10 mm black plastic safety eyes with secure backings
- Stuffing: Premium polyester fiberfill
- Tapestry needle: Blunt-ended yarn needle for sewing parts together and weaving ends
- Stitch marker: Essential for tracking the first stitch of continuous spiral rounds
- Scissors & straight pins: For cleanly cutting yarn tails and pinning pieces before sewing
- Blush / Cosmetics: A tiny touch of powdered pink cosmetic blush or chalk pastel for the rosy cheeks
3. US Crochet Abbreviations & Stitch Meanings
- ch: Chain stitch
- sl st: Slip stitch
- sc: Single crochet
- inc: Single crochet increase (work 2 single crochets into the same stitch)
- dec: Invisible single crochet decrease (pick up front loops of next 2 stitches and crochet them together)
- st(s): Stitch or stitches
- MR: Magic ring
- FO: Fasten off
Special Technique: The Invisible Decrease
Insert your crochet hook into the front loop only of the first stitch, then immediately insert it into the front loop only of the adjacent stitch. Yarn over, draw through both front loops, yarn over again, and draw through the remaining two loops. This prevents holes and visible bumps on your amigurumi surface.
4. Skills to Know Before Starting
- Continuous Spiral Working: Do not join rounds with slip stitches or chain 1 at the end of rounds unless specified; simply place the first stitch of the next round into the next stitch, keeping your stitch marker in place.
- Color Changes: Introduce new yarn colors on the final yarn-over of the preceding stitch to ensure clean and seamless transitions.
- Secure Pinning: Always pin ears, limbs, and head components in place before stitching to ensure correct symmetry and posture.
5. Complete Step-by-Step Crochet Pattern
Part A: Head (Cream Yarn)
- Round 1: Make a MR, work 6 sc into the ring [6 sts].
- Round 2: Work 2 sc in each st around [12 sts].
- Round 3: Work (1 sc, inc) 6 times around [18 sts].
- Round 4: Work (2 sc, inc) 6 times around [24 sts].
- Round 5: Work (3 sc, inc) 6 times around [30 sts].
- Round 6: Work (4 sc, inc) 6 times around [36 sts].
- Round 7: Work (5 sc, inc) 6 times around [42 sts].
- Round 8: Work (6 sc, inc) 6 times around [48 sts].
- Rounds 9–16 (8 rounds): Work 1 sc in each st around [48 sts].
- Eye Placement: Insert safety eyes between Rounds 12 and 13, spaced roughly 8 visible stitches apart. Embroider sleepy eyelashes and a tiny pink triangular nose right between them.
- Round 17: Work (6 sc, dec) 6 times around [42 sts].
- Round 18: Work (5 sc, dec) 6 times around [36 sts].
- Round 19: Work (4 sc, dec) 6 times around [30 sts].
- Pack the head firmly with polyester fiberfill.
- Round 20: Work (3 sc, dec) 6 times around [24 sts].
- Round 21: Work (2 sc, dec) 6 times around [18 sts].
- Fasten off, leaving a long 12-inch tail for sewing the head to the body.
Part B: Body (Pink Yarn)
- Round 1: Make a MR, work 6 sc into the ring [6 sts].
- Round 2: Work inc in each st around [12 sts].
- Round 3: Work (1 sc, inc) 6 times around [18 sts].
- Round 4: Work (2 sc, inc) 6 times around [24 sts].
- Round 5: Work (3 sc, inc) 6 times around [30 sts].
- Round 6: Work (4 sc, inc) 6 times around [36 sts].
- Round 7: Work (5 sc, inc) 6 times around [42 sts].
- Round 8: Work (6 sc, inc) 6 times around [48 sts].
- Rounds 9–15 (7 rounds): Work 1 sc in each st around [48 sts].
- Round 16: Work (6 sc, dec) 6 times around [42 sts].
- Rounds 17–18 (2 rounds): Work 1 sc in each st around [42 sts].
- Round 19: Work (5 sc, dec) 6 times around [36 sts].
- Rounds 20–21 (2 rounds): Work 1 sc in each st around [36 sts].
- Round 22: Work (4 sc, dec) 6 times around [30 sts].
- Round 23: Work 1 sc in each st around [30 sts].
- Stuff the body firmly with fiberfill.
- Round 24: Work (3 sc, dec) 6 times around [24 sts].
- Round 25: Work (2 sc, dec) 6 times around [18 sts].
- Fasten off and weave the remaining tail securely inside.
Part C: Ears (Make 2 Outer Ears in Pink Yarn, 2 Inner Patches in Cream)
- Outer Ears (Pink Yarn):
- Round 1: Make a MR, work 6 sc into the ring [6 sts].
- Round 2: Work (1 sc, inc) 3 times around [9 sts].
- Round 3: Work (2 sc, inc) 3 times around [12 sts].
- Round 4: Work (3 sc, inc) 3 times around [15 sts].
- Round 5: Work (4 sc, inc) 3 times around [18 sts].
- Rounds 6–12 (7 rounds): Work 1 sc in each st around [18 sts].
- Round 13: Work (4 sc, dec) 3 times around [15 sts].
- Rounds 14–15 (2 rounds): Work 1 sc in each st around [15 sts].
- Round 16: Work (3 sc, dec) 3 times around [12 sts].
- Do not stuff. Flatten the opening and sew across the base. Fasten off with a long sewing tail.
- Inner Ear Patches (Cream Yarn):
- Work in flat rows: Ch 4.
- Row 1: Starting in 2nd ch from hook, work 3 sc. Ch 1, turn [3 sts].
- Row 2: Inc, 1 sc, inc [5 sts]. Ch 1, turn.
- Rows 3–7 (5 rows): Work 1 sc in each st across [5 sts]. Ch 1, turn.
- Row 8: Dec, 1 sc, dec [3 sts]. Ch 1, turn.
- Row 9: Work 1 dec across remaining stitches, fasten off with a sewing tail, and stitch the cream patch flat onto the center of the pink outer ear.
Part D: Legs and Feet (Make 2 – Start with Cream, Switch to Pink)
- Feet (Cream Yarn):
- Round 1: Make a MR, work 6 sc into the ring [6 sts].
- Round 2: Work inc in each st around [12 sts].
- Round 3: Work (1 sc, inc) 6 times around [18 sts].
- Round 4: Work (2 sc, inc) 6 times around [24 sts].
- Rounds 5–6 (2 rounds): Work 1 sc in each st around [24 sts].
- Round 7: Work (2 sc, dec) 6 times around [18 sts].
- Stuff the foot base firmly.
- Round 8: Work (1 sc, dec) 6 times around [12 sts]. Switch to Pink Yarn on the final stitch.
- Legs (Pink Yarn):
- Rounds 9–14 (6 rounds): Work 1 sc in each st around [12 sts].
- Flatten the top opening and work 6 sc across both sides to close. Fasten off with a long sewing tail.
Part E: Arms (Make 2 – Start with Cream, Switch to Pink)
- Paws (Cream Yarn):
- Round 1: Make a MR, work 6 sc into the ring [6 sts].
- Round 2: Work inc in each st around [12 sts].
- Rounds 3–4 (2 rounds): Work 1 sc in each st around [12 sts].
- Stuff the lower paw lightly. Switch to Pink Yarn.
- Upper Arms (Pink Yarn):
- Rounds 5–10 (6 rounds): Work 1 sc in each st around [12 sts].
- Flatten opening and work 6 sc across both layers to seal. Fasten off with a sewing tail.
Part F: Bow Tie and Miniature Carrot
- Bow Tie (Cream Yarn):
- Ch 9. In 2nd ch from hook, work 1 sc in each ch across [8 sts]. Ch 1, turn.
- Work 4 rows of single crochet [8 sts]. Fasten off. Wrap a short strand of yarn tightly around the exact center several times to pinch it into a bowtie shape, then secure with a knot.
- Carrot (Orange and Green Yarn):
- Orange Body: Make a MR, work 4 sc in ring. Round 2: (1 sc, inc) twice [6 sts]. Round 3: Sc around [6 sts]. Round 4: (2 sc, inc) twice [8 sts]. Round 5: Sc around [8 sts]. Round 6: (3 sc, inc) twice [10 sts]. Stuff lightly, work 5 decreases to close, and fasten off.
- Green Top: Attach sage green yarn to the top center of the carrot, chain 4, slip stitch back down into the base, and repeat 3 times to form tiny leafy sprouts. Fasten off.
6. Assembly and Finishing Touches
- Attaching Head and Body: Position the stuffed head securely onto the top neck opening of the pink body. Whipstitch around the entire circumference twice to ensure the head remains stable and upright.
- Securing the Ears: Pin the finished ears to the top of the head spanning Rounds 4 through 8, angling them slightly outward for a playful expression. Stitch them down firmly.
- Placing Legs and Arms: Sew the flat-closed legs to the lower front base of the body so the bunny can sit upright. Attach the arms to the upper sides of the body just below the neck seam, angling one arm slightly forward so it can cradle the miniature carrot.
- Adding Details: Sew the cream bow tie to the center of the neck right under the chin. Glue or stitch the tiny carrot into the bunny’s paw. Lightly dab pink blush onto the cheeks using a cotton swab.
7. Troubleshooting Common Problems
- The head tilts or wobbles: Make sure you packed the neck opening with extra fiberfill before completing the head-to-body seam, and execute a second pass of stitching around the perimeter.
- The bunny tips backward when sitting: The legs were sewn too far underneath. Move the leg placement slightly forward toward the lower front edge of the body to act as a stabilizing base.
- Stitches look loose with visible gaps: Your hook size might be too large for your yarn weight. Switch down by half a millimeter (e.g., from 3.5 mm to 3.0 mm) for tighter, cleaner stitch walls.
8. Frequently Asked Questions
1. Can I use plush blanket yarn for this bunny?
Yes. Using super bulky chenille yarn with a 5.0 mm or 6.0 mm hook will yield a giant, ultra-squishy huggable plush toy, though you will need to upgrade your safety eyes to 14 mm or 16 mm.
2. Are plastic safety eyes safe for baby toys?
Plastic safety eyes pose a choking hazard for children under 3 years old. For handmade gifts intended for infants, embroider sleeping eyes or simple closed lashes using dark brown embroidery floss instead.
3. How do I clean and wash the finished plush?
Hand wash the bunny gently in cool water with mild wool detergent, press out excess moisture inside a clean towel without wringing, and lay flat to dry in a shaded area.

Leave a Comment