
A handmade crochet flower bouquet brings the colors of spring into your home without the worry of fresh flowers wilting. With soft yarn, a crochet hook, and a few simple techniques, you can create a lasting arrangement of colorful blossoms, delicate leaves, and decorative stems.
Crochet flowers make thoughtful handmade gifts for birthdays, Mother’s Day, weddings, anniversaries, and other special occasions. They can brighten a desk, decorate a shelf, add color to a room, or become part of a personalized gift.
This tutorial guides you through five different flower designs, two leaf sizes, and several stem options. You will learn how to crochet each component, attach the flowers securely, arrange the bouquet, and finish it neatly. You can follow the suggested spring palette or choose colors that match your home or the person receiving the bouquet.
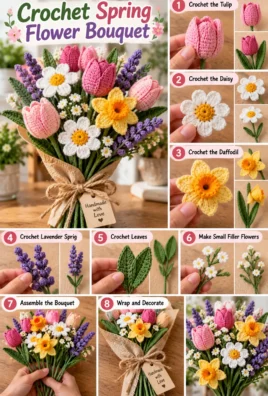
The example bouquet contains five flowers in complementary colors: a classic five-petal flower, a daisy, a tulip-inspired bloom, a small blossom, and a layered flower. You can make additional flowers for a fuller arrangement.
1. Project Overview
- Project name: Crochet Spring Flower Bouquet
- Skill level: Adventurous beginner to intermediate
- Construction: Separate crocheted flowers, leaves, and stem coverings assembled into one bouquet
- Recommended yarn: Smooth cotton or acrylic yarn in DK or light worsted weight
- Suggested hook: 3.0–4.0 mm, depending on the yarn and desired fabric
- Estimated time: Approximately 5–10 hours for a five-flower bouquet, depending on experience and assembly method
- Estimated finished height: Around 8–14 inches, depending on stem length and flower size
- Number of flowers: Five in the sample arrangement, with extra flowers optional
- Techniques: Chains, slip stitches, single crochet, half double crochet, double crochet, treble crochet, working into a foundation chain, joining, and fastening off
- Potential uses: Home decor, handmade gifts, desk decorations, wedding decor, and seasonal arrangements
These measurements and timing are estimates. Actual results depend on yarn weight, hook size, tension, flower dimensions, stem support, and how many components you make.
2. Materials and Tools
Suggested materials for a five-flower bouquet
- Flower yarn: Several colors of smooth cotton or acrylic yarn for petals and centers.
- Green yarn: For the leaves and stem coverings.
- Crochet hook: Approximately 3.0–4.0 mm, selected to suit your yarn.
- Scissors: For cutting yarn and trimming tails.
- Yarn needle: For sewing components together and weaving in ends.
- Stitch markers: Optional, useful for identifying the beginning of a round.
- Green pipe cleaners or flexible craft stems: Optional support for flowers that need to hold their shape.
- Floral wire: Optional for firmer stems, provided it can be completely covered and safely secured.
- Floral tape: Optional for wrapping supported stems.
- Small amount of stuffing: Optional for rounded flower centers.
- Ribbon or decorative paper: Optional for wrapping the finished bouquet.
Approximate yarn quantities
For a five-flower bouquet with leaves and covered stems, allow approximately:
- 50–100 yards of yarn for the flower petals and centers
- 30–60 yards of green yarn for leaves and stems
- A little extra yarn for sewing, joining, and correcting mistakes
These are planning estimates rather than exact requirements. Larger flowers, longer stems, thicker yarn, and additional leaves will use more yarn. If you are using leftover yarn, make sure you have enough green yarn for the stems and leaves before beginning assembly.
Safety notes
If you use wire, cover it completely so no sharp ends can protrude. Do not leave loose or exposed wire inside a flower or stem. Use scissors carefully and keep sharp tools away from young children.
For a bouquet intended for a young child, avoid exposed wire, detachable small parts, and components that could present a choking or injury hazard. A soft, wire-free bouquet is a more suitable option, although it should still be assessed for secure stitching and age-appropriate use.
3. Crochet Terminology and Abbreviations
This tutorial uses US crochet terminology.
- ch — Chain: A basic stitch used to create a starting chain or an opening.
- sl st — Slip stitch: A short stitch used to join or move across stitches.
- sc — Single crochet: A short stitch made by pulling yarn through two loops.
- hdc — Half double crochet: A stitch made by pulling yarn through three loops together after a yarn over.
- dc — Double crochet: A taller stitch made in two stages after drawing up a loop.
- tr — Treble crochet: A taller stitch made with two yarn overs before insertion and completed in stages.
- st — Stitch: One completed crochet stitch.
- sts — Stitches: More than one stitch.
- sp — Space: An opening in the crochet fabric.
- ch-sp — Chain space: An opening formed by chain stitches.
- rep — Repeat: Work the stated sequence again.
- rnd — Round: One complete circuit of stitches.
- FO — Fasten off: Secure the yarn when finishing a component.
How to make the basic stitches
Chain stitch (ch)
- Place the active loop on your hook.
- Yarn over by bringing the working yarn over the hook.
- Pull the yarn through the active loop.
You have made one chain.
Slip stitch (sl st)
- Insert the hook into the indicated stitch or space.
- Yarn over.
- Pull the yarn through the stitch or space and through the active loop.
Single crochet (sc)
- Insert the hook into the indicated stitch or space.
- Yarn over and pull up a loop. Two loops are now on the hook.
- Yarn over again and pull through both loops.
Half double crochet (hdc)
- Yarn over.
- Insert the hook into the indicated stitch or space.
- Yarn over and pull up a loop. Three loops are now on the hook.
- Yarn over and pull through all three loops.
Double crochet (dc)
- Yarn over.
- Insert the hook into the indicated stitch or space.
- Yarn over and pull up a loop. Three loops are now on the hook.
- Yarn over and pull through the first two loops.
- Yarn over again and pull through the remaining two loops.
Treble crochet (tr)
- Yarn over twice.
- Insert the hook into the indicated stitch or space.
- Yarn over and pull up a loop. Four loops are now on the hook.
- Yarn over and pull through the first two loops.
- Yarn over and pull through the next two loops.
- Yarn over again and pull through the final two loops.
The chain loop remaining on the hook is the active loop, not a completed stitch. When working into a foundation chain, insert the hook into the chain specified by the pattern. When working into a chain space, insert it into the opening rather than the top of a nearby stitch.
4. General Construction and Pattern Conventions
The bouquet is made from separate components that are assembled after crocheting. This makes it easy to change colors, replace a flower, or adjust the arrangement.
The five sample flowers are:
- Classic five-petal spring flower
- Simple daisy
- Five-petal tulip-inspired bloom
- Small five-petal blossom
- Layered spring flower
You will also make large and small leaves, then select a stem method and attach the components.
Unless a pattern states otherwise:
- A beginning chain used only to create height does not count as a stitch.
- A slip stitch used to join a round does not count as a stitch.
- Work into the specified stitches or chain spaces.
- Fasten off when a component is complete, leaving a tail long enough for sewing.
- Keep the yarn tension consistent so the petals and centers have a similar density.
Each flower pattern below states where the stitches are placed and how the petals are formed. The dimensions and yarn amounts are estimates because the yarn, hook, and tension can change the finished size.
5. Flower One: Classic Five-Petal Spring Flower
This simple flower has a contrasting center and five rounded petals. It is a good first component because the petals are worked directly into selected stitches around the center.
Suggested colors: yellow center with pink, lavender, coral, or white petals.
Materials
- Small amount of yarn for the center
- Small amount of contrasting yarn for the petals
- Crochet hook suitable for your yarn
- Scissors and yarn needle
Step A: Crochet the center
- Make a magic ring.
- Chain one. This chain does not count as a stitch.
- Work 10 single crochet stitches into the ring.
- Pull the yarn tail to close the center.
- Join with a slip stitch to the first single crochet.
- Fasten off if you want to change colors, leaving a tail for weaving in.
Center check: You should have 10 single crochet stitches around a small closed circle.
If you prefer a chain ring, chain four and join with a slip stitch to form a loop, then work 10 single crochet stitches into the ring.
Step B: Make five petals
Attach the petal color to any single crochet stitch of the center.
For each petal, work the following sequence into one center stitch:
- Slip stitch into the stitch.
- Chain two.
- Work three double crochet stitches into the same stitch.
- Chain two.
- Slip stitch into that same stitch to finish the petal.
Skip the next center stitch, then work the same sequence into the following stitch. Repeat this process around the center until you have made five petals, using every other stitch as an attachment point.
After the fifth petal, fasten off and weave in the ends.
Petal check: The center has 10 stitches, and the five petals attach to stitches 1, 3, 5, 7, and 9 around the circle. Five center stitches remain between the petal attachment points, giving you five evenly spaced petals.
Step C: Shape and finish
Gently spread the petals with your fingers. If a petal curls too tightly, relax the stitches gently rather than pulling the flower out of shape. Flatten the center lightly if needed.
6. Flower Two: Simple Daisy
This daisy has a rounded center and eight longer petals. Use yellow for the center and white, cream, or pale pink for the petals.
Materials
- Yellow yarn
- White or pale-colored yarn
- Crochet hook, scissors, and yarn needle
Step A: Crochet the center
- Make a magic ring.
- Chain one, which does not count as a stitch.
- Work 16 single crochet stitches into the ring.
- Pull the tail to close the center.
- Join with a slip stitch to the first single crochet.
- Fasten off if changing colors.
Center check: You should have 16 single crochet stitches in a closed circle.
Step B: Crochet eight petals
Attach the petal color to any center stitch.
For each petal, work all stitches into the same center stitch:
- Slip stitch into the stitch.
- Chain three.
- Work two treble crochet stitches into the same stitch.
- Chain three.
- Slip stitch into the same stitch.
Skip the next center stitch, then make the next petal in the following stitch. Repeat around the circle, using every other stitch to create eight petals.
Fasten off and weave in the ends.
Daisy check: Eight petals are attached to center stitches 1, 3, 5, 7, 9, 11, 13, and 15. Each petal contains two treble crochet stitches at its widest point, with chain-three sections forming the tips.
Step C: Finish the daisy
Spread the petals evenly around the center. If the petals overlap too much, gently separate them. If large gaps appear, check that you used every other center stitch consistently.
7. Flower Three: Five-Petal Tulip-Inspired Bloom
This flower is designed to resemble an open tulip cup. It uses five separately crocheted petals joined at their bases. The construction is simple, and the overlapping petals help create a rounded flower head.
Suggested colors: red, coral, pink, orange, or purple.
Materials
- Petal yarn
- Green yarn for the stem
- Crochet hook, scissors, and yarn needle
Step A: Make one petal
Make five identical petals in the flower color.
- Chain seven.
- Starting in the second chain from the hook, work one single crochet in the first chain.
- Work one half double crochet in the next chain.
- Work one double crochet in the next chain.
- Work one treble crochet in the next chain.
- Work one double crochet in the next chain.
- Work one half double crochet in the final chain.
You should have six stitches across the row: one sc, one hdc, one dc, one tr, one dc, and one hdc. Fasten off, leaving a long tail for sewing.
The petal narrows at one end and rises toward a rounded point near the treble crochet.
Step B: Make five petals
Repeat Step A until you have five matching petals. Keep the stitch sequence the same for every petal so the bloom looks balanced.
Step C: Join the petals into a cup
- Place two petals side by side, with their lower ends overlapping slightly.
- Use the yarn tails and a yarn needle to sew the lower edges together.
- Add the third petal, overlapping one edge with the previous petal.
- Continue until all five petals form a ring.
- Sew the first and fifth petals together at their lower edges to close the ring.
- Gently curve the petals inward with your fingers, overlapping their sides slightly to create a tulip-like cup.
Do not sew the entire petal edges together. Leave the upper portions free so the flower can open naturally.
Tulip check: You should have five petals joined at their lower edges, with the upper portions forming an open cup. The lower opening should be small enough to attach securely to the stem.
Step D: Attach the stem
Position the stem behind the lower center of the flower. Use the remaining yarn tails to sew the petal bases around the top of the stem covering. Make several secure stitches through the joined petal bases, avoiding stitches that pull the petals flat.
8. Flower Four: Small Five-Petal Blossom
This smaller blossom is useful for filling gaps between the larger flowers. It uses a compact center and short petals.
Suggested colors: pale pink, butter yellow, lilac, or white.
Step A: Crochet the center
- Make a magic ring.
- Chain one.
- Work five single crochet stitches into the ring.
- Pull the tail to close the ring.
- Join with a slip stitch to the first single crochet.
Center check: Five single crochet stitches form a small circle.
Step B: Make five small petals
For each petal, work into one center stitch:
- Slip stitch into the stitch.
- Chain one.
- Work one half double crochet and one double crochet into the same stitch.
- Chain one.
- Slip stitch into the same stitch.
Repeat in each of the five center stitches. After the fifth petal, join neatly and fasten off.
Blossom check: You should have five short petals, one attached to each center stitch.
Step C: Finish the blossom
Gently spread the petals so the center remains visible. Make several small blossoms in different colors if you want a fuller bouquet. These smaller flowers work especially well around the outer edges of the arrangement.
9. Flower Five: Layered Spring Flower
This flower has two layers of petals for a fuller, textured appearance. Make a small flower as the back layer and a slightly smaller flower as the front layer, then sew them together.
Materials
- Yarn for the back petal layer
- Contrasting yarn for the front layer
- Crochet hook, scissors, and yarn needle
Step A: Make the back layer
- Make a magic ring.
- Chain one.
- Work 10 single crochet stitches into the ring.
- Pull the tail to close the center and join with a slip stitch to the first single crochet.
- Attach the petal color.
- Work five petals into every other center stitch, using this sequence in each selected stitch: slip stitch, chain two, three double crochet stitches, chain two, slip stitch.
- Skip one center stitch between petals.
- Fasten off and weave in the ends.
You should have five petals in the back layer.
Step B: Make the front layer
- Make a magic ring.
- Chain one.
- Work eight single crochet stitches into the ring.
- Pull the tail to close the center and join with a slip stitch to the first single crochet.
- Attach the second petal color.
- In each center stitch, work: slip stitch, chain one, one half double crochet, one double crochet, chain one, slip stitch.
- Repeat in all eight center stitches.
- Fasten off, leaving a long tail for sewing.
You should have eight small petals in the front layer.
Step C: Join the layers
- Place the smaller flower over the center of the five-petal flower.
- Rotate it so its petals sit between the petals of the back layer.
- Thread the yarn tail onto a yarn needle.
- Sew through the centers of both layers with several small stitches.
- Keep the stitches close to the center so the petals remain free.
- Secure the yarn on the back and weave in the end.
Layered flower check: The finished flower has five larger back petals and eight smaller front petals. Both layers should be visible, and the center should lie flat enough for the flower to attach securely to a stem.
10. Crochet Leaves
Leaves add color and help connect the flowers visually. Make a mixture of large and small leaves, using the same green yarn for a coordinated arrangement.
Large leaf
- Chain nine.
- Starting in the second chain from the hook, work one slip stitch in the first chain.
- Work one single crochet in the next chain.
- Work one half double crochet in the next chain.
- Work one double crochet in each of the next three chains.
- Work one half double crochet in the next chain.
- Work three single crochet stitches into the final chain to form the tip.
- Turn the foundation chain so you can work along its opposite side.
- Work one half double crochet in the next chain space along the opposite side.
- Work one double crochet in each of the next three chain spaces.
- Work one half double crochet in the next chain space.
- Work one single crochet in the final chain space.
- Join with a slip stitch near the starting point and fasten off, leaving a tail for attachment.
The stitches along the two sides of the foundation chain create an elongated leaf with a pointed tip at each end.
Leaf check: The leaf should have a narrow tip at both ends and a wider middle. If one side looks uneven, check that you worked into each available chain space on the return side.
Small leaf variation
- Chain six.
- Starting in the second chain from the hook, work one slip stitch, one single crochet, one half double crochet, and one double crochet in the next four chains.
- Work three single crochet stitches into the last chain.
- Turn to the opposite side of the foundation chain.
- Work one double crochet, one half double crochet, one single crochet, and one slip stitch along the remaining chain spaces.
- Join and fasten off, leaving a tail for sewing.
This smaller leaf is useful for short stems and small blossoms.
Shape the leaves
Gently smooth the leaves with your fingers. You can curve them slightly by pinching the center lengthwise. Avoid pulling too hard, which can distort the stitches. When attaching the leaves, vary their angles and positions so they do not all point in the same direction.
11. Crochet Flower Stems
Choose a stem method based on how you want the bouquet to look. Soft yarn stems are flexible and safe from exposed wire, while supported stems can help heavier flower heads remain upright.
Option A: Crochet stem cover
This method creates a green covering for a pipe cleaner or suitable flexible craft stem.
Materials: Green yarn, crochet hook, a suitable support, scissors, and a yarn needle.
- Chain four.
- Join with a slip stitch to the first chain to form a small ring. Do not twist the chain.
- Chain one, then work one single crochet into each of the four chains.
- Join with a slip stitch to the first single crochet.
- Chain one and work one single crochet into each stitch around.
- Continue working joined rounds of four single crochet stitches until the covering reaches the desired length.
- Fasten off, leaving a tail for securing the top and bottom.
The result is a narrow tube. Slide the support inside only if it fits without stretching or splitting the stitches. Keep the support fully covered and make sure no sharp end protrudes. Secure the covering around the top and bottom with yarn.
If the support is too wide to slide inside the tube, do not force it. Make a wider tube or choose a softer stem method.
Option B: Soft yarn stem
A soft stem works well for small, lightweight flowers.
- Chain four and join to form a ring.
- Chain one and work four single crochet stitches into the ring.
- Join with a slip stitch.
- Continue working joined rounds of four single crochet stitches until the stem reaches the desired length.
- Fasten off, leaving a long tail.
- Use the tail to sew the stem securely to the back of the flower.
You can make the tube slightly thicker by increasing the number of stitches in the starting ring, but make sure the stem still fits the flower’s base.
Soft stems are flexible and may bend under heavier flowers. For a bouquet that will sit in a vase, you can use shorter soft stems or arrange them so they lean against one another for support.
Option C: Supported stem
For a firmer stem, use a suitable flexible craft stem or floral wire with a green crochet covering.
- Prepare the crochet covering using Option A.
- Check that the support fits inside without stretching the stitches.
- Insert the support carefully.
- Secure the top and bottom of the covering with yarn or a suitable method.
- If floral tape is used, wrap it according to its instructions and keep the support fully concealed.
- Attach the flower head with several secure stitches through its base and the covered stem.
Do not leave sharp wire ends exposed or use a support that can easily slide out. If you cannot cover and secure the support safely, use a soft yarn stem instead.
Choosing stem lengths
For a small arrangement, you might use stems of approximately 6–10 inches, with some shorter and some longer. These are estimates. The best length depends on the size of your flowers, the height of your vase, and the finished arrangement.
12. Attaching Leaves to Stems
Leaves look more natural when they are placed at different heights rather than all at the same level.
- Choose a position along the stem for the first leaf.
- Hold the narrow base of the leaf against the stem.
- Thread the leaf’s yarn tail onto a yarn needle.
- Sew through the leaf base and around the crochet stem covering with several small stitches.
- Secure the tail on the inside or back of the covering, where possible.
- Attach another leaf lower or higher on the stem, turning it slightly in a different direction.
- Weave in the remaining tails so they do not slide or become visible.
If you are using a supported stem, sew into the crochet covering only. Do not push the needle through exposed wire or use a method that could force a sharp end out of the stem.
For a more natural appearance, attach one or two leaves to some stems and leave others without leaves. This variation creates visual interest and avoids making every flower look identical.
13. Attaching Flowers to Stems
The flower head should be securely attached without making the center bulky or flattening the petals.
- Turn the flower over so the back faces you.
- Position the upper end of the stem behind the center of the flower.
- Thread a yarn tail from the flower or stem onto a yarn needle.
- Sew through several stitches at the back of the flower center and around the crochet stem covering.
- Repeat the stitches at different points around the attachment area to prevent the flower from twisting.
- Gently tug the stem to check the connection.
- Weave in the yarn tails and reshape the petals.
For the tulip-inspired bloom, attach the stem to the joined lower ends of the five petals. For the layered flower, sew the stem to the back layer rather than sewing through every petal. This helps the front petals remain free.
If a flower head tilts too far forward, reposition the stem slightly toward the back of the center and add a few more securing stitches. Avoid pulling the stitches so tightly that the center puckers.
14. Assembling the Spring Bouquet
Once the five flowers, leaves, and stems are finished, arrange them before securing the bouquet. This allows you to adjust the colors and heights without having to undo the wrapping.
Step-by-step assembly
- Lay out the flowers. Place all five flower heads in front of you and check that the colors work well together.
- Choose a focal flower. Use the largest or most colorful flower as the main feature.
- Position the taller stems. Place the tallest flowers toward the center or back of the arrangement.
- Add the smaller blossoms. Position the small five-petal flowers near the outside or in spaces between the larger blooms.
- Vary the stem lengths. Trim or adjust the stems so the flower heads sit at different heights.
- Arrange the leaves. Rotate the leaves outward and use them to fill gaps between the flower heads.
- Gather the stems. Hold the arrangement together loosely and adjust the flowers until the bouquet looks balanced.
- Secure the stems. Wrap the gathered stems with green yarn, ribbon, or suitable floral tape.
- Check the balance. Make sure the bouquet does not lean too far to one side.
- Wrap the bouquet if desired. Add decorative paper or fabric around the gathered stems.
Example five-flower arrangement
Try this combination for a spring-inspired bouquet:
- One pink classic five-petal flower as the focal point
- One white daisy with a yellow center
- One coral tulip-inspired bloom
- One small lavender blossom
- One layered flower in pale yellow and pink
Use green leaves at different heights to connect the flowers visually. The colors are only suggestions; you can change them to suit a particular season, room, or gift recipient.
Avoiding an unbalanced bouquet
Do not gather all the stems too tightly, because this can force the flowers into a flat cluster. Leave a little space between the heads so the petals remain visible.
If the arrangement looks crowded, spread the flower heads apart or increase the differences between stem lengths. If it looks sparse, add more leaves or crochet one or two extra small blossoms.
If you use supported stems, bend them gently rather than making sharp folds. Check that the crochet covering remains intact and that no wire becomes exposed.
15. Bouquet Wrapping and Display
A decorative wrap can turn your finished flowers into a gift-ready arrangement.
How to wrap the bouquet
- Gather the stems and secure them loosely with yarn or ribbon.
- Choose a piece of decorative paper, fabric, or other suitable wrapping material.
- Place the stems near the lower edge of the wrapping.
- Fold the material around the stems, leaving the flower heads uncovered.
- Secure the wrap with ribbon or another suitable fastener.
- Adjust the folds so they support the stems without crushing the leaves or flower heads.
Wrapping is optional. A simple ribbon around the stems may be enough if you prefer the crochet flowers to remain the main focus.
Display ideas
- Place the bouquet in a vase with a narrow opening that supports the stems.
- Use a decorative container for a desk or shelf.
- Tie the bouquet with a ribbon for a handmade gift.
- Create a seasonal arrangement using flowers in matching spring colors.
Choose a vase or container that keeps the bouquet upright without forcing the stems into an unnatural position. If the arrangement contains wire or detachable components, do not treat it as a toy, particularly around young children.
16. Finishing and Quality Checks
Before displaying or gifting your bouquet, inspect each component.
- All petals are securely attached.
- Every flower has the intended number of petals.
- Loose yarn ends are woven in.
- Leaves are firmly attached and do not slide down the stems.
- Stem coverings are neat and secure.
- Any wire or support is completely concealed.
- Flower heads remain secure when gently handled.
- The bouquet sits or rests in the intended arrangement.
- No sharp or loose components are exposed.
Gently reshape the petals and leaves with your fingers after assembly. If the yarn allows it, you can lightly block individual flower components before attaching them. Avoid excessive heat or steam unless the yarn’s care instructions specifically allow the chosen method.
Caring for the finished bouquet
Keep the bouquet away from rough handling, excessive heat, and moisture that could affect its shape or materials. For small marks, spot-clean gently if the yarn’s care instructions allow it. Avoid soaking a bouquet that contains wire, pipe cleaners, adhesives, or other materials that may be damaged by water.
Store the arrangement in a clean, dry place when it is not on display.
17. Troubleshooting Common Problems
The petals look uneven
Likely cause: The stitches may have different tension, or some petals may have been worked into the wrong attachment points.
Solution: Compare the petal stitch sequences and check that each one uses the same number and type of stitches. Gently reshape the petals with your fingers.
The flower center is too loose
Likely cause: The magic ring may not have been tightened enough, or the stitches around it may be too loose.
Solution: Pull the starting tail to close the center before weaving it in. If the ring cannot be tightened, remake the center and keep the starting stitches secure but comfortable to work.
The center ring will not close
Likely cause: The tail may have caught on a stitch or the ring may have been worked incorrectly.
Solution: Check that the starting tail can move freely before finishing the flower. If it remains stuck, carefully undo the center and make the ring again.
The petals curl or fold excessively
Likely cause: The tension may be too tight, or the petal stitches may be too short for the intended shape.
Solution: Check the stitch sequence and relax your tension. Spread the petals gently. If necessary, remake the flower with a slightly larger hook, keeping in mind that this will change its finished size.
The flower head looks too bulky
Likely cause: The center may contain too many stitches for the chosen yarn, or several attachment seams may overlap in one place.
Solution: Use a smaller center or a finer yarn for a future flower. When attaching the stem, sew through the back of the center rather than adding excessive stitches through the front.
Large gaps appear between petals
Likely cause: The petal attachment points may be uneven, or the center may have too few stitches for the intended spacing.
Solution: Check that the petals are attached at the specified stitches. Spread the petals evenly before fastening off. If the center’s stitch count is incorrect, undo the petal round and correct it.
The stem bends too much
Likely cause: A soft stem may not support the weight of the flower head.
Solution: Use a shorter stem, a firmer crochet tube, or a suitable fully covered support. Do not force an oversized support into a narrow crochet covering.
The flower head tilts or falls forward
Likely cause: The stem may be attached too far to one side or secured with too few stitches.
Solution: Reposition the stem closer to the back center of the flower and sew it securely at several points. Check the balance before wrapping the bouquet.
Leaves slide down the stem
Likely cause: The leaf base may not be attached securely enough.
Solution: Sew through the leaf base and the crochet stem covering several times. Secure the tail so it cannot loosen. If necessary, reposition the leaf and reinforce the attachment.
Yarn ends become visible
Likely cause: The tails may not have been woven in far enough or may have loosened during assembly.
Solution: Thread the tail onto a yarn needle and weave it through several stitches on the back of the component, changing direction where practical. Avoid trimming the tail too close before it is secure.
The bouquet looks crowded
Likely cause: The stems may be gathered too tightly or the flower heads may be too close together.
Solution: Loosen the gathering point, adjust the angles, and vary the stem lengths. Move the smaller flowers toward the outside to create more separation.
The bouquet looks sparse or unbalanced
Likely cause: There may be too much space between flower heads or too few leaves to connect the arrangement visually.
Solution: Add leaves or extra small blossoms, and redistribute the flower heads. Check the arrangement from the front and sides before securing it.
The second petal layer hides the first layer
Likely cause: The smaller flower may be positioned directly over the outer petals rather than between them.
Solution: Rotate the upper layer so its petals sit in the gaps between the lower petals. Sew only through the centers, leaving the petals free to spread.
18. Customization Ideas
Once you understand the basic components, you can personalize your bouquet in many ways.
- Pastel spring colors: Try soft pink, lavender, pale yellow, cream, and sage green.
- Bright seasonal colors: Use coral, orange, magenta, and sunny yellow.
- Single-color bouquet: Use one petal color for all flowers and vary the flower shapes.
- Mixed flower sizes: Combine large daisies, classic flowers, and small blossoms.
- Extra leaves and buds: Fill gaps with additional green leaves or small flowers.
- Longer or shorter stems: Adjust the height to suit a vase or gift arrangement.
- Different yarn textures: Use smooth yarn for the flowers and a contrasting texture for selected centers.
- Wrapped presentation: Add decorative paper, fabric, or ribbon for a gift.
- Matching vase cover: Crochet a simple cover for the container to coordinate with the flowers.
Changing yarn weight or hook size changes the dimensions and texture of the flowers. Thicker yarn creates larger components, while finer yarn creates smaller, more delicate flowers. Make a sample first if you want the flower heads to fit a particular vase or container.
An estimated bouquet height can be thought of as the stem length plus the height of the flower head, allowing for the angle of the flower. Because the flowers may lean at different angles, measure the assembled bouquet rather than relying on the stem length alone.
19. Frequently Asked Questions
Is a crochet flower bouquet suitable for beginners?
Yes, if you are comfortable learning a few basic stitches. The classic flower and small blossom are good starting points. The layered flower and supported stems require more assembly, so you can add them once you feel confident.
What yarn is best for crochet flowers?
Smooth cotton or acrylic yarn is a practical choice because the stitches are easy to see and the flowers can be shaped by hand. Choose a yarn weight that suits the finished size you want.
Which hook size should I use?
A hook between 3.0 mm and 4.0 mm is a useful starting range for the yarns suggested in this tutorial. Check the yarn label and adjust if the fabric is too tight or too loose.
Can I make the bouquet without wire?
Yes. Soft crocheted stems work well for lightweight flowers. They are flexible and may not keep heavier flower heads upright, so shorter stems or a supportive vase can help.
How do I keep flower petals in shape?
Use consistent tension, secure the center properly, and reshape the petals gently with your fingers. Blocking may help if the yarn’s care instructions allow it.
How do I attach a flower securely to its stem?
Position the stem behind the flower center and sew through several stitches at the back. Reinforce the connection without pulling the center too tightly or flattening the petals.
How many flowers should a small bouquet contain?
Five flowers make a balanced starting arrangement. You can make fewer for a small display or add extra blossoms and leaves for a fuller bouquet.
Can I change the flower colors?
Absolutely. Color choices do not affect the basic stitch construction. You can use one palette for the entire bouquet or give each flower a different color combination.
How do I make the bouquet look fuller?
Add extra small blossoms and leaves, vary the stem lengths, and spread the flower heads at different angles. Avoid gathering the stems too tightly.
How should I clean crocheted flowers?
Spot-clean gently if the yarn’s care instructions allow it. If your bouquet contains wire, pipe cleaners, adhesives, or other support materials, avoid soaking it.
Can I use leftover yarn for this project?
Yes. Small amounts of yarn are useful for petals, centers, and leaves. Make sure you have enough matching green yarn for the stems and attachment points.
Is a wire-supported bouquet suitable for young children?
A bouquet containing wire, small detachable parts, or sharp tools is not an appropriate toy for young children. For a child-friendly option, avoid exposed wire and small detachable components, and ensure all parts are securely stitched.
20. Final Thoughts
A crochet spring flower bouquet is a creative way to turn small amounts of yarn into a lasting decorative arrangement. The five flower styles in this tutorial give you a mixture of rounded petals, daisy-like blooms, a tulip-inspired cup, small blossoms, and layered texture.
Start with the classic five-petal flower and a simple soft stem. Once you are comfortable with the construction, add leaves, experiment with color combinations, and build a bouquet that suits your space or the person receiving it.
Take your time with the assembly, secure the flower heads carefully, and check every stem and yarn tail before displaying the finished bouquet. With a little practice, you can adapt the same components to make arrangements for different seasons and special occasions.
Leave a Comment