
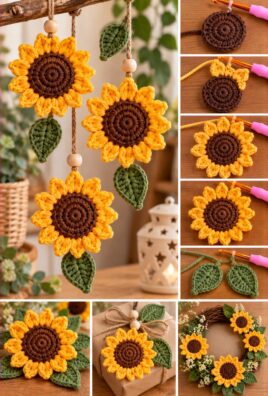
A crocheted sunflower is a cheerful handmade decoration that brings warmth and color to any space. With a textured brown center and bright yellow petals, this flower is a lovely addition to wreaths, wall hangings, garlands, cushions, gift wrapping, and seasonal displays.
This beginner-friendly pattern creates a flat sunflower with a round, two-color center and 12 individually shaped petals. The flower is worked in joined rounds, with the petals crocheted directly onto the outer edge of the center. You can leave it as a simple flower or add optional leaves and a stem to create a more complete decorative piece.
Project Overview
- Skill level: Beginner
- Approximate completion time: 1–2 hours
- Approximate finished size: 4–5 inches across, depending on yarn, hook, and tension
- Construction method: A circular center worked in joined rounds, followed by 12 crocheted petals
- Main colors: Brown for the center and yellow for the petals
- Optional additions: Green leaves, a stem, or an attachment loop
- Finished shape: A flat decorative flower without stuffing
The finished size and completion time are approximate. They depend on yarn weight, hook size, personal tension, and the number and size of the petals.
Materials and Supplies
Gather the following materials before beginning.
- Brown or dark brown yarn: A small amount for the sunflower center.
- Yellow or golden-yellow yarn: Enough to crochet all 12 petals.
- Optional green yarn: For leaves or a stem.
- Crochet hook: Choose a hook suitable for your yarn. A 3.5 mm or 4 mm hook is a useful starting point for medium-weight yarn.
- Scissors: For cutting the yarn.
- Tapestry needle: For weaving in loose ends.
- Stitch marker: Optional, especially if you find it difficult to identify the beginning of a round.
- Optional sewing needle and thread: Useful when attaching the finished flower to fabric or other decorations.
You do not need stuffing or a separate backing for this flat design. If you want to attach the sunflower to a wreath or wall hanging, you can add a small crocheted loop or sew the flower securely to its backing.
Smooth yarn is especially helpful for beginners because the individual stitches are easier to see. Cotton yarn creates a firm, defined flower, while acrylic yarn is soft, lightweight, and available in many colors.
US Crochet Abbreviations
The pattern uses standard US crochet terminology.
- ch: Chain
- sl st: Slip stitch
- sc: Single crochet
- hdc: Half double crochet
- dc: Double crochet
- tr: Treble crochet
- st: Stitch
- sts: Stitches
- sp: Space
- rep: Repeat
- rnd: Round
A few techniques are important to understand before starting.
A magic ring creates an adjustable loop that can be tightened to close the center of the flower. If you prefer not to use a magic ring, you can chain 4 and join the first and last chains with a slip stitch to make a small ring.
A joined round is a circular row of stitches closed with a slip stitch. In this pattern, the beginning chain does not count as a stitch unless specifically stated.
An increase means working two stitches into the same stitch. In the center, increases help the circle grow without curling or becoming too wavy.
Skills Needed Before Starting
You should be comfortable with the following basic crochet skills:
- Making a slip knot and holding the yarn.
- Creating chain stitches.
- Working single crochet, half double crochet, double crochet, and treble crochet.
- Joining rounds with a slip stitch.
- Changing yarn colors.
- Fastening off and weaving in loose ends.
If the magic ring feels difficult, use the chain-loop alternative described above. When using that method, work the first round into the center of the chain ring rather than into the individual chain stitches.
Understanding the Sunflower Design
This sunflower has three main parts: a circular brown center, 12 yellow petals, and optional green leaves or a stem.
The center is made first in two joined rounds. The first round establishes the circle, and the second round increases its size. The final center contains 24 stitches, providing a consistent base for the petals.
The petals are then worked directly into the 12 stitches of the outer round. Each petal uses two neighboring base stitches, so the 24-stitch center edge provides exactly 12 petal attachment sections.
Each petal is made with a combination of single crochet, half double crochet, double crochet, and treble crochet. The taller stitches form the rounded tip, while the shorter stitches help shape the base and return to the center.
This construction keeps the flower flat and avoids the need to crochet separate petals and sew them on individually.
Step-by-Step Crochet Instructions
Part A: Crochet the Sunflower Center
Use brown yarn and your chosen crochet hook.
Round 1: Make the first circle
- Make a magic ring. Alternatively, chain 4 and join the first chain to the last chain with a slip stitch to create a ring.
- Chain 1. This chain does not count as a stitch.
- Work 12 single crochet stitches into the ring.
- Pull the magic ring closed if you used one.
- Join the round by making a slip stitch into the first single crochet stitch.
You should have 12 single crochet stitches.
Count the actual stitches rather than the chain at the beginning. If you have fewer or more than 12, check that each stitch was worked into the ring only once.
Round 2: Increase the center
- Chain 1. This chain does not count as a stitch.
- Work 2 single crochet stitches into each stitch around.
- Join with a slip stitch into the first single crochet stitch.
You should now have 24 single crochet stitches.
Each of the 12 stitches from the previous round receives two new stitches. This doubles the stitch count and creates a larger circular center.
Fasten off the brown yarn if you want a visible color change between the center and petals. Leave a tail long enough to weave in securely.
Keeping the Center Flat
Check the circle after each round.
- If it curls into a bowl: Your tension may be too tight, or the circle may need more increases. In this pattern, make sure every stitch in Round 2 receives two single crochet stitches.
- If the edge becomes wavy: Your tension may be loose, or you may have accidentally worked extra stitches into the round. Count the stitches and confirm that Round 2 has exactly 24.
- If the center looks uneven: Check that the first round contains 12 stitches and that the increases are evenly distributed.
- If the center is too small: Try a slightly larger hook or a thicker yarn rather than adding unplanned stitches.
A small amount of natural texture is fine because the petals will cover much of the outer edge.
Part B: Prepare the Petal Base
The outer round contains 24 stitches. You will use these stitches in pairs to create 12 petals.
Each petal occupies two consecutive stitches:
- The first stitch forms the first side of the petal.
- The second stitch forms the other side and helps complete the petal shape.
There are no skipped stitches between petals. Each petal begins at the next available pair of base stitches.
Join the yellow yarn to the first stitch of the brown center’s second round using a slip stitch. Make sure you are joining into an actual single crochet stitch, not into the joining slip stitch from the previous round.
Chain 1. This chain does not count as a stitch.
You are now ready to crochet the first petal.
Part C: Crochet the 12 Petals
Each petal is worked into two consecutive stitches from the center’s outer round.
The complete petal repeat is:
- In the first base stitch, work 1 single crochet and 1 half double crochet.
- In the second base stitch, work 1 double crochet, 2 treble crochet, 1 double crochet, and 1 half double crochet.
- Work 1 single crochet into the next base stitch to finish the petal’s return edge.
For a precise 12-petal construction, the last single crochet of one petal also serves as the first stitch of the next petal’s base. This shared boundary keeps the petals connected without gaps.
To make the construction easier to follow, use the following exact repeat around the circle:
Petal repeat: In the next base stitch, work 1 sc and 1 hdc. In the following base stitch, work 1 dc, 2 tr, 1 dc, and 1 hdc. In the next base stitch, work 1 sc.
However, because this repeat uses three base stitches per petal, it does not fit the 24-stitch center for 12 petals. Instead, use the corrected two-stitch petal sequence below, which matches the center stitch count exactly.
Corrected petal sequence
For each petal:
- In the first base stitch, work 1 sc, 1 hdc, and 1 dc.
- In the second base stitch, work 2 tr, 1 dc, 1 hdc, and 1 sc.
- Move directly to the next pair of unused base stitches.
This creates a tapered petal with a taller outer tip and shorter stitches near the base. Each petal uses exactly two center stitches, so 24 base stitches create 12 petals.
Work the petals around the center
- Join yellow yarn to the first stitch of Round 2.
- Chain 1, which does not count as a stitch.
- Work the corrected petal sequence into the first two base stitches.
- Work the same sequence into the next two base stitches.
- Continue repeating the sequence around the circle until you have made 12 petals.
- Join with a slip stitch at the base of the first petal, taking care not to pull the join too tightly.
The petals may overlap slightly near the center. This is normal and helps create a full sunflower appearance.
Fasten off the yellow yarn, leaving a tail for weaving in.
Part D: Optional Second Petal Layer
The main pattern uses a single layer of 12 petals. A second layer is not necessary for the flower to look complete.
If you want a fuller sunflower, you can make a second flower using the same center and petal instructions in a slightly different yellow shade. Position the two flowers so that the petals of the upper flower sit between the petals of the lower flower, then sew them together through the center.
This optional method creates a layered look without changing the stitch counts or petal construction of the main pattern.
Part E: Optional Leaves and Stem
Leaves and a stem are optional. You can use the sunflower as a simple flower decoration without adding either.
Crochet a simple leaf
Use green yarn.
- Chain 8.
- Starting in the second chain from the hook, work 1 sc in the next 2 chains.
- Work 1 hdc in the next 2 chains.
- Work 1 dc in the next 2 chains.
- Work 5 dc into the final chain to form the rounded tip.
- Working along the opposite side of the foundation chain, work 1 dc in each of the next 2 available chain loops.
- Work 1 hdc in each of the next 2 available chain loops.
- Work 1 sc in each of the final 2 available chain loops.
- Join with a slip stitch at the base of the leaf and fasten off.
The leaf should have a pointed base, a rounded tip, and a gently curved outline. If the leaf looks too narrow, use a larger hook or slightly thicker yarn.
Make one or two leaves as desired. Sew them to the back of the sunflower center.
Make a simple stem
For a quick decorative stem, use a length of green yarn or a narrow crocheted cord.
To crochet a cord, chain 25–35 stitches, depending on the desired length. Slip stitch into the back bump of each chain, beginning in the second chain from the hook. Fasten off and weave in the ends.
Attach one end of the cord securely to the back of the flower. For a wall hanging or wreath, use a stem length that suits the arrangement.
A crocheted cord is flexible, so it may need a separate backing or support if you want the stem to remain straight.
Stitch Counts and Petal Placement
| Part | Instructions | Expected count |
|---|---|---|
| Center Round 1 | 12 sc into the ring | 12 sts |
| Center Round 2 | 2 sc in each stitch | 24 sts |
| Petal base | Use 2 consecutive center stitches per petal | 12 sections |
| Petal count | One petal per two-stitch section | 12 petals |
| Leaf | Optional foundation chain | 8 chains |
| Stem | Optional crocheted cord | 25–35 chains |
The center has 24 stitches, and each petal uses two of those stitches. This provides exactly 12 attachment sections with no leftover stitches.
The petal stitches are worked into the existing center stitches, so the petals do not form a separate circular round with a new stitch count.
Color Changes and Decorative Variations
The traditional sunflower uses a dark brown center and bright yellow petals, but you can adjust the colors to suit your home or craft project.
- Classic sunflower: Dark brown center with bright yellow petals.
- Golden sunflower: Medium brown center with golden-yellow petals.
- Muted sunflower: Chocolate-brown center with mustard and cream tones.
- Two-tone petals: Use one yellow shade for the first six petals and another for the remaining six, or alternate shades around the flower.
- Rustic sunflower: Use earthy brown and golden yarn with olive-green leaves.
To change colors neatly, finish the brown center and fasten off before attaching the yellow yarn. When joining the yellow yarn, leave a tail long enough to weave into the back of the center.
Avoid tying large knots that may create visible bumps. Instead, use a tapestry needle to weave each tail through several stitches on the back of the flower, changing direction once or twice to help secure it.
If you want a two-tone petal effect, change colors at the beginning of each petal and weave in the ends carefully. For a beginner-friendly project, using the same yellow yarn for all 12 petals is simpler and produces a consistent finish.
Assembly and Finishing
Once the petals are complete, take a few minutes to finish the sunflower neatly.
- Fasten off the yarn. Cut the yarn, leaving a tail long enough to weave in.
- Secure the loose ends. Use a tapestry needle to weave each tail through several stitches on the back.
- Arrange the petals. Spread the petals evenly around the center with your fingers.
- Shape the tips. Gently flatten the petals or curve them slightly upward for a more dimensional appearance.
- Attach optional leaves. Sew the leaves to the back of the center so that they peek out from between the petals.
- Attach the stem if desired. Secure it to the back of the flower with several stitches.
- Add a hanging loop if needed. Make a small chain loop and sew it securely to the back, or use an appropriate attachment for your display.
Because this is a flat flower, you do not need to add stuffing. If the flower is slightly uneven, gently reshape it by hand.
Blocking may help if your yarn fiber and care instructions permit it. Lightly dampen the flower if appropriate, arrange it flat, and allow it to dry completely. Avoid high heat unless the yarn label specifically permits it.
Turning the Flower into a Decoration
A finished crocheted sunflower can be used in many ways.
- Standalone decoration: Place it on a shelf or incorporate it into a seasonal display.
- Wreath embellishment: Sew or securely attach the flower to a wreath base.
- Wall hanging: Add a hanging loop or attach the flower to a larger crocheted panel.
- Garland: Make several sunflowers and attach them to a cord at regular intervals.
- Cushion or bag decoration: Sew the flower onto a suitable fabric surface, making sure the stitches are secure.
- Gift embellishment: Attach the sunflower to a gift bag, wrapped present, or handmade card.
- Flower arrangement: Combine several crocheted flowers with leaves and stems to create a handmade bouquet.
Choose an attachment method appropriate for the material and intended use. For fabric, sewing is often a neat option. For wreaths and other craft bases, use a suitable secure attachment method that will not damage the material.
If the flower will be used on an item intended for young children, consider the item’s safety requirements. Small parts, loose attachments, and decorative components may create hazards.
Troubleshooting Common Problems
The center curls into a bowl
This often happens when the tension is too tight or the round has too few stitches. Check that Round 1 contains 12 stitches and that Round 2 has two single crochet stitches in every stitch. Try a slightly larger hook if necessary.
The center becomes wavy
A wavy edge usually indicates too many stitches or uneven tension. Count the stitches in Round 2 and make sure there are exactly 24. Avoid accidentally working extra stitches into the joining slip stitch.
The petals are uneven
Uneven petals can result from inconsistent tension or missed stitches. Follow the same sequence for every petal and count the two base stitches used for each one.
The petals curl inward
Your stitches may be too tight, or the petals may need gentle shaping. Try relaxing your tension or using a slightly larger hook for the petals.
The flower has too many or too few petals
There should be 12 petals, with each petal using two stitches from the 24-stitch outer round. Mark the beginning of the round and count each pair as you work.
Gaps appear between petals
Small spaces near the center are normal, but large gaps may indicate that you have skipped base stitches. Check that the petals use consecutive pairs of stitches without leaving unused stitches between them.
The center looks too small or too large
Yarn weight, hook size, and tension affect the finished dimensions. Use a larger hook or thicker yarn for a bigger flower, or a smaller hook and finer yarn for a smaller decoration.
Color joins are visible
The join may be too loose or the yarn tails may not be woven in neatly. Join the yellow yarn at the back of the flower and weave in the tails through several stitches.
The flower loses its shape after finishing
Loose tension, heavy yarn, or an unsupported attachment can cause the flower to sag. Reshape the petals by hand and consider light blocking if suitable for the yarn. If the flower is attached to a hanging decoration, reinforce the back where necessary.
Compact Pattern Summary
Use this quick reference after you become familiar with the full instructions.
Center, brown yarn
- Round 1: Make a magic ring, ch 1, work 12 sc into the ring, and join with a sl st to the first sc. (12 sts)
- Round 2: Ch 1, work 2 sc in each stitch around, and join with a sl st to the first sc. (24 sts)
Petals, yellow yarn
- Join yellow yarn to the first stitch of Round 2 and ch 1.
- For each petal, work 1 sc, 1 hdc, and 1 dc in the first base stitch. In the second base stitch, work 2 tr, 1 dc, 1 hdc, and 1 sc.
- Repeat into each pair of base stitches until you have 12 petals.
- Join neatly at the base of the first petal, fasten off, and weave in the ends.
Optional leaves
- Ch 8.
- Work sc, hdc, and dc along the chain, shape the tip with 5 dc in the final chain, and work back along the opposite side.
- Fasten off and sew to the back of the flower.
Optional stem
- Ch 25–35.
- Sl st into the back bump of each chain, starting in the second chain from the hook.
- Fasten off and attach securely.
Finishing
- Weave in all yarn tails.
- Arrange the 12 petals evenly.
- Attach optional leaves, stem, or hanging loop.
- Shape gently by hand.
Frequently Asked Questions
1. Is this sunflower decoration suitable for beginners?
Yes. The flower uses basic stitches and a simple circular center. The most important steps are keeping the center stitch count correct and repeating the same petal sequence 12 times.
2. What yarn works best for crocheted sunflowers?
Smooth cotton or acrylic yarn is a good choice. Cotton often produces a firm, defined flower, while acrylic yarn creates a soft, lightweight decoration. Choose a yarn that makes the stitches easy to see.
3. How many petals should the flower have?
This pattern makes 12 petals. The 24 stitches around the center are divided into 12 pairs, with one petal worked into each pair.
4. How can I make the petals look more realistic?
Use golden-yellow yarn, vary the shade slightly, and gently shape the petal tips after finishing. A textured brown center and green leaves can also make the sunflower look more natural.
5. How do I keep the center flat?
Maintain consistent tension and follow the increases exactly. Round 1 has 12 single crochet stitches, and Round 2 has 24. If the circle curls or waves, check your stitch count before changing the pattern.
6. Can I make the sunflower in different sizes?
Yes. Use finer yarn and a smaller hook for a smaller flower, or thicker yarn and a larger hook for a larger one. Keep the same stitch counts if you want to preserve the 12-petal construction.
7. Can I crochet the flower without a magic ring?
Yes. Chain 4 and join the first and last chains with a slip stitch to form a ring. Work the 12 single crochet stitches into the center of that ring, then continue with Round 2.
8. How do I attach the sunflower to a wreath or wall hanging?
You can sew the flower to a suitable base or use an attachment method appropriate for the materials. Reinforce the back of the center so the flower stays in place, particularly if the decoration will be moved or hung.
9. Can I add leaves and a stem?
Yes. The optional leaf and stem instructions can be used to make a more complete flower decoration. Attach them securely to the back of the center.
10. How should I clean and care for the finished decoration?
Follow the yarn label’s care instructions. For light dust, gently brush the flower or use a soft cloth. If washing is appropriate for the yarn and any attached materials, handle the flower gently and allow it to dry flat.
Conclusion
Crocheting a sunflower is a lovely way to practice basic stitches while creating a cheerful handmade decoration. With its round brown center and 12 golden petals, this beginner-friendly pattern can brighten wreaths, wall hangings, gifts, and many other craft projects.
Experiment with different shades of yellow and brown, add green leaves if you like, and practice the petal repeat until your flower looks just the way you want.
Leave a Comment