
Cherry blossoms are loved for their delicate petals and soft spring colors. With this crochet cherry blossom branch pattern, you can create a handmade floral decoration that captures their charm and lasts long after the season has passed. Small pink or white blossoms, tiny contrasting centers, and optional buds combine to create a graceful branch suitable for a vase, shelf, desk, or seasonal display.
This project is made by crocheting individual flowers and attaching them securely to a natural branch, craft stem, or crocheted stem. Each blossom has five rounded petals, giving it the familiar look of a stylized cherry blossom. You can keep the arrangement simple with just a few flowers or make a fuller display with additional blossoms and buds. It is also a thoughtful handmade gift for someone who enjoys floral décor.
1. Finished Project Overview
Crochet Cherry Blossom Branch
A decorative branch with five-petal flowers, optional buds, and subtle stem details.
Skill level
Confident beginner
Terminology
US crochet terms
Branch length
About 12–16 inches
Open flowers
8–12 blossoms
Optional buds
2–4 buds
Hook size
About 3–4 mm
Yarn
Lightweight or medium-weight
Working time
About 4–7 hours
The finished dimensions and working time are estimates. The branch structure, flower size, yarn, hook, and number of blossoms will all affect the final arrangement. You can make fewer flowers for a delicate accent or add more blossoms for a fuller display.
2. Materials and Tools
Gather the following supplies before you begin.
- Pink, pale pink, or white yarn: For the flower petals.
- Yellow yarn: For the center of each blossom, if you want a contrasting center.
- Brown yarn: For covering or crocheting the stem.
- Optional green yarn: For small sepals or leaves.
- Crochet hook: A 3–4 mm hook is a useful starting point for lightweight yarn, but choose a hook that works well with your yarn.
- Scissors: For cutting yarn.
- Yarn needle: For sewing flower parts and weaving in ends.
- Stitch markers: Optional, to mark stitches or attachment positions.
- Measuring tape or ruler: To check the flower size and branch length.
- Optional floral wire or flexible craft stem: For a branch that needs additional support.
- Optional floral tape: For covering suitable attachment points.
- A vase or display base: To hold the finished arrangement.
Approximate yarn requirements
For a branch with 8–12 small blossoms and 2–4 optional buds, a practical starting estimate is:
| Color | Approximate amount |
|---|---|
| Pink or white | 15–30 g |
| Yellow | 2–5 g |
| Brown | 5–15 g |
| Green, if used | 2–5 g |
These amounts are approximate and vary with yarn weight, flower size, petal fullness, and the number of blossoms.
Choosing the branch structure
You can build the arrangement in three ways.
Natural branch: A real branch gives the decoration an organic silhouette. Choose one that is clean, dry, and free of sharp points or loose material. A natural branch may have irregular shapes, so plan the flower placement before attaching anything.
Craft stem: A purchased craft stem offers a more predictable shape and may be easier to cover or decorate. Check that it is suitable for your chosen attachment method.
Crocheted stem: A brown crocheted tube gives the project a yarn-based finish. However, a soft crocheted tube may bend or twist, so it may need an internal support if you want a more upright branch.
Safety when using wire or pointed materials
Wire is optional. If you use it, choose a suitable craft wire and cover every cut end completely. Secure the ends so they cannot poke through the yarn or expose sharp points. Handle scissors and pointed tools carefully, and keep small detachable parts away from young children and pets.
3. Crochet Abbreviations
This tutorial uses US crochet terminology.
| Abbreviation | Meaning |
|---|---|
| ch | Chain |
| sl st | Slip stitch |
| sc | Single crochet |
| hdc | Half double crochet |
| dc | Double crochet |
| st | Stitch |
| sts | Stitches |
| sp | Space |
| rnd | Round |
| rep | Repeat |
| sk | Skip |
| FO | Fasten off |
4. Understanding the Cherry Blossom Design
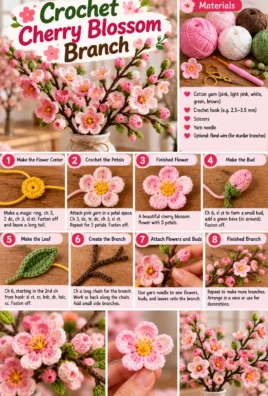
Each crocheted cherry blossom is a small decorative flower with five rounded petals arranged around a compact center. The flowers are attached individually to a branch, then positioned at different angles to create a natural-looking arrangement.
The main parts are:
- Flower center: A small ring of stitches, usually yellow or another contrasting color.
- Petals: Five rounded sections crocheted around the center.
- Center detail: Optional embroidery or small contrasting stitches.
- Buds: Small, compact flowers that have not opened fully.
- Sepals or leaves: Optional green details that can sit near the base of a flower or bud.
- Branch or stem: The structure that holds the flowers.
- Attachment points: The places where flowers, buds, and leaves are sewn or wrapped onto the branch.
This pattern is a stylized crochet interpretation of cherry blossoms rather than an exact botanical replica. The goal is to create a delicate flower with recognizable five-petal shaping and a balanced arrangement.
5. Essential Stitches and Techniques
Before making the flowers, become familiar with the basic stitches and finishing methods used in the pattern.
Magic ring
A magic ring creates an adjustable loop for the center of a flower.
- Form a loop with the yarn, leaving a tail.
- Insert your hook through the loop and pull up the working yarn.
- Chain 1 to secure the loop.
- Work the required stitches into the ring, going around the loop and the yarn tail.
- After completing the round, pull the yarn tail to close the center.
If you prefer not to use a magic ring, chain 4 and join the first chain to the last with a slip stitch to make a small ring. Work the center stitches into the ring.
Slip stitch join
Insert the hook into the specified stitch, yarn over, and pull the yarn through both the stitch and the loop already on the hook. A slip stitch is short and useful for joining rounds or securing the base of a petal.
Single crochet
- Insert the hook into the specified stitch.
- Yarn over and pull up a loop. You now have two loops on the hook.
- Yarn over and pull through both loops.
Half double crochet
- Yarn over.
- Insert the hook into the specified stitch.
- Yarn over and pull up a loop. You now have three loops on the hook.
- Yarn over and pull through all three loops.
Double crochet
- Yarn over.
- Insert the hook into the specified stitch.
- Yarn over and pull up a loop. You now have three loops on the hook.
- Yarn over and pull through two loops.
- Yarn over and pull through the remaining two loops.
Petal shaping
For this pattern, each petal is worked into one stitch of the flower center. A combination of single crochet, half double crochet, and double crochet creates a small rounded lobe.
The tallest stitch sits near the middle of the petal, while the shorter stitches form the edges. The chain stitches and slip stitch help define the base and separate one petal from the next.
Sewing and finishing
Use a yarn needle to secure loose ends and attach flower components. When sewing a flower to a branch, take several small stitches through the back of the center rather than sewing through the visible petal tips. This helps hold the flower securely without flattening it.
6. Materials, Gauge, and Finished Measurements
Gauge is less important for a decorative flower than for fitted clothing. However, consistent tension helps all the blossoms look similar when they are arranged together.
Aim for an individual flower measuring approximately 1.5–2 inches across. With lightweight yarn and a suitable hook, the flower should be small enough to sit naturally along a slender branch.
To check the size:
- Complete one flower, including all five petals.
- Lay it flat without stretching the petals.
- Measure across the widest points.
- If the flower is too large, try a smaller hook or finer yarn.
- If it is too small, try a larger hook or slightly heavier yarn.
The sample arrangement uses a branch around 12–16 inches long with 8–12 open flowers and 2–4 buds. These are flexible targets, not strict requirements. Flower spacing, the branch shape, and the number of offshoots will influence the final appearance.
7. Complete Step-by-Step Crochet Pattern
This section explains how to crochet the flower, optional details, and unopened buds before assembling the branch.
Part A: Crochet the Flower Center
Use yellow yarn or your chosen center color.
Round 1 — Center
- Make a magic ring, or create a small chain ring as described earlier.
- Chain 1. This chain does not count as a stitch.
- Work 5 sc into the ring.
- Pull the magic ring closed, leaving the center neat but not distorted.
- Join with a sl st into the first sc.
End-of-round count: 5 sc.
Fasten off the center color, leaving a tail long enough to weave in securely. The five single crochet stitches provide five anchor points for the petals.
If you use the chain-ring alternative, work all five single crochet stitches into the ring itself.
Part B: Crochet Five Petals
Use pink, pale pink, or white yarn.
Each petal is worked into one of the five stitches of the center. The tallest stitch in each petal is a double crochet, with shorter stitches on either side to create a rounded shape.
Petal instructions
- Join the petal yarn to any center sc with a slip stitch.
- Into that same center sc, work the following sequence:
- 1 ch
- 1 sc
- 1 hdc
- 1 dc
- 1 hdc
- 1 sc
- 1 ch
- 1 sl st
- Move to the next center sc.
- Repeat the same petal sequence in that stitch.
- Continue until you have worked one petal into each of the five center stitches.
- After the fifth petal, join neatly at the base of the first petal with a slip stitch if needed.
End-of-round count: 5 petals, with one petal worked into each center stitch.
Fasten off, leaving a tail for sewing if you need to reinforce the flower or attach it to the branch. Weave in the yellow center tail on the back of the flower.
Petal-shaping tips
- Work every stitch of one petal into the same center stitch.
- Do not skip a center stitch between petals; each of the five center stitches receives exactly one petal.
- Keep the chain stitches relaxed so the petals can spread.
- Gently arrange the five petals with your fingers after completing the flower.
The petals may touch or overlap slightly near the center, but all five should remain recognizable. If the flower looks crowded, use a slightly larger hook or lighter yarn rather than pulling the petals apart forcefully.
Part C: Optional Flower Center Detail
If you want a more defined center, use yellow yarn to add a small embroidered detail after completing the petals.
- Thread yellow yarn onto a yarn needle.
- Bring the needle from the back of the flower to the center.
- Make one or two tiny straight stitches across the center area.
- Return the needle to the back and secure the yarn with a few small stitches.
- Check the front to make sure the center remains flat.
Keep the embroidery small. Large or tightly pulled stitches may distort the center or draw the petals inward.
If you already made the center in yellow, this step is optional and may not be necessary.
Part D: Optional Sepals or Small Leaves
Green details can add a subtle finishing touch near the base of the flower or bud. They are optional; the main design works without leaves.
Small leaf pattern
- With green yarn, chain 5.
- Starting in the second chain from the hook, work 1 sc.
- Work 1 hdc into the next chain.
- Work 1 dc into the next chain.
- Work 1 sc into the final chain.
- Fasten off, leaving a tail for sewing.
This creates a narrow leaf with a tapered shape. The leaf may curl slightly, which can look natural in a decorative arrangement.
Use the yarn tail to sew the base of the leaf to the back of a flower or near a bud. Take small stitches and secure the tail on the wrong side. Make as many leaves as desired, or leave them out for a cleaner, blossom-only design.
Part E: Crochet Optional Buds
The buds are smaller and more compact than the open flowers. Make 2–4 buds for the sample arrangement, or omit them if you prefer a branch covered only in open blossoms.
Use pink or white yarn for the bud.
Bud Round 1
- Make a magic ring.
- Chain 1; this does not count as a stitch.
- Work 4 sc into the ring.
- Join with a sl st to the first sc.
End-of-round count: 4 sc.
Bud Round 2
- Chain 1.
- Work 2 sc into each of the 4 stitches around.
- Join with a sl st to the first sc.
End-of-round count: 8 sc.
Bud Round 3
- Chain 1.
- Repeat the following sequence 4 times: sc2tog over the next two stitches.
- Join with a sl st to the first decrease.
To make an sc2tog decrease, insert the hook into the next stitch and pull up a loop, insert the hook into the following stitch and pull up a loop, then yarn over and pull through all three loops on the hook.
End-of-round count: 4 stitches.
Fasten off, leaving a long tail. Lightly shape the bud with your fingers. If you want a rounder bud, add a very small amount of soft fiberfill before closing the opening. Avoid overfilling it, as the bud should remain small and compact.
Use the yarn tail to close any remaining opening with a yarn needle, then secure the tail on the underside.
Optional green sepal for a bud
- With green yarn, chain 4.
- Starting in the second chain from the hook, work 1 sl st, 1 sc, and 1 hdc in the remaining three chains.
- Fasten off, leaving a sewing tail.
- Sew the base of the green piece around the lower part of the bud, taking small stitches to secure it.
The sepal should sit around the base without covering the entire pink or white bud.
Part F: Make Multiple Blossoms
Repeat the flower pattern until you have 8–12 open flowers. Make 2–4 optional buds if you want a fuller branch with a mix of open and unopened blossoms.
For a coordinated arrangement, use the same yarn, hook, stitch counts, and tension for each flower.
Before assembling, check each blossom:
- It has exactly five petals.
- The center is secure and not excessively loose.
- The petals are not twisted or pulled tightly together.
- Loose yarn ends have been woven in or left long enough for secure attachment.
- The flowers are reasonably similar in size.
Keep the finished flowers together until you are ready to arrange them along the branch.
8. Creating the Branch or Stem
Choose one of the following methods according to the materials you have and the style you want.
Option One: Use a Natural Branch or Craft Stem
A natural branch gives the arrangement an organic silhouette, while a craft stem can provide a more predictable shape.
- Select a branch around 12–16 inches long, or choose a shorter stem for a smaller display.
- Make sure the branch is clean, dry, and free from sharp points or loose bark.
- Place the finished flowers along the branch before attaching them.
- Identify the positions where each flower and bud will sit.
- Attach each flower individually using its yarn tail and a yarn needle.
- Wrap the yarn around the branch where appropriate, then sew through the back of the flower several times to secure it.
- Attach buds near the ends of smaller offshoots, leaving enough space between them and the open flowers.
- If using floral tape, follow its instructions and make sure it does not damage the yarn or leave loose edges.
Attaching flowers securely
Pass the yarn needle through the back of the flower center, around the branch or stem, and back through the center. Repeat this process several times, using small stitches and keeping the yarn snug without crushing the petals.
Tie off or weave in the yarn tail on the back of the flower where it will be concealed. If the branch is too thick for the needle to pass around, sew the flower to a narrow loop of yarn or a suitable attachment wrap secured around the branch.
Avoid relying on a single loose stitch or a small dab of adhesive as the only attachment. The flowers should remain secure when the branch is gently moved.
Option Two: Make a Crocheted Stem
A crocheted stem gives the project a yarn-based finish. It can be made as a narrow tube, but remember that a soft crocheted tube may bend or twist without internal support.
Simple crocheted stem covering
- With brown yarn, chain 6.
- Starting in the second chain from the hook, work 1 sc in each chain across. You should have 5 sc.
- Chain 1 and turn.
- Work 1 sc in each of the 5 stitches.
- Repeat until the strip is long enough to wrap around your chosen support.
- Fasten off, leaving a long tail for sewing.
- Wrap the strip around a suitable craft stem or a covered support and sew the long edges together to form a narrow covering.
If you prefer a fully yarn-based stem without internal support, you can sew the strip into a soft tube and lightly stuff it with fiberfill. This may give it some body, but it will not necessarily hold a long, rigid branch shape.
Using internal support
If you use floral wire or a craft stem inside the crocheted covering, make sure the support is suitable for the finished size and weight. Cover all wire ends completely and secure them so that they cannot poke through the yarn. Do not leave sharp points exposed at the ends.
Attach the flower clusters by sewing their backs to the crocheted covering. Take several small stitches through the fabric of the stem, keeping the flower centers secure and the petals free to spread.
9. Planning the Flower Arrangement
Before permanently attaching the flowers, arrange them along the branch and examine the overall shape. Planning first makes it easier to avoid crowded clusters or large empty sections.
For the sample arrangement, use 8–12 open flowers and 2–4 buds. You can change these quantities according to the branch length and the look you prefer.
A simple placement plan
- Near the lower section: Place two or three blossoms at different angles.
- Along the middle: Arrange several flowers in small groups, leaving some space between clusters.
- Near the upper section: Use a few blossoms and one or two buds to create a lighter finish.
- At smaller offshoots: Place buds near the tips and open flowers closer to the main branch.
- Around the branch: Turn some flowers slightly to the side rather than facing every blossom in the same direction.
This is only a flexible suggestion. A naturally branching stem may need a different layout from a straight craft stem.
Make the arrangement look balanced
Avoid placing every flower in one straight line. Vary the angles and spacing so the branch looks lively without becoming crowded.
Use buds to fill selected gaps, but leave enough visible branch to preserve the slender silhouette. If the arrangement looks too dense, remove a few flowers and reposition them before sewing them permanently.
10. Assembling the Crochet Cherry Blossom Branch
Once you are happy with the placement, assemble the decoration carefully.
- Finish all flowers and buds. Check the centers, petals, and loose yarn ends.
- Weave in loose ends. Secure any tails that will not be used for attaching the components.
- Arrange the blossoms. Place the flowers and buds along the branch before making permanent attachments.
- Attach each flower individually. Use the long yarn tail, a yarn needle, or a suitable secure wrapping method.
- Reinforce the attachment points. Add a few extra stitches where necessary, especially if a flower sits at an angle or on a narrow offshoot.
- Attach optional leaves or sepals. Sew them near the flower or bud base using small, secure stitches.
- Conceal visible attachment points. Tuck the yarn tails behind the flower centers or into the crocheted stem covering.
- Check for exposed wire ends. If you used wire or another internal support, confirm that all ends are completely covered and secured.
- Adjust the flowers. Gently spread the petals and change the blossom angles to create a balanced silhouette.
- Test the stability. Gently move the branch and check that the flowers and buds remain attached before displaying it.
The flowers should be firmly secured, but avoid pulling the attachment yarn so tightly that the petals flatten or the center puckers.
If you used a real branch, keep the finished decoration away from excessive moisture and handle it gently. Moisture may affect the branch, the yarn, or the attachment method.
11. Finishing and Display
A few finishing touches can make the completed branch look more polished.
Shape the flowers
Gently separate the petals with your fingers. If one petal folds inward, ease it back into position without stretching the stitches. Check that the center lies flat and that the five petals are reasonably balanced.
Hide loose yarn tails
Use a yarn needle to weave remaining tails into the backs of flowers or through the crocheted stem covering. Avoid leaving long strands where they can catch on other objects.
Secure the branch base
Choose a vase or display container that suits the branch length and weight. A tall, narrow vase may work well for a slender arrangement, but it needs a stable base to prevent tipping.
If the branch is lightweight, use a suitable filler or internal support to keep it upright. Ensure the filler and support are secure and cannot easily spill or shift.
Choose a display location
The finished cherry blossom branch can decorate a shelf, desk, side table, or seasonal display. Keep it away from excessive moisture, and check the attachment points occasionally if the decoration is handled or moved often.
This is a decorative arrangement, not a toy. Small flowers, buds, yarn tails, and internal supports can become loose, so keep the finished piece out of reach of young children and pets.
12. Troubleshooting Common Problems
| Problem | Likely Cause | Solution |
|---|---|---|
| The petals curl too much. | The yarn tension is tight, or the hook is too small for the yarn. | Relax your tension and try a slightly larger hook. Gently shape the petals with your fingers. |
| The petals are too flat. | The yarn may be too stiff, or the petal stitches may not have enough height to create a rounded shape. | Check that each petal includes the specified hdc and dc stitches. Try a softer yarn if necessary. |
| The flower center has a large hole. | The magic ring has not been tightened enough. | Pull the starting tail to close the ring, then weave the tail securely into the back of the center. |
| The petals are uneven. | Some petals may have missing stitches or inconsistent tension. | Check that every petal uses the same stitch sequence and is worked into one center stitch. |
| The flower looks crowded. | The yarn may be too thick for the center, or the petals may be worked too tightly. | Try a smaller yarn weight or a slightly larger hook. Gently separate the petals without stretching them. |
| The flower center puckers. | The center ring or attachment stitches are too tight. | Loosen the center slightly before securing the tail, and avoid pulling the flower tightly when sewing it to the branch. |
| The blossoms are different sizes. | Tension, yarn, or hook size may differ between flowers. | Use the same materials and repeat the same stitch counts for each flower. |
| Attachment stitches are visible. | The yarn tail has been sewn across the front or has not been concealed. | Sew through the back of the center and hide the tail behind the flower or stem covering. |
| Flowers fall off the branch. | The attachment stitches are too loose or too few. | Reinforce the flower center with several small stitches around the branch or stem. Check the attachment before displaying the arrangement. |
| The branch bends too much. | The natural branch or craft stem is too flexible, or the crocheted stem lacks support. | Choose a more suitable branch or add a properly enclosed internal support. |
| The crocheted stem twists. | The tube is too loose or has no internal support. | Sew the covering securely around a suitable support, or use a narrower, more stable stem. |
| The arrangement looks too dense or too sparse. | Flower spacing does not suit the branch length or shape. | Reposition the flowers before permanently attaching them. Add or remove blossoms as needed. |
A small amount of variation makes handmade flowers charming. Focus on keeping the five petals recognizable, securing each flower firmly, and maintaining a balanced overall arrangement.
13. Customization Ideas
You can personalize your cherry blossom branch with different colors, flower quantities, and stem styles.
- Pale pink blossoms: A soft, classic choice for spring décor.
- Deep pink blossoms: Create a brighter arrangement with stronger color contrast.
- White blossoms with pink centers: Use white petals and a contrasting pink center detail.
- Cream flowers: Choose warm cream yarn for a subtle, neutral decoration.
- Different branch lengths: Make a shorter accent branch for a small vase or a longer branch for a larger display.
- More open flowers and fewer buds: Create a fuller flowering appearance.
- Extra buds: Use additional compact buds for a delicate, early-spring look.
- Small green details: Add a few leaves or sepals near selected flowers.
- Fully crocheted stem: Use a brown yarn covering for a coordinated handmade finish.
- Natural branch with crocheted blossoms: Combine real wood with soft yarn flowers for a contrasting texture.
- Multiple branches: Arrange several decorated branches in one stable vase for a fuller display.
Yarn weight and hook size affect the scale of the flowers. Lightweight yarn generally creates smaller blossoms, while thicker yarn produces larger flowers. If you make flowers in different sizes, arrange the larger ones closer to the main part of the branch and use smaller buds toward the ends.
14. Frequently Asked Questions
1. How many petals should a crochet cherry blossom have?
This pattern uses five petals per flower. Each petal is worked into one of the five single crochet stitches in the center round.
2. What yarn is best for crocheting cherry blossoms?
Smooth lightweight or medium-weight yarn is a good choice. Cotton and acrylic can both work well, depending on the texture and appearance you want. Use a yarn that allows you to see the stitches clearly.
3. What crochet hook size should I use?
A 3–4 mm hook is a useful starting point for many lightweight yarns. The best size depends on the yarn and your tension. Aim for petals that hold their shape without becoming stiff.
4. How long does it take to make one blossom?
A small flower may take approximately 10–20 minutes, depending on your speed, yarn, and experience. This is an estimate rather than a guaranteed time.
5. Can I make the flowers without a magic ring?
Yes. Chain 4 and join the first chain to the last with a slip stitch to form a ring. Work the five single crochet stitches into the ring. The center may have a slightly larger opening than a tightly closed magic ring.
6. How do I keep the petals from curling?
Avoid pulling the stitches too tightly, and use a hook that suits your yarn. After finishing the flower, gently arrange the petals with your fingers. If they remain stiff, try a slightly larger hook or a softer yarn.
7. How many flowers do I need for one branch?
The sample arrangement uses 8–12 open flowers and 2–4 optional buds. You can use fewer for a minimal decoration or more for a fuller branch, depending on its length and shape.
8. Can I attach crochet flowers to a real branch?
Yes. Choose a clean, dry branch and sew each flower securely around the branch or to a suitable attachment loop. Keep the attachment points neat and avoid excessive moisture.
9. How can I make a branch using only yarn?
You can make a narrow crocheted covering and sew it around a soft or supported stem. A fully crocheted tube without internal support may bend or twist, so consider your desired branch length and stability before choosing this method.
10. Do I need wire to support the stem?
No. Wire is optional. A suitable natural branch or craft stem may provide enough support. If you use wire, cover and secure every end so that no sharp points can emerge through the yarn.
11. How can I hide the attachment points?
Sew through the back of the flower center, conceal yarn tails behind the blossom, and position leaves or sepals over selected attachment areas if desired. Use small, secure stitches without flattening the petals.
12. Can I make the blossoms in different colors?
Absolutely. Try pale pink, deep pink, white, cream, or combinations of these shades. You can also vary the center color to create contrast while keeping the same five-petal construction.
13. How should I store the finished decoration?
Store the branch in a dry place where the flowers will not be crushed. If you remove it from a vase, place it in a box with enough space to protect the petals and any internal support.
14. Is this project suitable for beginners?
Yes, if you are comfortable with basic crochet stitches and sewing yarn pieces together. The flowers are small and repetitive, while the branch assembly requires careful placement and secure attachment.
15. Conclusion
A crochet cherry blossom branch brings the delicate charm of spring into your home with handmade flowers that can be enjoyed year after year. Once you have made the five-petal blossoms, you can experiment with flower colors, optional buds, and different branch shapes to create an arrangement that suits your space.
Take your time with the flower centers, keep the petals consistent, and attach each blossom securely before displaying the finished piece. Whether you choose a natural branch or a crocheted stem, your arrangement can be as simple or as full as you like.
Would you choose soft pink cherry blossoms, classic white flowers, or a mixture of both for your branch? Share your favorite color combination and how you would display your handmade flowers!
Leave a Comment