
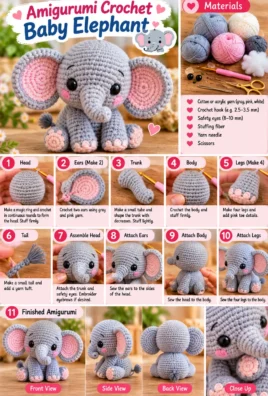
This adorable amigurumi baby elephant features a rounded head, plump body, floppy ears, a short curved trunk, and four little legs. With its sweet expression and soft, cuddly shape, it makes a lovely handmade keepsake, nursery decoration, or thoughtful crochet gift.
This beginner-friendly pattern walks you through each part, from crocheting the basic shapes to stuffing, assembling, and embroidering the elephant’s face. You’ll practice essential amigurumi techniques, including single crochet, increases, invisible decreases, and sewing pieces together. The separate head and body also make shaping easier and give you more control over the finished design.
Whether you choose classic gray yarn with pink ears or a playful pastel color palette, this amigurumi crochet baby elephant pattern is a charming project to add to your handmade collection.
1. Finished Project Overview

Project: Amigurumi Baby Elephant
Skill level: Confident beginner
Terminology: US crochet terms
Construction: Separate pieces sewn together
Finished size: Approximately 6–8 inches tall
Estimated time
5–8 hours
Main yarn
Worsted weight
Hook
3.5 mm
The finished dimensions and working time are estimates. They will vary with yarn thickness, hook size, stuffing, and personal tension.
The elephant consists of one head, one body, one trunk, two ears, and four legs, with an optional tail and embroidered facial details. The head and body are crocheted separately and joined during assembly.
2. Materials and Tools
Gather the following materials before starting.
- Main yarn: Approximately 80–120 yards of gray, light gray, blue-gray, or another main color.
- Optional accent yarn: Approximately 10–20 yards for inner ears or small decorative details.
- Crochet hook: A 3.5 mm hook is a useful starting point for worsted-weight yarn. Choose a smaller hook if your stitches leave visible gaps.
- Stuffing: Polyester fiberfill or another suitable stuffing material.
- Yarn needle: For sewing the pieces together and weaving in ends.
- Stitch markers: One to mark the beginning of each spiral round.
- Scissors: For cutting yarn neatly.
- Measuring tape: To check proportions.
- Embroidery thread or fine yarn: For the eyes and optional mouth.
The yarn quantities are estimates for the sample size, not guaranteed amounts. Keep a little extra yarn available for sewing and finishing.
Safety-related materials guidance
For a toy intended for babies or young children, embroidered eyes are preferable to plastic safety eyes because plastic components can detach and become choking hazards. Sew every component securely, weave yarn ends fully into the fabric, and inspect the seams regularly.
Even with embroidered features, a handmade toy is not automatically safe for every age group. Construction quality, yarn and stuffing materials, intended use, and applicable toy safety requirements all matter.
3. Crochet Abbreviations
The pattern uses US crochet terminology throughout.
| Abbreviation | Meaning |
|---|---|
| MR | Magic ring |
| ch | Chain |
| sl st | Slip stitch |
| sc | Single crochet |
| inc | Increase: 2 sc in the same stitch |
| dec | Invisible single crochet decrease |
| st | Stitch |
| sts | Stitches |
| rnd | Round |
| rep | Repeat |
| FO | Fasten off |
| FLO | Front loop only |
| BLO | Back loop only |
How to read the pattern
- Instructions in parentheses are repeated as directed.
- The number in brackets at the end of each round is the total number of stitches after completing that round.
- The main pieces are worked in continuous spiral rounds. Do not join the end of each round with a slip stitch unless specifically instructed.
- Place a stitch marker in the first stitch of the round. At the beginning of each new round, move the marker into the new first stitch.
Counting carefully is important because the shape of each piece depends on the stitch totals.
4. Essential Amigurumi Techniques
Making a magic ring
- Wrap the yarn around your fingers to create a loop.
- Insert the hook through the loop and pull up a loop of yarn.
- Chain 1 if needed to secure the working loop; this chain does not count as a stitch.
- Work the required single crochet stitches into the ring.
- Pull the yarn tail to tighten the center.
If the magic ring is difficult, chain 2 and work the required starting stitches into the second chain from the hook. This alternative may leave a slightly more visible center opening.
Single crochet
- Insert the hook into the indicated stitch.
- Yarn over and pull up a loop. Two loops will be on the hook.
- Yarn over again and pull through both loops.
This is the main stitch used throughout the elephant.
Increase
Work two single crochet stitches into the same stitch. Each increase adds one stitch to the round.
For example, 6 sc followed by 6 increases produces 12 stitches.
Invisible decrease
- Insert the hook under the front loop of the next stitch.
- Without yarning over, insert the hook under the front loop of the following stitch.
- Yarn over and pull through both front loops.
- Yarn over and pull through the two loops remaining on the hook.
This combines two stitches into one and helps create a smoother surface than a conventional decrease.
Working in continuous rounds
Work the first stitch of the new round directly into the first stitch of the previous round. Do not join rounds. Move the stitch marker to the new first stitch as you continue.
If you lose track of the beginning, stop and count the stitches rather than guessing. A misplaced increase or decrease can change the shape of the finished piece.
Stuffing and shaping
Add small portions of stuffing at a time. Spread it evenly with your fingers or a blunt stuffing tool. Avoid forcing stuffing into narrow parts, stretching the stitches, or making flexible pieces too stiff.
Sewing pieces together
Leave a long yarn tail on each piece that will be sewn to another piece. Use a yarn needle to pass through corresponding stitches or the fabric edges, keeping the seam even. Secure the yarn, weave the tail through the interior of the piece, and trim only after the end is safely hidden.
5. Finished Measurements and Tension
For this project, consistent stitch tension is more important than matching an exact gauge. The fabric should be tight enough that stuffing cannot be seen through the stitches.
Before assembling the elephant, check that:
- The head forms a rounded shape rather than a sharp cone.
- The body is plump and proportionate to the head.
- Both ears are similar in size and shape.
- All four legs match.
- The trunk is short and gently curved.
- The stitches remain even without being so tight that the hook becomes difficult to insert.
If stuffing shows between stitches, try a smaller hook or adjust your tension slightly. Do not pull the yarn so tightly that the fabric becomes distorted or uncomfortable to crochet.
6. Complete Amigurumi Baby Elephant Pattern
The following pattern uses continuous spiral rounds for the head, body, trunk, and legs. The ears are worked in rows to create soft, flexible ovals.
Important: Count each round before moving on. The stitch totals are included so you can check your work as you crochet.
Part A: Crochet the Head
Use your main yarn. The head should be rounded and slightly larger than the upper body to give the elephant its sweet, baby-like proportions.
Abbreviation reminder: “sc” means single crochet, “inc” means two single crochet stitches in one stitch, and “dec” means an invisible decrease over two stitches.
Head pattern
- Round 1: Work 6 sc into a magic ring. [6]
- Round 2: Inc in each stitch around. [12]
- Round 3: (Sc, inc) 6 times. [18]
- Round 4: (2 sc, inc) 6 times. [24]
- Round 5: (3 sc, inc) 6 times. [30]
- Round 6: (4 sc, inc) 6 times. [36]
- Round 7: (5 sc, inc) 6 times. [42]
- Rounds 8–13: Sc in every stitch around. [42 each round]
- Round 14: (5 sc, dec) 6 times. [36]
- Round 15: (4 sc, dec) 6 times. [30]
- Round 16: (3 sc, dec) 6 times. [24]
- Round 17: (2 sc, dec) 6 times. [18]
- Round 18: Sc in every stitch around. [18]
Fasten off, leaving a long tail for sewing. Keep the 18-stitch opening available for attaching the head to the body.
Stuffing the head: Begin adding stuffing after Round 13 or 14, when the head is wide enough to work comfortably. Continue stuffing gradually as you decrease. Aim for a firm but gently squeezable head, and keep the neck opening neat and round.
The widest part is Round 7, with 42 stitches. This gives the head a broad forehead and enough room for the ears, trunk, and embroidered eyes.
Part B: Crochet the Body
Use the same main yarn. The body starts at the bottom, widens into a plump oval, and narrows toward the neck.
Body pattern
- Round 1: Work 6 sc into a magic ring. [6]
- Round 2: Inc in each stitch around. [12]
- Round 3: (Sc, inc) 6 times. [18]
- Round 4: (2 sc, inc) 6 times. [24]
- Round 5: (3 sc, inc) 6 times. [30]
- Round 6: (4 sc, inc) 6 times. [36]
- Rounds 7–10: Sc in every stitch around. [36 each round]
- Round 11: (4 sc, dec) 6 times. [30]
- Round 12: (3 sc, dec) 6 times. [24]
- Round 13: (2 sc, dec) 6 times. [18]
- Round 14: Sc in every stitch around. [18]
Fasten off, leaving a long sewing tail. Keep the 18-stitch top opening for attaching the head.
Shaping the body
- Stuff the lower part first, adding small tufts of fiberfill evenly.
- Make sure the base stays rounded and balanced rather than forming a sharp point.
- Fill the middle firmly enough to hold its shape.
- Keep the top opening accessible and avoid packing stuffing into the edge where you will sew the head.
The body has 36 stitches at its widest point and narrows to 18 stitches at the top. Its opening matches the head’s 18-stitch opening, making the neck seam easier to align.
Part C: Crochet the Trunk
Use the main yarn. The trunk is short and gently tapered, with a shape that can be curved during assembly.
Trunk pattern
- Round 1: Work 6 sc into a magic ring. [6]
- Round 2: (Sc, inc) 3 times. [9]
- Rounds 3–9: Sc in every stitch around. [9 each round]
- Round 10: (Sc, dec) 3 times. [6]
Fasten off, leaving a long tail for sewing. The trunk is worked from its narrow tip toward its wider attachment end, so the opening at Round 10 will be sewn to the face.
Shaping the trunk
- Add only a small amount of stuffing, mostly toward the wider end.
- Keep the tip soft and flexible.
- Pin the wide end to the lower front of the head, just below the planned eye line.
- Curve the trunk gently to one side or downward before sewing it in place.
For a curled appearance, bend the trunk into the desired shape and use a few discreet stitches of matching yarn to secure the curve. Do not insert wire or rigid supports into a cuddly toy intended for young children.
Part D: Crochet Two Ears
Each ear is worked flat in rows. This produces a flexible, rounded ear that can be folded slightly at the base.
Use the main yarn for the outer ears. Make two matching pieces.
Outer ear pattern — make 2
- Foundation: Ch 7.
- Row 1: Sc in the second chain from the hook and in each remaining chain. [6]
- Row 2: Ch 1, turn. Inc, 4 sc, inc. [8]
- Row 3: Ch 1, turn. Inc, 6 sc, inc. [10]
- Row 4: Ch 1, turn. Sc across. [10]
- Row 5: Ch 1, turn. Sc across. [10]
- Row 6: Ch 1, turn. Dec, 6 sc, dec. [8]
- Row 7: Ch 1, turn. Sc across. [8]
- Row 8: Ch 1, turn. Dec, 4 sc, dec. [6]
Fasten off, leaving a long tail for sewing.
The ears should be soft and slightly elongated. Do not stuff them; their natural flexibility gives the elephant a floppy-eared appearance.
Optional inner ears
Use a contrasting color such as pink, cream, or pale blue.
- Foundation: Ch 5.
- Row 1: Sc in the second chain from the hook and in each remaining chain. [4]
- Row 2: Ch 1, turn. Inc, 2 sc, inc. [6]
- Row 3: Ch 1, turn. Sc across. [6]
Fasten off, leaving a sewing tail. Make two inner-ear pieces.
Center one inner-ear piece on each outer ear. Sew it down with small stitches around the edges, avoiding bulky knots. If you prefer a simpler design, leave the ears in a single color.
Part E: Crochet Four Legs
Use the main yarn. Each leg has a rounded foot and a short section that can be sewn securely to the body.
Leg pattern — make 4
- Round 1: Work 6 sc into a magic ring. [6]
- Round 2: Inc in each stitch around. [12]
- Rounds 3–5: Sc in every stitch around. [12 each round]
Fasten off, leaving a long sewing tail. Do not close the 12-stitch opening.
Stuffing and preparing the legs
- Add a small amount of stuffing to the rounded foot.
- Keep the upper part lightly stuffed so it can sit against the body.
- Flatten the top opening gently, aligning opposite stitches.
- Use the sewing tail to attach the flattened edge to the body.
Make sure all four legs have the same number of rounds and a similar amount of stuffing. This consistency helps the elephant sit more evenly.
Part F: Optional Tail
A short crocheted cord makes a simple tail.
- Foundation: Ch 9.
- Row 1: Sl st in the second chain from the hook and in each remaining chain. [8 sl sts]
Fasten off, leaving a long tail for sewing. The tail will be narrow and flexible.
Position it at the center back of the body, low enough to look natural but high enough not to interfere with the legs. Sew it securely and weave the yarn ends into the body. For a toy intended for young children, keep the tail short and avoid adding a detachable decorative tip.
Part G: Embroider the Face
Complete the face before closing the head if you prefer to hide the embroidery ends inside the piece. If the head is already stuffed, use a yarn needle to guide the ends into the interior.
Embroidered eyes
- Choose a position for the eyes on the front of the head, above the trunk.
- Use a ruler or count the stitches between the intended eye positions to help make them symmetrical.
- Use black or dark brown embroidery thread or fine yarn.
- Make several small stitches at each eye position until each eye has the shape and thickness you want.
- Secure the ends inside the head, keeping knots and loose strands inaccessible.
Optional facial details
- Add tiny embroidered nostrils near the end of the trunk.
- Stitch a small curved mouth beneath the trunk if you want a smiling expression.
- Add short embroidered eyebrows for a gentle or sleepy look.
Keep the details simple so they do not crowd the face. For a baby-oriented design, avoid beads, buttons, glued decorations, or other small parts that could detach.
7. Assembly Instructions
Take your time with assembly. The placement of the trunk, ears, head, and legs has a major effect on the elephant’s expression and balance.
Step 1: Prepare the pieces
Lay out the head, body, trunk, two ears, four legs, and optional tail. Check that the yarn tails needed for sewing are long enough. Weave in any other ends securely.
Step 2: Position and attach the trunk
- Place the head with the magic-ring end toward the back or lower area, depending on how you prefer the face to sit.
- Center the wide opening of the trunk on the lower front of the head.
- Use pins or stitch markers to hold it temporarily.
- Check the position from the front and side.
- Sew around the trunk opening with the matching yarn, catching the head fabric securely.
- Shape the trunk into a soft curve before securing the final stitches.
Avoid pulling the seam so tightly that the head fabric puckers.
Step 3: Attach the ears
Place one ear on each side of the upper head. The top of each ear should sit slightly below the top curve of the head, with enough space between them for the forehead.
- Fold the bottom edge of each ear slightly if you want a more three-dimensional shape.
- Pin both ears in place.
- Compare their height, angle, and distance from the trunk.
- Sew the base of each ear firmly to the head.
- Add a few small stitches behind the folded base if you want the ears to angle slightly forward.
Check symmetry before finishing the seams. Small differences can make the elephant look charming, but the ears should be securely attached.
Step 4: Finish the face
Embroider the eyes and any optional mouth or nostrils. Make sure the eyes sit at a similar height and distance from the trunk.
If you embroidered the eyes before stuffing, inspect them from the front after stuffing. The shape of the head can change slightly as it fills out.
Step 5: Finish stuffing and close the head
Add small amounts of stuffing until the head holds its rounded shape. Avoid making the lower neck area so full that it becomes difficult to sew.
The head has an 18-stitch opening. The body also has an 18-stitch opening, so you can align the openings stitch by stitch.
Step 6: Attach the head to the body
- Place the body upright with its bottom facing down.
- Position the head on top, keeping the trunk facing forward.
- Pin the openings together, matching one head stitch to one body stitch.
- Check from the front and both sides to ensure the head is not tilted.
- Sew the openings together using the long tail from the head or body.
- Work around the full neck seam, catching both pieces evenly.
- Secure the yarn and weave the end into the interior.
If the head feels loose, reinforce the seam with a second pass of yarn through the existing stitches.
Step 7: Attach the four legs
Place the legs around the lower body.
- Position two front legs on either side of the front center.
- Position two back legs toward the rear, spaced evenly from the front pair.
- Keep the lower edges of all four legs at a similar height.
- Use pins or stitch markers to check the elephant’s balance before sewing.
Sew each flattened leg opening securely to the body. Check the elephant on a flat surface as you work. Adjust the leg positions before completing the seams if the body tilts or one leg sits noticeably higher than the others.
Step 8: Attach the optional tail
Sew the tail to the center back of the body. Reinforce the attachment with several small stitches and hide the yarn ends inside the body.
Step 9: Final inspection
Gently reshape the head, body, ears, trunk, and legs. Check every seam and embroidered detail. Secure any loose yarn ends and repair openings before the elephant is used or displayed.
8. Stuffing and Final Shaping
The right amount of stuffing helps each part maintain its shape without making the elephant hard or stiff.
- Head: Stuff firmly enough to maintain a rounded shape while keeping the face smooth.
- Body: Distribute stuffing evenly, especially around the lower portion, so the elephant has a stable silhouette.
- Trunk: Use minimal stuffing to keep it flexible and easy to curve.
- Ears: Leave flat or only lightly shaped; stuffing is not necessary for this row-based design.
- Legs: Stuff the feet moderately and leave the upper edges soft enough to sew against the body.
Add fiberfill in small tufts. Use your fingers or a blunt tool to move it into corners without stretching the crochet stitches.
Avoid overfilling the head or body. Too much stuffing can make stitches spread apart, distort the shape, and put unnecessary tension on the seams.
Final shaping checklist
- The head is rounded and sits straight on the body.
- The trunk is securely attached and gently curved.
- Both ears are similar in size and firmly sewn.
- The eyes are level and the embroidery ends are hidden.
- All four legs are securely attached and evenly positioned.
- The body is evenly stuffed and holds its shape.
- The seams are closed without visible gaps.
- No loose yarn ends or detachable decorations remain accessible.
9. Troubleshooting Common Problems
| Problem | Likely Cause | Solution |
|---|---|---|
| The head looks angular instead of rounded. | Inconsistent increases, skipped stitches, or uneven stuffing. | Check the stitch counts, redistribute the stuffing, and reshape the head gently. |
| The body looks too narrow. | The widest rounds may have been worked incorrectly or the fabric may be tightly compressed. | Confirm that Rounds 6–10 contain 36 stitches and adjust the stuffing distribution. |
| The trunk bends awkwardly. | Too much stuffing or an unsuitable attachment angle. | Remove some stuffing if possible, reshape the trunk, and reposition its wide end before sewing. |
| The ears curl at the edges. | Tight turning chains or uneven row tension. | Keep the turning chain relaxed and gently flatten the ears before attaching them. |
| The ears are different sizes. | Different stitch counts or tension between pieces. | Compare the row counts and measurements; remake the smaller or larger ear if necessary. |
| The legs do not match. | Different round counts or stuffing amounts. | Make sure each leg has five rounds total and use similar amounts of stuffing. |
| Stuffing shows through the stitches. | The hook is too large or tension is too loose. | Try a smaller hook and check that the stitches close around the stuffing. |
| The head leans after assembly. | The neck openings were not aligned evenly. | Unpick part of the seam, reposition the head, and sew the openings together stitch by stitch. |
| The elephant cannot sit evenly. | The legs are unevenly placed or the body is overstuffed at one side. | Adjust the leg positions and redistribute stuffing toward the center of the body. |
| The seams look bulky. | The sewing yarn is too thick or the stitches are pulled too tightly. | Sew with the project yarn, take smaller even stitches, and avoid pulling the seam into a ridge. |
| The embroidered eyes are uneven. | The eye positions were not measured before stitching. | Remove and redo one eye if needed; count the stitches from the trunk and center line to match the positions. |
| Stuffing escapes through a seam. | The seam is loose or the crochet fabric has stretched. | Add a reinforcing seam and repair any open stitches before use. |
| The finished elephant feels too stiff. | The pieces are overstuffed. | If practical, reopen the relevant seam, remove a little stuffing, and close it securely again. |
10. Customization Ideas
Once you understand the basic construction, you can personalize your elephant without changing the main pattern.
- Classic gray and pink: Use gray for the head, body, trunk, and legs, with pink inner ears.
- Blue-gray and cream: Choose a soft blue-gray main color and cream accents for a calm, gentle look.
- Beige or pastel colors: Try warm beige, pale lavender, mint, or soft yellow for a distinctive handmade gift.
- Miniature elephant: Use finer yarn and a compatible smaller hook. The finished elephant will be smaller, and the pieces may be more delicate to assemble.
- Larger elephant: Choose thicker yarn and a compatible hook, keeping the stitches dense. You will need more yarn, and the finished dimensions will increase.
- Simple scarf: Crochet a narrow strip in a contrasting color and wrap it loosely around the neck. Secure it if the toy is intended to be handled often, and avoid loose or detachable accessories for very young children.
- Embroidered eyelashes: Add a few tiny stitches above the eyes for a gentle expression.
- Different trunk positions: Sew the trunk straight down, curve it slightly to one side, or angle the tip upward.
- Different ear shapes: Keep the original oval ears for a classic elephant silhouette, or adjust their width and length while maintaining matching dimensions.
Changing yarn weight or hook size affects the finished size, stitch density, and yarn requirements. Always check that the fabric remains dense enough to contain the stuffing.
11. Frequently Asked Questions
1. Is this amigurumi baby elephant suitable for beginners?
Yes. The pattern uses basic stitches and simple shaping, including single crochet, increases, invisible decreases, and sewing. Beginners should be comfortable counting stitches and working in continuous rounds before starting.
2. What yarn is best for crocheting an elephant?
Worsted-weight yarn is a practical choice because it creates a sturdy fabric and makes the stitches easy to see. Acrylic or cotton yarn can work well, provided the hook produces a dense fabric. Check the yarn label for care instructions.
3. What hook size should I use?
A 3.5 mm hook is a useful starting point for worsted-weight yarn. If the stuffing is visible between stitches, try a smaller hook. The goal is a dense fabric that remains comfortable to crochet.
4. How do I keep stuffing from showing?
Use a smaller hook if necessary, maintain consistent tension, and add stuffing gradually. Avoid stretching the stitches by overfilling the pieces.
5. Can I make the elephant without a magic ring?
Yes. Chain 2 and work the required starting stitches into the second chain from the hook. This creates a small center, although it may not close as tightly as a magic ring.
6. How do I make the trunk curve naturally?
Keep the trunk lightly stuffed, curve it into position, and sew it to the head at the desired angle. A few discreet stitches can help hold the curve without using rigid supports.
7. Should I stuff the ears?
No. The flat, row-based ears in this pattern are designed to remain soft and flexible. Leaving them unstuffed gives them a floppy appearance.
8. How can I make both ears the same size?
Use the same yarn, hook, and row sequence for each ear. Count every row and compare the pieces before attaching them. If one is noticeably different, remake it rather than stretching it into shape.
9. How do I attach the head securely?
Match the 18-stitch opening of the head to the 18-stitch opening of the body. Pin the pieces in position, sew around the complete neck seam, and reinforce the seam if needed.
10. Can I make the elephant larger or smaller?
Yes. Use finer yarn with a smaller compatible hook for a smaller elephant, or thicker yarn with a compatible hook for a larger one. Changes in yarn and hook size affect the amount of yarn required and the final stitch density.
11. Are embroidered eyes better for a baby-oriented toy?
Embroidered eyes avoid the detachable plastic components that can pose choking hazards. However, embroidered features must also be secured properly, and a handmade toy is not automatically suitable for every age group.
12. How do I clean and care for the finished elephant?
Follow the yarn and stuffing manufacturers’ care instructions. Gentle spot cleaning may be appropriate for some materials. If washing is permitted, avoid harsh handling that could loosen seams or distort the stuffing, and allow the toy to dry completely before use.
12. Care and Safety Notes
To help your handmade elephant retain its shape, store it in a clean, dry place and follow the care instructions for the materials used. Different yarns and stuffing materials may require different cleaning methods.
Inspect the elephant regularly, especially if it will be handled frequently. Check the neck seam, ears, trunk, legs, tail, and embroidered details for loose stitches or openings. Repair damaged seams before further use.
For a toy intended for young children:
- Avoid small detachable parts and loose decorative accessories.
- Secure all sewn components and hide yarn ends thoroughly.
- Do not use exposed wire, sharp supports, or rigid internal materials.
- Remember that small components and loose fibers may pose hazards.
- Do not describe the finished elephant as certified or compliant with toy safety standards unless it has actually been evaluated against the applicable requirements.
These precautions help you make more informed construction choices, but they do not replace an appropriate safety assessment for the intended age group.
13. Conclusion
Crocheting an amigurumi baby elephant is a lovely way to practice shaping, stuffing, embroidery, and assembly while creating a character with plenty of personality. Its rounded head, floppy ears, curved trunk, and little legs make it a charming addition to a handmade animal collection.
Experiment with different yarn colors, gentle facial expressions, and trunk positions to give your elephant its own character. Take your time with the sewing and final shaping, since these small details make a big difference in the finished result.
Which color combination would you choose for your baby elephant: classic gray and pink, blue-gray and cream, or a soft pastel shade? Share your favorite idea or the part you enjoyed crocheting most!
Leave a Comment