
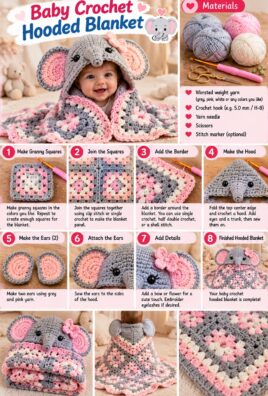
A baby hooded blanket combines the comfort of a soft crocheted blanket with a cozy attached hood. With a rectangular body, a neatly shaped hood, and a simple border, this project makes a thoughtful handmade gift for a baby shower or a new arrival. You can make it in one gentle color, add a contrasting hood, or finish it with a decorative edge.
This beginner-friendly baby crochet hooded blanket pattern uses half double crochet stitches for a flexible, easy-to-count fabric. You will learn how to create a straight foundation chain, maintain even row edges, shape a separate hood, sew it to the blanket, and add a neat border. The instructions include approximate dimensions, stitch counts, and practical finishing tips so you can customize the size and colors to suit your project.
The blanket is intended for appropriate supervised use, not as loose bedding for an unattended sleeping infant.
1. Project Overview
Pattern at a glance
Skill level
Confident beginner
Terminology
US crochet terms
Construction
Worked in rows
Blanket body
30 × 36 inches
Hood panel
About 12 × 12 inches
Working time
Approximately 12–20 hours
Yarn: Soft worsted-weight yarn • Hook: Approximately 5 mm • Colors: One main color, with an optional contrasting color for the hood or border
The dimensions and working time are estimates. Actual results vary with yarn, hook size, stitch tension, and finishing. The hood is made from a separate square panel folded diagonally into a triangle, with one edge sewn closed and the other edge attached to the blanket.
2. Materials and Tools
Gather these supplies before beginning:
- Main yarn: Approximately 1,500–1,900 yards of smooth worsted-weight yarn for the blanket, hood, and border.
- Optional contrasting yarn: Approximately 100–200 yards if you want a different hood or border color.
- Crochet hook: Approximately 5 mm, or the size needed to achieve the desired fabric density.
- Scissors: For cutting yarn.
- Yarn needle: For sewing the hood and weaving in ends.
- Stitch markers: Helpful for marking the first and last stitches of rows or the hood placement.
- Measuring tape: To check the blanket and hood dimensions.
- Optional row counter: Useful for tracking the long sequence of blanket rows.
Yarn quantities are approximate. A textured stitch, heavier yarn, larger blanket, or looser tension can increase yarn use.
Choose a soft yarn that feels comfortable against the skin and has clear stitch definition. Smooth yarn makes it easier to identify the first and last stitches in each row. Check the yarn label for washing instructions and fiber characteristics before choosing materials for a baby blanket.
3. Crochet Abbreviations
| Abbreviation | Meaning |
|---|---|
| ch | Chain |
| sl st | Slip stitch |
| sc | Single crochet |
| hdc | Half double crochet |
| dc | Double crochet |
| st | Stitch |
| sts | Stitches |
| sk | Skip |
| rep | Repeat |
| RS | Right side |
| WS | Wrong side |
| FO | Fasten off |
This pattern uses US crochet terminology. The turning chain is handled consistently throughout: the turning chain does not count as a stitch in the blanket body or hood panel. This means you work the first stitch of each new row into the first actual stitch, rather than into the turning chain.
4. Essential Stitches and Techniques
Making a slip knot and foundation chain
- Make a loop with the yarn, then pull a section of the working yarn through it.
- Place the loop on the hook and gently tighten it without making it difficult to slide.
- Yarn over and pull through the loop on the hook to make a chain.
- Continue until you have the required number of chains.
Keep the foundation chain relaxed. If it is too tight, the bottom edge of the blanket may pull inward even when the later rows are worked correctly.
Single crochet
- Insert the hook into the indicated stitch.
- Yarn over and pull up a loop.
- Yarn over again and pull through both loops on the hook.
Single crochet is used for the optional border.
Half double crochet
- Yarn over.
- Insert the hook into the indicated stitch.
- Yarn over and pull up a loop. There will be three loops on the hook.
- Yarn over again and pull through all three loops.
Half double crochet is the main stitch for both the blanket and the hood panel. It creates a fabric with a little more height than single crochet while remaining easy to count.
Double crochet
- Yarn over and insert the hook into the indicated stitch.
- Yarn over and pull up a loop.
- Yarn over and pull through the first two loops.
- Yarn over and pull through the remaining two loops.
Double crochet is included in the abbreviation list for completeness but is not required for the main sample pattern.
Understanding the turning chain
At the end of each row, ch 2 and turn. The two chains give the hook enough height to begin the next row, but they do not count as a stitch.
Work the first hdc into the first actual stitch of the previous row and the final hdc into the last actual stitch. This convention helps keep both sides straight.
Keeping the edges even
Count your stitches at the end of every row, especially during the first few rows. If helpful, place a stitch marker in the first and last stitch of a row. Move the markers as you turn the work.
Do not work into the turning chain at the end of the row. Since the turning chain is not a stitch in this pattern, doing so would add stitches and make the blanket wider.
Joining the hood
The hood is crocheted separately as a square. Fold the square diagonally to form a triangle, sew one of the square’s original edges to create the back seam, and attach the other original edge to the blanket. The diagonal folded edge forms the hood opening.
This method creates a simple hood without complicated shaping or decreases.
5. Gauge and Finished Measurements
Gauge matters because it determines the finished width and length of the blanket. Before making the full project, crochet a small sample using hdc.
For the sample pattern, aim for approximately:
- 14 hdc stitches across 4 inches
- 12 rows over 4 inches
To check your gauge:
- Crochet a sample at least 5 inches wide and 5 inches tall.
- Measure 4 inches across the middle and count the stitches.
- Measure 4 inches vertically and count the rows.
- If you have too many stitches in 4 inches, try a larger hook.
- If you have too few stitches, try a smaller hook.
- Recheck the sample before calculating the foundation chain.
The blanket body should measure approximately 30 inches wide and 36 inches long before the hood is attached. Measure the completed body before adding the hood and border. Washing or blocking can change the final measurements depending on the fiber, so follow the yarn label’s care guidance.
6. Choose the Main Stitch Pattern
The blanket uses half double crochet throughout the main body. This stitch is suitable for beginners because it is easy to repeat, produces a reasonably flexible fabric, and creates a consistent surface for attaching the hood.
The sample gauge is 14 hdc stitches and 12 rows per 4 inches. At this gauge, approximately 105 stitches produce a 30-inch width, and 108 rows produce a 36-inch length.
Keep the same stitch pattern throughout the body. If you want stripes, change colors at the end of a row rather than introducing a more complicated stitch pattern.
7. Complete Baby Blanket Pattern
Part A: Foundation Chain
The target blanket width is approximately 30 inches.
At the sample gauge of 14 hdc stitches per 4 inches, you need about 105 hdc stitches across. Since the first hdc is worked into the third chain from the hook, make 107 foundation chains.
This gives you 105 stitches in the first row: skip the first two chains nearest the hook, then work one hdc into each of the remaining 105 chains.
If your gauge differs, crochet and measure a swatch first. Estimate the number of hdc stitches needed for 30 inches, then add two chains for the starting chains that you will skip.
Part B: Row 1
- Make ch 107.
- Yarn over and insert the hook into the third chain from the hook.
- Work 1 hdc in that chain.
- Work 1 hdc in each remaining chain across.
- Turn your work.
End of Row 1: 105 hdc stitches.
Count the stitches before continuing. The two skipped chains do not count as stitches.
Part C: Row 2
- Ch 2 and turn. The turning chain does not count as a stitch.
- Work 1 hdc into the first stitch.
- Work 1 hdc in each stitch across.
- Work the final hdc into the last actual stitch of the previous row.
End of Row 2: 105 hdc stitches.
Check the beginning and end of the row carefully. Missing the first or last stitch will gradually make the blanket narrower.
Part D: Remaining Blanket Rows
Repeat Row 2 until you have completed 108 rows in total, including Row 1.
At the sample gauge of 12 rows per 4 inches, 108 rows should measure approximately 36 inches.
For a consistent result:
- Count the stitches at the end of each row.
- Check the length after every 12 rows; each group should add approximately 4 inches.
- Measure the width occasionally to ensure that the sides remain straight.
- If your row gauge differs slightly, measure the blanket as it grows and adjust the total row count to reach the target length.
Do not add random increases or decreases to correct a blanket that is too narrow. If the width is significantly different, it is usually better to adjust the foundation chain before starting again.
Part E: Check the Blanket Body
Before making the hood, verify that:
- The blanket is approximately rectangular.
- The side edges are straight.
- Each row contains 105 hdc stitches.
- The body measures approximately 30 × 36 inches.
- The top edge is straight and suitable for attaching the hood.
Fasten off and weave in the yarn tail if you are ready to add the hood. You can also leave a working yarn tail for later finishing.
8. Complete Hood Pattern
The hood is made from a separate square panel. When folded diagonally, it forms a triangle with a folded edge that becomes the hood opening, a back seam, and an attachment edge.
This method is simple to crochet and does not require complicated shaping. The sample hood panel measures approximately 12 × 12 inches before folding.
Part A: Hood Foundation Chain
At the sample gauge of 14 hdc stitches per 4 inches, 40 hdc stitches measure approximately 11.4 inches across.
To make 40 hdc stitches in the first row, chain 42. Work into the third chain from the hook, as you did for the blanket.
Part B: Hood Panel Rows
Use the same yarn and hook as the blanket, or choose a contrasting color.
- Foundation: Ch 42.
- Row 1: Hdc in the third chain from the hook and in each remaining chain across. [40 hdc]
- Rows 2–36: Ch 2, turn, hdc in the first stitch and in each stitch across. [40 hdc per row]
Fasten off, leaving a long tail for sewing.
At the sample gauge, 40 hdc stitches measure approximately 11.4 inches wide, and 36 rows measure approximately 12 inches long. The panel is therefore close to a 12-inch square, though the exact dimensions depend on tension.
Part C: Fold and Shape the Hood
Lay the square panel flat. Fold it diagonally, bringing one corner to the opposite corner so that the panel becomes a triangle.
The diagonal folded edge forms the opening of the hood. The two pairs of original square edges meet along the two sides of the triangle.
- Align the first pair of 12-inch edges carefully.
- Sew this pair together using the long yarn tail. This forms the back seam of the hood.
- Keep the other pair of 12-inch edges aligned; these will be attached to the blanket.
- Check that the folded panel is not twisted and that the seam runs evenly from one corner to the other.
The hood opening runs along the diagonal fold, which is approximately 17 inches for a 12-inch square. This gives the hood a depth of about 8–9 inches from its attachment edge to the folded opening, depending on the final shape and how it is sewn.
Part D: Optional Hood Border
If you want a contrasting edge around the hood opening, use single crochet.
- Attach the border yarn near one end of the diagonal folded edge.
- Work 1 sc at evenly spaced intervals along the opening edge.
- Keep the stitches relaxed enough that the opening lies flat.
- Continue along the full diagonal edge.
- Fasten off and weave in the yarn ends.
The folded edge is the hood opening; do not sew it closed. If the edge begins to ruffle, use fewer stitches. If it pulls inward, add a few stitches evenly along the edge.
9. Attaching the Hood to the Blanket
Attach the hood at the center of one short edge of the rectangular blanket. The hood’s two aligned 12-inch edges form the attachment edge, while the folded diagonal remains open.
Step 1: Prepare the blanket
Lay the blanket flat with the right side facing up. Identify one of the short edges, which should measure approximately 30 inches across.
Mark the center of that edge. You can fold the blanket in half widthwise to find the midpoint, then place a stitch marker there.
Step 2: Mark the hood
Find the center of the hood’s attachment edge, opposite the diagonal opening. Mark this point with a stitch marker.
Step 3: Match the centers
Place the hood at the center of the blanket edge. Align the center markers, then mark both ends of the hood attachment.
The hood will cover approximately 11–12 inches of the 30-inch blanket edge. The remaining portions of the blanket edge will remain uncovered on either side.
Step 4: Pin the hood in place
Use pins or stitch markers to hold the hood in position. Check that:
- The hood is centered.
- The folded opening faces away from the blanket and remains open.
- The back seam lies neatly.
- The blanket edge does not stretch or bunch beneath the hood.
Step 5: Sew the hood to the blanket
Thread the yarn tail onto a yarn needle. Sew the two aligned edges of the hood to the blanket edge with small, even stitches, catching both hood layers and the blanket fabric securely.
Work from the center toward one side, then return to the center and sew toward the other side. This helps keep the hood centered and distributes any slight difference in tension evenly.
Avoid pulling the yarn too tightly, as this can cause the blanket edge to pucker.
Step 6: Reinforce and finish
Check the attachment seam from both sides. Add a few reinforcing stitches at the ends if needed, without making the seam excessively stiff.
Secure the yarn and weave in the ends. Gently open the hood and check that the triangular shape holds without twisting.
10. Optional Blanket Border
A single-crochet border gives the blanket a clean, simple finish. You can use the main yarn or a contrasting color.
The sample border is worked in one round around the rectangular blanket body, before the hood is attached if you prefer easier access to all four edges. If the hood is already attached, work carefully around the exposed blanket edges without closing the hood opening.
Border instructions
- Attach the yarn at a corner of the blanket.
- Ch 1. Work 1 sc into each stitch across the top edge.
- At the corner, work (sc, ch 2, sc) into the corner stitch or corner space.
- Along each side edge, work approximately 1 sc into the end of each row.
- At the next corner, work (sc, ch 2, sc) into the corner.
- Work 1 sc into each stitch across the bottom edge.
- Repeat the corner construction and side-edge instructions around the remaining edges.
- Join with a sl st to the first sc of the border round.
- FO and weave in the yarn ends.
For the sample gauge, one sc into each row end should give approximately three sc stitches per inch along the side edges. Adjust the spacing slightly if your fabric differs from the sample gauge.
Keeping the border flat
- If the border curls inward, add a few extra sc stitches evenly along the side edges.
- If it ruffles, reduce the number of sc stitches along those edges.
- Keep the corner construction consistent at all four corners.
- Avoid pulling the yarn tightly when joining the round.
If you added a separate border around the hood opening, keep it distinct from the border around the blanket body. The hood opening must remain open and flexible.
11. Color Changes and Personalization
The simple hdc fabric makes it easy to customize your blanket.
- Single-color design: Use one soft, neutral color for the body and hood.
- Contrasting hood: Crochet the blanket in cream and the hood in pale gray, pink, or blue.
- Striped blanket: Change colors after a set number of rows, such as every 6 or 12 rows.
- Contrasting border: Add a single-crochet border in a coordinating color.
- Soft pastels: Try mint, lavender, pale yellow, or blush.
- Neutral shades: Combine cream, beige, taupe, or gray.
- Simple textured rows: For a subtle variation, you can alternate blocks of hdc rows with another easy stitch pattern, but keep the main sample pattern consistent if you want the most straightforward beginner experience.
Changing colors neatly
- At the end of the row before a color change, stop before completing the final pull-through of the last hdc.
- Use the new color for the final yarn-over and pull-through.
- Ch 2 and turn with the new color.
- Continue the next row as usual.
- Secure the old yarn and weave in the ends after the work is complete.
Avoid leaving loose yarn tails on the blanket surface. If you add stripes, count the rows in each color block to keep the design balanced.
12. Finishing and Care
Before considering the blanket finished, work through this checklist:
- Secure all loose yarn tails.
- Inspect the hood’s back seam.
- Check the hood attachment seam for gaps.
- Look along the blanket edges for uneven tension.
- Measure the finished blanket and hood.
- Block gently if appropriate for the selected fiber.
- Follow the yarn label’s washing and drying instructions.
Blocking can help even out the edges and improve the shape, but it will not correct significant stitch-count errors.
Different fibers respond differently to care. Cotton may stretch or become heavier when wet, acrylic may be sensitive to high heat, and wool blends may require gentler washing. Always follow the yarn label and dry the blanket fully before storing it.
13. Troubleshooting Common Problems
| Problem | Likely Cause | Solution |
|---|---|---|
| The foundation chain is too tight. | The chains were pulled too firmly. | Restart with a relaxed chain or use a slightly larger hook for the foundation chain. |
| The blanket sides slope inward. | Stitches were missed at the beginning or end of rows. | Check the first and last hdc in each row and maintain the 105-stitch count. |
| The blanket edges become wavy. | Extra stitches were added, often by working into the turning chain. | Remember that the ch 2 does not count as a stitch and should not be worked into. |
| The stitch count changes unexpectedly. | A first or last stitch was skipped or worked twice. | Count each row and use stitch markers to identify the edge stitches. |
| The blanket is too narrow. | The foundation chain produced fewer stitches than needed or gauge is tighter than expected. | Adjust the foundation chain for the desired width before beginning the full blanket. |
| The blanket is too short. | Fewer than 108 rows were completed or row gauge is shorter than expected. | Measure the blanket and add rows until the target length is reached. |
| The hood is too small. | The hood gauge is tighter or the panel is smaller than intended. | Recheck the hood gauge and increase the panel dimensions if necessary. |
| The hood is too deep. | The panel dimensions or fold placement create more depth than desired. | Adjust the square size before folding, keeping both dimensions and the seam plan consistent. |
| The hood twists after sewing. | The hood was folded unevenly or the wrong edges were aligned. | Unpick the seam if necessary, refold the panel carefully, and match the edges before resewing. |
| The hood is not centered. | The centers were not marked or the panel shifted during sewing. | Mark both centers and the ends of the attachment before stitching. |
| The hood seam looks bulky. | Too many sewing passes or excessive tension. | Use small, even stitches and reinforce only where necessary. |
| The blanket border curls. | Too few stitches were worked along the row ends. | Add a few sc stitches evenly along the side edges. |
| The border ruffles. | Too many stitches were worked along the row ends. | Reduce the number of sc stitches along the sides. |
| The finished fabric feels too stiff. | The hook is too small or the yarn is too rigid for the intended fabric. | Try a slightly larger hook and check the drape with a gauge swatch. |
14. Frequently Asked Questions
1. What size should a baby hooded blanket be?
The sample blanket body measures approximately 30 × 36 inches before adding the hood and border. Baby blanket sizes vary according to their intended use, so you can adjust the width and length to suit your project.
2. What yarn is best for a baby crochet blanket?
Choose a soft, smooth yarn that is comfortable to handle and suitable for frequent cleaning. Check the yarn label for fiber information and care instructions before beginning.
3. Which crochet stitch works well for a hooded blanket?
Half double crochet is a good choice for beginners. It is easy to count, produces a flexible fabric, and works well for a rectangular blanket.
4. How much yarn is needed?
The sample project may require approximately 1,500–1,900 yards of main-color yarn, plus additional yarn if you choose a contrasting hood or border. Actual quantities vary with gauge, yarn weight, and finishing choices.
5. How do I calculate the foundation chain?
First, make a gauge swatch and determine how many hdc stitches fit into 4 inches. Estimate the number of stitches needed for your desired width, then add two chains because the first hdc is worked into the third chain from the hook.
6. Can I make the hood in a different color?
Yes. Crochet the hood panel separately in a contrasting color, then fold, seam, and attach it using the same instructions. Make sure the panel dimensions remain compatible with your intended hood size.
7. How do I attach the hood securely?
Mark the center of both the blanket edge and the hood attachment edge. Match the centers, pin the hood in place, and sew the edges together with small, even stitches. Check that the blanket does not pucker.
8. Can I make the blanket larger?
Yes. Increase the foundation chain to create a wider blanket and add rows for more length. Use your gauge to estimate the required stitches and rows, and check that the finished fabric remains flexible.
9. How do I keep the blanket edges straight?
Count each row and remember that the turning chain does not count as a stitch. Work the first and last hdc into the actual stitches at the edges, and avoid accidentally working into the turning chain.
10. Does the blanket need a border?
No. The blanket can be finished without a border, but a single-crochet border provides a neat edge and a simple decorative finish.
11. How should I wash a crochet baby blanket?
Follow the care instructions for your yarn and any other materials. Wash gently using the recommended method, avoid unsuitable heat, and make sure the blanket is completely dry before storing it.
12. Can a hooded blanket be used during a baby’s sleep?
A hooded blanket should not be used as loose bedding for an unattended sleeping infant. Follow current safe-sleep guidance from an appropriate health authority. Use the blanket only in suitable supervised situations, and never allow the hood to cover the baby’s face.
15. Baby Safety Considerations
Because this project is designed for a baby, use it thoughtfully and inspect it regularly.
- Use the blanket in appropriate, supervised situations.
- Do not use a loose hooded blanket as bedding for an unattended sleeping infant.
- Keep the hood away from the baby’s face.
- Avoid buttons, beads, cords, and detachable decorative embellishments.
- Secure all yarn ends and sew the hood attachment firmly.
- Check for loose stitches, damaged seams, and other signs of wear before each use.
- Do not describe the finished blanket as certified or universally safe.
These precautions support responsible use but do not replace appropriate safety guidance for the intended age group.
16. Conclusion
This baby crochet hooded blanket is a thoughtful handmade project that combines a simple rectangular blanket with a cozy, attached hood. The easy half double crochet fabric makes it approachable for confident beginners, while the separate hood gives you room to experiment with colors and finishing details.
Choose a soft neutral palette, add a contrasting hood, or finish the edges with a simple decorative border. With careful stitch counting, even tension, and secure seams, you can create a personalized blanket for a meaningful handmade gift.
Which color combination would you choose for your hooded baby blanket: cream and beige, gray and pink, or soft pastel stripes? Share your favorite idea!
Leave a Comment