
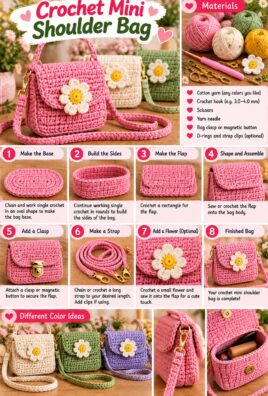
A crochet mini shoulder bag is a practical handmade accessory that combines a compact size with plenty of opportunities for personalization. Its simple rectangular body can hold everyday essentials such as a phone, keys, cards, and a few small personal items, making it a lovely project for everyday use or a thoughtful handmade gift.
This beginner-friendly crochet mini shoulder bag pattern uses a dense single crochet fabric to help the bag retain its shape. You will learn how to crochet a folded rectangular panel, sew the side seams, finish the opening, make a comfortable shoulder strap, and add an optional closure or fabric lining. Choose a classic neutral color, a soft pastel shade, or contrasting yarn for the strap and edging. With a few simple adjustments, you can customize the bag’s size and strap length to suit your style.
1. Finished Project Overview
Project at a glance
Skill level
Confident beginner
Terminology
US crochet terms
Construction
One folded panel
Finished body
About 7 × 6 inches
Strap length
40–48 inches
Working time
Approximately 5–8 hours
Yarn: Medium-weight cotton • Hook: Approximately 4 mm • Main stitch: Single crochet • Optional closure: Sew-on button and crochet loop
The finished dimensions and working time are estimates. Yarn thickness, hook size, stitch tension, strap construction, and finishing choices can all affect the result.
2. Materials and Tools
Gather these materials before you begin:
- Main yarn: Approximately 200–300 yards of medium-weight cotton yarn or another suitable bag yarn.
- Crochet hook: Approximately 4 mm, or a size that produces dense, even stitches with your chosen yarn.
- Scissors: For trimming yarn.
- Yarn needle: For sewing the sides, attaching the strap, and weaving in ends.
- Stitch markers: To mark the fold line and strap attachment points.
- Measuring tape: For checking the body dimensions and strap length.
- Optional button: A sew-on button for a simple closure.
- Optional fabric lining: A lightweight woven fabric for the inside of the bag.
- Optional sewing needle and thread: For attaching a lining or button.
- Optional strap rings: Suitable hardware if you prefer a removable strap.
Choosing the yarn
Cotton yarn is a useful choice for bags because it usually provides clear stitch definition and a relatively stable fabric. Cotton blends may offer a softer feel, while acrylic yarn can produce more drape and may stretch more under weight.
For this sample, choose a yarn that feels sturdy enough for a small bag and use a hook that creates close stitches. A dense fabric helps prevent small items from slipping through gaps.
The yarn estimate includes the body, edging, and strap. Actual usage will vary with the finished dimensions, yarn weight, stitch pattern, strap length, and any decorative details. If you use hardware, make sure it is compatible with the construction and securely attached.
3. Crochet Abbreviations
The pattern uses US crochet terminology.
| Abbreviation | Meaning |
|---|---|
| ch | Chain |
| sl st | Slip stitch |
| sc | Single crochet |
| st | Stitch |
| sts | Stitches |
| sk | Skip |
| rep | Repeat |
| RS | Right side |
| WS | Wrong side |
| FO | Fasten off |
4. Essential Stitches and Techniques
Making a slip knot and foundation chain
- Form a loop with the yarn.
- Pull a section of the working yarn through the loop.
- Place the loop on the hook and gently tighten it.
- Yarn over and pull through the loop on the hook to make a chain.
- Continue until you have the required number of chains.
Keep the foundation chain relaxed. If it is too tight, the bottom edge of the bag may pull inward.
Single crochet
- Insert the hook into the indicated stitch.
- Yarn over and pull up a loop. Two loops will be on the hook.
- Yarn over again and pull through both loops.
Single crochet creates a compact fabric that is useful for a small shoulder bag.
Working in rows
At the end of a row, ch 1 and turn. In this pattern, the turning chain does not count as a stitch.
Work the first sc into the first actual stitch of the previous row, then continue across. Work the final sc into the last actual stitch. Counting the stitches at the end of each row helps keep the panel rectangular.
Working in rounds
The main bag panel is worked in rows, not rounds. The opening edging is worked around the finished opening and joined with a slip stitch. When working this edging, distribute stitches evenly along the row ends so the opening remains flat.
Seaming the bag
After folding the rectangular panel, align the side edges. Use a yarn needle and matching yarn to sew the two sides with small, even whip stitches. Catch the edges consistently without pulling them too tightly.
Making a shoulder strap
A strap made from several rows of single crochet is more substantial than a simple chain. The sample strap is designed to be approximately 1–1.5 inches wide and 40–48 inches long before attachment. Measure it before sewing, as different stitch tension can affect its length.
5. Gauge and Finished Measurements
Gauge matters for a bag because it affects the body dimensions, capacity, and strap length.
Use the following approximate gauge as a starting point:
- 16 sc stitches across 4 inches
- 18 rows over 4 inches
To check your gauge:
- Crochet a small swatch in single crochet.
- Measure 4 inches across the middle and count the stitches.
- Measure 4 inches vertically and count the rows.
- Compare the results with the sample gauge.
- Use a smaller hook if the fabric is too loose, or a larger hook if it is too stiff and tight.
- Recalculate the foundation chain if your stitch gauge differs significantly.
Measure the finished bag body before attaching the strap or lining. Cotton and other yarns can stretch slightly during use, especially when a long strap carries weight. Avoid loading the bag with more than the construction can comfortably support.
6. Complete Crochet Mini Shoulder Bag Pattern
This design uses one rectangular panel that folds to create the front, bottom, and back of the bag. The side edges are sewn together, leaving the top open.
The sample body is designed to measure approximately 7 inches wide and 6 inches tall, with a bottom depth of about 2 inches. These dimensions depend on the gauge and the accuracy of the folds.
Part A: Foundation Chain
The panel needs approximately 28 stitches across to create a width of 7 inches at the sample gauge of 16 sc per 4 inches.
Make ch 29. You will work one single crochet into the second chain from the hook and into each remaining chain, creating 28 stitches.
If your gauge differs, measure your swatch and calculate how many stitches are needed for a 7-inch width. Add one chain for the first single crochet worked into the second chain from the hook.
Part B: Row 1
- Ch 29.
- Sc in the second chain from the hook.
- Sc in each remaining chain across.
- Ch 1 and turn.
End of Row 1: 28 sc stitches.
The turning chain does not count as a stitch.
Part C: Remaining Body Rows
– Rows 2–63: Ch 1, turn, sc in the first stitch and in every stitch across. [28 sc per row]
Fasten off after Row 63, leaving a tail for finishing.
At the sample gauge of 18 rows per 4 inches, 63 rows measure approximately 14 inches. This length creates the front, bottom, and back sections when folded.
Part D: Mark the Fold Lines
Lay the panel flat with the right side facing up.
The panel is approximately 7 inches wide and 14 inches long. Divide its length into three sections:
- Front: Approximately 6 inches, or 27 rows.
- Bottom: Approximately 2 inches, or 9 rows.
- Back: Approximately 6 inches, or 27 rows.
Place stitch markers between Rows 27 and 28, and between Rows 36 and 37. These markers indicate the two fold lines.
Fold the panel along these markers so that the front and back sections rise from the 2-inch bottom section. The two top edges should meet at the opening, and the right side of the fabric should face outward.
Part E: Sew the Side Seams
Use the long yarn tail or a separate length of matching yarn.
- Align the front and back side edges.
- Starting at the top opening, sew the side edges together down the front section, around the bottom fold area as needed, and up the back section.
- Use small whip stitches, catching the corresponding edge stitches evenly.
- Repeat on the other side, keeping the seam height and tension consistent.
- Secure the seam ends and weave in the yarn tails.
The bottom fold forms the base, so it does not need a separate seam. Avoid sewing across the top opening. If the side edges are aligned properly, the finished body should be approximately 7 inches wide and 6 inches tall, with a 2-inch base depth.
Part F: Finish the Bag Opening
The opening consists of the top edge of the front panel and the top edge of the back panel. Each edge contains 28 stitches, giving approximately 56 stitches around the opening before edging.
- Attach the yarn at a side seam near the opening.
- Ch 1, then work 1 sc into each of the 28 stitches across the front top edge.
- Continue across the 28 stitches of the back top edge.
- Join with a sl st to the first sc.
- FO and weave in the yarn tail.
Expected edging count: approximately 56 sc stitches.
The side seams connect the front and back edges at the ends, so no additional stitches are required along the vertical side seams at the opening. If your seam construction changes the number of accessible stitches, distribute the edging evenly and keep the opening flat.
If the edging pulls inward, work more loosely or use a slightly larger hook for the border. If it waves, check that you have not added extra stitches.
Part G: Crochet the Shoulder Strap
The strap is worked as a narrow strip of single crochet. A strip is generally more stable than a long chain, although any crochet strap may stretch under weight.
For the sample, aim for a strap approximately 42 inches long and 1.25 inches wide before attachment.
Strap pattern
- Foundation: Ch 6.
- Row 1: Sc in the second chain from the hook and in each remaining chain. [5 sc]
- Rows 2–189: Ch 1, turn, sc in each stitch across. [5 sc per row]
Fasten off, leaving a long tail at each end for attachment if you have not already secured the first end.
At the sample gauge of 18 rows per 4 inches, 189 rows measure approximately 42 inches. To adjust the strap length, use about 4.5 rows per inch as a starting estimate:
- 40 inches: Approximately 180 rows.
- 42 inches: Approximately 189 rows.
- 48 inches: Approximately 216 rows.
Measure the strap while it is lying flat and relaxed. If your row gauge differs, adjust the number of rows to reach the desired length. A 5-stitch strap at the sample stitch gauge measures approximately 1.25 inches wide.
Part H: Attach the Strap Securely
- Place the bag flat and mark matching attachment points near the upper corners, just below the opening.
- Lay the strap in position and check that it is not twisted.
- Temporarily pin or clip both ends to the bag.
- Try the bag on or hold it against your body to check the strap drop.
- Sew each end to the bag with matching yarn, passing through the strap and several stitches of the bag body.
- Reinforce each attachment point with multiple passes of yarn.
- Weave in and secure the remaining yarn tails.
For a stronger attachment, distribute the stitches across the full width of the strap rather than sewing only along one edge. Avoid placing the strap so close to the opening that it distorts the edging.
If you use strap rings, sew the strap securely around each ring and attach the rings to the bag with suitable, securely finished loops. Make sure any hardware is compatible with the yarn and does not have sharp or exposed edges.
Do not assume the bag can carry heavy items simply because the strap is reinforced. Start with light everyday essentials and check the attachment points regularly.
Part I: Optional Button Closure
A sew-on button and crocheted loop provide a simple closure without requiring metal hardware.
Make the loop
- Attach yarn at the center of the back edge of the opening.
- Ch 8 to form a small loop.
- Sl st into the same area where the chain began, forming a loop.
- Fasten off and weave in the yarn ends securely.
Test the loop against your chosen button before securing it permanently. If it is too loose or too tight, adjust the chain length.
Sew the button to the center of the front opening, checking that it lines up with the loop when the bag is closed. Use strong thread or matching yarn and secure the button firmly.
A magnetic snap is another option, but it should be compatible with the bag fabric and attached according to the hardware instructions. A small fabric reinforcement patch or lining can help stabilize the area. Detachable small components may be unsuitable for children’s accessories.
Part J: Optional Fabric Lining
A fabric lining can help the bag retain its shape and prevent small items from catching in the crochet stitches.
- Measure the inside width, height, and bottom depth of the completed bag.
- Cut fabric panels to fit the interior, allowing extra fabric for seam allowances.
- Sew the fabric panels together to form a lining that fits the bag without stretching it.
- Turn the lining so its seams are inside.
- Place it inside the crochet body, aligning the top edge with the bag opening.
- Sew the lining to the inside of the opening with small, discreet stitches.
Keep the lining clear of the strap attachments and closure mechanism. The lining should fit smoothly without pulling the crochet body out of shape.
7. Finishing and Final Shaping
Complete the following checklist before using your bag:
- Secure all yarn tails and trim any excess.
- Check both side seams for gaps.
- Confirm that the opening lies flat.
- Measure the finished body and check the bottom depth.
- Measure the strap and confirm that it is not twisted.
- Reinforce the strap attachment points.
- Test the optional closure.
- Check the lining, if used, for loose seams.
- Gently reshape the bag by hand.
Blocking may help even out the body, depending on the yarn fiber. Follow the yarn label and avoid excessive heat or unsuitable blocking methods, which can damage some fibers.
8. Troubleshooting Common Problems
| Problem | Likely Cause | Solution |
|---|---|---|
| The bag body curls at the edges. | The foundation chain is too tight or the tension is uneven. | Try a more relaxed foundation chain and check your stitch tension. |
| The panel is too narrow. | The stitch gauge is tighter than expected or stitches were missed. | Check the gauge and confirm that every row has 28 stitches. |
| The panel is too short. | Fewer rows were worked or the row gauge is tighter than expected. | Measure the panel and add rows before folding if needed. |
| The sides are uneven. | Stitches were missed at row ends or the side seams were sewn at different heights. | Check the row counts and align both seams before sewing. |
| The bag stretches too much. | The yarn is soft or the fabric is too loose for the intended load. | Use a denser fabric, consider a lining, and carry lighter items. |
| The strap is too long. | Too many rows were worked or the strap stretched. | Shorten the strap before attachment or resew the ends closer together. |
| The strap twists. | The strip was twisted before attachment. | Lay the strap flat and check its orientation before sewing both ends. |
| The strap stretches under weight. | The strap is narrow, loosely crocheted, or made from stretchy yarn. | Use a denser stitch, reinforce the strap, and reduce the load. |
| The side seams look bulky. | Stitches are too large or the yarn was pulled too tightly. | Use small, even whip stitches and matching yarn. |
| The bag opening becomes wavy. | Too many edging stitches were added or tension is uneven. | Check the approximate 56-stitch count and distribute stitches evenly. |
| The closure does not align. | The button and loop were placed before checking their positions. | Reposition the button or adjust the loop so the opening closes naturally. |
| The hardware pulls on the yarn. | The hardware is attached to too few stitches or lacks reinforcement. | Reinforce the area with additional stitches or a fabric patch. |
| The bag does not hold its shape. | The fabric is too loose or the yarn stretches easily. | Use a smaller hook if appropriate, add a lining, and avoid overloading the bag. |
9. Customization Ideas
Personalize your mini shoulder bag by changing the colors, strap, or finishing details.
- Solid neutral colors: Choose cream, beige, taupe, brown, or black for a versatile everyday accessory.
- Pastel shades: Try lavender, pale pink, mint, or soft blue.
- Contrasting strap: Use a second color for a simple accent.
- Striped panel: Change colors every few rows for a playful design.
- Textured stitches: Experiment with another dense stitch pattern after practicing the sample.
- Decorative border: Add a contrasting edging around the opening.
- Different strap lengths: Shorten the strap for a closer shoulder fit or lengthen it for a looser drop.
- Button or magnetic closure: Choose a closure that matches your preferred style and can be securely attached.
- Fabric lining: Add a lining for extra structure and a smoother interior.
- Different body sizes: Increase the foundation chain for a wider bag or add rows to create a taller body, adjusting the fold positions to maintain the desired base depth.
Changing yarn weight, hook size, stitch pattern, or strap length affects the finished dimensions and the amount of stretch. Make a gauge swatch before changing the main panel dimensions.
10. Care and Durability
Follow the care instructions for the yarn and any lining or hardware. Cotton, acrylic, and blended yarns can respond differently to washing and drying, so check the label before cleaning.
- Clean the bag using a method appropriate for the yarn.
- Allow the bag to dry fully before storing it.
- Avoid carrying excessive weight.
- Inspect the strap attachment points regularly.
- Repair loose side seams promptly.
- Check the closure and hardware for damage.
- Protect the lining from sharp objects and unnecessary strain.
Even a dense crochet fabric can stretch when carrying weight. Treat the bag as a small accessory for light essentials rather than assuming it is suitable for heavy loads.
11. Frequently Asked Questions
1. What yarn is best for a crochet mini shoulder bag?
Medium-weight cotton yarn is a useful choice because it offers clear stitch definition and a relatively stable fabric. Cotton blends and acrylic yarn can also work, but their drape and stretch may differ.
2. What hook size should I use?
A 4 mm hook is a practical starting point for medium-weight yarn. Adjust the size based on your gauge and the density you want for the bag body.
3. How much yarn do I need?
The sample bag may use approximately 200–300 yards, including the body, strap, and edging. The amount varies with yarn weight, strap length, and any lining or decorative details.
4. How long should a mini shoulder bag strap be?
A strap of approximately 40–48 inches is a useful starting range. The ideal length depends on your height, preferred shoulder drop, and how the strap is attached.
5. How do I stop the bag from stretching?
Use a dense stitch pattern, choose yarn with suitable structure, and avoid carrying excessive weight. A fabric lining can also help the bag retain its shape.
6. Is single crochet good for a bag?
Yes. Single crochet creates a compact fabric with relatively small gaps, making it a practical stitch for a mini shoulder bag.
7. How do I make the bag wider or taller?
For a wider bag, increase the foundation chain and recalculate the stitch count using your gauge. For a taller bag, add rows and adjust the fold positions so the front, bottom, and back sections remain proportionate.
8. How do I attach a strap securely?
Sew each strap end to the bag with matching yarn, passing through the strap and multiple stitches of the body. Reinforce each attachment point with several passes and check it regularly during use.
9. Should I line my crochet bag?
A lining is optional, but it can provide additional structure and help prevent small items from catching in the stitches. It is especially useful if your yarn is soft or the fabric has small gaps.
10. What closure is easiest for beginners?
A sew-on button with a crocheted loop is simple and requires little additional hardware. Make sure the loop fits the button securely and that both are firmly attached.
11. Can I make the bag without hardware?
Yes. You can leave the opening unfastened or use a crocheted loop with a securely sewn button. The sample bag works without any hardware.
12. How should I wash the finished bag?
Follow the yarn label’s cleaning instructions. Remove any detachable hardware only if it is designed to be removed, and allow the bag to dry completely before storing it.
12. Conclusion
This crochet mini shoulder bag is a practical project that lets you create a personalized accessory using simple stitches and straightforward construction. The folded panel keeps the body construction manageable, while the strap, edging, closure, and optional lining give you plenty of opportunities to customize the finished design.
Experiment with neutral colors, pastel shades, or contrasting straps to make a bag that suits your style. Take your time with the seams and strap attachments, and measure carefully before finishing.
What would you choose for your mini shoulder bag: a classic neutral color, a pastel shade, or a striped design? And which small essentials would you carry inside?
Leave a Comment