
Introduction
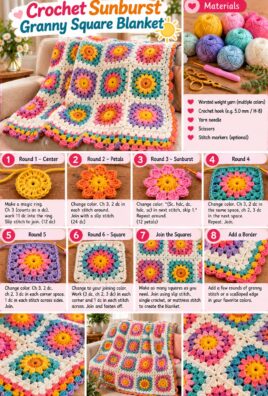
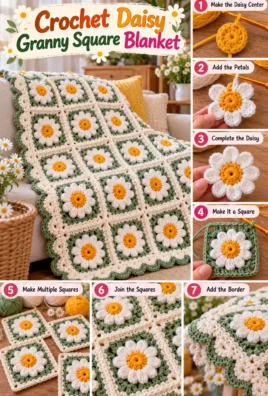
A crochet sunburst granny square blanket combines the timeless charm of granny squares with a beautiful, floral-inspired center. Each square begins with a small, rounded motif, develops a raised sunburst texture, and finishes with a classic square border. When joined together, the individual motifs create a cozy blanket with depth, color, and a cheerful handmade appearance.
This crochet sunburst granny square blanket pattern is designed for confident beginners who are ready to explore textured stitches, color changes, and joining techniques. You will learn how to make each square, keep your motifs consistent in size, arrange them into a balanced layout, and join them with a neat seam. A simple single-crochet border completes the blanket.
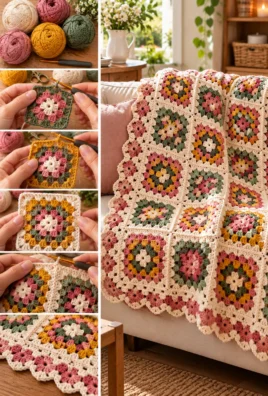
Choose warm sunset shades, soft pastels, or a coordinated neutral palette to create a sofa throw, bed accent, or thoughtful handmade gift.
Finished Project Overview
- Project: Sunburst granny square blanket
- Skill level: Confident beginner
- Terminology: US crochet terms
- Construction: Make individual squares, block if appropriate, join them, and add a border
- Sample layout: 4 columns by 5 rows, using 20 squares
- Approximate square size: 6 × 6 inches before joining
- Approximate blanket size: 24 × 30 inches before the border
- Approximate finished size: 26 × 32 inches with a border about 1 inch wide
- Estimated working time: Approximately 12–20 hours, depending on experience and finishing choices
- Yarn: Medium-weight yarn, such as category 4
- Hook: Approximately 5 mm, or the size needed to achieve your target square size
- Colors: Three main colors per square, plus a joining and border color if desired
- Main techniques: Magic ring, double crochet, treble crochet, puff stitches, chain spaces, color changes, joining, and border crochet
The measurements are approximate. Your finished dimensions will depend on your yarn, hook, tension, joining method, and border width.
Materials and Tools
Gather the following supplies before beginning:
- Medium-weight yarn in several coordinated colors
- A crochet hook compatible with your yarn
- Scissors
- A yarn needle for weaving in ends
- Stitch markers, if helpful
- Measuring tape or ruler
- Optional blocking mats and rust-resistant pins
Suggested color palette
Choose three colors for each motif:
- Center color: A warm yellow, cream, or another shade that makes the center stand out.
- Textured middle color: Orange, coral, pink, or a contrasting shade.
- Outer square color: Cream, beige, sage green, or another color that coordinates with the blanket.
You can repeat the same palette across all 20 squares for a cohesive design. Alternatively, use different center colors while keeping the outer round consistent so the blanket feels varied but still coordinated.
Approximate yarn quantities
For a small blanket made from 20 squares measuring about 6 inches each, plan for approximately:
| Yarn use | Estimated amount |
|---|---|
| Motif centers and textured rounds | 400–600 yards |
| Outer rounds of the squares | 150–250 yards |
| Joining seams | 75–125 yards |
| Blanket border | 100–150 yards |
| Total estimated amount | 725–1,125 yards |
These are planning estimates, not guaranteed quantities. Puff stitches can use more yarn than simpler stitches, and individual tension can make a noticeable difference. If possible, purchase a little extra yarn, especially for the joining and border colors.
Crochet Abbreviations
The pattern uses US crochet terminology.
| Abbreviation | Meaning |
|---|---|
| MR | Magic ring |
| ch | Chain |
| sl st | Slip stitch |
| sc | Single crochet |
| hdc | Half double crochet |
| dc | Double crochet |
| tr | Treble crochet |
| st | Stitch |
| sts | Stitches |
| sp | Space |
| ch-sp | Chain space |
| rnd | Round |
| rep | Repeat |
| sk | Skip |
| FO | Fasten off |
Special stitch used in this pattern:
– Puff stitch (puff): A group of partially completed double-crochet-style stitches worked into the same space and finished together as one raised stitch. The exact construction is explained below.
Essential Stitches and Techniques
1. Magic ring
A magic ring creates an adjustable center that can be tightened to close the hole in the middle of your square.
- Make a loop with the yarn, leaving a tail of several inches.
- Insert your hook through the loop and pull up a loop of working yarn.
- Chain once if needed to secure the loop; this chain does not count as a stitch in this pattern.
- Work the required stitches into the ring.
- Pull the yarn tail firmly to close the center.
- Join the round with a slip stitch where instructed.
Alternative: Chain 4 and join the first and last chains with a slip stitch to form a ring. Work the first round into the center of this ring. This method may leave a slightly larger hole.
2. Double crochet
- Yarn over and insert your hook into the indicated stitch or space.
- Yarn over and pull up a loop. You now have three loops on your hook.
- Yarn over and pull through the first two loops.
- Yarn over and pull through the remaining two loops.
One double crochet is complete.
3. Treble crochet
A treble crochet is taller than a double crochet.
- Yarn over twice.
- Insert your hook into the indicated stitch or space.
- Yarn over and pull up a loop, leaving four loops on the hook.
- Yarn over and pull through two loops.
- Yarn over and pull through two more loops.
- Yarn over and pull through the final two loops.
Treble crochet is included in the abbreviations for reference but is not required in the main motif pattern.
4. Puff stitch
In this pattern, one puff stitch is made by working four partially completed double-crochet-style loops into the same stitch, then pulling through all the accumulated loops together.
- Yarn over, insert the hook into the indicated stitch, and pull up a loop.
- Yarn over and pull through the first two loops, leaving the unfinished stitch on your hook.
- Repeat the process three more times in the same stitch. You will have five loops on your hook.
- Yarn over and pull through all five loops.
- Chain 1 to help secure and separate the puff.
The puff itself counts as one stitch. The following chain is a separate chain space and does not count as a stitch.
Keep the puff stitches relaxed enough that the next round can be worked into the spaces between them.
5. Joining rounds
At the end of a round, insert your hook into the top of the first stitch specified in the instructions, yarn over, and pull through both the stitch and the loop on your hook. This creates a slip-stitch join.
When a round begins with a chain, follow the instructions carefully: the starting chain in this pattern does not count as a stitch unless explicitly stated.
6. Forming square corners
The square is created by placing corner groups into four evenly spaced chain spaces. Each corner uses:
3 dc, ch 2, 3 dc
The chain-2 space is the corner space for the next round. The six double crochets form the two halves of the corner, with the chain space between them.
7. Joining motifs
For the main joining method, use a slip-stitch join. Place two squares with their right sides facing up and their edges touching. Match corresponding stitches and corner spaces, then slip stitch through both layers without pulling too tightly. This creates a visible, slightly raised seam.
Gauge and Finished Measurements
For this project, consistent square dimensions are more important than achieving an exact stitch gauge.
The target is approximately 6 × 6 inches per completed square before joining.
To check your gauge:
- Complete one square, including the optional fifth round if needed.
- Lay it flat without stretching it.
- Measure its width and height.
- Check that both measurements are approximately equal.
- Compare every additional square with the first.
- If the square is consistently too small or too large, adjust your hook size or tension.
A square that curls or ruffles may have a tension or stitch-count issue rather than simply a gauge difference.
Calculating the blanket size
The width before the border is approximately the width of one square multiplied by the number of columns.
The length before the border is approximately the height of one square multiplied by the number of rows.
For the sample blanket:
- Width: 6 inches × 4 columns = 24 inches
- Length: 6 inches × 5 rows = 30 inches
- With a border about 1 inch wide on every side: approximately 26 × 32 inches
These measurements assume that joining does not significantly change the dimensions. A bulky seam or a wide border may make the final blanket larger.
Complete Sunburst Granny Square Pattern
This motif begins with 12 double crochets, adds 12 raised puff stitches, transitions into 12 groups of three double crochets, and then forms four evenly spaced corners. The optional fifth round enlarges the square while preserving its shape.
The pattern is designed around these counts so that the corners and sides remain balanced.
Round 1: Center
Center color
- Make a magic ring.
- Ch 3. This chain counts as the first dc for this round.
- Work 11 dc into the ring.
- Pull the ring closed.
- Join with a sl st to the top of the beginning ch-3.
Stitch count: 12 dc, including the beginning chain counted as one dc.
Fasten off if you want a separate center color, leaving a tail long enough to weave in. Tighten the ring before securing the tail.
Round 2: Sunburst Texture
Textured middle color
Attach the second color in the top of any dc from Round 1.
- Ch 1. This does not count as a stitch.
- Work 1 puff stitch into the same dc.
- Ch 1.
- Work 1 puff stitch into the next dc, then ch 1.
- Repeat the puff stitch and ch-1 sequence around the round.
- After the twelfth puff, ch 1 and join with a sl st to the top of the first puff.
You will work exactly one puff stitch into each of the 12 stitches from Round 1. The chain spaces between the puffs create room for the next round.
Stitch count: 12 puff stitches and 12 ch-1 spaces.
Tip: Do not make the chain spaces too tight. The next round will be worked into these spaces, so they need to remain easy to find.
Round 3: Transition Round
Continue with the same color or attach a third color.
- Sl st into the first ch-1 space between puff stitches.
- Ch 3; this counts as the first dc of the first group.
- Work 2 more dc into the same ch-1 space, making a group of 3 dc.
- Ch 1.
- In the next ch-1 space, work 3 dc, then ch 1.
- Repeat around the motif until you have worked into all 12 chain spaces.
- Join with a sl st to the top of the beginning ch-3.
Each space between puff stitches receives exactly 3 dc, followed by a ch-1 space. These 12 groups create a stable foundation for the square round.
Stitch count: 36 dc arranged in 12 groups of 3 dc, plus 12 ch-1 spaces.
Check: You should have 12 groups around the motif. If you have fewer or more, count the chain spaces before beginning the next round.
Round 4: Forming the Square
Outer square color
Attach the outer color in any ch-1 space from Round 3. The corners will be placed in every third chain space, producing exactly four corners.
- Ch 3; this counts as the first dc of the first corner.
- In the same ch-1 space, work 2 more dc, ch 2, and 3 dc. Your first corner is complete.
- In each of the next two ch-1 spaces, work 3 dc.
- In the next ch-1 space, work the corner sequence: 3 dc, ch 2, 3 dc.
- Work 3 dc into each of the next two ch-1 spaces.
- Repeat the corner sequence followed by two groups of 3 dc until you have made all four corners.
- After the fourth corner, join with a sl st to the top of the beginning ch-3.
Each corner space from Round 3 receives one complete corner group. The other eight spaces receive 3 dc each.
Stitch count: 48 dc arranged as 12 dc along each side, with four ch-2 corner spaces. Each side includes the three dc from one half of each adjoining corner.
The square should now have four recognizable corners and relatively straight sides. Lay it flat to check the shape before proceeding.
Optional Round 5: Enlarging the Square
Use this round if Round 4 produces a square smaller than your 6-inch target. Keep the same outer color for a coordinated finish, or use a contrasting shade.
- Attach the yarn in any ch-2 corner space.
- Ch 3; this counts as the first dc of the corner.
- Work 2 more dc into the same corner space, ch 2, and work 3 dc into that same space.
- Work 1 dc into each of the 12 dc along the side until you reach the next corner space.
- In the next corner space, work 3 dc, ch 2, and 3 dc.
- Repeat the side and corner sequence around the square.
- Join with a sl st to the top of the beginning ch-3.
Stitch count: 72 dc, arranged as 18 dc along each side, with four ch-2 corner spaces.
Each side has 12 dc between its corner spaces plus 3 dc from each adjoining corner half, giving 18 dc along the side.
Square-size check: Round 4 may be sufficient for some yarns and hooks. Round 5 is included in the sample blanket when needed to reach approximately 6 inches. Measure your square rather than relying on round number alone.
Pattern consistency check
Before making all 20 motifs, confirm the following:
- Round 1 contains 12 dc.
- Round 2 contains 12 puff stitches and 12 ch-1 spaces.
- Round 3 contains 12 groups of 3 dc.
- Round 4 creates exactly four corners, with 12 dc along each side.
- Round 5, if used, creates 18 dc along each side.
- Every round is joined at the instructed stitch.
- The square lies flat without pronounced curling or ruffling.
If the motif does not lie flat, check the stitch counts and your tension before changing the pattern.
Color Changes and Yarn Management
Color changes help emphasize the sunburst effect and make the square look like a small flower surrounded by a frame.
Changing colors between rounds
- Finish the final stitch of the current round, stopping before its last yarn-over when appropriate.
- Yarn over with the new color and pull it through to complete the stitch.
- Join the round as instructed.
- If the previous round is complete, fasten off the old color and attach the new color in the required stitch or chain space.
- Pull the new yarn gently to secure the join without puckering the fabric.
Because this pattern joins each round with a slip stitch, you can fasten off after each round for clearly separated color sections.
Weaving in ends
Leave yarn tails long enough to weave in securely. Thread each tail through a yarn needle and weave it through several stitches on the wrong side of the motif. Change direction once or twice so the tail is less likely to loosen.
Avoid tying bulky knots in the middle of the square. Keep the tails away from the raised puff stitches where possible so the textured surface remains soft.
Should you carry yarn?
Carrying yarn is generally unnecessary for this pattern because the colors change between complete rounds. Fastening off and attaching the next color usually produces a cleaner result. If you decide to carry yarn, avoid carrying it across exposed areas where it may show through the fabric.
Making Multiple Squares
For the sample blanket, make 20 matching squares, arranged in 4 columns and 5 rows.
Work one complete square first and use it as your reference. If you need the optional fifth round to reach the target size, use that same round structure for every square.
Keep the motifs consistent
- Use the same yarn weight throughout the blanket.
- Use the same hook size for every motif.
- Follow the same four-round or five-round construction for all squares.
- Keep your tension as consistent as possible.
- Use the same blocking method for every square.
- Check dimensions before joining.
Plan the color order
Before you start joining, decide which colors should appear in each row. You might use a warm yellow center, a different middle shade for each square, and the same cream outer round throughout.
Write down the sequence by row, such as:
- Row 1: Yellow center, coral middle, cream outer round; repeat with coordinated variations.
- Row 2: Cream center, orange middle, cream outer round; alternate with a complementary shade.
- Rows 3–5: Repeat or vary the sequence while maintaining an overall balance.
This is only a color-planning example. Choose combinations that suit your home and the yarn you already have.
Quality-control checklist
Before joining, check each square:
- Width and height are approximately 6 inches.
- All four corners are clear and evenly spaced.
- Round stitch counts match the pattern.
- The square lies flat.
- Color joins are secure.
- Loose ends are woven in.
- The surface is free from accidental knots and loose loops.
Correcting a small problem now is easier than fixing it after the squares are joined.
Blocking the Squares
Blocking helps the motifs align more neatly, especially when the squares vary slightly in shape. It cannot, however, correct major stitch-count errors.
- Finish the square and weave in the yarn ends.
- Check the stitch count and confirm that the motif is square.
- Choose a blocking method suitable for the yarn fiber.
- Shape the square to approximately 6 × 6 inches without stretching it excessively.
- Allow it to dry or cool completely, depending on the blocking method.
- Measure the square again before joining.
Cotton may respond well to damp blocking, while acrylic often holds its shape with less aggressive methods. Wool and wool blends may need gentle handling. Always check the yarn label and avoid unsuitable heat, particularly with heat-sensitive synthetic fibers.
Use the same method for all 20 squares. Consistent blocking makes it easier to align the edges and maintain an even blanket shape.
Arranging the Blanket Layout
Arrange the 20 squares into four columns and five rows on a flat surface.
Before joining, check that the colors are distributed evenly. Avoid placing several very bright or very dark squares together unless you want a concentrated block of color.
How to organize the layout
- Place the first row of four squares in your preferred order.
- Arrange the next four squares underneath, checking how the center and outer colors interact.
- Continue until all five rows are complete.
- Turn each square so its corners and color sections are oriented consistently.
- Compare neighboring squares to make sure their sizes are similar.
- Rearrange any motifs that interrupt the color balance.
- Record the chosen order so the arrangement stays the same during joining.
If you prefer a repeating pattern, alternate two or three color combinations. For a more playful blanket, vary the center colors while keeping the outer rounds identical.
Do not begin joining until you are happy with both the color arrangement and the alignment of the square edges.
Joining the Squares
This pattern uses a slip-stitch join. It creates a defined seam that can complement the raised sunburst centers. The seam is usually less bulky than a single-crochet join, although tight slip stitches can make the blanket less flexible.
Use a joining yarn that coordinates with the outer rounds, and use the same yarn throughout the seams.
Step 1: Join the squares horizontally
- Place two squares side by side with their right sides facing up.
- Align their edges and match the corner spaces.
- Insert your hook through the corresponding edge stitch or stitch loops on both squares.
- Attach the joining yarn and pull up a loop.
- Make a slip stitch through the matched locations.
- Continue along the edge, matching corresponding stitches in order.
- Keep your tension even so the edges remain the same length.
- At the end of the seam, secure the yarn and weave in the tail.
For the cleanest result, use the same matching points along every edge. When joining edges that include the corners, ensure that the corner spaces align rather than pulling them together unevenly.
Step 2: Make four horizontal strips
Join the four squares in each row. Repeat until you have five strips, each containing four squares.
Lay the strips flat and check that the seams are not puckered. If a strip is noticeably shorter than the others, check whether your slip stitches are too tight.
Step 3: Join the strips vertically
- Place the first two strips together, matching the squares at every intersection.
- Slip stitch along the long edge, matching the corresponding stitch locations.
- Check each meeting point where four corners come together.
- Repeat with the remaining strips until all five rows are joined.
Keep the joining yarn relaxed enough that the blanket can drape naturally. A seam that is pulled too tightly can cause the finished blanket to curl inward or distort the squares.
Step 4: Finish the seams
Secure all joining tails and weave them into the wrong side of the blanket. Check every intersection and make sure no corner has been missed.
Alternative: A single-crochet join creates a more prominent ridge and a firmer seam. It can be attractive when you want the joins to become part of the design, but it may add more bulk than the slip-stitch method.
Blanket Border
A simple single-crochet border gives the blanket a clean frame. Use the outer-round color for a subtle finish or choose a contrasting shade for extra definition.
Border Round 1
- Attach the border yarn in a corner space of the completed blanket.
- Ch 1. This does not count as a stitch.
- Work 1 sc into each stitch along the first edge.
- Along the sides of the squares, distribute single crochets evenly across the row ends. Avoid placing so many stitches that the edge begins to ruffle.
- At each corner, work 3 sc into the corner point. For this border, the corner point is the outermost corner space or the equivalent turning point at the edge of the joined squares.
- Continue around all four sides, working 3 sc into each corner point.
- Join with a sl st to the first sc.
Corner construction: Work 3 sc into each corner point, including the corner where you began. Use the same method at all four corners.
Because the blanket contains both stitch tops and row ends along its perimeter, the number of border stitches will not necessarily be identical on every side. The goal is even spacing and a flat edge rather than forcing an arbitrary stitch count.
Check the border
Lay the blanket flat before fastening off.
- If the border pulls inward, you may have too few stitches along the edges or your tension may be too tight.
- If the border ripples, you may have too many stitches along the row ends.
- If the corners look rounded, make sure you have worked 3 sc into each corner point.
If you want a wider border, repeat the single-crochet round, placing 1 sc in each stitch and 3 sc in the center sc of each corner group. This keeps the corners expanding consistently. The extra round will increase the finished dimensions.
Finishing and Care
Complete these finishing steps before using or gifting the blanket.
- Secure and weave in every loose yarn end.
- Inspect all seams and corners for gaps.
- Lay the blanket flat and check that it does not curl or ruffle.
- Measure the finished dimensions and note any difference from the target.
- Block gently if the yarn fiber and care instructions allow it.
- Follow the washing and drying instructions on the yarn label.
Cotton may soften or change shape after washing. Acrylic can be sensitive to high heat, while wool blends may require gentler washing to reduce the risk of felting or shrinkage. Do not assume that all yarns can be machine washed or tumble dried.
After washing, check that the joining seams and border remain secure. Store the blanket clean and dry, and avoid hanging it for long periods if its weight could stretch the fabric.
Troubleshooting Common Problems
| Problem | Likely Cause | Solution |
|---|---|---|
| The sunburst center curls | The center stitches are too tight, or the ring is overly constricted | Check the stitch count and loosen your tension. Tighten the magic ring only enough to close the center. |
| The textured groups look uneven | Puff stitches have different heights or numbers of partial stitches | Make every puff with four partial stitches and complete them together. Keep the loops similar in height. |
| The motif remains circular rather than square | The four corners were not placed in the correct chain spaces | In Round 4, place a corner in every third ch-1 space from Round 3, producing exactly four corners. |
| The corners are rounded or unclear | The corner groups are inconsistent or the chain spaces are too tight | Work 3 dc, ch 2, 3 dc in each designated corner space. Keep the chain-2 spaces open. |
| The square ruffles | There may be too many stitches, loose tension, or incorrectly placed corner groups | Recount the groups and confirm that Round 3 has 12 groups of 3 dc. Check that Round 4 has four corners. |
| The square curls inward | Tension may be too tight, or the motif may have too few stitches | Check the counts and loosen your tension. If the square is consistently small, try a larger hook or the optional fifth round. |
| Square sizes vary | Different tension, yarn, hook sizes, or round structures | Use the same yarn and hook, repeat the same rounds, and measure each square before joining. |
| Color changes leave bulky joins | Yarn tails or joining stitches are too bulky | Fasten off neatly, avoid unnecessary knots, and weave tails through several stitches on the wrong side. |
| Joining seams are too tight | Slip stitches are being pulled too firmly | Relax the joining tension and check the blanket’s flexibility after every seam. |
| The blanket edges become wavy | Border stitches are too numerous or unevenly distributed | Reduce the number of stitches along row ends and space them evenly. |
| The border pulls inward | Too few stitches along the edges or overly tight tension | Add stitches where necessary and keep the border relaxed. |
| The finished blanket is too small | The motifs are smaller than the target, or the border is narrower than planned | Measure a completed square, adjust your hook or use Round 5, and recalculate the blanket size before making all the squares. |
Customization Ideas
One of the best features of sunburst granny squares is how easily you can change their appearance without changing the basic construction.
Choose a color theme
- Warm sunset: Yellow centers, orange or coral puff rounds, and rust-colored outer squares.
- Cream and neutral: Beige centers, taupe textures, and cream borders.
- Pastel garden: Pale pink, lavender, mint, and soft yellow.
- Coordinated outer rounds: Use different center and middle colors while keeping the same outer color on every square.
- Contrasting border: Finish the blanket with a shade that highlights the colors in the motifs.
Make a larger blanket
Keep the same square pattern and change the number of columns and rows.
For example, if you use squares measuring 6 inches:
- Four columns produce a width of about 24 inches before the border.
- Six columns produce a width of about 36 inches before the border.
- Five rows produce a length of about 30 inches before the border.
- Seven rows produce a length of about 42 inches before the border.
For a six-column-by-seven-row blanket, you would need 42 squares. With a border about 1 inch wide on each side, the approximate finished size would be 38 × 44 inches.
The general calculation is: multiply the square width by the number of columns to estimate the blanket width, and multiply the square height by the number of rows to estimate the blanket length. Then add twice the border width to each dimension.
Joining seams can change the measurements slightly, so use these figures as planning estimates.
Try a decorative join
The slip-stitch join in the main pattern creates a visible, defined seam. If you want a different look, you could explore a flatter sewn seam or a more prominent single-crochet join. Whichever method you choose, use it consistently across all the squares.
Frequently Asked Questions
1. What is a sunburst granny square?
A sunburst granny square is a crochet motif with a rounded, often floral-looking center, a textured middle section, and an outer round that forms a square. Combining many motifs creates a decorative blanket.
2. Is this blanket pattern suitable for beginners?
It is suitable for confident beginners who already know basic crochet stitches. The main skills to practice are puff stitches, joining rounds, creating square corners, changing colors, and joining motifs.
3. What yarn works best for sunburst granny squares?
Medium-weight yarn is a practical choice for this sample blanket. Cotton, acrylic, and suitable blends can all work. Choose yarns with similar weights and care requirements so the squares behave consistently.
4. How many squares do I need for the sample blanket?
You need 20 squares arranged in four columns and five rows.
5. How large is each square?
The target is approximately 6 × 6 inches before joining. The actual size depends on yarn, hook size, tension, and whether you work the optional fifth round.
6. How can I make the blanket bigger?
Add more columns to increase the width and more rows to increase the length. Multiply the square dimensions by the number of columns and rows, then add twice the planned border width to each measurement.
7. Why does my square curl?
Curling may result from tight tension, incorrect stitch counts, or uneven corner placement. Check that the motif has 12 puff stitches in Round 2, 12 groups of 3 dc in Round 3, and four evenly spaced corners in Round 4.
8. How do I make the corners more defined?
Work the specified corner group of 3 dc, ch 2, 3 dc into each designated corner space. Keep the chain-2 space visible and avoid pulling the stitches too tightly.
9. Should I block the squares before joining?
Blocking is helpful when the squares vary slightly in shape or size. Use a method suitable for your yarn and shape the squares without stretching them excessively. Blocking cannot fix major stitch-count errors.
10. What is the easiest way to join the motifs?
The slip-stitch join used in this tutorial is a straightforward option. Match the corresponding stitches and corner spaces, then slip stitch through both squares with consistent tension.
11. Can I use different colors for every square?
Yes. You can vary the center and textured rounds while keeping a common outer color to tie the blanket together. Plan the arrangement before joining so the colors feel balanced.
12. How should I wash the finished blanket?
Follow the yarn label’s care instructions. Cotton, acrylic, and wool blends can respond differently to washing, heat, and drying. Handle the blanket gently and check that the seams and border remain secure after cleaning.
Conclusion
Your sunburst granny square blanket brings together raised floral textures, colorful motifs, and the classic charm of a handmade crochet blanket. Once you have mastered the four-corner structure, making additional squares becomes a satisfying way to experiment with color and build a design that reflects your style.
Take your time with the first motif, measure your squares before joining, and keep your seam tension consistent for the neatest result.
Which color palette would you choose for your sunburst granny square blanket: warm sunset shades, soft pastels, or timeless neutrals?
Leave a Comment