
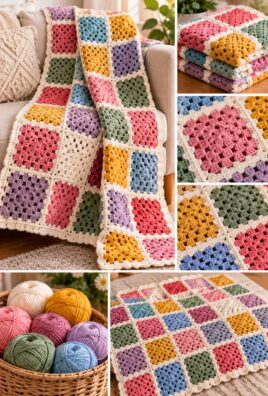
A solid granny square blanket has a smooth, classic look that works beautifully with one color or a mix of coordinating shades. Unlike traditional open granny squares, this version fills the spaces between the corners with stitches, creating a more compact fabric that is ideal for a cozy handmade blanket.
In this tutorial, you’ll learn how to crochet a solid granny square, make matching squares, join them into a blanket, and finish the edges with a neat border. The pattern uses US crochet terminology and includes stitch counts to help you keep every square even.
1. Project Overview
- Skill level: Beginner
- Sample blanket size: Approximately 36 × 48 inches (91 × 122 cm), before and after joining depending on seam width and border
- Individual square size: Approximately 6 × 6 inches (15 × 15 cm)
- Estimated completion time: Approximately 15–25 hours
- Yarn: Worsted-weight yarn, category 4
- Hook: 5.0 mm (US H/8), adjusted to suit your tension
- Estimated yarn quantity: Approximately 1,400–1,800 yards (1,280–1,646 m), including joining and border
- Sample layout: 6 squares across and 8 squares down, for a total of 48 squares
- Joining method: Slip-stitch join worked from the wrong side
- Border: Two rounds of single crochet
The dimensions and yarn requirements are approximate. Your hook size, stitch tension, yarn fiber, and joining method will affect the final measurements.
2. Materials and Tools
Gather the following materials:
- Worsted-weight yarn in one or more colors
- A 5.0 mm crochet hook
- Scissors
- Yarn needle
- Measuring tape
- Stitch marker, if helpful
For a simple two-color blanket, choose one main color for most squares and a contrasting shade for selected squares or the border. If you use several colors, plan the arrangement before joining so that the finished blanket looks balanced.
Choosing your yarn
A smooth acrylic yarn or a washable acrylic blend is a practical choice for a blanket because it is widely available and often easy to care for. Cotton can produce a clearly defined stitch, but it may create a heavier fabric. Wool blends can feel warm and soft but may need more delicate washing.
Choose a yarn that produces a flexible fabric without large gaps between stitches. A hook that is too large may make the blanket more open, while a hook that is too small may make it stiff.
For the sample blanket, plan for approximately 1,400–1,800 yards of yarn in total. The amount needed for each color depends on your layout. Allow extra yarn for joining and the border, especially if you use a contrasting shade.
Check the yarn label before washing or blocking the finished blanket.
5. Understanding the Solid Granny Square
A solid granny square is built in rounds from the center outward. Each round adds stitches along the four sides while preserving four corner spaces.
In this pattern:
- The center begins with four groups of double crochet stitches.
- Each corner is formed by working 2 dc, ch 2, 2 dc into a corner space.
- The stitches between the corners fill the sides, creating a relatively closed fabric.
- Each new round adds four stitches to each side’s length, keeping the square balanced.
Unlike an open granny square, this design does not use repeated chain spaces along the sides. The only chain spaces are at the four corners, where they provide room for the square to expand.
6. Complete Solid Granny Square Pattern
Use worsted-weight yarn and a 5.0 mm hook. The sample square has six rounds and should measure approximately 6 × 6 inches (15 × 15 cm), depending on tension.
Special instructions
Magic ring: Make a loop with the yarn, insert the hook through it, yarn over, and pull up a loop. Chain 3 to begin the first round. Work the stitches into the ring, then pull the yarn tail to close the center.
Alternative starting loop: Ch 4 and join with a sl st to form a ring. Work the first round into the ring instead of a magic ring.
Corner group: Work 2 dc, ch 2, 2 dc into the same corner space. This creates a new corner and adds stitches to both adjoining sides.
Turning and joining: The square is worked in joined rounds. At the start of Rounds 2–6, slip stitch into the next corner space before beginning. The ch 3 at the start of each round counts as the first dc of the corner group. Join each round with a sl st to the top of the starting ch 3. The ch 2 corner spaces do not count as stitches.
Round 1: Create the Center
- Make a magic ring.
- Ch 3; this counts as the first dc.
- Work 2 dc into the ring.
- Ch 2.
- Work 3 dc into the ring, then ch 2.
- Repeat the sequence of 3 dc into the ring, ch 2 twice more.
- Join with a sl st to the top of the starting ch 3.
- Pull the magic ring closed securely.
Count: 12 dc and 4 corner spaces.
You should have four groups of 3 dc, separated by four ch-2 spaces. These spaces establish the square’s corners.
Round 2: Establish the Solid Square
- Sl st into the next 2 dc and into the first corner ch-2 space.
- Ch 3, then work 1 dc into the same corner space.
- Ch 2, then work 2 dc into that same corner space. This completes the first corner group.
- Work 1 dc into each of the next 3 dc along the side.
- In the next corner space, work 2 dc, ch 2, 2 dc.
- Repeat the side-and-corner sequence around the square: 1 dc in each of the 3 side stitches, then 2 dc, ch 2, 2 dc in the next corner space.
- After completing all four corners and sides, join with a sl st to the top of the starting ch 3.
Count: 28 dc and 4 corner spaces, with 7 dc along each side between corner spaces.
The four corner groups form the square shape, while the double crochet stitches along each side fill the spaces between the corners.
Round 3: Expand the Square
- Sl st into the next dc and into the first corner ch-2 space.
- Ch 3, then work 1 dc into the same corner space.
- Ch 2, then work 2 dc into that corner space.
- Work 1 dc into each of the next 7 dc along the side.
- In the next corner space, work 2 dc, ch 2, 2 dc.
- Repeat the side-and-corner sequence around the square, working 1 dc in each stitch along the side and the corner group into each corner space.
- Join with a sl st to the top of the starting ch 3.
Count: 44 dc and 4 corner spaces, with 11 dc along each side.
Round 4: Continue the Solid Square
- Sl st into the next dc and into the first corner ch-2 space.
- Ch 3, then work 1 dc into the same corner space.
- Ch 2, then work 2 dc into that corner space.
- Work 1 dc into each of the next 11 dc along the side.
- In the next corner space, work 2 dc, ch 2, 2 dc.
- Repeat around, working 1 dc in every stitch along each side and a corner group into each corner space.
- Join with a sl st to the top of the starting ch 3.
Count: 60 dc and 4 corner spaces, with 15 dc along each side.
Round 5: Continue Expanding
- Sl st into the next dc and into the first corner ch-2 space.
- Ch 3, then work 1 dc into the same corner space.
- Ch 2, then work 2 dc into that corner space.
- Work 1 dc into each of the next 15 dc along the side.
- In the next corner space, work 2 dc, ch 2, 2 dc.
- Repeat around, working 1 dc into each stitch along the sides and a corner group into each corner space.
- Join with a sl st to the top of the starting ch 3.
Count: 76 dc and 4 corner spaces, with 19 dc along each side.
Round 6: Complete the Sample Square
- Sl st into the next dc and into the first corner ch-2 space.
- Ch 3, then work 1 dc into the same corner space.
- Ch 2, then work 2 dc into that corner space.
- Work 1 dc into each of the next 19 dc along the side.
- In the next corner space, work 2 dc, ch 2, 2 dc.
- Repeat around, working 1 dc into each stitch along each side and a corner group into every corner space.
- Join with a sl st to the top of the starting ch 3.
Count: 92 dc and 4 corner spaces, with 23 dc along each side.
Fasten off, leaving a tail long enough to weave in securely. Thread the tail onto a yarn needle and weave it through several stitches on the wrong side, changing direction before trimming the excess.
Lay the square flat and measure it from edge to edge. If your square is noticeably smaller or larger than approximately 6 inches, use the same number of rounds for every square and adjust the final blanket dimensions accordingly.
7. Stitch Counts and Square Accuracy
Use this reference table to check each round as you work.
| Round | Double crochet stitches | DC stitches per side | Corner spaces |
|---|---|---|---|
| 1 | 12 | 3 | 4 |
| 2 | 28 | 7 | 4 |
| 3 | 44 | 11 | 4 |
| 4 | 60 | 15 | 4 |
| 5 | 76 | 19 | 4 |
| 6 | 92 | 23 | 4 |
Each round adds 16 double crochet stitches in total: four new stitches for each of the four sides. The number of stitches between corner spaces increases by four per round.
The starting ch 3 counts as one dc. The ch-2 spaces at the corners do not count as stitches. The slip stitches used to join rounds are not included in the stitch totals.
To keep the square accurate:
- Work only into the four designated corner spaces for corner groups.
- Work one dc into every stitch between the corner spaces.
- Make sure each side has the same stitch count.
- Check that the square lies flat before moving on to the next motif.
8. Gauge and Finished Square Size
The six-round square is intended to measure approximately 6 × 6 inches (15 × 15 cm), but the actual dimensions depend on your yarn, hook, and tension.
Measure the square from the midpoint of one edge to the midpoint of the opposite edge. Avoid stretching the fabric while measuring.
If your square is smaller than expected, you can try a slightly larger hook. If it is too large or the fabric is too loose, try a smaller hook. Always use the same yarn, hook, and number of rounds for all squares in the blanket.
To make larger squares, continue the same round structure:
- Work the corner group into each corner space.
- Work one dc into every stitch along each side.
- Add four stitches to each side length on every new round.
- Stop when the square reaches your desired size.
For example, Round 7 has 27 dc along each side and 108 dc in total. Round 8 has 31 dc along each side and 124 dc in total.
For smaller squares, stop after fewer rounds. Consistency matters more than reaching an exact measurement, so finish all squares to the same dimensions before joining.
9. Calculate the Number of Squares Needed
The sample blanket uses 48 squares arranged in 6 columns and 8 rows.
Each square measures approximately 6 inches across.
- Across: 6 squares × 6 inches = approximately 36 inches.
- Down: 8 squares × 6 inches = approximately 48 inches.
- Total: 6 × 8 = 48 squares.
These measurements describe the squares before joining. Slip-stitch seams can draw the fabric in slightly, while the outer border adds a little width and length. The finished blanket may therefore differ from the simple 36 × 48-inch calculation.
For a practical estimate, plan for a finished blanket around 36–38 inches wide and 48–50 inches long, depending on your seams and border.
To calculate a different size, divide the desired width and length by the measured size of one finished square. Round to a whole number of squares, then multiply the number across by the number down to find the total.
For example, a 4 × 6 layout uses 24 squares, while a 5 × 7 layout uses 35 squares.
10. Color Planning and Square Layout
Solid granny squares work well in a single color or in a combination of coordinated shades.
One-color blanket
Use the same yarn for all 48 squares, the joining seams, and the border. This creates a simple, uniform look and makes yarn planning easier.
Two-color blanket
Alternate two colors in a regular pattern. For the sample layout, use Color A for the first square in each row, then alternate Color A and Color B across the row. For six squares per row, each row contains three squares of each color.
For eight rows, this layout uses 24 squares in each color.
Multicolor blanket
Choose a small palette of complementary shades and arrange the squares before joining. Spread each color across the blanket rather than clustering all squares of one color in a single area.
Contrasting joins and border
A contrasting color can make the seams and outer edge more noticeable. Remember to reserve enough yarn for joining all 48 squares and completing the border.
Before joining, lay all squares out on a flat surface. Turn or rearrange them until you are happy with the balance of colors. Take a photograph or mark the row order if you need help remembering the layout.
11. Join the Granny Squares
This pattern uses a slip-stitch join from the wrong side. The join creates a visible seam and helps hold the blanket together without requiring a separate sewing needle for every seam.
Step 1: Align two squares
- Place two squares with their wrong sides facing each other and right sides facing outward.
- Align the corresponding corner spaces and edge stitches.
- Insert your hook through the matching edge loops of both squares.
- Join the yarn in the aligned corner spaces with a slip stitch.
For the neatest result, use the same edge loops consistently along the seam.
Step 2: Join the edges
- Insert the hook through the corresponding edge loops of both squares.
- Yarn over and pull through both squares and the loop already on your hook to make a slip stitch.
- Continue with one slip stitch for each pair of corresponding dc stitches along the edge.
- At the far end, join the aligned corner spaces with a slip stitch.
- Fasten off and weave in the yarn ends securely.
Each side of a six-round square has 23 dc stitches between its corner spaces. Match all 23 edge stitches when joining two squares.
Keep the slip stitches even. Pulling too tightly can make the seam pucker, while loose slip stitches may leave gaps.
Step 3: Join the squares into rows
Join the squares side by side until you have six squares in each row. Make eight rows in total.
Lay each completed row flat and check that its edges line up before joining the next row.
Step 4: Join the rows
- Place two completed rows together, with their wrong sides facing each other.
- Align the edges and the points where the squares meet.
- Slip stitch through the corresponding edge loops of the two rows.
- Continue across the full width, matching the square edges and seam intersections carefully.
- Fasten off and weave in the ends.
- Repeat until all eight rows are joined.
At the intersections where four squares meet, keep the corner spaces aligned. Avoid adding several extra stitches into the same intersection, as this can create a bulky knot of yarn.
Step 5: Inspect the seams
Lay the joined blanket flat. Check for gaps, tight seams, and places where the corners do not meet neatly. Correct any uneven joins before adding the border.
The blanket should lie flat, with the squares arranged in straight rows and columns.
12. Crochet the Blanket Border
The border uses two rounds of single crochet. It gives the outside edge a neat finish and helps the blanket look complete.
Use the border color of your choice.
Border Round 1
- Join the yarn at an outer corner of the blanket.
- Ch 1. This chain does not count as a stitch.
- Along the top edge, work 1 sc into each dc stitch on the outer edges of the squares.
- Where two squares meet along the outer edge, work 1 sc into the joining point if needed to fill the small gap without bunching the fabric.
- At each outer corner, work 3 sc into the corner space or corner stitch area.
- Continue around the entire blanket, working evenly along the sides.
- Join with a sl st to the first sc.
When working along an edge made from the sides of squares, distribute the stitches evenly. Avoid forcing too many stitches into a narrow area or skipping so many that the edge draws inward.
Border Round 2
- Ch 1; it does not count as a stitch.
- Work 1 sc into each stitch around.
- At each outer corner, identify the middle stitch of the 3-sc corner group from the previous round and work 3 sc into that stitch.
- Continue around the blanket, keeping the stitch tension even.
- Join with a sl st to the first sc.
- Fasten off and weave in the yarn ends securely.
The second round maintains the corners and adds a little more definition to the edge. If you prefer a narrower border, you can stop after Round 1.
Keep the border even
- If the border pulls inward, you may have worked too few stitches along the edges.
- If the border waves, you may have worked too many stitches or used inconsistent tension.
- Make sure the corner increases are worked into the middle stitch of each corner group in Round 2.
- Check that the blanket remains flat as you work.
13. Finishing and Blocking
Once the border is complete, take a few minutes to finish the blanket neatly.
- Weave in all yarn ends. Thread each tail onto a yarn needle and weave it through several stitches on the wrong side. Change direction before trimming the excess.
- Inspect the joins. Check the seams between squares and reinforce any loose sections.
- Shape the blanket. Lay it flat and gently smooth the squares, seams, and border.
- Check the corners. Make sure the four outer corners are reasonably square and the border does not pull inward.
- Measure the blanket. Record the final width and length so you know the finished dimensions.
- Block if appropriate. Follow the yarn manufacturer’s recommendations. Some fibers tolerate gentle wet blocking, while others may be better shaped with a light steam treatment or simply smoothed by hand.
Do not apply high heat unless the yarn care instructions specifically permit it. Acrylic and other synthetic fibers can be damaged by excessive heat.
14. Troubleshooting
The square curls upward
Likely cause: The fabric may be too tight, or the corner increases may have been missed.
Solution: Check that each corner has the correct 2 dc, ch 2, 2 dc group. If the square remains curled, try a larger hook and compare the fabric.
The square becomes wavy
Likely cause: Extra stitches may have been added, or corner groups may contain too many stitches.
Solution: Count the stitches along each side and check that you have only four corner spaces. Follow the increase sequence without adding extra stitches along the sides.
The corners are not clearly defined
Likely cause: The corner spaces may be too small or may have been worked incorrectly.
Solution: Make sure each corner contains ch 2 between the two pairs of dc stitches. Keep the corner spaces consistent in every round.
The side stitch counts become uneven
Likely cause: A stitch may have been skipped or worked twice.
Solution: Count the dc stitches between corner spaces after every round. The sample square should have 3, 7, 11, 15, 19, and 23 dc along each side from Rounds 1–6.
The center has a large hole
Likely cause: The magic ring may not have been tightened fully.
Solution: Pull the starting tail firmly but carefully to close the center. Weave the tail through nearby stitches on the wrong side to help secure it.
The square is not actually square
Likely cause: One or more sides may have a different stitch count, or the tension may vary between rounds.
Solution: Measure both dimensions and compare the side stitch counts. If the square is badly uneven, correct the round where the count first changed.
Different squares have different dimensions
Likely cause: Your tension may have changed, or you may have used different hooks or yarns.
Solution: Use the same hook, yarn weight, and number of rounds for every square. Measure each square before joining. If a square is only slightly different, gentle blocking may help when appropriate for the yarn.
The seams look bulky
Likely cause: The slip stitches may be too tight, or extra stitches may have been worked at the intersections.
Solution: Use consistent loops from both squares and maintain relaxed tension. Avoid making multiple extra stitches in one corner intersection.
Gaps appear where four squares meet
Likely cause: The corner spaces may not have been aligned during joining.
Solution: Align the four corner spaces before joining the rows. Secure the intersection with the joining seam without pulling the yarn so tightly that the fabric puckers.
The blanket border puckers or flares
Likely cause: Too few or too many stitches were worked along the outer edges.
Solution: Work evenly along the square edges and add stitches at the outer corners. If the edge pulls inward, add the necessary stitches along the sides; if it waves, remove excess stitches.
The finished blanket is smaller or larger than expected
Likely cause: The squares differ from the estimated 6-inch size, or the joining seam and border have changed the final dimensions.
Solution: Measure a finished square before making all 48. Calculate the layout using your actual square size, and allow for the joining seam and border when estimating the finished blanket.
15. Customization and Blanket Variations
You can adapt this pattern to make blankets in different sizes and color combinations.
- Baby-size blanket: Use a smaller layout, such as 4 × 5 squares, for 20 squares total. With 6-inch squares, the dimensions before joining and border are approximately 24 × 30 inches.
- Lap blanket: Use a layout such as 6 × 8 squares, as in the main pattern, or increase the number of squares for a larger result.
- Larger blanket: Add more squares across and down. This increases both the yarn requirement and the number of seams.
- Single-color design: Crochet all squares in one shade for a coordinated, minimalist look.
- Multicolor design: Use a planned palette and arrange the squares before joining.
- Contrasting seams: Use a different color for the slip-stitch joins to make the grid more noticeable.
- Decorative border: Add another border round if desired, but keep the stitch count and corner increases consistent.
- Different yarn fiber: Choose a fiber suited to the blanket’s intended use and care requirements. Changing yarn weight may also change square dimensions and the amount of yarn needed.
Whenever you change the layout or square size, recalculate the total number of squares and measure the finished motifs before joining.
16. Frequently Asked Questions
1. Is a solid granny square blanket suitable for beginners?
Yes. The square uses basic double crochet stitches, chain spaces, and repeated corner groups. The main skills are counting stitches and recognizing the four corner spaces.
2. What is the difference between a solid granny square and a classic open granny square?
A classic open granny square often uses groups of stitches separated by chain spaces along the sides. This solid version fills the sides with double crochet stitches, leaving only the four corner chain spaces. The result is a more compact fabric.
3. How do I keep the square flat?
Use the correct corner group in every round, maintain an even stitch count along all four sides, and avoid pulling the stitches too tightly. If the square curls or waves, check the corner increases and hook size.
4. How can I make all my squares the same size?
Use the same yarn, hook, stitch pattern, and number of rounds for every square. Measure the squares as you finish them and block them consistently if the yarn permits.
5. How many squares do I need for a blanket?
The sample blanket uses 48 squares in a 6 × 8 layout. The total for any blanket is the number of squares across multiplied by the number of squares down. Use your actual square dimensions to estimate the finished size.
6. Which joining method works best for solid granny squares?
This tutorial uses a slip-stitch join from the wrong side. It creates a visible seam and connects the squares without requiring separate sewn seams. A different method can change the texture and final dimensions slightly.
7. Why do my seams look bulky?
The joining stitches may be too tight, or the corner intersections may contain extra stitches. Align the squares carefully and use the same edge loops throughout each seam.
8. Can I make the blanket in different colors?
Yes. You can alternate two colors, use a coordinated palette, or make every square a different shade. Plan the arrangement before joining so the final layout looks balanced.
9. How do I calculate the final blanket dimensions?
Multiply the measured square width by the number of squares across and the measured square height by the number of squares down. Then allow for the joining seams and border, which may change the finished dimensions slightly.
10. How should I wash and care for the finished blanket?
Follow the yarn manufacturer’s care instructions. Some yarns can be machine-washed, while others require gentler treatment. Avoid high heat unless permitted, and make sure the blanket is completely dry before storing it.
Final Thoughts
A solid granny square blanket is a rewarding project that combines a simple repeat with plenty of room for color and creativity. Once you master the six-round square, you can make matching motifs, join them into a coordinated layout, and finish the blanket with a clean single-crochet border.
For the neatest result, keep your stitch counts consistent, measure your squares before joining, and take your time with the seams and finishing. The same basic method can be adapted to many blanket sizes while preserving the classic solid granny square look.
Leave a Comment