
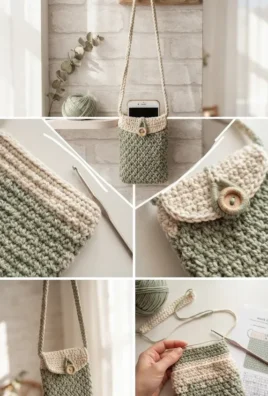
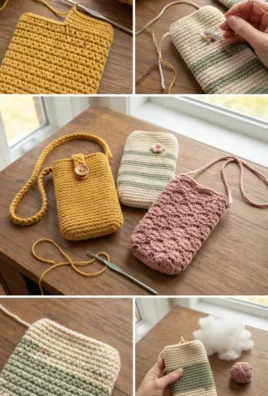
A handmade crochet phone pouch is a stylish, compact, and highly practical accessory that keeps your smartphone secure while offering a touch of custom charm. Featuring solid textured stitches, lovely striped color variations, embroidered floral details, secure button closures, and comfortable braided straps, these pouches are as fun to craft as they are to use.
Following your preferred style, this pattern is completely text-based with zero images and zero tables, providing clear, descriptive, and structured instructions in English from start to finish.
1. Project Overview
All measurements and times are approximate:
- Skill level: Easy to Intermediate
- Completion time: 3 to 5 hours per pouch
- Finished size: Approximately 4.5 inches wide by 7 inches tall (customizable for any smartphone size), with a 40-inch crossbody strap
- Construction: Worked in continuous spiral rounds from the bottom up to form a sturdy sleeve pouch, with optional flaps, button loops, and separate crossbody straps attached securely
- Main stitches: Magic ring, chain, slip stitch, single crochet, half double crochet, and shell textures
- Suggested uses: Hands-free errands, travel, walks, festivals, and thoughtful handmade gifting
The final dimensions will depend on your yarn weight, hook size, and personal stitch tension.
2. Materials and Supplies
- Yarn: Sturdy medium worsted weight yarn (Category 4) or DK cotton yarn:
- Color Options: Mustard Yellow, Cream/Sage Green stripes, and Dusty Rose (approx. 80 to 100 g per pouch)
- Crochet hook: 3.5 mm (US E/4) or 4.0 mm (US G/6) to keep the fabric dense and protective for your device
- Hardware & Fasteners: One wooden button or decorative toggle fastener
- Tapestry needle: Blunt-ended yarn needle for embroidery, seaming, and weaving in tails
- Stitch marker: Essential for marking the beginning of spiral rounds
- Scissors & measuring tape: For clean cuts and accurate device sizing
3. US Crochet Abbreviations & Stitch Meanings
- ch: Chain stitch
- sl st: Slip stitch
- sc: Single crochet
- hdc: Half double crochet
- inc: Single crochet increase (work 2 single crochets into the same stitch)
- st(s): Stitch or stitches
- sp: Space
- ch-sp: Chain space
- MR: Magic ring
- FO: Fasten off
Special Technique: The Secure Base Round
To create a flat, sturdy base that fits a smartphone snugly without sagging, work across both sides of a short foundation chain, placing multiple stitches into the end loops to curve smoothly upward into the pouch walls.
4. Skills to Know Before Starting
- Working in Continuous Spirals: Keep your stitch marker at the start of each round to avoid losing track of your height.
- Surface Embroidery: Adding simple embroidered flowers or French knots to personalize plain striped pouches.
- Strap Reinforcement: Securing straps firmly to the inner side seams so they can handle daily weight.
5. Complete Step-by-Step Crochet Pattern
Part A: The Main Pouch Body (Solid or Striped)
- Foundation Chain: Ch 18 in your chosen main color (e.g., Mustard Yellow or Cream).
- Round 1: Starting in 2nd ch from hook, work 1 sc in each of the next 16 chains, 3 sc in the final chain. Working along the opposite side of the chain, work 16 sc, then 2 sc in the last chain [36 sts].
- Round 2: Work 1 sc in each st around [36 sts].
- Rounds 3–24 (22 rounds): Work 1 sc in each stitch around to build a deep sleeve pouch [36 sts]. (Note: Switch yarn colors every 4 to 6 rounds if you want a striped cream and sage green effect).
- Fasten off and weave in tails.
Part B: Optional Folding Flap and Button Loop
- Flap Row 1: Count 18 stitches across the back rim of the pouch. Attach yarn and work 1 hdc in each of those 18 stitches [18 sts]. Ch 2, turn.
- Flap Rows 2–5 (4 rows): Work 1 hdc in each st across [18 sts]. Ch 2, turn.
- Flap Row 6 (Buttonhole Row): Work 7 hdc, chain 5, skip 4 stitches, work 7 hdc [19 sts including ch-sp]. Ch 2, turn.
- Flap Row 7: Work 1 hdc in each st across and 4 hdc inside the chain-5 loop. Fasten off.
- Attaching the Button: Align the flap down over the front of the pouch and sew a wooden button securely onto the front body so it buttons neatly through the loop.
Part C: Crossbody Strap
- Foundation: Ch 160 (approx. 40 inches long).
- Row 1: Starting in 2nd ch from hook, work 1 slip stitch or 1 half double crochet across every chain to form a sturdy strap.
- Fasten off, leaving long sewing tails, and attach both ends securely to the upper interior side seams of the phone bag.
6. Optional Surface Embroidery (For Striped Pouches)
- Embroidered Daisies: Thread your tapestry needle with yellow and white yarn. Stitch simple lazy-daisy petals radiating outward from a yellow French knot onto the upper cream section of a striped pouch for a sweet floral accent.
7. Troubleshooting Common Problems
- The pouch is too tight for the phone: Smartphone models vary in thickness. If needed, start with a foundation chain of 20 or 22 stitches instead of 18.
- The strap stretches out: Use half double crochet instead of slip stitches for the strap, or work a braided chain to minimize elasticity.
- Stitches look uneven: Keep a consistent pulling tension on your yarn so the single crochet rows stack evenly.
8. Frequently Asked Questions
1. Can I use cotton yarn instead of acrylic?
Yes! Cotton yarn is ideal for phone bags because it has minimal stretch, keeping the pouch sturdy and secure.
2. How do I wash the finished phone pouch?
Hand wash gently in cool water with mild detergent, press out excess moisture in a clean towel, and lay flat to dry.
3. Can I make this pouch without a flap?
Yes, many phone pouches are made as open top sleeves without flaps or buttons for quick, easy access to your device.
Leave a Comment