
A modern granny square combines a classic crochet technique with fresh colors, clean edges, and a balanced geometric shape. Made from clusters of double crochet stitches worked from the center outward, this versatile motif is perfect for blankets, tote bags, cushions, cardigans, and many other handmade projects.
In this beginner-friendly tutorial, you will learn how to create a neat granny square with four well-defined corners, consistent side clusters, and tidy color changes. The pattern uses joined rounds and a repeatable structure, so you can make matching squares for a larger project.
1. Project Overview
- Skill level: Beginner to confident beginner
- Approximate completion time: 30–60 minutes for a small square
- Approximate finished size: 5–6 inches after four rounds, depending on gauge
- Construction: Worked from the center outward in joined rounds
- Main stitch: Double crochet
- Design features: Four chain-space corners and groups of three double crochet stitches
- Color options: One color, two coordinated colors, or a different color for each round
- Suitable projects: Blankets, cushion covers, bags, garments, and decorative accessories
The finished size and completion time vary with your yarn, hook size, tension, and number of rounds. If you plan to make several squares for one project, use the same yarn and hook and keep your tension consistent.
2. Materials and Supplies
Gather the following materials:
- Medium-weight yarn in one, two, or three coordinated colors
- Crochet hook suitable for your yarn, often around 5 mm for medium-weight yarn
- Scissors
- Tapestry or yarn needle
- Measuring tape
- Stitch markers, optional
Choosing yarn and hook size
Medium-weight yarn is a good choice for beginners because the stitches are easy to see and the square grows quickly. Cotton, acrylic, and cotton-blend yarns can all work well.
Choose a hook size that creates a flexible fabric without large gaps. If your square feels stiff or curls inward, your hook may be too small or your tension may be too tight. If the fabric looks loose and the corners are difficult to define, try a smaller hook.
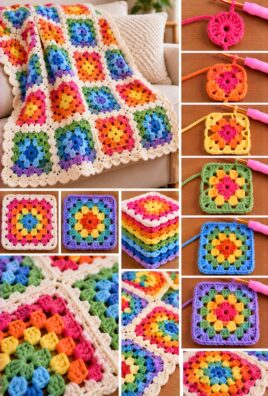
For a modern appearance, choose a restrained color palette. Cream with sage green, charcoal with dusty pink, or navy with warm beige can create a clean, contemporary look. A single color can also look modern when the stitch clusters and corners are even.
3. US Crochet Abbreviations
This tutorial uses US crochet terminology.
- ch: Chain
- sl st: Slip stitch
- dc: Double crochet
- sp: Space
- st / sts: Stitch / stitches
- rep: Repeat
- rnd: Round
Important pattern notes
- The square is worked in joined rounds, not turned rows.
- The beginning chain three counts as the first double crochet of the round.
- A group of three double crochet stitches is called a cluster in this pattern.
- A corner space is made with chain stitches and separates the clusters at a corner.
- Join each round with a slip stitch to the top of the beginning chain three.
Counting the beginning chain as a double crochet keeps the round counts consistent and avoids adding an extra stitch at the join.
4. Basic Skills Before You Begin
You only need a few basic crochet skills to make this square. If you are new to crochet, practice each movement before starting the full pattern.
Make a slip knot
- Leave a short yarn tail.
- Form a loop with the yarn, crossing the working yarn over the tail.
- Pull a small loop of the working yarn through the first loop.
- Place the new loop on your hook.
- Tighten gently so the loop slides comfortably along the hook.
Make a magic ring
- Wrap the yarn around two fingers to form a loop.
- Insert the hook under the first strand and catch the working yarn.
- Pull a loop through, then chain one to secure the ring.
- Work the stitches required by the pattern into the ring.
- Pull the yarn tail to close the center after the first round.
If the magic ring feels difficult, chain four and join with a slip stitch to make a small ring. Work the first round into the center of that ring. The center may leave a slightly larger hole, but it is a useful alternative for beginners.
Make a double crochet
- Yarn over and insert the hook into the stitch or space.
- Yarn over again and pull up a loop. You should have three loops on the hook.
- Yarn over and pull through the first two loops.
- Yarn over again and pull through the remaining two loops.
One double crochet is complete.
Make a granny cluster
A granny cluster is a group of three double crochet stitches worked into the same space. In this pattern, the clusters are separated by chain spaces. Do not work the three double crochet stitches into the individual stitches of the previous cluster; work them into the designated chain space.
Join a round
At the end of a round, insert your hook into the top of the beginning chain three, yarn over, and pull through both the stitch and the loop on your hook. This makes a slip stitch and closes the round.
5. Design and Construction
This pattern uses a classic granny-square structure with a clean, contemporary finish.
The square begins with four double crochet clusters arranged around a center ring. Chain-two spaces form the four corners. In later rounds, each corner space receives two clusters separated by a chain-two space. Chain-one spaces between the corners create places for new clusters along the sides.
Each new round adds one more side cluster along every side. This keeps the square expanding evenly while preserving four distinct corners.
For a modern finish, use two or three coordinated colors, keep the clusters consistent, and weave in the yarn ends neatly. You can also use a single color for a minimalist square with a subtle geometric texture.
6. Detailed Round-by-Round Pattern
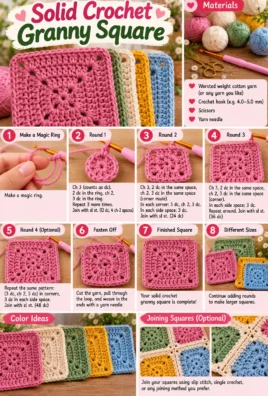
Round 1: Create the Center
Begin with a magic ring, or use the chain-four alternative described above.
- Ch 3. This counts as the first dc of the first cluster.
- Work 2 dc into the center ring.
- Ch 2 to create the first corner space.
- Work 3 dc into the ring, then ch 2.
- Repeat the previous step twice more.
- Join with a sl st to the top of the beginning ch 3.
- If you used a magic ring, pull the yarn tail to close the center.
You should have four clusters and four corner spaces. Each cluster contains three double crochet stitches, counting the beginning chain three as the first stitch of the first cluster.
The four chain-two spaces form the corners. The center should look like a small square rather than a circle.
Round 2: Establish the Square
In this round, each corner space receives two clusters, with a chain-two space between them. A chain-one space separates the corner groups along each side.
- Sl st across the next two dc to reach the first corner space.
- Ch 3, then work 2 dc into the same corner space.
- Ch 2, then work 3 dc into that same corner space. This completes the corner group.
- Ch 1.
- In the next corner space, work 3 dc, ch 2, and 3 dc.
- Ch 1.
- Repeat the corner group and chain-one sequence around the square until all four corners have been worked.
- Join with a sl st to the top of the beginning ch 3.
You should now have eight clusters, four corner spaces, and four chain-one side spaces. Each side has one chain-one space between the two clusters that sit beside its corners.
The square should be wider than Round 1, with four visible corners and a small gap along each side where the next round’s cluster will go.
Round 3: Build the Side Clusters
Round 3 introduces the first cluster along each side.
- Sl st across the next two dc and into the next corner space.
- Ch 3, then work 2 dc into the same corner space.
- Ch 2, then work 3 dc into the same corner space.
- Ch 1.
- Work 3 dc into the next chain-one side space.
- Ch 1.
- In the next corner space, work 3 dc, ch 2, and 3 dc.
- Ch 1, work 3 dc into the next side space, then ch 1.
- Repeat this sequence around the square until all four corners and side spaces have been worked.
- Join with a sl st to the top of the beginning ch 3.
You should have 12 clusters in total: eight corner clusters and four side clusters. Each side now has one side cluster between its corner groups. There are four corner spaces and eight chain-one side spaces.
The square should look more defined, with a visible cluster along each side and clear corner spaces.
Round 4: Add Another Layer
Round 4 follows the same construction as Round 3, but there are now two chain-one spaces along each side. Work one cluster into each side space from the previous round.
- Sl st across the next two dc and into the next corner space.
- Ch 3, then work 2 dc into the same corner space.
- Ch 2, then work 3 dc into the same corner space.
- Ch 1.
- Work 3 dc into each chain-one side space until you reach the next corner. Ch 1 between each cluster.
- In the next corner space, work 3 dc, ch 2, and 3 dc.
- Ch 1 and repeat the side-space clusters and corner group around the square.
- Join with a sl st to the top of the beginning ch 3.
You should have 16 clusters in total: eight corner clusters and eight side clusters. Each side has two side clusters, four corner spaces remain, and there are 12 chain-one side spaces.
The square should be larger and retain its four corners. If the edges start to ripple, check your tension and make sure every side cluster is worked into a chain-one space rather than into the top of a double crochet stitch.
Round 5 and Additional Rounds
You can continue growing the square by repeating the structure of Round 4.
For every additional round:
- Move to the next corner space with slip stitches.
- Ch 3, then work 2 dc into that corner space.
- Ch 2, then work 3 dc into the same corner space.
- Ch 1.
- Work 3 dc into every chain-one space along the side, placing ch 1 between clusters.
- At the next corner space, work 3 dc, ch 2, and 3 dc.
- Continue around all four sides, maintaining the same corner and side-space sequence.
- Join with a sl st to the top of the beginning ch 3.
Each new round adds one additional side cluster to every side. For example, Round 5 has three side clusters per side, and Round 6 has four side clusters per side.
Keep the corner spaces at chain two and the side spaces at chain one. These consistent spaces help the square expand without losing its shape.
7. Changing Colors
Color changes can give a granny square a modern, polished look. You can use a different color for every round, keep the center contrasting with neutral outer rounds, or work the entire square in one color.
Change color at the end of a round
For a neat color change:
- Complete the final round until you reach the last joining slip stitch.
- Before pulling the final yarn through the loops, drop the old color and use the new color to complete the join.
- Tighten the new color gently.
- Begin the next round with the new color and follow the same corner and side-space instructions.
- Weave in both yarn tails on the wrong side when you finish.
Avoid leaving long loose loops at the join. Secure the tails by weaving them through several stitches in different directions.
Three simple color approaches
- A different color for every round: Choose colors that work well together, such as cream, sage, and muted terracotta.
- Contrasting center with neutral outer rounds: Use a bright center and finish the outer rounds in cream, beige, or gray.
- Single-color design: Work all rounds in one color for a clean, understated look.
For a set of squares, keep the color order consistent unless you deliberately want a varied design.
8. Stitch Count and Round Reference
The following table summarizes the main counts for the first four rounds.
| Round | Total clusters | Side clusters per side | Corner spaces | Side chain-one spaces |
|---|---|---|---|---|
| 1 | 4 | 0 | 4 | 0 |
| 2 | 8 | 0 | 4 | 4 |
| 3 | 12 | 1 | 4 | 8 |
| 4 | 16 | 2 | 4 | 12 |
| 5 | 20 | 3 | 4 | 16 |
| 6 | 24 | 4 | 4 | 20 |
A cluster is a group of three double crochet stitches. The beginning chain three counts as the first double crochet of its cluster.
There are always four corner spaces. Each new round adds four clusters in total, one on each side, and adds four chain-one side spaces. This predictable pattern makes it easier to check your work as the square grows.
9. Size and Customization
The finished size depends on your yarn, hook size, tension, and number of rounds.
Make the square larger
Add more rounds using the same corner and side-space sequence. Each additional round adds one side cluster along every side.
Make the square smaller
Stop after fewer rounds. For a small motif, two or three rounds may be enough, while larger squares may need six or more rounds.
Measure your square
Lay the square flat without stretching it and measure from one side to the opposite side. Measure across the center rather than diagonally from corner to corner.
For a project made from multiple motifs, use the same yarn, hook, and round count for every square. If your tension varies, block the motifs to consistent dimensions where appropriate for the yarn.
Adapt the square for different projects
- Blankets: Make enough squares to create the desired width and length, then plan the joining and border.
- Cushion covers: Match the square dimensions to the cushion insert and use a suitable joining method.
- Bags: Choose a firm yarn and dense enough fabric to support the intended use.
- Clothing: Make consistent motifs and check their drape and fit before joining them into a garment.
Do not assume a fixed number of squares will create a particular finished size. Measure your completed motifs and plan the layout before joining.
10. Finishing
Once the square reaches your desired size, complete the final joining slip stitch and fasten off.
- Cut the yarn, leaving a tail long enough to weave in.
- Pull the tail through the loop on your hook and tighten gently.
- Thread the tail onto a tapestry needle.
- Weave the tail through several stitches on the wrong side, changing direction to help secure it.
- Weave in any remaining yarn tails from color changes.
- Lay the square flat and check that all four corners are defined and the sides are even.
Blocking the square
Blocking can improve the square’s appearance, especially when you are making several motifs for one project.
- Lay the square on a suitable flat surface.
- Gently shape the four corners and straighten the sides.
- Measure the square and compare it with your other motifs.
- Pin the corners and sides in place if suitable for the yarn and blocking method.
- Allow the square to dry completely before removing the pins.
Follow the care instructions for your yarn. Avoid direct heat or steam on fibers that may be damaged by it. Blocking should help the square lie flat, not stretch it excessively.
11. Troubleshooting
| Problem | Likely cause | Practical correction |
|---|---|---|
| The square curls inward | The hook may be too small, tension too tight, or side spaces missed | Check that every side cluster is worked into a chain-one space. Try a larger hook if the fabric is too stiff. |
| The edges become wavy | The stitches or spaces are too loose, or extra clusters were added | Count the side clusters and keep the chain-one spaces consistent. |
| The corners look rounded or uneven | The corner space was missed or the corner clusters are uneven | Work 3 dc, ch 2, and 3 dc in every corner space. |
| Side clusters have inconsistent spacing | Some clusters were worked into stitches instead of chain spaces | Identify the chain-one spaces and place one cluster in each space. |
| The center ring leaves a large hole | The magic ring was not tightened enough or a chain-loop start was used | Pull the magic-ring tail firmly after Round 1 and weave in the tail securely. |
| Joins are visible | The joining slip stitch is too loose or color changes are uneven | Keep the joining stitch snug and change colors during the final joining movement. |
| Color changes look messy | Yarn tails are loose or the new color was attached unevenly | Secure the tails by weaving them through several stitches and keep the first stitch of each new round consistent. |
| Multiple squares have different dimensions | Tension, yarn, hook, or round count varies | Use the same materials, count rounds, and block motifs to a consistent size when suitable. |
12. Quick Pattern Summary
Materials
- Medium-weight yarn in one to three colors
- Suitable crochet hook
- Scissors, tapestry needle, measuring tape
- Optional stitch markers
Abbreviations
- ch: Chain
- sl st: Slip stitch
- dc: Double crochet
- sp: Space
- st(s): Stitch(es)
- rep: Repeat
- rnd: Round
Round 1
- Magic ring; ch 3, 2 dc into the ring, ch 2.
- Work 3 dc and ch 2 three more times.
- Join with sl st to the top of the beginning ch 3.
- Count: 4 clusters and 4 corner spaces.
Round 2
- Sl st across the next two dc into the corner space.
- In each corner space, work 3 dc, ch 2, 3 dc.
- Ch 1 between corner groups.
- Join with sl st to the top of the beginning ch 3.
- Count: 8 clusters, 4 corner spaces, 4 side chain-one spaces.
Round 3
- In each corner space, work 3 dc, ch 2, 3 dc.
- Ch 1, work 3 dc in each side chain-one space, and ch 1 before the next corner.
- Join with sl st.
- Count: 12 clusters, 1 side cluster per side, 4 corner spaces, 8 side chain-one spaces.
Round 4 and beyond
- Work the corner group in each corner space.
- Ch 1 between the corner and side clusters.
- Work 3 dc in every side chain-one space, with ch 1 between clusters.
- Join with sl st to the top of the beginning ch 3.
- Each new round adds one side cluster per side.
Finishing
- Fasten off and weave in the yarn ends.
- Shape the four corners and straighten the sides.
- Block gently if appropriate for the yarn.
13. Project Ideas
Once you have made a set of matching squares, you can use them in a variety of projects.
- Blankets and throws: Join squares in rows and columns, then add a border to finish the outer edge.
- Cushion covers: Make a front and back panel, join them around a cushion insert, and secure the opening.
- Tote bags and shoulder bags: Choose a sturdy yarn and reinforce the seams and handles.
- Cardigans and vests: Plan the square arrangement carefully, check the fit, and use a joining method that suits the garment’s drape.
- Table runners and decorative accessories: Combine coordinated colors and finish the outer edges neatly.
Consistent square dimensions and a suitable joining method are important for a polished result. For wearable items and bags, also consider the fabric’s stretch, weight, and durability.
14. Frequently Asked Questions
Is a modern granny square suitable for beginners?
Yes. The pattern uses double crochet clusters and chain spaces. Once you understand the corners and joining method, the repeated rounds become easier to follow.
What makes a granny square look modern?
Restrained color combinations, consistent clusters, even tension, and neat finishing can create a contemporary look. A single-color square can also look modern.
Can I crochet the square in one color?
Yes. Keep the same yarn throughout the rounds. The shape will still be defined by the clusters and corner spaces.
How do I prevent the square from curling?
Check your tension and make sure every corner is worked correctly. Avoid missing side spaces, and try a different hook size if the fabric is too stiff or loose.
How many rounds should I make?
Make as many rounds as needed for your desired dimensions. Measure the square as it grows, because the finished size depends on yarn, hook size, and tension.
How can I make multiple squares the same size?
Use the same yarn and hook, maintain consistent tension, and make the same number of rounds. Measure each square and block them to consistent dimensions where suitable.
Do I need to change colors between rounds?
No. You can use one color for the entire square or change colors at the end of any round. Secure and weave in the yarn tails neatly.
Is blocking necessary?
Not always, but blocking can help straighten the sides and align the corners, especially when making multiple motifs for a larger project.
How can I join several squares together?
Slip-stitch joining is one option for a relatively low-profile seam. Align the edges first and join corresponding stitches with consistent tension to avoid gaps or puckering.
Conclusion
A modern granny square is a rewarding project that combines simple stitches with endless design possibilities. By keeping your clusters consistent, forming each corner carefully, and finishing the edges neatly, you can create a motif that works beautifully on its own or as part of a larger project.
Practice the four-round pattern, experiment with colors, and make a set of matching squares for your next blanket, bag, cushion, or garment.
Leave a Comment