
The crochet slip stitch is one of the shortest and most useful stitches to learn. It helps you join rounds, move across stitches without adding much height, finish edges, and create decorative details on handmade projects.
If you are new to crochet, this simple stitch is an excellent place to build your skills. Once you understand where to insert your hook and how to pull the yarn through the loops, you can use slip stitches in granny squares, hats, blankets, garments, and many other projects.
1. What Is a Crochet Slip Stitch?
A crochet slip stitch is a small, low-profile stitch that creates very little height compared with a single crochet or double crochet stitch.
It is commonly used to connect stitches, close rounds, move the working yarn to another part of a project, and create neat finishing details.
A slip stitch looks like a small loop or horizontal link along the top of the crochet fabric. Because it is so short, it adds very little bulk.
Slip stitch vs. single crochet
The main difference is how the yarn is pulled through the loops.
- Slip stitch: Pull the yarn through the target stitch and then through the loop already on the hook in one continuous movement.
- Single crochet: Pull up a loop through the target stitch first, creating two loops on the hook, then yarn over and pull through both loops.
A slip stitch is shorter and usually quicker to complete. However, it can become difficult to work into later rows if you pull it too tightly.
2. Materials and Supplies
You only need a few basic supplies to practice a slip stitch.
- Medium-weight yarn in a light or clearly visible color
- A crochet hook suitable for your yarn
- Scissors
- A yarn needle for weaving in the yarn end
Smooth, light-colored yarn is especially helpful for beginners because it makes the stitches and loops easier to see.
Check the yarn label for a recommended hook size. If you already have a comfortable hook and yarn combination for practicing chain stitches, you can use the same materials here.
3. Crochet Abbreviations
The following standard US crochet abbreviations are used in this tutorial.
| Abbreviation | Meaning |
|---|---|
| ch | Chain |
| sl st | Slip stitch |
| st | Stitch |
| sts | Stitches |
| sp | Space |
| FO | Fasten off |
In written crochet patterns, sl st is the standard abbreviation for slip stitch.
A stitch is a completed crochet stitch, while a space is an opening in the fabric, such as the gap beneath a chain or between stitch groups. Your pattern will tell you whether to insert the hook into a stitch or a space.
4. Skills to Know Before Starting
You do not need much crochet experience to learn a slip stitch, but understanding a few basics will make the process easier.
Holding the hook
Hold your hook in a comfortable position, either like a pencil or like a knife. There is no single correct grip as long as you can control the hook smoothly.
Controlling the yarn
Keep the working yarn moving steadily through your fingers. You want enough tension to form neat stitches without making the loops too small.
Making a slip knot
A slip knot attaches the yarn to your hook. Make a loop with the yarn, pull a strand through it, and place the resulting loop on the hook. Tighten it gently around the hook without making it difficult to move.
A slip knot is not the same as a slip stitch. The slip knot is used to begin working, while a slip stitch is made by inserting the hook into a chain, stitch, or space and pulling yarn through.
Making a foundation chain
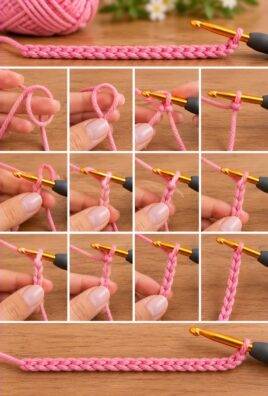
To make a chain, yarn over and pull the yarn through the loop on your hook. Repeat until you have the desired number of chains.
Recognizing the top loops
Most crochet stitches have two loops across the top that resemble a small V. Unless a pattern says otherwise, insert the hook under both loops when working into the top of a stitch.
5. How to Crochet a Slip Stitch Step by Step
For your first practice sample, make a foundation chain of 11 chains. This gives you 10 chain stitches to work into after the loop on your hook.
Beginner tip: Work slowly at first. The most important part is pulling the same loop through both the target stitch and the loop already on your hook.
Step 1: Make a slip knot
Create a slip knot and place it on your crochet hook.
Adjust it so the loop fits comfortably around the hook. It should slide along the shaft without being loose enough to fall off.
Step 2: Make a foundation chain
Yarn over and pull through the loop on your hook to make one chain.
Continue until you have 11 chains in total. Keep the chains loose enough that you can insert the hook into them easily.
Step 3: Find the next chain
Look at the chain beneath your hook. Each chain has small loops along its top.
Skip the chain directly beneath the active loop and insert the hook into the next chain. This leaves a convenient starting chain and makes it easier to see your first slip stitch.
Step 4: Insert the hook
Push the hook under the top loop of the selected chain. For this beginner exercise, you can work under the top loop only, although working under both top loops is also common in other patterns.
Make sure the hook passes through the chain rather than through the large opening between chains.
Step 5: Catch the working yarn
Bring the working yarn over the hook from back to front. This movement is called a yarn over.
Keep the yarn held securely enough that it does not slip off the hook.
Step 6: Pull the yarn through the target chain
Use the hook to pull the yarn through the chain you inserted it into.
You now have the newly pulled loop on your hook, along with the loop that was already there.
Step 7: Pull the same loop through the active loop
Continue moving the hook so that the newly pulled loop passes through the loop already on the hook.
This is the key movement that completes a slip stitch. You do not need to make another yarn over.
After the movement, one active loop remains on your hook.
Step 8: Adjust the tension
Gently pull the working yarn until the stitch looks neat.
Do not tighten it excessively. The stitch should sit close to the chain without becoming too small to work into later.
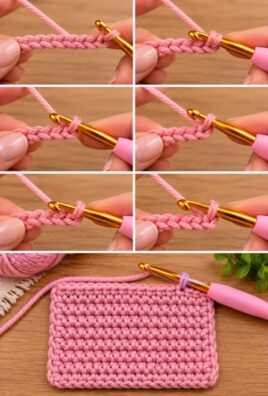
Step 9: Repeat across the chain
Insert the hook into the next chain, yarn over, and pull the yarn through both the target chain and the active loop on your hook.
Repeat until you have worked into all 10 selected chains.
You should now have a short row of slip stitches. The fabric will be relatively low and compact compared with a row of single crochet stitches.
6. Where to Insert the Hook
The correct insertion point depends on the instructions in your crochet pattern.
Working into a foundation chain
A foundation chain has small loops along its top. Insert the hook into the loop or loops specified by the pattern.
Working under one loop can leave a decorative ridge on the opposite side. Working under both top loops creates a different edge. Either method may be correct when the pattern specifies it.
Working into the top of a stitch
Most completed crochet stitches have two top loops forming a V.
Unless instructed otherwise, insert your hook beneath both loops. This is a common method for joining stitches and working into the top of a crochet row.
Working into a chain space
A chain space is an opening beneath a chain or between groups of stitches. If the pattern says to work into a chain space, insert the hook into the opening rather than into the individual chain loops.
Working into the first stitch of a round
When joining a round, identify the first actual stitch of that round. Insert the hook into the stitch specified by the pattern, often beneath both top loops, and complete the slip stitch.
Do not automatically join into the nearest chain or opening. Some patterns specify joining into the first stitch, while others specify a particular chain or space.
7. How to Use a Slip Stitch to Join a Round
Slip stitches are often used to close a round of crochet, including rounds in hats, granny squares, and other motifs.
Here is a simple practice exercise.
- Make a chain of 10.
- Join the last chain to the first chain with a slip stitch, taking care not to twist the chain.
- Chain 1, then work one single crochet into each chain around.
- When you reach the end, identify the first single crochet you made.
- Insert your hook beneath the top two loops of that first single crochet.
- Yarn over and pull the yarn through the stitch.
- Continue pulling the same loop through the active loop on your hook.
- Gently adjust the join so it is secure but not tight.
The round is now joined.
Counting note: The joining slip stitch usually does not count as a regular stitch unless the pattern explicitly says otherwise. In this example, count the 10 single crochet stitches separately from the slip stitch used to close the round.
If your pattern says to join into the first single crochet, do not accidentally join into the chain 1 or a nearby chain space.
8. Common Uses of the Slip Stitch
Joining crochet rounds
Slip stitches close a round neatly without adding much height. They are useful in granny squares, hats, bags, and circular motifs.
Moving across stitches
Sometimes a pattern asks you to slip stitch across several stitches to reach a particular position. This moves the working yarn without adding much height.
Because slip stitches are short, avoid pulling them too tightly when you need to work into the next stitch.
Finishing edges
Slip stitches can create a compact edge around blankets, garments, and other crochet pieces. They may be useful when you want a low-profile finish, although single crochet may be more suitable when you need a sturdier or more substantial border.
Joining crochet pieces
Some patterns use slip stitches to join two pieces. The resulting seam can be relatively flat, depending on the method and tension.
For a more prominent seam, single-crochet joining may be preferable. For a softer, less visible seam, sewing with a yarn needle may be a better option.
Creating surface details
Surface slip stitches can be worked over an existing crochet fabric to create lines, outlines, and decorative patterns. The hook is inserted into the fabric from front to back and the yarn is drawn through to form a line of small stitches.
Making slip-stitch ribbing
Working slip stitches into selected loops across rows can create a stretchy, ridged texture. This technique is often used for cuffs, hat brims, and garment edges.
Because slip-stitch ribbing can be slow to work and firm in texture, maintain relaxed tension and use a hook that allows you to work comfortably.
9. How Tight Should a Slip Stitch Be?
Slip stitches are naturally short, but they should not be pulled so tightly that they become difficult to work into.
Follow these tips:
- Keep the working yarn moving smoothly through your fingers.
- Avoid shrinking the active loop excessively around the hook.
- Use the hook shaft to help maintain a consistent loop size.
- Make sure you can insert the hook into the next stitch without struggling.
- Check that the fabric lies flat instead of gathering or puckering.
- Practice several stitches before using the technique in a larger project.
If your slip stitches are consistently too tight, try using a slightly larger hook for the slip-stitch section. You can also consciously keep the active loop a little taller before pulling the yarn through.
10. Common Mistakes and How to Fix Them
Pulling the yarn through only the target stitch
What happens: You pull the yarn through the chain or stitch but stop before passing it through the active loop.
How to fix it: Continue the same movement until the newly pulled loop passes through the loop already on your hook. One slip stitch is complete when one active loop remains.
Inserting the hook into the wrong chain
What happens: You accidentally skip a chain or insert the hook into the gap between chains.
How to fix it: Pause and identify the small chain loops before inserting the hook. Count the chains as you work until the movement becomes familiar.
Making the stitch too tight
What happens: The stitches become tiny, and it is difficult to insert the hook into the next one.
How to fix it: Keep the active loop relaxed and avoid pulling the working yarn sharply after every stitch. If necessary, use a slightly larger hook.
Accidentally skipping a stitch
What happens: Your row becomes shorter, or the edge looks uneven.
How to fix it: Count the completed slip stitches and compare them with the number of chains you intended to work into. If you find the mistake, undo the stitches back to the skipped chain and work it.
Adding an extra stitch when joining a round
What happens: The stitch count increases unexpectedly.
How to fix it: Identify the first actual stitch of the round and join there. Do not count the joining slip stitch as a regular stitch unless the pattern instructs you to.
Joining into the wrong loop or space
What happens: The seam looks uneven, or the round appears twisted.
How to fix it: Follow the pattern’s exact joining instruction. Check whether it specifies the first stitch, a chain, or a chain space.
Confusing a slip knot with a slip stitch
What happens: You may think the starting knot is already a completed crochet stitch.
How to fix it: Remember that a slip knot attaches the yarn to your hook. A slip stitch is made by inserting the hook into a target chain, stitch, or space and pulling yarn through both the target and the active loop.
Creating an uneven edge
What happens: Some stitches look longer or looser than others.
How to fix it: Keep the hook loop a similar size for every stitch. Avoid pulling the yarn tighter at the beginning or end of the row.
Losing track of the first stitch in a round
What happens: You join to the wrong stitch or accidentally work into the joining slip stitch.
How to fix it: Place a stitch marker in the first actual stitch of the round. Move the marker as you begin each new round.
11. How to Fasten Off After a Slip Stitch
Fastening off secures your yarn when you have finished the practice sample or a project section.
- Complete the final slip stitch.
- Cut the working yarn, leaving a tail of approximately 5–6 inches.
- Pull the cut end completely through the active loop on your hook.
- Gently tighten the yarn tail to secure the final loop.
- Thread the tail onto a yarn needle.
- Weave the tail through several stitches on the wrong side of the fabric.
- Trim the remaining yarn carefully.
Fastening off is a finishing step, not another slip stitch.
If the work will be stretched or handled frequently, weave the yarn tail through several stitches in one direction and then change direction before trimming.
12. Practice Exercise for Beginners
This exercise will help you develop a steady rhythm.
Step 1: Make a foundation chain
Create a slip knot and chain 16.
Step 2: Work the first slip stitch
Skip the chain directly beneath the active loop. Insert your hook into the next chain and complete one slip stitch.
Step 3: Continue across the row
Work one slip stitch into each remaining chain, pulling the yarn through the target chain and then through the active loop.
Step 4: Count your stitches
You should have 15 slip stitches because you skipped the first chain.
Step 5: Inspect the fabric
Look for stitches that are much tighter or looser than the others. Check that the edge is relatively straight and that the fabric is not puckering.
Step 6: Practice again
Make another chain and repeat the exercise. Focus on smooth hook movements rather than speed.
With practice, you will begin to recognize the correct insertion point and complete the stitch without needing to think through every movement.
13. Compact Slip Stitch Reference
When you need a quick reminder, follow these steps:
- Insert the hook into the specified stitch or space.
- Yarn over.
- Pull the yarn through the target stitch or space.
- Continue pulling the same loop through the loop already on the hook.
- Keep the stitch relaxed enough to work into later.
One slip stitch is complete when the yarn has passed through the target and the previous active loop, leaving one active loop on your hook.
14. Frequently Asked Questions
What does “sl st” mean in crochet?
“Sl st” is the standard US crochet abbreviation for slip stitch. It refers to a short stitch used for joining, moving across stitches, and finishing work.
Is a slip stitch the same as a slip knot?
No. A slip knot attaches the yarn to your hook at the beginning of your work. A slip stitch is made by inserting the hook into a chain, stitch, or space and pulling yarn through both the target and the active loop.
Does a slip stitch count as a stitch?
A slip stitch is a stitch, but whether it counts toward a pattern’s stitch total depends on the instructions. A joining slip stitch usually does not count as a regular stitch unless the pattern specifically says otherwise.
Why is my slip stitch too tight?
You may be pulling the working yarn too firmly or making the active loop too small. Keep the loop relaxed around the hook and maintain enough space to insert the hook into the next stitch.
How do I use a slip stitch to join a round?
Insert the hook into the stitch or space specified by the pattern, yarn over, and pull the yarn through both the target and the active loop. Make sure you join at the correct location.
Can a slip stitch be used to join crochet pieces?
Yes. Slip stitches can join two pieces together, although the seam may have more texture than a sewn seam. Choose the joining method that best suits the project’s appearance and flexibility.
Where should I insert the hook?
The pattern determines the insertion point. It may be under both top loops of a stitch, under one loop, into a foundation chain, or into a chain space.
Is a slip stitch suitable for beginners?
Yes. It is one of the simplest crochet stitches to learn. The key is understanding the difference between pulling yarn through the target stitch and then through the active loop.
Can I use a slip stitch to create a decorative border?
Yes. A row of slip stitches can create a narrow, low-profile edge. Keep the tension relaxed so the border does not pull the fabric inward.
How can I make my slip stitches look even?
Keep the active loop a consistent size and avoid tightening the yarn after every stitch. Practice slowly and check the fabric regularly.
15. Conclusion
The crochet slip stitch is a small but useful technique that appears in countless crochet projects. Once you become comfortable with hook placement, pulling the yarn through both the target stitch and the active loop, and maintaining relaxed tension, you will find it much easier to join rounds and finish your work neatly.
Take your time, practice a few rows, and focus on consistent movements. With a little patience, the slip stitch will become a reliable part of your crochet skills.
Leave a Comment