
Learning how to hold crochet yarn comfortably is one of the most useful skills for a new crocheter. The right grip helps the yarn move smoothly, makes it easier to form consistent stitches, and allows you to focus on learning the movements of your hook.
There is no single correct way to hold crochet yarn. Some crocheters guide the yarn over their index finger, others wrap it gently around their little finger, and some prefer to lay it across their palm. In this tutorial, you’ll learn three common methods, how to adjust yarn tension, and how to practice until you find a comfortable technique that works for you.
1. Tutorial Overview
- Skill level: Absolute beginner
- Approximate practice time: 10–20 minutes per session
- Materials: Yarn, crochet hook, scissors, and a comfortable workspace
- Main skill: Guiding the working yarn and controlling its tension
- After practicing: You should be better able to guide yarn smoothly, form a short chain, and recognize when your grip needs adjusting.
Yarn control develops gradually through repetition. Your fingers may feel awkward at first, but you do not need to master a particular grip immediately. Begin slowly and allow your hands to find a natural rhythm.
2. Materials and Preparation
You only need a few basic supplies to practice holding crochet yarn.
- Medium-weight yarn: Choose smooth yarn in a light or clearly visible color so you can see the loops easily.
- Crochet hook: Use a hook appropriate for your yarn. For many medium-weight yarns, a 5 mm hook is a useful starting point.
- Scissors: To cut the yarn when needed.
- Comfortable chair: Choose a position that lets your shoulders relax and your arms rest naturally.
- Good lighting: Make sure you can clearly see the yarn and the loop on your hook.
Smooth, medium-weight yarn is often easier to handle than very thin, slippery, fuzzy, or highly textured yarn. You can experiment with different yarns once you feel comfortable with the basic movements.
Identify the working yarn and the yarn tail
Before you begin, identify the two ends of the yarn used when starting a crochet project.
- Working yarn: The strand connected to the ball or skein. This is the yarn you guide toward the hook as you make stitches.
- Yarn tail: The short loose end used when starting a project. It is usually secured and woven into the finished work later.
Your fingers should guide the working yarn, not the yarn tail.
Pull out a short length of yarn from the ball or skein. Give yourself enough slack to move comfortably without allowing a large tangle to form. The yarn should feed freely without dragging the ball across the floor or becoming caught on nearby objects.
3. Understanding Your Hands
Your two hands usually have different jobs when you crochet. One hand controls the hook, while the other guides the working yarn and supports the fabric.
If you crochet right-handed
- Right hand: Usually holds and moves the crochet hook.
- Left hand: Usually guides the working yarn and helps control tension.
- Left fingers: Support the stitches or crocheted fabric near the hook.
If you crochet left-handed
- Left hand: Usually holds and moves the crochet hook.
- Right hand: Usually guides the working yarn and helps control tension.
- Right fingers: Support the stitches or crocheted fabric near the hook.
These are common arrangements rather than strict rules. You can change your hand positions to suit your mobility, comfort, and preferred technique.
The main idea is to let the hook catch and pull the yarn through loops while the opposite hand supplies the yarn at a steady pace.
4. Method One: Hold the Yarn Over Your Index Finger

Holding the yarn over the index finger is a common method because it allows you to guide the yarn while keeping the finger available to adjust tension.
Step-by-step instructions
1. Hold the working yarn with your non-dominant hand. For right-handed crocheters, this is usually the left hand. For left-handed crocheters, it is usually the right hand.
2. Bring the yarn across your palm. Let it rest naturally without squeezing it between your fingers.
3. Guide the yarn toward your index finger. Place the strand over the top of the finger so it can move toward the hook.
4. Choose a comfortable finger position. You can keep the yarn resting over the index finger or wrap it gently around the finger once if you need more control.
5. Support the crochet fabric with your remaining fingers. Hold the fabric lightly near the hook so the stitches remain stable while you work.
6. Adjust the index finger as needed. Raise or lower it slightly to allow more or less yarn to feed through your hand.
7. Move the hook to catch the yarn. Let the hook perform the yarn-over and pull-through movement without forcing your guiding hand into a rigid position.
How the yarn should move
The yarn should slide smoothly over your index finger as you form each stitch. You should feel enough contact to guide the strand, but not so much friction that the yarn becomes difficult to pull.
If the yarn slips off your finger, adjust the angle of your index finger or add a little support with another finger. If it feels trapped, relax your hand or remove the extra wrap.
5. Method Two: Wrap the Yarn Around Your Little Finger

This method can help crocheters who find that the yarn moves too freely through their fingers. A gentle wrap around the little finger creates additional contact, allowing you to regulate how quickly the yarn feeds.
Step-by-step instructions
- Hold the working yarn with your non-dominant hand.
- Bring the yarn around your little finger.
- Guide the strand across your palm toward your index finger.
- Rest the yarn over or around your index finger, whichever feels more comfortable.
- Use your index finger to guide the yarn toward the hook.
- Support the crocheted fabric with your other fingers.
- Adjust the amount of contact between the yarn and your fingers until the strand moves smoothly.
You do not need a fixed number of wraps. Start with the least amount of wrapping that provides comfortable control.
How to avoid excessive tension
A little friction can help regulate yarn flow, but wrapping too tightly may restrict movement and make stitches difficult to form.
If the yarn feels difficult to pull, loosen the wrap or remove it altogether. If the yarn still slips too quickly, adjust your finger position gently rather than squeezing the strand.
This method is optional. You can achieve good yarn control without wrapping the yarn around your little finger.
6. Method Three: Lay the Yarn Across Your Palm

If you dislike wrapping yarn around your fingers, you can guide it across your palm instead. This method keeps the grip simple and may feel more comfortable for people who prefer less finger wrapping.
Step-by-step instructions
- Hold the working yarn in your non-dominant hand.
- Lay the strand loosely across your palm.
- Guide it between your chosen fingers toward your index finger.
- Position your index finger so the yarn can move toward the hook.
- Use your other fingers to support the fabric and keep the yarn from slipping out of place.
- Open or close your fingers slightly to regulate the flow.
- Practice moving the hook through several stitches while keeping your guiding hand relaxed.
How to keep the yarn in position
You do not need to squeeze the yarn between your fingers. Instead, use gentle contact and small adjustments to guide it.
If the yarn slips away from your palm, change the angle of your hand or guide the strand between different fingers. If the yarn becomes restricted, loosen your grip and allow more slack.
This method may suit some crocheters better than others. Feel free to modify it rather than forcing your hand into a position that feels unnatural.
7. How to Adjust Yarn Tension
Yarn tension describes how tightly or loosely the working yarn is controlled as it moves toward the hook. It affects the size of your loops, the appearance of your stitches, and how easily you can insert your hook into the work.
The goal is not to make every crocheter hold yarn with identical tension. The goal is to find a comfortable, repeatable rhythm that produces stitches reasonably consistent in size.
Yarn that is too tight
You may notice that:
- The hook is difficult to move through loops.
- Your fingers feel tense.
- The yarn barely slides through your guiding hand.
- Your chains are so tight that inserting the hook into them becomes difficult.
How to adjust it:
- Relax the fingers of your guiding hand.
- Reduce excessive wrapping around your little finger.
- Allow a little more yarn to feed toward the hook.
- Make a few stitches slowly before adjusting your grip again.
Avoid pulling the working yarn tightly after every stitch in an attempt to make the loops uniform.
Yarn that is too loose
You may notice that:
- The yarn slips through your fingers without much control.
- Your loops become oversized.
- Your stitches vary noticeably in size.
- The yarn repeatedly falls off your index finger.
How to adjust it:
- Add gentle contact between the yarn and your fingers.
- Try resting the strand more securely over your index finger.
- If comfortable, try a loose wrap around your little finger.
- Keep the working yarn close enough to guide it without pulling it taut.
Yarn that moves smoothly
When your tension is comfortable:
- The yarn feeds without snagging.
- Your hook moves through loops without excessive force.
- Your stitches are reasonably consistent.
- Your guiding hand can move naturally.
If your stitches are still uneven, do not assume your grip is wrong. Hook movement, yarn thickness, and practice also affect stitch size. Make small adjustments and give yourself time to adapt.
8. Coordinating Yarn and Hook Movements
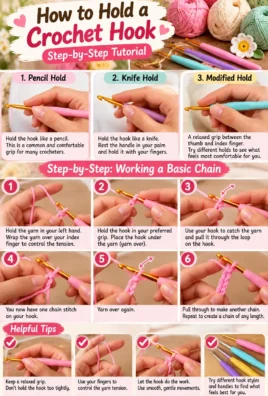
Once you have chosen a comfortable yarn-holding method, practice coordinating both hands by making a simple chain.
The hand holding the hook performs the yarn-over and pull-through movements. Your non-dominant hand guides the working yarn and helps maintain a comfortable loop size.
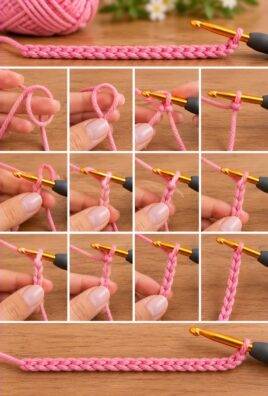
Practice making a chain
1. Hold the hook comfortably. Use your preferred hook grip without squeezing it too tightly.
2. Guide the working yarn. Position it using one of the three methods described above.
3. Keep the loop on your hook relaxed. It should be large enough for the hook to move freely but not so loose that it loses its shape.
4. Move the hook beneath the working yarn. Rotate the hook as needed to catch the strand.
5. Catch the yarn. This movement is called a yarn-over.
6. Draw the yarn through the loop on the hook. Guide the strand with your non-dominant hand while the hook pulls it through.
7. Allow the yarn to feed forward. Do not pull the new loop too tightly against the hook.
8. Repeat at a comfortable pace. Continue making chains while keeping your hands relaxed.
Each time you pull the yarn through the loop, a new chain stitch forms. Your fingers do not need to perform the entire movement themselves. Their job is to guide the yarn while the hook catches and pulls it through.
How to control the loop on your hook
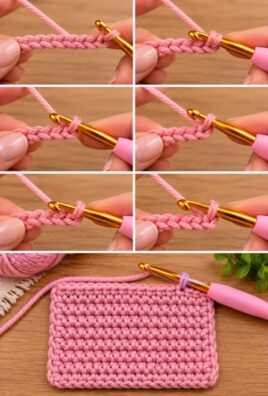
After forming a chain stitch, the remaining loop should fit comfortably around the shaft of your hook.
If you tighten it too much, the next yarn-over may become difficult. If you leave it extremely loose, the chain may look uneven. Aim for a loop that moves freely along the hook without becoming stretched out.
9. A Beginner Practice Exercise
Set aside approximately 10–20 minutes for a short practice session. You do not need to finish a project. The purpose is to become familiar with the movement of the yarn and hook.
Practice One: Smooth yarn movement
Approximate time: 2–3 minutes
- Choose one of the three yarn-holding methods.
- Hold the working yarn in your non-dominant hand.
- Gently draw a short length of yarn through your fingers.
- Repeat the movement several times.
- Notice whether the strand moves smoothly or catches against your fingers.
The yarn should not slide uncontrollably, but you should not have to pull forcefully to make it move.
If the yarn catches, loosen your grip or remove an unnecessary wrap. If it slips too easily, adjust the position of your fingers.
Practice Two: Make a short chain
Approximate time: 5–10 minutes
- Form a starting loop on your hook.
- Guide the working yarn with your chosen grip.
- Make approximately 10–15 chain stitches.
- Pause and examine the chain.
- Check whether the loops are reasonably similar in size.
- Try inserting the hook into a few chain stitches to see whether they are comfortable to work into.
Do not worry if your first chain is uneven. Concentrate on comfortable hand placement and smooth yarn movement rather than speed.
If the chains are too tight, relax your guiding hand and allow more yarn to feed. If they are too loose, use gentle finger contact to regulate the strand.
Practice Three: Try a different grip
Approximate time: 3–5 minutes
- Make another short chain using a second yarn-holding method.
- Compare how comfortable each position feels.
- Notice whether the yarn feeds smoothly.
- Check whether your chain stitches are reasonably consistent.
- Choose the grip that feels more natural, or combine comfortable elements from both methods.
You do not need to choose a permanent grip after one practice session. Your preferred hand position may change as you gain experience.
Take a short break whenever your hands feel tired.
10. Common Mistakes and How to Fix Them
Holding the yarn too tightly
Why it happens: Beginners may grip the yarn firmly because they think tight control will produce neater stitches.
How to fix it: Relax your fingers and allow the yarn to slide. Use only enough contact to guide the strand.
Wrapping the yarn around too many fingers
Why it happens: Extra wraps can feel secure at first but may create too much friction.
How to fix it: Remove unnecessary wraps and test a simpler grip. Add wrapping only if you need more control.
Letting the yarn slip uncontrollably
Why it happens: The strand may not have enough contact with your fingers, or your index finger may be positioned too low to guide it.
How to fix it: Raise your index finger slightly or guide the yarn between different fingers. A gentle little-finger wrap is another option.
Pulling the working yarn after every stitch
Why it happens: You may be trying to force each stitch into the same size.
How to fix it: Allow the hook and yarn to move naturally. Focus on making loops reasonably consistent rather than tightening every stitch separately.
Keeping the guiding hand rigid
Why it happens: You may be concentrating so hard on controlling the yarn that your fingers stop moving naturally.
How to fix it: Relax your fingers between stitches. Make small adjustments rather than holding one position with constant force.
Holding the hook too tightly
Why it happens: A strong grip can feel like it provides more control, especially when learning a new movement.
How to fix it: Hold the hook securely but comfortably. Allow your wrist and fingers to move without unnecessary squeezing.
Making chains too tight
Why it happens: The loop is tightened too much after each pull-through, or the working yarn is held under excessive tension.
How to fix it: Keep the loop comfortably around the hook shaft. If necessary, try a slightly larger hook for the starting chain.
Changing hand positions constantly
Why it happens: You may be searching for a perfect grip before giving any method time to feel familiar.
How to fix it: Choose one comfortable method and practice a short chain. Change only one part of the grip at a time so you can identify what helps.
Focusing on speed too early
Why it happens: You may compare your progress with experienced crocheters.
How to fix it: Slow down and focus on coordination. Speed usually develops through repetition, not by forcing faster movements.
Experiencing finger discomfort
Why it happens: Your grip may be too tight, your hand position may be awkward, or repetitive movement may be causing strain.
How to fix it: Stop and rest. When you resume, try a more relaxed grip, change your hand position, or shorten your practice sessions. Do not push through pain to improve your technique.
11. Comfort and Hand Position
Comfort matters just as much as yarn control. A grip that feels natural allows you to practice longer without unnecessary strain.
Keep these tips in mind:
- Relax your shoulders. Avoid lifting them toward your ears while concentrating.
- Keep your wrists comfortable. Avoid sharply bending your wrists for long periods.
- Use a light grip on the hook. Hold it securely without squeezing.
- Support the fabric gently. Your fingers should stabilize the work without crushing it.
- Take regular breaks. Pause to stretch gently and let your hands rest.
- Adjust your grip when needed. You do not have to maintain one position throughout an entire project.
The yarn should be controlled through gentle positioning and movement rather than forceful gripping.
If you experience persistent pain, numbness, or tingling, stop crocheting and seek appropriate professional guidance rather than continuing through discomfort.
12. Choosing the Best Yarn-Holding Method
Each of the three methods offers a different way to control the working yarn. The most suitable option depends on your comfort and how the yarn behaves as you crochet.
Yarn over the index finger
This method is a useful starting point if you want the yarn to be easy to guide with small finger movements. You can adjust the angle of your index finger to influence how freely the yarn feeds.
Yarn wrapped around the little finger
This method may suit you if the yarn tends to slip too freely through your hand. The extra contact can provide more resistance, but it should remain gentle.
Yarn across the palm
This method may feel simpler if you dislike wrapping yarn around your fingers. It allows you to control the strand through hand position and light finger contact.
How to choose
Consider the following factors:
- Personal comfort: Does your hand feel relaxed in this position?
- Yarn flow: Does the strand move without catching or slipping excessively?
- Tension control: Can you form loops without forcefully tightening them?
- Yarn texture: Is the yarn smooth, slippery, fuzzy, or thick?
- Hand size and mobility: Can you hold the yarn comfortably with your fingers?
- Personal preference: Do you prefer wrapping the yarn or laying it across your hand?
For absolute beginners, the simplest approach is to start with the least complicated grip that feels comfortable. Make a short chain, observe how the yarn moves, and adjust one part of your grip at a time.
There is no need to copy another crocheter’s hand position exactly.
13. Frequently Asked Questions
1. Which hand should hold the crochet yarn?
The non-dominant hand usually guides the working yarn, while the dominant hand usually holds and moves the hook. Right-handed crocheters commonly guide the yarn with the left hand, while left-handed crocheters commonly guide it with the right hand. You can adjust this arrangement to suit your needs.
2. How tightly should I hold the working yarn?
Hold it firmly enough to guide its movement, but loosely enough that it slides smoothly toward the hook. If the yarn is difficult to pull, relax your grip. If it slips uncontrollably, adjust your finger position to create a little more contact.
3. Is there one correct way to hold crochet yarn?
No. The index-finger method, little-finger wrap, and across-the-palm method are all options. Choose the one that allows you to control the yarn comfortably and make reasonably consistent stitches.
4. Why does my yarn keep slipping off my index finger?
Your index finger may be positioned too low, or the yarn may not have enough contact with your hand. Try raising the finger slightly, guiding the yarn between different fingers, or using a gentle wrap around your little finger.
5. Why are my crochet chains too tight?
You may be tightening each loop too much or holding the working yarn under excessive tension. Relax your guiding hand and allow the loop to remain comfortably around the hook shaft. A slightly larger hook may also help when making a starting chain.
6. Should I wrap the yarn around my little finger?
You can, but it is not required. A gentle wrap may help regulate yarn that feeds too freely. If wrapping makes your hand feel restricted, use a different method.
7. Can left-handed crocheters use the same yarn-holding methods?
Yes. Left-handed crocheters can use all three methods. They usually hold the hook in the left hand and guide the working yarn with the right, but the arrangement can be modified for comfort.
8. How long does it take to become comfortable holding crochet yarn?
It varies from person to person. Some beginners become more comfortable after a few short practice sessions, while others need more time. Practice regularly at a comfortable pace without expecting immediate consistency.
9. What should I do if my fingers become uncomfortable?
Stop and rest. When you resume, loosen your grip, change the yarn-holding method, or shorten your practice sessions. If pain, numbness, or tingling persists, seek appropriate professional guidance.
10. Can I change my yarn-holding method after learning to crochet?
Absolutely. Your preferred method can change with experience, yarn type, project, or comfort. You can experiment with different grips whenever you need to.
Conclusion
Learning how to hold crochet yarn is an important first step toward comfortable, confident crocheting. By experimenting with the index-finger method, a gentle little-finger wrap, and the across-the-palm method, you can discover which position gives you the best balance of control and comfort.
Start with a short length of yarn and a simple chain of 10–15 stitches. Focus on smooth yarn movement, relaxed hands, and reasonably consistent loops rather than speed. With patient practice and small adjustments, coordinating your yarn and hook will gradually feel more natural.
Leave a Comment