
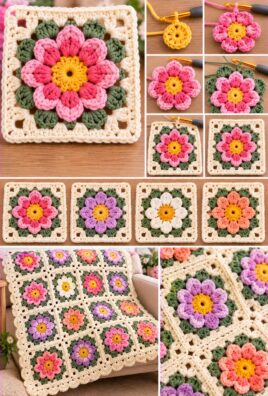
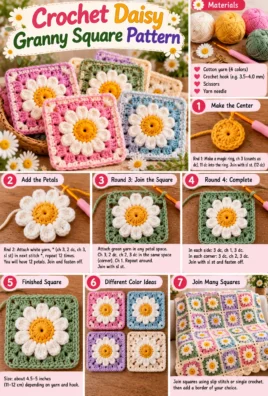
A crochet sunburst granny square combines a rounded, flower-like center with raised stitches and a classic square border. Its rich texture and colorful rounds make it a lovely motif for blankets, pillows, tote bags, garments, and many other crochet projects.
In this beginner-friendly tutorial, you’ll learn how to create the center, form the sunburst texture, fill the spaces between the raised stitches, and shape four balanced corners. Each round builds on the previous one, helping you create a neat, attractive square that’s ready to join with other motifs.
1. Project Overview
- Skill level: Confident beginner
- Approximate finished size: 5–6 inches square
- Approximate completion time: 30–60 minutes
- Recommended yarn: Worsted-weight yarn, category 4
- Suggested hook: 5 mm
- Construction: Joined rounds
- Main techniques: Magic ring, chain stitches, single crochet, half double crochet, double crochet, treble crochet, clusters, and corner shaping
The finished size will vary with your yarn, hook, and personal tension.
2. Materials and Tools
- Worsted-weight yarn in four complementary colors:
- Color A: Center
- Color B: Sunburst texture or petals
- Color C: Background
- Color D: Outer border
- 5 mm crochet hook, or the size needed to achieve a fabric you like
- Scissors
- Yarn needle
- Measuring tape
- Stitch markers, optional
Approximate yarn requirements
For one square measuring about 5–6 inches, allow approximately 15–25 yards of yarn in total, distributed across the four colors. This is a planning estimate rather than an exact consumption figure. Larger squares, thicker yarn, raised stitches, and tighter tension may increase the amount needed.
3. US Crochet Abbreviations and Stitch Guide
All stitch names in this pattern use US crochet terminology.
| Abbreviation | Meaning |
|---|---|
| ch | Chain |
| sl st | Slip stitch |
| sc | Single crochet |
| hdc | Half double crochet |
| dc | Double crochet |
| tr | Treble crochet |
| st(s) | Stitch(es) |
| sp(s) | Space(s) |
| sk | Skip |
| rep | Repeat |
| rnd(s) | Round(s) |
| yo | Yarn over |
Special stitches
Double crochet cluster (dc cluster): Yarn over, insert the hook into the specified stitch or space, yarn over and pull up a loop, yarn over and pull through two loops. Repeat this partial double crochet in the same location until the specified number of partial stitches has been made, leaving the final loop of each on the hook. Yarn over and pull through all remaining loops to close the cluster. In this pattern, a three-dc cluster is treated as one textured group, not three separate completed stitches.
Puff stitch: Yarn over, insert the hook into the designated space, yarn over and pull up a loop. Repeat the same action in that space until there are five loops on the hook. Yarn over and pull through all five loops, then chain 1 to secure the puff. This pattern uses clusters instead of puff stitches, so you do not need to make puffs.
Chain space (ch-sp): The open space created by chain stitches in the previous round. When instructed to work into a chain space, insert your hook under the chain strands rather than into an individual chain.
Corner space: The chain-2 space at each corner of the square. The corner stitches are worked into this space to turn the motif and create two adjoining sides.
Joining rounds: At the end of each round, insert the hook into the designated joining stitch—usually the top of the beginning chain or the first stitch—and make a slip stitch. This closes the round. Do not count the joining slip stitch as an additional stitch.
Starting with a magic ring
Make a loop with the yarn, insert your hook through it, pull up a loop, and chain 1 to secure your working loop. Work the instructed stitches into the ring. When the round is complete, pull the yarn tail to close the center.
If you prefer not to use a magic ring, chain 4 and join with a slip stitch to form a small ring. Work the first round into the ring. The chain-loop method may leave a slightly larger center opening.
4. Understanding the Sunburst Design
This pattern uses five joined rounds to create a colorful, textured square.

Round 1 — The center
Color A forms a compact circle with 12 double crochet stitches. This provides a stable foundation for the textured round.

Round 2 — The sunburst
Color B creates 12 raised clusters separated by chain spaces, producing the flower-like texture.

Round 3 — Filling the gaps
Color C fills the spaces between the clusters with groups of three double crochet stitches.

Round 4 — Square shaping
Four evenly spaced corner groups turn the circular motif into a square.

Round 5 — The border
Color D creates a clean edge with a chain space at each corner for easy joining.
5. Complete Step-by-Step Crochet Pattern
Before you begin
- Work with the right side facing you throughout the pattern; do not turn after joining a round.
- Join every round with a slip stitch as instructed.
- The beginning chain of each round is used only for height and does not count as a stitch.
- The joining slip stitch does not count as a stitch.
- A three-dc cluster counts as one textured group in Round 2.
- Chain spaces are counted separately from completed stitches.
- Fasten off and change colors after each of the first four rounds.
Round 1: Create the center

Color A
- Make a magic ring.
- Chain 2. This beginning chain does not count as a stitch.
- Work 12 dc into the ring.
- Pull the yarn tail firmly to close the center.
- Join with a sl st to the first dc, not to the beginning chain.
- Fasten off.
Round 1 count: 12 dc stitches, 0 chain spaces.
Check that the circle lies reasonably flat. The center should be closed without pulling so tightly that the stitches become difficult to work into.
Round 2: Create the sunburst texture

Color B
- Join Color B in any dc from Round 1.
- Chain 2; this does not count as a stitch.
- Make a three-dc cluster in the same stitch.
- Chain 1.
- Make a three-dc cluster in the next dc.
- Chain 1.
- Repeat around until you have worked one cluster into each of the 12 stitches.
- After the twelfth cluster, chain 1 and join with a sl st to the top of the first cluster.
- Fasten off.
How to make each three-dc cluster:
- Yarn over and insert the hook into the designated stitch.
- Yarn over and pull up a loop.
- Yarn over and pull through two loops, leaving two loops on the hook.
- Repeat these partial double crochet steps twice more in the same stitch. You should have four loops on the hook.
- Yarn over and pull through all four loops to close the cluster.
Each cluster is worked into a separate stitch from Round 1. The chain-1 spaces between clusters will be used in the following round.
Round 2 count: 12 clusters and 12 chain-1 spaces. Each cluster is one group, not three separate stitches.
Check that the clusters are evenly distributed around the center. If they are crowded, loosen your tension slightly rather than adding extra spaces.
Round 3: Fill the gaps between the textured groups

Color C
- Join Color C in any chain-1 space from Round 2.
- Chain 2; this does not count as a stitch.
- Work 3 dc into the same chain-1 space.
- Work 3 dc into each remaining chain-1 space around.
- Join with a sl st to the first dc of the round.
- Fasten off.
Work all three double crochet stitches under the chain strands of each space, not into the cluster stitches themselves.
You should have 12 groups of 3 dc, giving you 36 completed dc stitches. There are no chain spaces in this round.
Round 3 count: 36 dc stitches in 12 groups, 0 chain spaces.
The motif should still look circular at this stage. Avoid pulling the stitches tightly around the raised clusters, as this may cause the center to cup.
Round 4: Shape the circle into a square

Continue with Color C
This round uses the 12 spaces between the groups from Round 3. Four of these spaces become corners, while the other eight form the side sections.
- Join Color C in any space between two 3-dc groups from Round 3.
- Chain 2; this does not count as a stitch.
- Work 3 dc into the same space. This is the first corner’s first half.
- Chain 2.
- Work another 3 dc into the same space. The two groups and chain-2 space together form one corner.
- Work 3 dc into each of the next two spaces.
- In the next space, work 3 dc, chain 2, and 3 dc. This creates the second corner.
- Work 3 dc into each of the next two spaces.
- Repeat the corner sequence in the next space, then work 3 dc into each of the following two spaces.
- Repeat the corner sequence in the final corner space.
- Work 3 dc into each of the last two spaces.
- Join with a sl st to the first dc of the round.
The four corner spaces are placed at equal intervals, with exactly two side groups between consecutive corners.
Round 4 count:
- 4 corner spaces, each containing ch 2.
- 4 corners, each made of two 3-dc groups.
- 8 side groups of 3 dc.
- 56 completed dc stitches in total.
- 4 chain-2 corner spaces.
Each side consists of 12 dc stitches: three from one corner group, six from the two side groups, and three from the next corner group.
Do not count the chain-2 spaces as stitches. They are the turning spaces that define the corners.
Round 5: Finish the square

Color D
The final round stabilizes the edges and gives the square a tidy finish.
- Join Color D in any corner chain-2 space.
- Chain 1; this does not count as a stitch.
- Work 1 sc into each of the six dc stitches belonging to the two groups that form the corner, working along the sides as you go.
- Continue with 1 sc into each dc stitch along the side until you reach the next corner chain-2 space.
- Work (1 sc, ch 2, 1 sc) into the corner chain-2 space.
- Repeat the same process around all four sides. Work one sc into every dc stitch and (1 sc, ch 2, 1 sc) into each corner space.
- Join with a sl st to the first sc.
- Fasten off and weave in all remaining ends.
The single crochet border adds a firm edge without making the square too bulky. Keep the chain-2 corner spaces loose enough for the square to lie flat.
Round 5 count: 56 sc stitches and 4 chain-2 corner spaces.
There are 12 sc stitches along each side when the side is counted from one corner chain space to the next. Each corner space contains two sc stitches separated by a chain-2 space.
6. Color Changes and Joining Tips
For a clean color change, finish the final stitch of a round with the new color when possible:
- Begin the last stitch of the old-color round as usual.
- Before the final pull-through, drop the old color and use the new color to complete the stitch.
- Join the round with the new color.
- Secure the old color and weave its tail into the back of the fabric.
Because this pattern uses four color stages, fastening off after each round is often the neatest approach. It prevents long strands from showing through the open spaces and keeps the back of the square tidy.
You may carry yarn only when the distance is short and the carried strand will remain hidden. Otherwise, fastening off and rejoining gives a cleaner result.
7. Stitch Counts and Pattern Verification
Use this summary to check your work before moving to the next round.
| Round | Stitches or groups | Chain spaces |
|---|---|---|
| 1 | 12 dc | None |
| 2 | 12 three-dc clusters | 12 ch-1 spaces |
| 3 | 12 groups of 3 dc; 36 dc total | None |
| 4 | 56 dc total | 4 ch-2 corner spaces |
| 5 | 56 sc total | 4 ch-2 corner spaces |
Counting conventions
- The beginning chains do not count as stitches.
- A three-dc cluster in Round 2 counts as one textured group.
- The three completed dc stitches in a Round 3 group count individually.
- Corner chains are spaces, not completed stitches.
- The joining slip stitch is not counted.
- Round 4 has four corners because every third space around the 12-space circle is used for a corner.
After Round 4, each side has 12 dc stitches. After Round 5, each side has 12 sc stitches between the corner spaces. If your counts differ, check that you have not accidentally worked into a cluster, skipped a chain space, or counted a joining slip stitch.
8. Gauge, Measurements, and Sizing
The approximate finished size is 5–6 inches square, although your result may be smaller or larger depending on your materials and tension.
To measure the motif, lay it flat and measure straight across from one outer edge to the opposite edge. Measure both width and height to check that the square is balanced.
How to adjust the size
- For a smaller square: Try a smaller hook or finer yarn.
- For a larger square: Use a larger hook or thicker yarn.
- For a larger border: Add a compatible square-border round after Round 5.
If you add another round, preserve the four-corner structure. Work evenly along each side and place the same corner sequence in each of the four corner spaces. Do not add increases randomly, as this may distort the shape.
When making multiple squares for a blanket, pillow, or bag, use the same yarn weight, hook, and stitch tension for every motif. Compare their measurements before joining them.
9. Finishing and Blocking
Once the final round is complete, take a few minutes to prepare your square for use.
- Fasten off securely. Cut the yarn, leaving a tail long enough to weave in comfortably.
- Weave in the ends. Use a yarn needle to pass each tail through several stitches on the wrong side, changing direction once or twice to secure it. Avoid pulling so tightly that the fabric puckers.
- Shape the corners. Lay the square on a flat surface and gently straighten the sides. Check that the four corners are clearly defined.
- Block if appropriate. Follow the care instructions for your yarn. Cotton may tolerate damp blocking, while wool and synthetic fibers require methods suited to their specific care requirements. Avoid applying heat unless the yarn instructions explicitly permit it.
- Compare your squares. If you are making several motifs, place them side by side and check that their dimensions and corner shapes match.
Blocking can improve the appearance of the square, but it will not fully correct a significant stitch-count error. Correct any missing or extra stitches before blocking.
10. Troubleshooting Common Problems
The center has a large hole
Likely cause: The magic ring was not tightened enough, or the starting loop stretched while you worked.
Solution: Pull the yarn tail firmly after completing Round 1. Secure the tail by weaving it into the back of the center. If you used a chain loop, remember that it may leave a slightly larger opening.
The textured stitches look uneven
Likely cause: The loops in your clusters are different heights, or the tension varies between stitches.
Solution: Pull each partial double crochet to a similar height before closing the cluster. Keep your yarn tension consistent and check that all 12 clusters are worked into individual stitches from Round 1.
The square curls or cups
Likely cause: The stitches may be too tight, or the motif may have an incorrect stitch count.
Solution: Check the 12 clusters in Round 2, the 12 groups in Round 3, and the four evenly spaced corners in Round 4. If the counts are correct, try a slightly larger hook. Blocking may help with mild curling.
The sides become wavy
Likely cause: Too many stitches were added along the sides, or the border tension is too loose.
Solution: Work one sc into every dc stitch along the final border, without adding extra stitches outside the corner spaces. Check that each side contains 12 sc stitches between corners.
The corners are rounded or poorly defined
Likely cause: The chain-2 spaces are too tight, or the corner stitches have been placed in adjacent spaces instead of the same space.
Solution: In Round 4, work both 3-dc groups and the chain-2 space into the same corner space. In Round 5, work (1 sc, ch 2, 1 sc) into each corner space.
The square is not symmetrical
Likely cause: The corner spaces are not equally spaced around the motif.
Solution: In Round 4, use every third space from Round 3 for a corner. This leaves exactly two side groups between consecutive corners.
The finished square is too small or too large
Likely cause: Your yarn weight, hook size, or stitch tension differs from the expected gauge.
Solution: Adjust the hook size or yarn weight. If you add border rounds, use the same increase pattern at all four corners to keep the square balanced.
Color changes leave visible gaps
Likely cause: The new color was joined loosely, or the yarn tails were not secured.
Solution: Join the new color firmly but not tightly, and weave the ends into the back of nearby stitches. Fastening off between rounds often gives the cleanest result.
The final round has too many or too few stitches
Likely cause: A stitch was skipped or worked twice, or a corner space was mistaken for a regular stitch.
Solution: Count the 56 dc stitches and four corner spaces at the end of Round 4. In Round 5, work one sc into each of those 56 dc stitches and the specified two sc stitches into each corner space, with ch 2 between them.
11. Creative Variations and Uses

Traditional sunset colors
Combine yellow, orange, rust, and cream for a warm sunburst effect. High-contrast colors make the raised clusters stand out.

Soft pastel palette
Use pale pink, lavender, butter yellow, and ivory for a gentle floral look. Similar color values create a softer transition between rounds.

Monochromatic texture
Use one color throughout to emphasize the raised clusters and the contrast between the rounded center and square edges.

Blankets and cushions
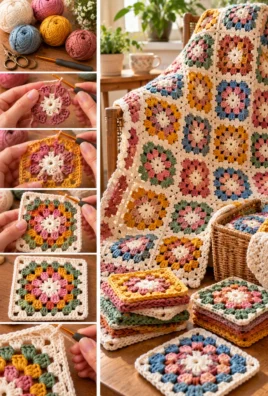
Make multiple squares and join them with slip stitches, single crochet, or your preferred joining method. Consistent sizing will help the finished fabric lie flat.
You can also use sunburst squares for tote bags, scarves, cardigans, and other projects built from joined motifs. Remember that different yarn weights or additional border rounds affect the finished dimensions and yarn requirements.
12. Frequently Asked Questions
1. Is a sunburst granny square suitable for beginners?
Yes, especially for crocheters who already know basic stitches. The pattern introduces clusters and joined rounds, so beginners may find it helpful to practice double crochet and joining techniques first.
2. What is the difference between a sunburst granny square and a classic granny square?
A sunburst granny square has a rounded center and raised, flower-like clusters that create a textured appearance. A classic granny square usually relies on repeated groups of double crochet separated by chain spaces, giving it a more open, block-like texture.
3. Can I use different yarn weights?
Yes. You can use different yarn weights, but you should adjust the hook accordingly. The finished size and amount of yarn needed will change. For a project made from multiple squares, use the same yarn and hook for each motif whenever possible.
4. How do I keep all my squares the same size?
Use the same yarn, hook, stitch pattern, and tension. Measure each square after blocking, if you block them, and make sure all motifs have the same number of rounds and the same corner construction.
5. Why is my square curling or becoming wavy?
Curling often comes from tight tension or incorrect stitch placement. Wavy edges usually indicate too many stitches or overly loose tension. Check your counts first, then adjust your hook size if necessary.
6. How can I make the corners more defined?
Make sure each corner in Round 4 is worked into the correct space using two groups of 3 dc separated by ch 2. In Round 5, use (1 sc, ch 2, 1 sc) in every corner space.
7. Do I need to fasten off after every color change?
For this four-color pattern, fastening off between rounds is recommended because it produces a cleaner appearance. If you use fewer colors, you may be able to keep a color attached, provided the unused yarn can be managed neatly without visible floats or loose strands.
8. What projects can I make with sunburst granny squares?
You can join them into blankets, pillow covers, tote bags, scarves, cardigans, and other motif-based projects. Choose a suitable yarn for the intended use and check the finished dimensions before assembling the pieces.
Conclusion
This crochet sunburst granny square pattern combines a compact center, raised clusters, and carefully placed corners to create a colorful and versatile motif. By following each round and checking the stitch counts, you can build a balanced square with a distinctive flower-like center and a neat outer border.
Experiment with different color combinations, keep your tension consistent, and make a few practice squares before starting a larger project. Once you are comfortable with the construction, you can combine your motifs into blankets, bags, pillows, and many other handmade creations.
Leave a Comment