
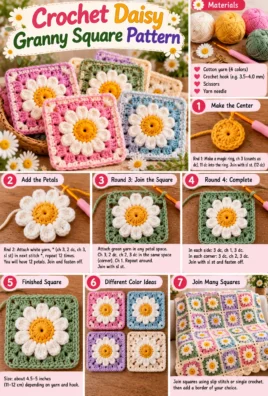
A solid granny square is a versatile crochet motif with four defined corners and a dense fabric that leaves fewer open spaces than a traditional granny square. It is a useful building block for blankets, cushions, bags, garments, and many other handmade projects.
This beginner-friendly tutorial explains how to create a neat square using double crochet stitches, chain spaces, and carefully placed increases at the four corners. You’ll learn how to start the square, work each round, maintain straight sides, and finish the edges cleanly.
1. Project Overview
- Project: Crochet Solid Granny Square Pattern
- Skill level: Beginner
- Construction: Worked in joined rounds from the center outward
- Approximate finished size: 6–8 inches after several rounds, depending on yarn, hook, tension, and round count
- Approximate time: 1–2 hours for a sample square
- Main techniques: Chain stitches, double crochet, chain spaces, slip-stitch joins, and corner increases
- Suggested uses: Blankets, cushion covers, bags, cardigans, and other patchwork crochet projects
The square can be made in one color or several colors. For a first sample, use medium-weight yarn and work six rounds to practice the construction and check your tension.
2. Materials and Tools
You will need:
- Medium-weight yarn in your preferred color or colors.
- A crochet hook suitable for your yarn, such as a 5 mm hook for a medium-weight sample.
- Scissors.
- A yarn needle for weaving in the ends.
- A measuring tape, if you want to check the finished dimensions.
Choosing yarn and a hook
Medium-weight acrylic, cotton, or a suitable blend works well for learning this pattern. Acrylic is often soft and easy to care for, while cotton can provide a clearly defined stitch texture.
Use a hook that creates a fabric that is neither too loose nor too stiff. If you plan to make several squares for one project, keep the yarn weight and hook size consistent. Small differences in tension can cause noticeable differences in square dimensions.
3. Abbreviations and Terminology
This tutorial uses standard US crochet terminology.
- ch: Chain
- sl st: Slip stitch
- dc: Double crochet
- st / sts: Stitch / stitches
- sp: Space
- rnd: Round
- rep: Repeat
Important pattern conventions
The beginning chain of each round is not counted as a stitch. At the start of each round, ch 3 provides the height needed for the first double crochet, and the first actual dc is worked into the designated stitch or space.
A chain space is the opening created by chain stitches. A corner space is a designated chain-2 space that forms one of the square’s four corners. The stitches worked into a corner space are made around the chain space, not into an individual chain stitch.
4. Techniques to Know Before Starting
Make a slip knot and starting chain
Create a loop with the yarn, pull a section of the working yarn through it, and place the loop on your hook. Tighten it gently without closing the loop around the hook.
To make a chain, yarn over and pull through the loop on the hook.
Form a starting ring
For this pattern, make ch 4, then insert your hook into the first chain and work a slip stitch to join the chain into a ring.
Alternatively, use a magic ring if you already know how to make one. Work the first round into the ring and tighten it after the stitches are complete.
Make a double crochet
- Yarn over.
- Insert the hook into the indicated stitch or space.
- Yarn over and pull up a loop. You now have three loops on the hook.
- Yarn over and pull through the first two loops.
- Yarn over and pull through the remaining two loops.
Work into a chain space
Insert your hook into the open space underneath the chain rather than into the individual chain stitches. This creates a clean group of stitches around the space.
Join a round with a slip stitch
At the end of a round, insert the hook into the top of the first actual double crochet of that round, yarn over, and pull through the stitch and the loop on your hook.
Identify the first stitch
After joining a round, look for the first double crochet made in that round. The starting chain is not a stitch, so do not count it when checking your stitches.
Weave in yarn ends
After fastening off, thread the tail through a yarn needle. Weave it through several stitches on the wrong side, changing direction once or twice to help secure it. Trim the excess carefully.
5. Gauge, Size, and Tension
Gauge is not critical for a single decorative square, but consistent tension matters if you plan to join multiple squares.
With medium-weight yarn and a suitable hook, six rounds may produce a square approximately 6–8 inches wide. This is only an example; your finished dimensions will depend on the yarn, hook, tension, and pattern construction.
To measure your square, lay it flat without stretching it and measure from one edge to the opposite edge. Repeat in the other direction. The two measurements should be reasonably close.
Check that all four corners are defined and that the sides remain straight. If you plan to make a blanket, measure every square before joining them.
6. Step-by-Step Solid Granny Square Pattern
The square is worked in joined rounds. Every round has four corner spaces, and each new round adds more double crochet stitches along the sides.
For this pattern, the corner structure is always:
3 dc, ch 2, 3 dc in each corner space.
The chain-2 space between the two groups of three double crochet stitches forms the corner. Along each side, work double crochet stitches into the individual stitches from the previous round.
Part A: Start the Square
- Make a slip knot and ch 4.
- Insert your hook into the first chain.
- Work a sl st to join the chain into a ring.
- Ch 3. This chain provides the height for the first dc but does not count as a stitch.
You are now ready to work the first round into the center ring.
Part B: Round One — Establish the Four Corners
Round 1:
- Ch 3.
- Work 2 dc into the center ring.
- Ch 2.
- Work 3 dc into the ring.
- Ch 2.
- Work 3 dc into the ring.
- Ch 2.
- Work 3 dc into the ring.
- Ch 2.
- Join with a sl st to the first actual dc of the round, located at the top of the beginning ch 3.
You should have four groups of 3 dc, separated by four ch-2 corner spaces.
Round 1 stitch arrangement: Four groups of 3 dc and four corner spaces.
The four chain-2 spaces establish the corners. The groups of double crochet between them form the initial sides of the square.
Part C: Round Two — Expand the Square
Round 2:
- Sl st across the next two dc to reach the first corner space. If needed, work another sl st into the corner space.
- Ch 3, then work 2 dc into the same corner space.
- Ch 2.
- Work 3 dc into the same corner space. This completes the first corner.
- Work 1 dc into each of the next 3 dc along the side.
- In the next corner space, work 3 dc, ch 2, and 3 dc.
- Work 1 dc into each of the next 3 dc.
- Repeat the corner section and the following three side dc stitches until all four corners have been completed.
- Join with a sl st to the first actual dc of the round.
Each corner receives two groups of 3 dc with a ch-2 space between them. Each side receives one dc into each stitch from the previous side group.
Round 2 stitch arrangement: Each side has 9 dc between its two corner spaces, counting the 3 dc from the first corner group, the 3 side dc, and the 3 dc from the next corner group.
The corner spaces stay in the same positions relative to the four corners, while the sides grow with each round.
Part D: Round Three and Later Rounds
For every subsequent round, the same corner structure is repeated, and the side sections become longer.
Round 3:
- Sl st across the next two dc to reach a corner space. If necessary, sl st into the corner space.
- Ch 3, then work 2 dc into the corner space.
- Ch 2.
- Work 3 dc into the same corner space.
- Work 1 dc into each dc along the side until you reach the next corner space.
- In that corner space, work 3 dc, ch 2, and 3 dc.
- Work 1 dc into each dc along the next side.
- Repeat the corner and side instructions until all four corners have been worked.
- Join with a sl st to the first actual dc of the round.
For Round 4 and every round after it, repeat the same construction:
- Move to a corner space.
- Work 3 dc, ch 2, and 3 dc in that space.
- Work 1 dc into every dc along the side until the next corner space.
- Repeat at all four corners.
- Join the round to the first actual dc.
How to recognize the corner space: It is the ch-2 opening between the two groups of 3 dc at each corner. Do not confuse it with the individual stitches along the sides.
As the square grows, the sides contain more double crochet stitches. Keep the corner spaces clear and continue placing the same corner groups into them.
Part E: Continue to the Desired Size
Continue working rounds until the square reaches your preferred dimensions.
For example, you might make six rounds for a small sample or continue for more rounds if you need a larger square. Each new round adds more stitches along all four sides, while the four corner spaces remain in the same positions.
To maintain a balanced square:
- Check that you have worked all four corners in every round.
- Confirm that each corner contains 3 dc, ch 2, and 3 dc.
- Make sure every stitch along the sides receives one dc.
- Count the side stitches between corner spaces and compare them with the previous round.
- Measure the square occasionally to confirm that its width and height remain similar.
If you are making multiple squares, stop at the same round count only if your yarn and tension produce matching dimensions. Otherwise, compare the actual measurements and adjust your approach consistently across the project.
Part F: Join and Finish the Final Round
After completing the final round, join with a sl st to the first actual dc of the round.
- Cut the yarn, leaving a tail long enough to weave in securely.
- Yarn over and pull the cut end completely through the loop on your hook.
- Tighten the loop gently to secure the final stitch.
- Thread the tail through a yarn needle and weave it through several stitches on the wrong side.
- Smooth the square with your hands and check the four corners and sides.
Blocking can help straighten the edges and make several squares more uniform. The best method depends on the fiber: some yarns tolerate wet blocking, some benefit from gentle steam, and others should not be exposed to heat. Follow the yarn’s care instructions and avoid applying heat directly to fibers that may melt or become damaged.
7. Complete Written Pattern Summary
Use this compact summary as a quick reference while crocheting. The starting chain does not count as a stitch.
Starting ring: Ch 4 and join with a sl st to form a ring.
Round 1: Ch 3, 2 dc in ring, ch 2; *3 dc in ring, ch 2; rep from * twice more. Join with a sl st to the first actual dc. There are four groups of 3 dc and four corner spaces.
Round 2: Sl st to a corner space. Ch 3, 2 dc in the same space, ch 2, 3 dc in the same space. Work 1 dc in each dc along the side. In the next corner space, work 3 dc, ch 2, and 3 dc. Continue around, working 1 dc into each side stitch and the same corner group into each corner space. Join with a sl st to the first actual dc.
Round 3 and later: Move to a corner space. Work 3 dc, ch 2, and 3 dc in the corner space. Work 1 dc into each dc along the side to the next corner. Repeat at all four corners, then join with a sl st to the first actual dc.
Finishing: Fasten off, weave in the yarn ends, check that all four corners are defined, and block if appropriate for the yarn.
8. Maintaining a Perfect Square Shape
The square curls or cups upward
Likely cause: The fabric may be too tight, or the corner increases may be missing or incorrectly placed.
Correction: Check that each corner contains 3 dc, ch 2, and 3 dc. Confirm that you have worked every side stitch. If the construction is correct but the fabric remains stiff, try a slightly larger hook.
The edges become wavy or ruffled
Likely cause: Extra stitches may have been worked along the sides, or the tension may be too loose.
Correction: Check that each side stitch receives exactly one dc and that you have not accidentally worked into the starting chain or joining slip stitch. If the stitch placement is correct, try a smaller hook or adjust your tension.
The corners look rounded or uneven
Likely cause: The corner chain spaces may be too tight, or the corner groups may not match.
Correction: Use a relaxed ch 2 at every corner and make sure each corner has two groups of 3 dc. Avoid pulling the joining slip stitch too tightly.
One side becomes longer than another
Likely cause: A side may have extra or missing stitches, or your tension may vary.
Correction: Count the stitches between corner spaces on all four sides. Compare the counts and correct any misplaced stitches before working another round.
The stitch count differs between sides
Likely cause: You may have missed a stitch, worked two stitches into one side stitch, or counted the corner space as a stitch.
Correction: Count only the actual dc stitches along the sides. Treat each ch-2 corner space separately and work the full corner group into it.
The center looks too tight or too loose
Likely cause: The starting ring may be too tight, or the first round may have been worked with inconsistent tension.
Correction: Tighten the starting ring only enough to close the hole without distorting the stitches. If the first round feels stiff, relax your tension or try a more suitable hook size.
9. Color Changes and Customization
The solid granny square is easy to customize while keeping the same corner construction.
Use one color throughout
One color creates a simple, uniform square and avoids extra yarn ends. This is an easy option for a first sample or a coordinated blanket.
Change colors between rounds
To change colors neatly, finish the final stitch of the round with the new color: begin the stitch as usual, but use the new yarn for the final yarn-over and pull-through. Join the round as instructed, then begin the next round with the new color.
Secure the old yarn and weave in the end when you are ready. Avoid leaving loose tails that could work free during use.
Add a contrasting border
A contrasting final round can frame the square and help it coordinate with other motifs. Keep the same corner construction in the border round so the square remains flat.
Adjust the dimensions
Work fewer rounds for a smaller square or more rounds for a larger one. Adding rounds increases the side length and yarn requirement. Reducing the number of rounds creates a smaller motif without changing the basic construction.
Try different yarn textures or weights
Different yarn weights will change the size, drape, and appearance of the square. If you change yarn weight, choose a suitable hook and keep the materials consistent across all squares intended for the same project.
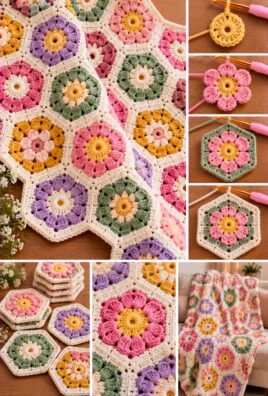
10. Joining Multiple Squares
Solid granny squares are useful for larger projects, but they should be prepared carefully before joining.
Make consistent squares
Use the same yarn weight, hook size, stitch pattern, and general tension for every square. If you use different colors, try to keep the yarn type and thickness consistent.
Measure before joining
Lay each square flat and measure from edge to edge in both directions. Compare the measurements before assembly. Even small differences can create uneven rows or puckered seams.
Choose a joining method
You can sew the squares together with a yarn needle, join them with slip stitches, or use a single-crochet seam. The best choice depends on the look, flexibility, and thickness you want for the finished project.
Whichever method you choose, align the corners and match the stitches along the edges. Avoid pulling the seam so tightly that the fabric gathers.
Use the squares for different projects
- Blankets: Arrange the squares in rows and columns before joining.
- Cushions: Join enough squares to create the front and back, then add a closure if you want a removable insert.
- Bags: Use a firm yarn and a joining method that supports the intended shape.
- Garments: Check the square dimensions and drape carefully because the finished fabric must fit comfortably.
Add a border to the completed project
A border can create a finished frame around the joined squares. Choose a border stitch that complements the fabric and accommodates the corners of the overall project.
If the squares are not perfectly uniform, blocking may help when appropriate for the yarn fiber. Blocking will not correct major stitch-count differences, so fix those before joining.
11. Troubleshooting Guide
Why does my granny square look like a circle?
The corners may not be defined clearly, or the corner spaces may have been worked incorrectly. Check that each corner has 3 dc, ch 2, and 3 dc, and that the side stitches are worked between the corner spaces.
Why are the corners not clearly defined?
The chain spaces may be too tight, or the corner groups may be missing stitches. Make sure every corner has its own ch-2 space between two groups of 3 dc.
Why does the square become wavy?
Extra stitches along the sides can create excess fabric. Check that you work one dc into each side stitch and avoid adding stitches into the starting chain or joining slip stitch.
Why are my sides uneven?
Uneven tension or missed stitches can change the length of one side. Count the stitches along each side between corner spaces and compare the measurements.
Why are there visible gaps between stitches?
Some gaps are normal because of the spaces between crochet stitches, but a very open fabric may result from a hook that is too large or loose tension. Try a smaller hook if you want a denser fabric.
Why does the joining seam look bulky?
The seam may be too tight, or the joining method may create a thick ridge. Try smaller, more even stitches and avoid catching extra loops or thick groups of yarn.
Why do my squares have different sizes?
Different tension, yarn thickness, hook sizes, or round counts can affect dimensions. Use consistent materials and measure the squares before joining. If necessary, block them when suitable for the yarn.
12. Frequently Asked Questions
1. Is a solid granny square suitable for beginners?
Yes. This pattern uses chain stitches, double crochet, slip-stitch joins, and repeated corner groups. Beginners who know these basic stitches can practice by making one sample square before starting a larger project.
2. What is the difference between a solid granny square and a traditional granny square?
A solid granny square has a denser fabric with fewer open spaces. A traditional granny square often uses groups of double crochet separated by chain spaces along the sides, creating a more open, lacy texture.
3. How many rounds should I crochet?
Work as many rounds as needed to reach your desired dimensions. Six rounds can be a useful starting sample, but the finished size depends on yarn, hook, and tension.
4. Can I use different yarn weights?
Yes. Different yarn weights will change the square’s dimensions and texture. Choose a suitable hook and use the same yarn weight and tension for squares that will be joined together.
5. How do I make all my squares the same size?
Use the same yarn, hook, pattern, and tension. Measure each square before joining and compare the dimensions. Blocking may help with minor differences when appropriate for the yarn.
6. Can I change colors between rounds?
Yes. Introduce the new color at the end of a round or join it at the beginning of the next round. Secure and weave in the yarn ends neatly.
7. Do I need to block my finished square?
Not always. Blocking can help straighten edges and make several squares more uniform, especially before joining. The appropriate method depends on the yarn fiber and its care instructions.
8. What projects can I make with solid granny squares?
You can use them for blankets, cushions, bags, garments, and other patchwork projects. Choose yarn and a joining method suitable for the item’s intended use.
9. How can I prevent my square from curling?
Check that the four corner groups are correct and that every side stitch receives one dc. Maintain consistent tension and use a suitable hook. If the construction is correct but the fabric is stiff, consider a slightly larger hook.
10. Can I make the square larger without changing the basic pattern?
Yes. Continue adding rounds using the same corner construction and work one dc into each side stitch. More rounds increase the dimensions while keeping the basic square structure unchanged.
13. Conclusion
A neat solid granny square comes from consistent tension, clearly formed corners, and regular stitch-count checks. Practice the pattern with one sample square, measure the finished result, and adjust your materials or technique before making multiple squares for a larger project. Once you are comfortable with the construction, you can experiment with colors, sizes, and joining methods to create a wide range of handmade pieces.
Leave a Comment