
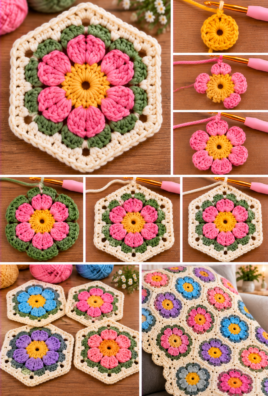
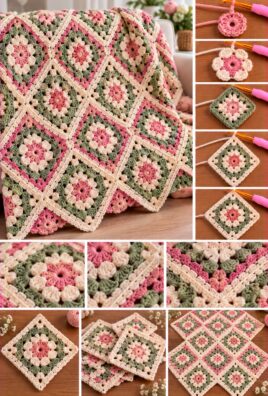
A crochet flower granny square combines the beauty of a flower with the familiar shape of a classic granny square. With a colorful center, soft petals, and four neat corners, this versatile motif is perfect for blankets, cushion covers, bags, garments, and other handmade projects.
This beginner-friendly pattern walks you through each stage, from crocheting the flower center to shaping the petals and transforming the circle into a square.
1. Project Overview
- Project name: Crochet Flower Granny Square
- Skill level: Beginner to confident beginner
- Construction: A circular flower center, eight petals, a transition round, and a square border
- Estimated finished size: Approximately 5–6 inches across
- Estimated completion time: Approximately 45–90 minutes per square
- Materials: Medium-weight yarn in two or three colors and a suitable crochet hook
- Main techniques: Magic ring, chain stitches, double crochet, treble crochet, working into spaces, color changes, and joined rounds
- Suggested uses: Blankets, bags, cushion covers, cardigans, scarves, and decorative panels
The final dimensions and completion time are estimates. Yarn weight, hook size, tension, petal height, and the number of outer rounds will affect the finished motif.
2. Materials and Tools
Gather the following supplies:
- Color A: Yarn for the flower center
- Color B: Yarn for the petals
- Color C: Yarn for the square border
- Crochet hook suitable for your yarn, often around 4.5–5 mm for medium-weight yarn
- Scissors
- Yarn needle
- Stitch markers, optional
- Measuring tape, optional
Smooth, medium-weight yarn is a good choice for beginners because it makes individual stitches and chain spaces easier to see. Cotton or acrylic yarn can work well, provided the yarn is suitable for the intended project.
Choose colors that contrast enough to make the petals stand out from the center and border. Using the same yarn weight and hook size for all rounds helps keep the motif balanced. If you plan to make many squares, use the same materials and tension for every motif.
3. US Crochet Abbreviations
This tutorial uses US crochet terminology throughout.
- ch: Chain
- sl st: Slip stitch
- sc: Single crochet
- hdc: Half double crochet
- dc: Double crochet
- tr: Treble crochet
- st / sts: Stitch / stitches
- sp: Space
- rnd: Round
- rep: Repeat
- RS: Right side of the work
- WS: Wrong side of the work
Starting chains do not count as stitches unless a step specifically states otherwise. At the end of each round, join with a slip stitch into the first stitch or designated space.
A chain space is the opening created by chain stitches. When instructed to work into a chain space, insert the hook into the opening rather than into the top loops of an individual stitch.
How to make a treble crochet
- Yarn over twice.
- Insert the hook into the indicated stitch or space.
- Yarn over and pull up a loop. Four loops are now on the hook.
- Yarn over and pull through two loops.
- Yarn over and pull through two loops again.
- Yarn over and pull through the last two loops.
4. Skills to Know Before Starting
You will use a few basic techniques throughout this pattern.
- Slip knot: Form a loop with the yarn and pull a second loop through it. Place the loop on your hook and tighten gently.
- Magic ring: Create an adjustable loop, work stitches into it, then pull the tail to close the center.
- Chain stitch: Yarn over and pull through the loop on the hook.
- Double crochet: Yarn over, insert the hook, pull up a loop, then work through two loops twice.
- Working into a space: Insert the hook through the opening formed by chains, not into a stitch.
- Joining a round: Use a slip stitch to connect the end of the round to its beginning.
- Changing colors: Finish the last stitch of a round with the new color, then continue with that color.
- Weaving in ends: Use a yarn needle to thread loose tails through several stitches on the wrong side.
The motif is built in four main stages: a small center, eight petals, a transition round that prepares the shape for corners, and a square-forming round.
5. Gauge and Finished Size
Gauge describes the size of your stitches. For a single motif, matching a precise gauge is not essential, but consistent tension helps the square lie flat. When making several squares for a blanket or garment, consistent sizing is especially important.
With medium-weight yarn and a suitable hook, the finished square may measure approximately 5–6 inches after the main four rounds. This is only an estimate.
To measure your motif, lay it flat without stretching it and measure from one edge to the opposite edge. Make a second measurement in the perpendicular direction. The measurements should be similar.
If you are making multiple squares, compare the first few motifs before joining them. Adjust your tension or hook size if the squares differ noticeably.
6. Step-by-Step Flower Granny Square Pattern
This design uses eight rounded petals around a small circular center. Each petal is worked into one of eight evenly spaced chain spaces. A transition round creates a larger framework, and the final round establishes four corners.
A. Creating the Flower Center
Use Color A.
Round 1
- Make a magic ring.
- Chain one. This chain does not count as a stitch.
- Work 16 double crochet stitches into the ring.
- Pull the yarn tail to close the ring.
- Join with a slip stitch into the first double crochet.
Stitch count: 16 double crochet stitches.
Fasten off Color A, leaving a tail long enough to weave in securely. You now have a small circle with sixteen double crochet stitches around the center.
If you prefer not to use a magic ring, chain four and join with a slip stitch to make a ring. Work the sixteen double crochet stitches into that ring.
B. Creating the Flower Petals
Use Color B.
The sixteen stitches from the center round provide eight evenly spaced positions, with two center stitches used for each petal. Each petal is worked into a pair of neighboring stitches, leaving the next pair for the following petal.
Attach Color B with a slip stitch in the first stitch of the center round.
Petal round
For each petal:
- Chain one. This does not count as a stitch.
- Work one single crochet into the first designated stitch.
- Work one half double crochet into the next stitch.
- Chain three to create the rounded outer tip.
- Work one half double crochet into the same stitch as the previous half double crochet.
- Work one single crochet into the next stitch.
- Slip stitch into the following center stitch to secure the petal base.
For the next petal, move to the next unused pair of center stitches and repeat the same sequence. Continue around until eight petals have been formed.
Join with a slip stitch at the base of the first petal.
Fasten off Color B and weave in the end.
Important: Keep the chain-three tip of each petal loose enough to form a soft curve. Do not pull the chain tightly, or the petals may curl inward.
When finished, check that all eight petals are spaced evenly around the center. Each petal should have a similar height and width.
C. Adding the Transition Round
The transition round creates spaces around the flower and prepares the motif for its square shape. Use Color C.
Attach Color C at the base of any petal with a slip stitch.
Transition round
- Chain one.
- Work one single crochet into the base stitch of the first petal.
- Chain three.
- Work one single crochet into the base stitch of the next petal.
- Chain three again.
- Continue around, working one single crochet at the base of every petal and chaining three between petals.
- Join with a slip stitch into the first single crochet.
You should have eight single crochet stitches, one at each petal base, separated by eight chain-three spaces.
The chain spaces are openings, not stitches. They provide room for the square-forming round to extend beyond the flower without pulling the petals together.
Check that the chain spaces are approximately the same length. If the transition round draws the flower inward, loosen your chains or use a slightly larger hook for this round.
D. Forming the Four Corners
Keep Color C attached for the square-forming round.
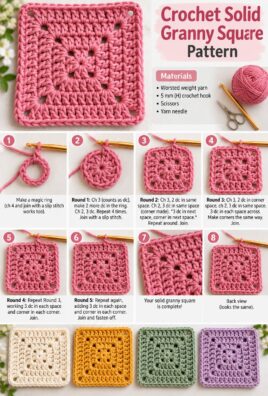
The eight chain-three spaces from the transition round provide four corner spaces and four side spaces. Each corner is placed in every other chain-three space, with a side space between neighboring corners.
Square-forming round
- Chain three. This counts as the first double crochet of the round.
- Work two double crochet stitches into the same chain-three space.
- Chain two to form the first corner.
- Work three double crochet stitches into the same space.
This completes the first corner group.
- Work three double crochet stitches into the next chain-three space. This forms the first side group.
- In the next chain-three space, work three double crochet stitches, chain two, then three more double crochet stitches. This forms the second corner.
- Work three double crochet stitches into the next chain-three space.
- Repeat the corner group in the next space, followed by a three-double-crochet side group in the following space.
- Continue around, alternating a corner group and a side group, until all eight spaces have been used.
- Join with a slip stitch to the top of the beginning chain-three.
You should have four corner groups, each made of two groups of three double crochet stitches separated by a chain-two corner space. Between each pair of corners is one side group of three double crochet stitches.
How to check the square: The four chain-two spaces should form the corners. The sides should stretch between them, and the flower should remain visible in the center. If the corners are difficult to identify, check that you placed a corner group in every other chain-three space.
E. Adding Optional Square Rounds
If you want a larger motif, work additional rounds using Color C or another coordinating color.
Optional enlargement round
- Slip stitch across the next two double crochet stitches to reach the first corner chain space.
- Chain three. This counts as the first double crochet of the corner group.
- Work two double crochet stitches into the same corner chain space.
- Chain two.
- Work three double crochet stitches into the same corner chain space.
- Work three double crochet stitches into the next side space between double crochet groups.
- Continue along the side, working three double crochet stitches into each available gap between groups.
- At the next corner chain space, work three double crochet stitches, chain two, then three more double crochet stitches.
- Repeat the side groups and corner groups around the square.
- Join with a slip stitch to the top of the beginning chain-three.
For every additional round, work a corner group of three double crochet stitches, chain two, and three double crochet stitches in each corner chain space. Along each side, work three double crochet stitches into every gap between neighboring double crochet groups.
As the square grows, the number of side groups increases. Keep the corner spaces clear and maintain consistent tension so the square lies flat.
F. Finishing the Motif
When the square reaches the desired size:
- Join the final round neatly with a slip stitch.
- Cut the yarn, leaving a tail of approximately 6 inches.
- Pull the tail through the final loop to fasten off.
- Thread the tail onto a yarn needle.
- Weave it through several stitches on the wrong side, changing direction once to help secure it.
- Repeat for any remaining loose ends.
- Lay the square flat and gently shape the corners and sides.
Make one sample square and measure it before crocheting multiple motifs. This helps you determine how many squares you need for a blanket, bag, or other larger project.
7. Complete Written Pattern Summary
Use this compact version while crocheting. All stitches use US terminology, and starting chains do not count as stitches unless stated otherwise.
Center — Round 1: With Color A, make a magic ring, ch 1, work 16 dc into the ring, close the ring, and join with a sl st to the first dc. Fasten off.
Petals — Petal round: With Color B, attach at the first center stitch. For each of eight petals, work sc in the first designated stitch, hdc in the next stitch, ch 3, hdc in the same stitch as the previous hdc, sc in the next stitch, and sl st into the following center stitch to secure the base. Repeat evenly around and join at the first petal base. Fasten off.
Transition — Round 1: With Color C, attach at a petal base. Ch 1, sc at the base of the first petal, ch 3, then sc at the base of each remaining petal, chaining 3 between bases. Join to the first sc. There should be eight sc stitches and eight chain-three spaces.
Square-forming round: Work corner groups of three dc, ch 2, and three dc into every other chain-three space. Work one group of three dc into each intervening chain-three space. Join with a sl st to the top of the beginning ch 3.
Optional enlargement rounds: In each corner ch-2 space, work three dc, ch 2, and three dc. Along each side, work three dc into each gap between neighboring dc groups. Join, fasten off, and weave in ends.
Finishing: Shape the motif flat, check that all four corners are balanced, and measure before making additional squares.
8. Color Changes and Finishing
Changing colors between rounds helps define the flower and the square border.
- Finish the final stitch of the current round until two loops remain on the hook, if applicable.
- Draw the new color through those loops to complete the stitch.
- Join the round as instructed.
- Continue with the new color.
- Fasten off the previous color if it will not be used again soon.
For this pattern, the center, petals, and transition round are each fastened off after completion. This means the yarn is not carried behind the flower, avoiding long strands that could show through the motif.
Weave in the ends with a yarn needle. Avoid bulky knots, and do not pull the tails so tightly that the fabric puckers.
If you are making a collection of squares, use the same color placement in each motif for a coordinated look.
9. Joining Multiple Flower Granny Squares
Flower granny squares can be joined to create blankets, cushion covers, bags, and garments.
Before joining:
- Complete all squares with the same number of rounds.
- Use the same yarn weight and hook size whenever possible.
- Measure each motif while it lies flat.
- Arrange the flowers in your preferred color order.
- Turn the squares so their flower centers face the same direction.
Recommended joining method: Single crochet seam
A single crochet seam creates a visible, slightly raised ridge between squares. It is sturdy and easy to work.
- Place two squares together with their right sides facing outward.
- Align the edges and corner chain spaces.
- Attach the joining yarn at a corner.
- Insert the hook through the corresponding edge stitch or space of both squares.
- Work a single crochet stitch through both layers.
- Continue along the edge, joining corresponding stitches and spaces.
- At the end, fasten off or continue joining the next pair of squares.
- Repeat until all motifs are connected.
Try to use the same number of joining stitches along each edge. At the corners, keep the join neat without pulling the squares together too tightly.
Once all squares are joined, you can add a border by working single crochet or double crochet around the outside edge of the project. Work extra stitches at the outer corners as needed to help the border lie flat.
10. Troubleshooting Guide
| Problem | Likely cause and solution |
|---|---|
| The flower center curls inward. | Your tension may be too tight. Try a larger hook or relax your stitches slightly. |
| The petals look uneven. | The stitches or chain-three tips may vary in tension. Repeat the same stitch sequence for all eight petals. |
| The petals are too crowded. | Your yarn may be too thick for the hook, or the petal stitches may be tight. Try a larger hook or a finer yarn. |
| The square remains circular. | Check that the square-forming round has four corner groups in every other chain-three space. |
| The four corners are not clearly defined. | Make sure each corner has three dc, ch 2, and three dc in one designated space. |
| The square curls or becomes wavy. | Tight tension can cause curling, while too many stitches can create waves. Check the placement of the side groups and try a different hook size. |
| The sides are different lengths. | Your corner placements or side-group spacing may be inconsistent. Count the groups and compare opposite sides. |
| The transition round has large gaps. | The chain-three spaces may be too loose. Try chaining more evenly or using a slightly smaller hook for that round. |
| The finished squares are different sizes. | Tension, yarn, or the number of rounds may differ. Measure each square and standardize your materials and technique. |
| The joined squares do not align neatly. | Align the corner spaces first and join matching edge stitches consistently. Avoid pulling the seam too tightly. |
11. Customization Ideas
- Contrasting flower: Use a dark center, bright petals, and a neutral square border.
- Pastel motif: Choose soft pink, cream, lavender, or pale yellow.
- Bright blanket squares: Mix several petal colors while keeping the center and border consistent.
- Single-color flower: Use one yarn color throughout to emphasize texture rather than color contrast.
- Extra border: Add another round in a coordinating shade to increase the square size.
- Larger motif: Work additional square rounds, keeping the same corner structure.
- Mixed color combinations: Make each flower a different color while using a shared border color to unify the project.
Changing yarn weight or hook size will affect the finished dimensions. If you change the petal count, you will also need to adjust the center arrangement and petal placement so the flower remains evenly spaced.
12. Frequently Asked Questions
1. Is a flower granny square suitable for beginners?
Yes. This pattern uses familiar stitches and repeats the same petal sequence around the center. The square-forming round takes a little attention, but the four corner groups make the structure easy to recognize.
2. How many petals should the flower have?
This pattern uses eight petals. The center round has sixteen double crochet stitches, providing eight evenly spaced pairs of stitches for the petals.
3. Which stitches can be used to create the petals?
Petals can be made with single crochet, half double crochet, double crochet, treble crochet, or textured stitches. This particular pattern uses single crochet and half double crochet with a chain-three tip.
4. How do I turn a flower into a square?
The transition round creates eight chain-three spaces around the petal bases. The square-forming round places four corner groups in every other space and side groups in the spaces between them.
5. How can I keep the four corners even?
Place one corner group in each designated corner space and keep the same stitch arrangement at all four corners. Check that opposite sides have matching groups and that the chain-two corner spaces remain open.
6. Can I use different yarn weights?
Yes, but the finished square will change size. Use a suitable hook for the yarn and keep the same yarn weight and hook size across all motifs in a larger project.
7. How do I make all my squares the same size?
Use the same materials, repeat the same pattern, and measure each motif flat. Keep the number of outer rounds consistent, and adjust your tension if the squares differ noticeably.
8. What is the best way to join flower granny squares?
A single crochet seam is a sturdy beginner-friendly choice. It creates a slightly raised ridge between motifs. For a flatter join, you can sew the edges together with a yarn needle.
9. Do I need to block the finished square?
Not always. If the square lies flat and the corners are even, blocking may not be necessary. If the edges are uneven, use a blocking method suitable for your yarn fiber and avoid excessive heat.
10. What projects can I make with flower granny squares?
You can join them to create blankets, cushion covers, bags, cardigans, vests, scarves, and decorative home accessories. Measure your motifs first to estimate how many squares your project will need.
13. Conclusion
A crochet flower granny square is a versatile motif that combines a cheerful floral center with the classic shape of a granny square. Evenly spaced petals, a balanced transition round, and clearly formed corners help create a neat, repeatable design.
If you are new to the pattern, complete one sample square and check its size before making a full set. Once you are comfortable with the stitches and corner placement, you can experiment with colors and use your motifs in a wide range of handmade projects.
Leave a Comment