
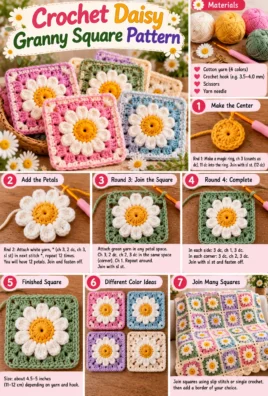
A crochet daisy granny square is a charming floral motif that combines a cheerful flower with the timeless structure of a classic granny square. With a sunny yellow center, soft white petals, and a contrasting background, this design adds a handmade touch to blankets, pillow covers, tote bags, cardigans, scarves, and many other crochet projects.
This crochet daisy granny square pattern is designed for confident beginners who know basic crochet stitches and want to learn how to build a flower into a square. You will work the yellow center first, create eight white petals around it, and then use the background color to form four recognizable corners and balanced sides.
The pattern includes clear round-by-round instructions, stitch counts, color-change advice, finishing tips, and troubleshooting suggestions. Once you understand the construction, you can repeat the motif in your favorite colors and combine multiple squares into a coordinated project.
1. Finished Project Overview
Crochet Daisy Granny Square
A floral motif with a yellow center, eight white petals, and a square background.
Skill level
Confident beginner
Terminology
US crochet terms
Finished size
About 4–5 inches
Working time
About 45–90 minutes
Yarn
Medium-weight yarn
Hook
4.5–5 mm, or as needed
Colors
3
Construction
4 main rounds
The finished dimensions and working time are estimates, not guaranteed results. Your square may be larger or smaller depending on your yarn, hook, tension, and experience. An optional fifth round lets you enlarge the motif if necessary.
2. Materials and Tools
You need only a small amount of yarn and a few basic crochet supplies to make one square.
- Yellow yarn: For the flower center.
- White or cream yarn: For the eight petals.
- Contrasting background yarn: For the square and its corners.
- Crochet hook: A 4.5–5 mm hook is a useful starting point for many medium-weight yarns. Follow the yarn label and choose a hook that produces a fabric that lies flat.
- Scissors: For cutting yarn.
- Yarn needle: For weaving in ends.
- Stitch markers: Optional, but useful for marking the four corner spaces.
- Ruler or measuring tape: To check the finished dimensions.
- Blocking tools: Optional, such as a blocking mat and rust-resistant pins.
Approximate yarn quantities
For one small motif, a practical starting estimate is:
| Color | Approximate amount |
|---|---|
| Yellow | 1–2 g |
| White or cream | 3–5 g |
| Background | 5–10 g |
| Total | About 9–17 g |
These quantities are approximate. A larger square, fuller petals, heavier yarn, or looser tension can increase yarn use. Keep extra yarn available if you plan to make several matching squares.
Choosing the right yarn
- Cotton: Gives clear stitch definition and a stable shape. It is useful for decorative squares and bags, although it may feel less stretchy than acrylic.
- Acrylic: Usually lightweight, widely available, and easy to care for. It can be a good choice for blankets and everyday accessories.
- Wool or wool blends: Often provide warmth, softness, and some natural elasticity. Check the care instructions before using wool for an item that needs frequent washing.
For a coordinated set of motifs, use the same yarn weight and, ideally, the same yarn type across all three colors.
3. Crochet Abbreviations and Terminology
This tutorial uses US crochet terminology. US and UK stitch names differ for some stitches, so use US terminology when following the instructions.
| Abbreviation | Meaning |
|---|---|
| ch | Chain |
| sl st | Slip stitch |
| sc | Single crochet |
| hdc | Half double crochet |
| dc | Double crochet |
| st | Stitch |
| sts | Stitches |
| sp | Space |
| ch-sp | Chain space |
| rnd | Round |
| rep | Repeat |
| sk | Skip |
| beg | Beginning |
| FO | Fasten off |
The main pattern uses chains, slip stitches, single crochet, and double crochet. Half double crochet is included as a reference abbreviation but is not required in the main motif.
4. Special Stitches and Techniques
Read this section before beginning the pattern. Understanding the flower construction will make the later rounds easier to follow.
Magic ring
A magic ring creates an adjustable loop at the center of your flower.
- Make a loop with the yellow yarn, leaving a yarn tail.
- Insert your hook through the loop and pull up a loop of yarn.
- Chain 1 to secure the working loop. This chain does not count as a stitch.
- Work the required stitches into the loop, making sure they go around the loop and the yarn tail.
- When the round is complete, pull the yarn tail to close the center.
Pull gently but firmly. If the ring is difficult to tighten, make sure you have not accidentally crocheted around the working yarn instead of the adjustable loop.
Alternative: Chain 4 and join the first chain to the last with a slip stitch to make a small ring. Work the center stitches into that ring. This method is easier for some beginners, although it may leave a slightly larger center hole.
Slip stitch join
A slip stitch join closes a round without adding much height.
- Insert your hook into the specified stitch or space.
- Yarn over and pull the yarn through the stitch or space.
- Continue pulling that same loop through the loop already on your hook.
Keep the slip stitch relaxed. Pulling it too tightly can make the edge pucker.
Double crochet cluster
A double crochet cluster is a group of incomplete double crochet stitches that are finished together at the top.
For a 3-dc cluster:
- Yarn over, insert the hook into the designated stitch or space, yarn over, and pull up a loop.
- Yarn over and pull through two loops. You now have two loops remaining on the hook.
- Yarn over, insert the hook into the same location, pull up a loop, and yarn over and pull through two loops. Three loops remain on the hook.
- Repeat the same process once more in the same location. Four loops remain on the hook.
- Yarn over and pull through all four loops.
This produces one cluster with three double crochet legs and one shared top. In this pattern, the flower petals use a different construction: each petal is a small group of ordinary double crochet stitches worked into a center stitch.
Daisy petal construction
Each petal is formed by working into one designated yellow-center stitch:
- Chain 2.
- Work 3 double crochet stitches into the same center stitch.
- Chain 2.
- Slip stitch into that same center stitch to secure the petal.
This makes a compact, rounded petal. Each petal uses one center stitch, and the flower has eight petals arranged evenly around the center. The chain-2 sections form the rounded ends of the petal.
The petals are secured individually with slip stitches. Do not work all the stitches of a petal into the spaces between center stitches; use the center stitch itself as specified.
Granny square corners
A granny square needs four corner spaces to create its square shape. In this pattern, each corner is formed by working:
2 dc, ch 2, 2 dc into the designated corner space.
The chain-2 space between the two pairs of double crochet stitches is the corner space for the next round. The sides are worked into the spaces between the corners.
The corners must remain in the same four positions throughout any additional rounds.
5. Gauge and Finished Measurements
A precise gauge is less critical for a decorative motif than for fitted clothing. However, consistent tension matters if you plan to join several squares into a blanket, bag, or pillow cover.
Aim for a finished square measuring approximately 4–5 inches (10–12.5 cm) across after gentle blocking. This is a target rather than a guaranteed size.
Use the following method to check your motif:
- Complete the yellow center and white flower section.
- Measure the flower before adding the square background.
- Complete the square.
- Measure from one side to the opposite side in both directions.
- If the motif is too small or too large, adjust your hook size or use the optional background round.
When making multiple squares, use the same yarn, hook, stitch counts, and tension. Measure each motif before joining, and block them to similar dimensions if necessary.
6. Complete Step-by-Step Crochet Daisy Granny Square Pattern
This pattern uses three colors:
- Color A: Yellow center.
- Color B: White or cream petals.
- Color C: Contrasting background.
The flower has eight petals. The background transition creates eight evenly spaced chain spaces, and the next round turns four of those spaces into corners.
The instructions below use a small center with eight single crochet stitches. To help the flower and square remain balanced, work the background transition into the back loops of the original center stitches, underneath the petals. This keeps the white petals visible while providing a foundation for the square.
Round 1: Yellow Flower Center
Color A · 8 single crochet stitches
The first round creates the yellow center and provides eight anchor stitches for the petals.
- Make a magic ring, or use the chain-ring alternative described earlier.
- Chain 1. This chain does not count as a stitch.
- Work 8 sc into the ring.
- Pull the magic ring closed, leaving a small, neat center.
- Join with a sl st into the first sc, not into the beginning chain.
End-of-round count: 8 sc.
Fasten off Color A, leaving a tail long enough to weave in securely. Keep the center flat rather than pulling it so tightly that the stitches bunch together.
Tip: If you use the chain-ring alternative, work all eight single crochet stitches into the ring itself, not into the individual chains.
Round 2: White Daisy Petals
Color B · 8 petals
This round creates the white flower. Each petal is worked into one of the eight yellow center stitches.
- Join Color B to any yellow sc with a slip knot and your hook. Insert the hook into the chosen center stitch, pull up a loop of white yarn, and secure it with a slip stitch.
- Chain 2.
- Work 3 dc into the same yellow center stitch.
- Chain 2.
- Work a sl st into that same yellow center stitch to secure the petal.
- Move to the next yellow sc and repeat the petal instructions.
Continue until you have made one petal in each of the eight yellow stitches. Join the round with a sl st at the base of the first petal, using the same joining point where you attached the white yarn.
End-of-round count: 8 petals, each made with ch 2, 3 dc, ch 2, and a securing sl st.
Fasten off Color B.
Keep the petals even: Work all three double crochet stitches into the same center stitch. Avoid accidentally inserting the hook into a chain or into the top of a petal stitch. If a petal twists, gently straighten it before beginning the next one.
The petals should sit around the center without being pulled tight. They may overlap slightly at their bases, but the flower should still have eight clearly visible petals.
Round 3: Background Transition
Color C · 8 single crochet stitches and 8 chain spaces
This round stabilizes the flower and creates the eight spaces used to form the square.
The key is to work into the back loop of each original yellow sc, beneath the white petal. The front of the yellow stitch supports the flower, while the back loop provides a foundation for the background.
- Turn the flower over so you can see the back of the yellow center.
- Join Color C into the back loop of any yellow center stitch. Make sure you are working into the original yellow stitch, not into the white petal.
- Chain 1; this does not count as a stitch.
- Work 1 sc into the back loop of the same yellow center stitch.
- Chain 2.
- In the back loop of the next yellow center stitch, work 1 sc, then chain 2.
- Repeat around the flower until all eight yellow center stitches have been used.
- Join with a sl st into the first sc of the round.
End-of-round count: 8 sc and 8 ch-2 spaces.
Fasten off Color C if you want to make the next round in the same background color but prefer a fresh, neatly positioned start. Alternatively, keep Color C attached and move to the next round with a slip stitch into the appropriate starting space.
Important: The eight chain spaces must be reasonably even. Do not pull the chains tightly against the yellow center. If the background pulls the flower inward, loosen your tension or try a slightly larger hook for this round.
Round 4: Forming the Granny Square
Color C · 4 corners and 4 side clusters
In this round, four of the eight chain spaces become corners. The remaining four spaces become the centers of the sides.
Each corner uses 2 dc, ch 2, 2 dc in one chain space. Each side section uses 3 dc in the next chain space.
To make the corner positions easy to track, place a stitch marker in every other chain space before you begin. These four marked spaces will become the corners.
- If Color C is fastened off, join it with a slip stitch into any marked ch-2 space. Chain 3; this counts as the first dc.
- Work 1 dc into the same marked space, chain 2, then work 2 dc into that same space. Your first corner is complete.
- Move to the next ch-2 space, which is not marked as a corner. Work 3 dc into that space to make the first side cluster.
- Move to the next marked ch-2 space. Work 2 dc, ch 2, and 2 dc into the space to make the second corner.
- Work 3 dc into the next unmarked ch-2 space.
- Continue in this alternating sequence: a corner in each marked space and 3 dc in each unmarked space.
- After completing all four corners and all four side clusters, join with a sl st to the top of the beginning ch-3.
End-of-round count:
- 4 corners, each with two pairs of dc separated by a ch-2 space.
- 4 side clusters, each containing 3 dc.
- 4 corner ch-2 spaces.
The square should now have four recognizable corners and four sides. The flower remains at the center, framed by the background color.
Check the shape: Lay the motif on a flat surface before continuing. If the square cups or the corners do not line up, check that you worked into alternating spaces and did not accidentally place a corner in a side space.
Optional Round 5: Enlarging the Square
Color C · 4 corners and 2 additional clusters per side
Use this round if your square is smaller than your target size or if you want a wider background border. The finished dimensions will depend on your yarn and tension.
- Join Color C into any corner ch-2 space if you fastened off. Otherwise, slip stitch into the corner space.
- Chain 3, then work 1 dc into the same corner space, ch 2, and work 2 dc into that same space. This completes the first corner.
- Work 3 dc into the gap between the corner’s second pair of dc and the first side cluster.
- Work 3 dc into the gap between the first and second side clusters along that side.
- Work 2 dc, ch 2, and 2 dc into the next corner space.
- Repeat the same sequence along the remaining three sides, adding two 3-dc clusters per side and maintaining the same corner construction.
- Join with a sl st to the top of the beginning ch-3.
End-of-round count:
- 4 corner ch-2 spaces.
- 8 side clusters in total, with 2 clusters along each side.
- Each side gains two additional 3-dc clusters.
Fasten off Color C.
When to use this round: Add it when the motif measures less than your desired 4–5 inches, or when you prefer a wider square. If the motif already reaches your target dimensions, you can stop after Round 4.
Pattern Summary
| Round | Color | Main result |
|---|---|---|
| 1 | Yellow | 8 sc for the flower center |
| 2 | White | 8 petals |
| 3 | Background | 8 sc and 8 ch-2 spaces |
| 4 | Background | 4 corners and 4 side clusters |
| 5 (optional) | Background | 4 corners and 2 clusters per side |
The stitch counts in this summary describe the main stitches and spaces of each round. The petals contain additional stitches worked into the same center stitches, so the flower’s decorative stitch count is separate from the background’s stitch and space count.
7. Color Changes and Yarn Management
Clean color changes help the yellow center, white petals, and background stand out clearly.
When to change colors
- Yellow to white: Finish Round 1 and fasten off the yellow yarn. Attach white yarn at a yellow center stitch to begin the first petal.
- White to background: Complete all eight petals, join the round, and fasten off the white yarn before beginning Round 3.
- Background rounds: Keep the same background color for Rounds 3–5, or fasten off between rounds if doing so makes the next starting position easier to manage.
Changing color neatly
When a round ends in a slip stitch and you want the next color to begin at that joining point, you can introduce the new color during the final pull-through of the joining stitch. Insert your hook into the joining stitch, draw up the old color, then use the new color for the final pull-through. This can help create a tidy transition.
For this pattern, fastening off and rejoining at the correct stitch or space is also a perfectly practical choice. It gives you control over where the next round begins.
Managing yarn tails
- Leave a tail of about 4–6 inches when fastening off.
- Weave each tail into several stitches on the wrong side using a yarn needle.
- Change direction once or twice as you weave to help secure the tail.
- Avoid pulling the tail so tightly that the center or background puckers.
- Trim the excess only after you are satisfied that the tail is secure.
Because this motif uses separate color sections, fastening off is usually neater than carrying unused yarn across the back. Carrying yarn can create visible strands, extra bulk, or color showing through the petals.
8. Finishing the Daisy Granny Square
Finishing helps the motif look neat and makes it easier to join with other squares.
- Fasten off the final round. Cut the yarn, leaving a tail of approximately 4–6 inches.
- Secure the yarn tail. Thread it onto a yarn needle and weave it into the wrong side of the background stitches.
- Inspect the flower. Check that all eight petals are present and evenly distributed around the yellow center.
- Shape the corners. Gently arrange the four corners so they point outward evenly. Make sure the corner chain spaces remain open enough to identify.
- Measure the square. Measure across both directions and compare the results with your target dimensions.
- Block if necessary. If the square is slightly uneven, gently shape it to a square and allow it to dry according to the fiber’s care requirements.
Blocking cotton yarn
Cotton can benefit from gentle wet blocking. Dampen the motif according to the yarn’s care instructions, shape it on a flat blocking surface, and pin the corners in place if needed. Allow it to dry completely before removing the pins.
Blocking acrylic yarn
Acrylic often responds well to gentle washing and careful shaping. Some acrylic fibers can be permanently damaged by excessive heat, so avoid direct ironing or high-temperature steam unless the yarn manufacturer specifically recommends an appropriate method. For most beginners, gentle washing and pinning to shape is the safer option.
Correcting uneven edges
If the square is slightly uneven, adjust the corner positions and side edges gently while blocking. Avoid stretching the motif excessively to force it to a particular measurement. If the sides differ noticeably, check the stitch placement and tension before making more squares.
9. Troubleshooting Common Problems
| Problem | Likely cause | How to fix it |
|---|---|---|
| The flower center curls. | The center stitches or magic ring are too tight, or the yarn tension is uneven. | Relax your tension and check that the ring is closed without bunching the stitches. If needed, try a slightly larger hook. |
| The petals look uneven. | Some petals have more stitches or tighter chains than others. | Use the same petal formula each time: ch 2, 3 dc, ch 2, sl st into the same center stitch. |
| The petals overlap too much. | The petals are too long for the center or the yarn is bulky. | Check that you have exactly 3 dc per petal. Consider a smaller hook or lighter yarn if the petals remain crowded. |
| Large holes appear between the petals. | The petal bases or securing slip stitches are loose, or the yarn is unsuitable for the hook. | Secure each petal in the correct center stitch and check that the stitches are evenly tensioned. A little space at the base is normal. |
| The square turns into a circle. | The four corner spaces were not formed in alternating positions. | In Round 4, use four alternating chain spaces as corners and work one 3-dc side cluster in each space between them. |
| The corners look rounded or unclear. | The corner chains are too tight or the corner stitches are placed in the wrong spaces. | Work 2 dc, ch 2, 2 dc into each marked corner space. Keep the ch-2 spaces open. |
| The square waves or ruffles. | Too many stitches were added, or tension is too loose. | Check the number of side clusters and make sure each designated side space receives only the instructed stitches. |
| The motif is too small. | The yarn is thin, the hook is small, or tension is tight. | Try a larger hook or add the optional fifth round. |
| The background pulls the petals out of shape. | Round 3 is too tight or the hook catches the white petals rather than the yellow center’s back loops. | Work into the back loop of each original yellow sc and keep the ch-2 spaces relaxed. |
| Color changes leave visible gaps. | The new yarn is not secured firmly at the joining point. | Leave adequate tails, weave them in carefully, and rejoin in the specified stitch or space. |
| The square does not match other motifs. | Different tension, yarn, hook sizes, or round counts have changed the dimensions. | Use the same materials and stitch counts. Block all squares to consistent dimensions before joining. |
A little variation is normal in handmade motifs. The most important things are keeping the petal construction consistent, preserving four corner spaces, and checking the shape before adding more rounds.
10. Customization Ideas
One of the best features of a daisy granny square is how easily you can change its appearance without changing its basic construction.
- Traditional daisy: Use a sunny yellow center, bright white petals, and a soft green or blue background.
- Cream and mustard: Choose a mustard center, ivory petals, and a warm beige background for a muted vintage look.
- Pastel palette: Try pale pink, lavender, mint, or baby blue for a soft decorative motif.
- Bold modern colors: Combine a golden center and white petals with teal, burgundy, forest green, or a rich charcoal background.
- Larger squares: Add further background rounds, preserving the four corner spaces and working the same corner pattern each time.
- Smaller motifs: Use finer yarn and a smaller hook, keeping the same basic stitch layout. Check that the petal bases remain easy to work into.
- Coordinated sets: Use the same center and petal colors across all motifs, changing only the background color for a varied but cohesive look.
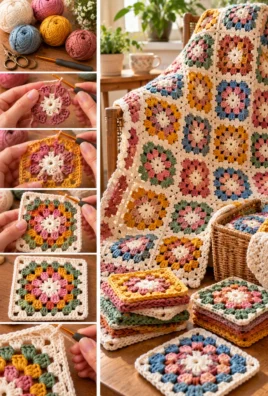
- Blankets and pillow covers: Arrange the squares in a planned color sequence before joining.
- Bags and garments: Choose a yarn with suitable strength and drape, and make a test motif before producing the full set.
Changing yarn weight or hook size affects the final dimensions. If you want every square to match, avoid changing materials halfway through a project unless you have checked the resulting size.
11. Joining Multiple Daisy Granny Squares
When you have crocheted several motifs, prepare them before assembling a larger project. Consistent squares make a blanket, pillow cover, bag, or garment look more polished.
Prepare the motifs
- Count the rounds in every square and confirm that each motif uses the same construction.
- Measure each square in both directions.
- Block the squares to similar dimensions if necessary.
- Arrange them in the intended color order before joining.
- Check that the corners align and the flower centers face the same way.
If one square is noticeably larger than the others, inspect its stitch counts and tension rather than stretching it excessively to match.
Choose a joining method
Slip-stitch seam
A useful choice for a defined, slightly raised seam. Place two squares with their edges together and work slip stitches through the corresponding edge stitches. Keep the seam relaxed so the fabric remains flexible.
Single-crochet seam
Creates a more pronounced ridge and can add structure to bags or decorative panels. Work single crochet through matching edge stitches, checking frequently that the seam does not pull the squares together too tightly.
Mattress-style seam
A sewing method that can produce a relatively discreet join. Use a yarn needle and matching yarn, taking small, consistent stitches through the corresponding edge loops.
Keep the finished project neat
Weave in loose ends before joining if they are easier to access that way. Alternatively, secure them after joining if the construction provides a better place to hide them. For a large blanket or pillow cover, a simple border around the assembled project can unify the edges and create a finished appearance.
You do not need to add a border to every individual square. Choose the method that suits your project and the texture you want.
12. Frequently Asked Questions
1. Is the crochet daisy granny square suitable for beginners?
Yes. If you know how to chain, single crochet, double crochet, and slip stitch, you can follow this pattern. The main challenge is working neatly into the original center stitches beneath the petals. Take your time with Round 3 and mark the four corner spaces before Round 4.
2. How many petals should a daisy granny square have?
This pattern has eight petals. Each petal is made with a chain-2 beginning, three double crochet stitches, a chain-2 finish, and a slip stitch into the same yellow center stitch.
3. Can I make this pattern without a magic ring?
Yes. Chain 4 and join the first chain to the last with a slip stitch to form a ring. Work the eight single crochet stitches into that ring. The center may have a slightly larger opening than one made with a tightly closed magic ring.
4. What yarn is best for a daisy granny square?
Medium-weight cotton, acrylic, or a suitable blend can all work well. Cotton gives clear stitch definition, acrylic is often easy to care for, and wool blends can add warmth and softness. Use the same yarn weight across all three colors for more consistent results.
5. How can I make my petals look fuller?
First, check your tension and make sure all three double crochet stitches are worked into the same center stitch. If you want a fuller flower, you can experiment with a different petal formula, but test it on a separate motif because changing the number or size of stitches may affect the background construction.
6. Why does my granny square curl?
Curling can result from tight tension, uneven side stitches, or incorrectly formed corners. Check that Round 3 has eight chain-2 spaces and that Round 4 has exactly four corners, each made with 2 dc, ch 2, and 2 dc. Gentle blocking may help with minor unevenness.
7. How do I keep all my squares the same size?
Use the same yarn, hook, stitch counts, and tension for every motif. Measure each square after the same number of rounds and block the motifs to consistent dimensions before joining them.
8. Can I make the motif larger?
Yes. Add the optional fifth round or continue adding background rounds. For each new round, work the established corner pattern into each corner chain space and add side clusters in the gaps along the sides.
9. What is the easiest way to join daisy granny squares?
A slip-stitch seam is a practical option for beginners because it creates a defined join without requiring complicated sewing. A single-crochet seam makes a more pronounced ridge, while a mattress-style seam can create a subtler join.
10. Can I use this pattern for a blanket or pillow?
Absolutely. Make multiple matching squares, measure them carefully, arrange them in your preferred layout, and join them with a suitable seam. A border around the completed piece can help unify the edges.
11. How do I stop the flower center from becoming loose?
Pull the magic ring closed firmly after Round 1, but do not tighten it so much that the stitches bunch together. Weave in the yellow yarn tail securely on the wrong side. If you use the chain-ring alternative, weave the starting tail carefully to help reduce the center opening.
12. Does the finished motif need blocking?
Not always. If the square lies flat and its corners are clear, you may not need to block it. Blocking is helpful when the edges are uneven or you want several motifs to have matching dimensions. Follow the yarn’s care instructions and avoid inappropriate heat, particularly with acrylic fibers.
13. Conclusion
Your crochet daisy granny square is a lovely way to combine a simple flower with a classic crochet motif. Once you are comfortable with the eight petals and four-corner construction, you can experiment with new color combinations and make a coordinated set of squares for your next project.
Remember to keep your stitches consistent, mark the corner spaces, and measure your motifs before joining them together.
What colors would you choose for your daisies? Would you use your finished squares for a cozy blanket, a decorative pillow, or a handmade tote bag? Share your favorite color combination or project idea with other crocheters!
14. SEO Publishing Details
SEO-Friendly Meta Title
Crochet Daisy Granny Square Pattern for Beginners
Meta Description
Learn how to crochet a daisy granny square with a yellow center, eight white petals, and a contrasting background using this step-by-step beginner-friendly pattern.
Secondary Keywords
- Daisy granny square tutorial
- Floral crochet square
- Crochet flower motif
- Beginner crochet granny square
- Crochet daisy pattern
- Crochet floral motif pattern
- Granny square flower pattern
Short Excerpt
Create a cheerful crochet daisy granny square with a yellow center, eight white petals, and a colorful square background. Follow the step-by-step instructions to make floral motifs for blankets, pillow covers, bags, and more.
Suggested Internal-Link Topics
- Classic crochet granny square pattern
- Crochet flower motifs for beginners
- How to join crochet granny squares
- Crochet blanket construction for beginners
- Crochet borders for square projects
- Choosing yarn for crochet accessories
Related Article Ideas
- Crochet Sunflower Granny Square Pattern
- Crochet Five-Petal Flower Motif for Beginners
- How to Join Granny Squares with a Flat Seam
- Crochet Daisy Blanket: Planning and Joining Floral Squares
- Crochet Flower Pillow Cover Using Granny Squares

Leave a Comment