
A crochet granny square pillow is a lovely way to add handmade texture, color, and personality to your home. Classic granny squares are ideal for this project because you can make them individually, experiment with color combinations, and join them into a decorative cover for a sofa, bed, reading nook, or favorite chair.
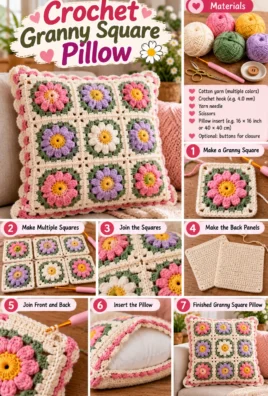
This tutorial explains how to crochet a set of matching granny squares, assemble a square front panel, make a compatible back panel, and create an envelope-style opening so the pillow insert can be removed. You can use a traditional multicolor design, a soft neutral palette, or a modern combination of contrasting shades.
The sample project is designed around a 40 cm by 40 cm pillow insert. The finished dimensions will depend on your yarn, hook, tension, joining method, and border, so you will make and measure one sample square before crocheting the remaining motifs.
1. Project Overview
Skill level
Confident beginner
Construction
16 granny squares and a crocheted back
Suggested yarn
Worsted-weight yarn
Suggested hook
4.5–5 mm
Pillow insert
40 × 40 cm
Front layout
4 columns × 4 rows
Estimated completion time: 8–14 hours. Estimated yarn requirement: 450–650 g for a fully crocheted cover, depending on yarn, square size, back-panel construction, and border.
Main stitches include chain, slip stitch, and double crochet. Optional finishing may include blocking, a single crochet border, a fabric lining, or a different closure.
The yarn quantity and finished dimensions are planning estimates, not guaranteed results.
2. Materials and Tools
- Smooth, durable yarn: Choose cotton, acrylic, or a suitable blend intended for home décor.
- Crochet hook: Begin with a hook suitable for the yarn, often 4.5–5 mm for worsted-weight yarn.
- Scissors: For cutting yarn.
- Yarn needle: For weaving in ends and sewing seams.
- Measuring tape or ruler: For checking square and panel dimensions.
- Stitch markers: Optional, but helpful for marking corners and seam positions.
- Pillow insert: A 40 cm by 40 cm insert for the sample project.
- Optional fabric: For a fabric-backed cover or lining.
- Optional closure: Buttons, a zipper, or another suitable fastening if you do not use the envelope-style back described below.
- Optional blocking tools: Use only methods suitable for the chosen yarn.
Choosing yarn
Cotton often provides clear stitch definition and a sturdy finish. Acrylic can be soft, lightweight, and convenient for many decorative covers. Blends may combine softness and durability.
Choose yarn with a texture and drape that suit your room and intended use. Very stiff yarn can make the cover feel rigid, while very loose or stretchy fabric may shift around the insert.
For a fully crocheted cover with 16 squares, a matching back panel, joining seams, and a border, allow approximately 450–650 g of yarn as an initial estimate. A fabric-backed cover usually needs less crochet yarn because the back is sewn from fabric rather than crocheted.
3. US Crochet Terminology and Abbreviations
This tutorial uses US crochet terminology throughout.
| Abbreviation | Meaning |
|---|---|
| ch | Chain |
| sl st | Slip stitch |
| sc | Single crochet |
| hdc | Half double crochet |
| dc | Double crochet |
| st / sts | Stitch / stitches |
| sp | Space |
| ch-sp | Chain space |
| rnd | Round |
| rep | Repeat |
| FO | Fasten off |
| RS | Right side |
| WS | Wrong side |
Stitches and spaces
A stitch is an individual crochet stitch, such as a double crochet. A chain space is the open gap formed by one or more chain stitches. In a granny square, clusters are worked into these spaces, not into the tops of the individual double crochet stitches, unless an instruction specifically says otherwise.
A granny cluster is three double crochet stitches worked into the same chain space.
How to make the stitches
Chain (ch): Make a slip knot and place it on the hook. Yarn over and pull through the loop on the hook. Repeat for each chain.
Slip stitch (sl st): Insert the hook into the indicated stitch or space, yarn over, and pull through both the stitch or space and the loop already on the hook.
Single crochet (sc): Insert the hook, yarn over and pull up a loop, then yarn over and pull through both loops.
Half double crochet (hdc): Yarn over, insert the hook, yarn over and pull up a loop, then yarn over and pull through all three loops.
Double crochet (dc): Yarn over, insert the hook into the stitch or space, yarn over and pull up a loop. Yarn over and pull through two loops, then yarn over and pull through the remaining two loops.
Granny-square conventions
The square is worked in joined rounds without turning.
- The beginning ch 3 counts as one dc.
- A standard cluster contains three dc stitches, including the beginning ch 3 when it is used as part of the first cluster of a round.
- Each corner consists of 3 dc, ch 2, and 3 dc worked into the same corner space.
- Side clusters are separated by ch 1.
- Each round is joined with a sl st to the top of the beginning ch 3.
- Joining slip stitches do not count as clusters.
These conventions are used throughout the pattern so the square grows evenly while keeping four clear corners.
4. Design, Gauge, and Sizing
The pillow cover has three main components:
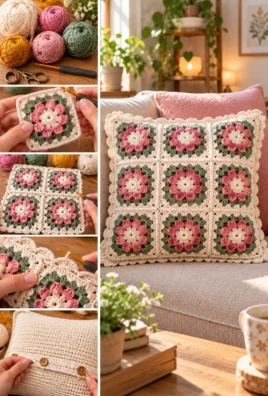
- Front panel: 16 granny squares joined in four columns and four rows.
- Back panel: Two crocheted rectangles that overlap to create an envelope opening.
- Finishing edge: A simple border around the assembled cover.
The envelope-style back is the main closure method in this tutorial. It allows the pillow insert to be removed without requiring a zipper or buttons.
Make and measure one sample square
Crochet one complete granny square using the pattern below. Measure its width and height while it lies flat without stretching.
For a front panel intended to measure approximately 40 cm by 40 cm, the target square size is around 9.5 cm per side before joining, assuming the seams add a small amount of width and height.
Estimated square width ≈ target front-panel width divided by the number of columns, before accounting for extra seam width or a border.
Estimated square height ≈ target front-panel height divided by the number of rows, before accounting for extra seam height or a border.
Worked example
Suppose your measured square is 9.5 cm wide and 9.5 cm high.
- Four squares across: 9.5 cm × 4 = 38 cm.
- Four squares down: 9.5 cm × 4 = 38 cm.
- If joining seams add about 1 cm in total across and 1 cm in total vertically, the assembled front will measure approximately 39 cm by 39 cm before the outer border.
- A carefully measured border may bring the front close to 40 cm by 40 cm.
These measurements are estimates. Some joining methods add almost no width, while others create more noticeable seams. The most reliable method is to measure your assembled front before making the back panel.
If your sample square measures 10.5 cm, four squares would already measure about 42 cm across before joining. In that case, use fewer rounds per square or a smaller hook and make another sample.
5. Complete Granny Square Pattern
Use the same yarn and hook for all 16 squares. You may change colors between rounds if you wish.
The pattern is written for five rounds, but your measured square size determines whether this is suitable for the 40 cm pillow front. If five rounds produce a square that is too large, stop earlier and make every square with the same number of rounds.
Round 1: Create the center
- Make a magic ring, leaving a yarn tail long enough to weave in later.
- Ch 3. This counts as the first dc.
- Work 2 dc into the ring to complete the first cluster.
- Ch 2.
- Work 3 dc into the ring.
- Ch 2.
- Repeat the sequence of 3 dc into the ring, ch 2, until you have four clusters and four corner spaces.
- After the fourth cluster, ch 2 and join with a sl st to the top of the beginning ch 3.
Pull the magic-ring tail firmly to close the center. Weave the tail through several stitches on the wrong side and change direction to secure it.
Round 1 verification:
- 4 clusters.
- 4 corner spaces.
- 12 dc in total, counting the beginning ch 3 as one dc.
Each ch-2 space marks a corner of the square.
Round 2: Form the corners
- Sl st across the top of the stitches as needed to reach a corner ch-2 space.
- Ch 3, counting this as the first dc.
- Work 2 more dc into the same corner space.
- Ch 2.
- Work 3 dc into the same corner space.
- Ch 1.
- In the next corner space, work 3 dc, ch 2, and 3 dc.
- Ch 1 and repeat the same corner group in each remaining corner space.
- After the fourth corner, join with a sl st to the top of the beginning ch 3.
Round 2 verification:
- 8 clusters.
- 4 corner spaces.
- 4 side ch-1 spaces, one between each pair of corner groups.
Round 3: Add side clusters
- Sl st across the stitches as needed to reach a corner ch-2 space.
- Ch 3, then work 2 dc into the same corner space.
- Ch 2 and work 3 dc into that same corner space.
- Ch 1.
- Work 3 dc into the next side ch-1 space.
- Ch 1.
- Work the standard corner group of 3 dc, ch 2, and 3 dc into the next corner space.
- Continue around the square, working one 3-dc cluster into every side ch-1 space and the standard corner group into each corner space.
- Join with a sl st to the top of the beginning ch 3.
Round 3 verification:
- 12 clusters.
- 4 corner spaces.
- 8 side ch-1 spaces, with two along each side.
Round 4: Expand the square
- Sl st across the stitches as needed to reach a corner ch-2 space.
- Ch 3, work 2 dc into the same corner space, ch 2, and work 3 dc into the same space.
- Ch 1.
- Work 3 dc into every side ch-1 space, placing ch 1 between adjacent clusters.
- At the next corner space, work 3 dc, ch 2, and 3 dc.
- Continue around the square, working one cluster into each side space and the standard group into each corner.
- Join with a sl st to the top of the beginning ch 3.
Round 4 verification:
- 16 clusters.
- 4 corner spaces.
- 12 side ch-1 spaces, with three along each side.
Round 5: Continue the pattern
- Sl st across the stitches as needed to reach a corner ch-2 space.
- Ch 3, work 2 dc into the same corner space, ch 2, and work 3 dc into that space.
- Ch 1.
- Work 3 dc into each side ch-1 space, placing ch 1 between adjacent clusters.
- At each corner, work the standard group of 3 dc, ch 2, and 3 dc.
- Continue around the square, preserving the same corner and side-cluster sequence.
- Join with a sl st to the top of the beginning ch 3.
Round 5 verification:
- 20 clusters.
- 4 corner spaces.
- 16 side ch-1 spaces, with four along each side.
How to keep the square growing evenly
Each new round adds one cluster along every side and maintains the same four corner spaces. Work clusters into chain spaces, not into the tops of individual dc stitches.
If you want a larger square, continue the same method: work the standard corner group into each corner space and one cluster into every side ch-1 space, with ch 1 between adjacent clusters.
For the pillow front, all 16 squares must have the same number of rounds and matching dimensions. Measure the first square before continuing with the remaining motifs.
6. Making All 16 Squares the Same Size
A flat, well-aligned pillow front depends on consistent squares. If some motifs are larger than others, the seams may pucker or the front panel may look uneven.
Follow these steps:
- Complete one sample square. Work all the rounds you plan to use.
- Measure the square. Measure across its widest points in both directions without stretching it.
- Record the result. Write down the hook size, yarn, number of rounds, and finished dimensions.
- Use the same yarn and hook. Different yarns or hook sizes can create noticeable differences.
- Keep your tension consistent. Avoid making some rounds much tighter than others.
- Count the rounds. Make every square with the same round count.
- Compare the completed motifs. Measure each square before joining.
- Block if suitable. Gentle blocking may help align the squares if the yarn fiber tolerates it.
Changing only the yarn color does not necessarily change the size. However, different yarns, hook sizes, and tension can make the squares noticeably different.
If a square is much larger or smaller than the others, correct it before assembly. Do not rely on stretching every square to force a match.
7. Color Planning and Square Arrangement
The classic granny square is ideal for experimenting with color. You can change colors every round, keep the center and outer rounds consistent, or make all 16 squares in a single color.
Three suggested color schemes
- Warm neutrals: Cream centers, beige middle rounds, and warm brown outer rounds.
- Soft garden: Pastel pink, white, and sage green.
- Modern contrast: Mustard yellow, ivory, and muted blue.
You can use a different combination if it better suits your room.
Plan the 4-by-4 layout
Before joining the squares, arrange all 16 motifs in four columns and four rows.
A simple planning method is to:
- Place all the squares on a flat surface.
- Distribute the brightest or darkest motifs across the layout rather than gathering them in one area.
- Alternate color combinations to create a balanced pattern.
- Check that the corners and edges line up.
- Take a note of the order before moving the squares.
If you use several color combinations, repeat each combination at different positions to create a coordinated look. The layout can be symmetrical or deliberately varied.
8. Weaving in Ends
Finish each square before joining it to the others. Secure ends are especially important on a pillow cover because the fabric may be handled and washed regularly.
- After the final round, cut the yarn, leaving a tail of approximately 10–15 cm.
- Pull the cut end through the final loop to secure it.
- Thread the tail through a yarn needle.
- On the wrong side, weave the tail through the backs of several stitches.
- Change direction and weave through another section to help secure the end.
- Trim the excess yarn carefully without cutting the crochet fabric.
Avoid tying bulky knots at the corners. If you have changed colors several times, weave each end through stitches of a matching or compatible color where possible.
Check all 16 squares for loose tails before joining them.
9. Joining the Granny Squares
This tutorial uses a slip-stitch crochet join. It creates a visible seam and can give the pillow front a defined grid. The seam should be even without being so tight that it pulls the squares inward.
Step 1: Arrange the squares
Place the 16 squares in the chosen four-column by four-row layout. Keep the right side of every square facing upward.
Step 2: Align two adjacent edges
Place two squares side by side with their right sides facing upward. Align the edge stitches and corner spaces.
Step 3: Attach the joining yarn
Attach the yarn at one end of the aligned edges. Use the background color or a contrasting color, depending on the look you want.
Step 4: Work the slip-stitch seam
- Insert the hook through the corresponding edge loops of both squares.
- Yarn over and pull through the two edge loops.
- Pull the new loop through the loop already on the hook to complete one slip stitch.
- Repeat along the edge, matching the stitch positions on both squares.
- Keep the tension even so the seam does not bunch or stretch the fabric.
Use the same edge-loop method throughout the project. Avoid skipping edge stitches unintentionally, as this can leave gaps.
Step 5: Join horizontal strips
Join the four squares in each row first. This creates four horizontal strips, each containing four squares.
Step 6: Join the strips
Align the long edges of the strips and join them using the same slip-stitch method. Match the intersections carefully so the corners of the squares meet neatly.
Step 7: Secure the seams
Fasten off and weave in the joining yarn ends on the wrong side. Lay the front panel flat and check that it remains square.
Prevent gaps and bulky intersections
- Match corresponding edge stitches consistently.
- Avoid pulling the seam too tightly.
- Keep the corners aligned where four squares meet.
- Weave in joining ends separately instead of tying several bulky knots together.
- If the panel ripples, check the seam tension before proceeding.
The joining method affects the final width and height. Measure the assembled front panel rather than relying only on the individual square measurements.
10. Complete Pattern: Crocheted Back Panel
The back uses two rectangular crochet pieces that overlap to form an envelope opening. This makes the pillow insert removable without requiring a zipper or buttons.
For the sample, each rectangle is intended to measure approximately 40 cm wide by 26 cm high before finishing. When the two rectangles overlap by about 12 cm, their combined height is approximately 40 cm.
The actual dimensions must be matched to your assembled front panel.
Gauge for the back panel
For this worked example, suppose your single crochet swatch measures 14 sc stitches and 18 rows per 10 cm.
- Target width: approximately 40 cm.
- Estimated stitch count: 40 cm × 1.4 stitches per centimeter = 56 stitches.
- Target height: approximately 26 cm.
- Estimated row count: 26 cm × 1.8 rows per centimeter = 46.8 rows.
Use 56 stitches across and work approximately 47 rows, measuring the fabric as you go.
If your gauge differs, recalculate the stitch count and row count. Do not force your panel to use these sample numbers if they produce the wrong dimensions.
Make the first back rectangle
Use the chosen yarn and hook.
Foundation chain: Ch 57. The turning chain does not count as a stitch.
Row 1: Work 1 sc into the second chain from the hook and 1 sc into each remaining chain.
Stitch count: 56 sc.
Row 2: Ch 1 and turn. Work 1 sc into the first stitch and 1 sc into each stitch across.
Stitch count: 56 sc.
Rows 3–47: Repeat Row 2, maintaining 56 sc in every row. Measure the panel and stop when it reaches approximately 26 cm high.
Stitch count for every row: 56 sc.
Fasten off and weave in the end.
Make the second back rectangle
Repeat the same instructions to create a second rectangle matching the first one.
Both pieces should have the same width and height. Lay them together and compare their edges before adding the closure.
Finish the overlapping edges
Choose one long edge of each rectangle as the opening edge.
- Attach yarn at one corner of the first opening edge.
- Ch 1 and work 1 sc across the edge, placing one sc into each stitch.
- Fasten off and weave in the end.
- Repeat along the opening edge of the second rectangle.
These finished edges form the two sides of the envelope opening. If you prefer a firmer edge, you can add a second sc round, but measure the panels afterward because additional edging can affect their dimensions.
11. Optional Fabric Backing
If you prefer a fabric back instead of two crocheted rectangles, you can sew a fabric panel to the crochet front. This reduces the amount of crochet yarn required and provides a different texture.
A fabric-backed cover is optional; the main tutorial remains complete with the crocheted envelope back above.
Prepare the fabric
- Measure the assembled granny-square front panel.
- Measure the pillow insert and check how much room the finished cover needs.
- Decide whether the fabric will form a single back panel or an envelope-style back with overlapping sections.
- Add a suitable seam allowance around the fabric edges.
- Cut the fabric to the required dimensions.
- Finish any raw edges to prevent fraying.
- Lay the fabric against the crochet front and confirm that their edges match.
For an envelope back, cut two fabric rectangles with enough overlap to cover the opening when the insert is inside. The exact size depends on the measured front panel and the seam allowance.
Sew the fabric to the crochet carefully. Avoid pulling the crochet fabric while sewing, as this can distort the square front.
If the fabric is much less stretchy than the crochet, test the fit before sewing the entire perimeter. Make sure the closure remains accessible for inserting and removing the pillow.
12. Closure: Envelope-Style Back
The main closure uses two overlapping back rectangles. Their finished opening edges overlap so the pillow insert can be placed inside and removed later.
Arrange the back pieces
- Lay the first back rectangle flat with its right side facing down.
- Place the second rectangle over it, also with its right side facing down.
- Position the two rectangles so their finished opening edges overlap by approximately 12 cm.
- Align the outer top and bottom edges so the combined back panel matches the height of the assembled front.
For the sample, each rectangle is approximately 26 cm high. Two pieces of that height with a 12 cm overlap create a combined height of approximately 40 cm.
These dimensions are estimates. Adjust the overlap if your measured front panel or pillow insert requires it.
Check the overlap
Before sewing, lay the assembled back over the front panel. The outer edges should align on all four sides, and the opening should remain covered by the overlapping fabric.
If the overlap is too narrow, the pillow insert may push the opening apart. If the overlap is too wide, the back may become bulky. Adjust the arrangement before sewing.
Secure the opening edges
The opening edges have already been finished with single crochet. You can leave them as they are, or reinforce the ends with a few additional stitches if they appear loose.
Do not sew the two overlapping opening edges to each other. The overlap must remain open so the pillow insert can be removed.
Optional buttons or zipper
If you prefer a more secure closure, you can add buttons or a zipper instead. These options require additional sewing and may need a different back-panel arrangement. Make sure the closure is compatible with the fabric and does not distort the crochet.
For the main tutorial, the envelope closure is sufficient and requires no extra hardware.
13. Adding a Border
A simple single crochet border frames the granny squares and gives the pillow cover a tidy edge. Use the background color or a contrasting shade.
Because the border adds a little width, measure the front panel and compare it with the pillow insert before deciding how many rounds to work.
Border Round 1: Single crochet
- With the front and back pieces aligned and the outer edges ready to be joined, attach the border yarn at one corner.
- Ch 1. This does not count as a stitch.
- Work sc stitches evenly along the edge.
- Along the top and bottom edges, work into the available stitches.
- Along vertical edges, distribute the sc stitches evenly across the row ends rather than automatically working one into every row.
- At each outer corner, work 3 sc into the corner point to help the border turn neatly.
- Continue around all four sides.
- Join with a sl st to the first sc.
- Fasten off and weave in the end.
If you have already sewn the front and back together, work the border through the corresponding edge stitches of both layers so the edging helps secure the seam. Keep the envelope opening accessible; do not accidentally crochet the overlapping opening edges together.
Optional Border Round 2
For a slightly wider edge:
- Attach the yarn at any point on the previous border round.
- Ch 1.
- Work 1 sc into each stitch around.
- At each corner, work 3 sc into the middle stitch of the previous corner group.
- Join with a sl st to the first sc.
- Fasten off and weave in the end.
This second round is optional. A single round often gives a neat finish without making the pillow cover too large or bulky.
Check the border tension
- If the border pulls inward, it may be too tight or have too few stitches. Undo the affected section and distribute more stitches evenly.
- If the border ripples, it may have too many stitches. Remove the affected section and work fewer stitches.
- If the corners look rounded or puckered, check that the corner increase is placed consistently.
Keep the border flat and even. The cover should remain square rather than curling or flaring.
14. Assembling the Pillow Cover
Follow this order to keep the front and back aligned and the envelope closure accessible.
Step 1: Finish the granny-square front
Check that all 16 squares are joined, the panel lies flat, and the corners line up. Measure the front panel in both directions and record its dimensions.
Step 2: Finish and measure the back
Measure the two crocheted back rectangles and arrange them with the planned overlap. Confirm that the combined back matches the front panel’s width and height.
Step 3: Align the pieces
Lay the front panel with its right side facing upward. Place the arranged back pieces over it, with their right sides facing the front’s right side. The finished opening edges should overlap and remain inside the perimeter.
Align all four outer edges. Use stitch markers to hold the corners and side edges in place.
Step 4: Join the perimeter
Using a yarn needle and matching yarn, sew the front and back together along the top, bottom, and both sides. Catch the corresponding edge stitches of the front and back without pulling the seam too tightly.
The envelope opening must remain accessible. Sew only the outer perimeter, not the overlapping opening edges.
Step 5: Add the border
Work the single crochet border around the outer perimeter if you have not already completed it. Ensure the border catches the edges of both the front and back layers.
Step 6: Secure the yarn ends
Weave in all loose ends on the inside of the cover. Check the corners and the edges of the envelope opening for loose stitches.
Step 7: Insert the pillow
Turn the cover right side out through the envelope opening. Insert the pillow form and smooth the corners into place.
Step 8: Check the fit
Make sure the insert sits comfortably inside the cover and the envelope overlap stays closed. The front should look flat, the seams should remain secure, and the corners should not be excessively stretched.
If the cover is too tight, do not force the insert inside. Recheck the panel dimensions and consider adjusting the seams or making a larger cover.
15. Fitting the Pillow Insert
A crochet cover may stretch more than a woven fabric cover. The best fit depends on the yarn, stitch pattern, seam construction, and thickness of the insert.
Close fit versus relaxed fit
A close-fitting cover keeps the pillow looking neat and reduces excess fabric around the corners. A looser cover is easier to insert and remove, but may look less structured.
Do not assume that the cover must always be smaller than the insert. Crochet fabric varies in stretch, and a firm stitch pattern may have very little give.
Test before final assembly
- Measure the assembled front and back pieces.
- Compare the measurements with the pillow insert.
- Check whether the joining seams and border add extra width.
- Test the envelope overlap with the insert inside.
- Adjust the panel dimensions or seam allowance before making final changes permanent.
If the cover is too loose, you may be able to take in the side seams slightly. If it is too tight, undoing the seams will not create additional fabric; you may need to remake a panel or add a suitable border only if that can increase the size without distorting the design.
16. Troubleshooting Common Problems
| Problem | Likely cause and solution |
|---|---|
| Granny squares are different sizes. | Tension, yarn, hook size, or round count may differ. Compare the squares before joining and correct any outliers. |
| The front panel becomes wavy. | Seams may be too loose, or the squares may not be the same size. Undo the affected seams, match the edges, and join with even tension. |
| Seams look bulky. | Too many loops or thick knots may have been caught in the join. Use a consistent edge-loop method and weave in ends separately. |
| Corners do not align. | The squares may have been joined out of position. Realign the corners and use stitch markers at the intersections before continuing. |
| The back panel is too large or too small. | The measured front dimensions may differ from the planned size. Adjust the back panel to match the actual assembled front rather than relying on estimates. |
| The pillow cover is too tight. | The cover may be too small for the insert or the fabric may not stretch enough. Check the dimensions and remake or adjust a panel if needed. |
| The pillow insert slips out. | The envelope overlap may be too narrow or the insert may be too large for the cover. Increase the overlap or adjust the back construction so the opening stays covered. |
| The envelope opening does not overlap enough. | The back rectangles may be too short or positioned incorrectly. Reposition the pieces and increase the overlap before sewing the perimeter. |
| The border curls inward. | The border may be too tight or have too few stitches. Undo the affected section and work a more even distribution of stitches. |
| The border ripples. | Too many stitches may have been added along the edges. Reduce the stitch count slightly in the affected section. |
| Yarn ends come loose. | Ends may be too short or woven in only one direction. Reweave through several stitches and change direction before trimming. |
| The finished cover looks asymmetrical. | The front panel may not be square, or the back pieces may be misaligned. Measure both directions, align the corners, and correct the assembly before inserting the pillow. |
17. Customization Ideas
You can personalize the pillow cover while keeping the same basic construction.
- Change the colors: Use two colors for a simple graphic look or several shades for a patchwork effect.
- Make larger or smaller squares: Add or omit granny-square rounds, ensuring all 16 squares match.
- Use a contrasting border: A darker or brighter edge can frame the squares.
- Try a textured back panel: Substitute single crochet for a different stitch pattern after checking the gauge.
- Keep the envelope back: This is a simple, removable closure without extra hardware.
- Add a fabric lining: A lining may help support the crochet, especially if the stitch pattern has large gaps.
- Use another closure: Buttons or a zipper can provide a different finish, but require suitable sewing and a closure plan.
- Make a two-color or single-color design: A consistent palette can create a modern look, while multiple colors make the squares more playful.
How changes affect the dimensions
Changing yarn weight, hook size, square size, or border width can alter the final cover dimensions.
Estimated front-panel width ≈ width of one square multiplied by the number of columns, plus any extra width created by joining seams.
Estimated front-panel height ≈ height of one square multiplied by the number of rows, plus any extra height created by joining seams.
Measure the assembled front before making the back panel. This is more reliable than calculating the finished cover from the square dimensions alone.
18. Care Instructions
Care for the pillow cover according to the yarn label and the materials used in its construction.
- Remove the pillow insert: Take out the insert before washing the cover, when the materials allow.
- Check the yarn label: Cotton, acrylic, wool, and blended yarns may need different care methods.
- Wash appropriately: Use hand washing or a machine cycle only if the yarn and construction support it.
- Dry carefully: Lay the cover flat if appropriate, and reshape it gently if necessary.
- Check the closure: Inspect the envelope edges, buttons, zipper, or other closure for wear.
- Care for fabric backing separately: If you use a fabric lining, make sure its washing and drying requirements are compatible with the crochet.
- Store when dry: Avoid leaving the cover damp, and keep it in a clean, dry place when not in use.
Do not assume the cover is machine-washable simply because the yarn feels durable. Check the yarn label and consider the care needs of any fabric, zipper, buttons, or pillow insert.
19. Frequently Asked Questions
1. Is a granny square pillow suitable for beginners?
Yes. The classic granny square uses repeated clusters and chain spaces. Joining the squares and making a neat envelope back require care, but the construction is manageable with practice.
2. What yarn is best for a crochet pillow cover?
Cotton, acrylic, and suitable blends can all work well. Choose yarn with good stitch definition and enough durability for home décor.
3. Which hook size should I use?
A 4.5–5 mm hook is a useful starting point for many worsted-weight yarns. Make a sample square and adjust the hook to achieve the desired dimensions and fabric texture.
4. How many granny squares do I need for a 40 cm pillow?
The sample uses 16 squares arranged in four columns and four rows. Each square must be measured so the assembled front is close to the intended size.
5. How do I make all the squares the same size?
Use the same yarn, hook, tension, and number of rounds. Measure each square before joining and correct any noticeable differences.
6. What is the easiest way to join granny squares?
A slip-stitch crochet join is a practical option. Align the corresponding edge loops and work slip stitches along each seam with even tension.
7. Should I block the squares before joining?
Blocking is optional. It can help the motifs align, but only use a method suitable for the chosen yarn fiber.
8. Can I make the back panel from fabric?
Yes. Measure the assembled crochet front, allow a seam allowance, and sew a fabric back that matches the front dimensions. You can use an envelope-style fabric back if you want a removable insert.
9. How do I add an envelope-style closure?
Make two back rectangles, finish their opening edges, overlap them, and align their outer edges with the front panel. Sew around the outer perimeter while leaving the overlap opening accessible.
10. How do I make the pillow cover fit snugly?
Measure the assembled front and back against the insert before final assembly. Account for the stretch of your crochet fabric and the extra width created by seams and borders.
11. Why does my border curl?
The border may be too tight or have too few stitches along the edges. Undo the affected section and redistribute the stitches until the border lies flat.
12. How should I wash and care for the pillow cover?
Remove the insert and follow the yarn label’s instructions. Check any fabric backing or closure components for separate care requirements.
13. Can I make the pillow cover larger?
Yes. Use larger squares, add more granny-square rounds, or adjust the back panel. Recalculate the layout and measure the assembled front before making the back.
14. Can I use different colors in each square?
Yes. Arrange the squares before joining them so the color distribution looks balanced. Using the same yarn weight and hook helps keep their dimensions consistent.

Leave a Comment