
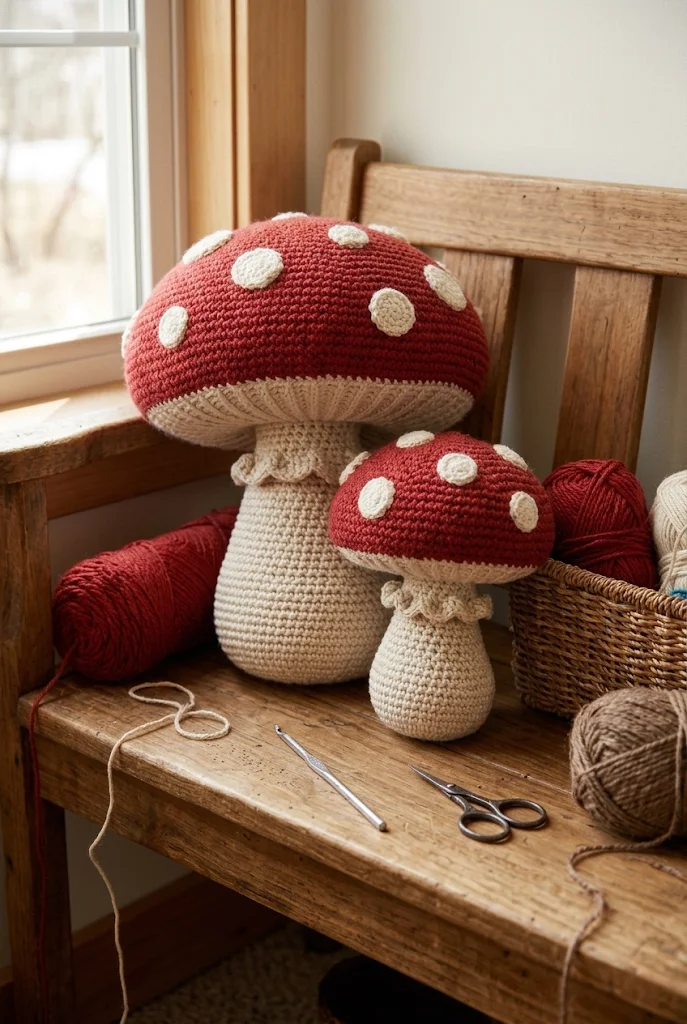
A handmade crochet mushroom pillow brings cottagecore enchantment, woodland nostalgia, and tactile comfort to any living space or bedroom corner. Inspired by the iconic fly agaric (Amanita muscaria) toadstool, this pillow features a vibrant dome-shaped red cap sprinkled with raised white polka dots, an intricate underside with ribbed textured gills, an elegant ruffled stem ring (annulus), and a sturdy weighted trunk base.
This complete, step-by-step pattern guides you through crocheting, shaping, stuffing, and assembling your toadstool pillow without relying on any tables.
Hero Preview
A handmade crochet red mushroom pillow set resting peacefully by a sunlit window:
1. Project Overview
All measurements and times are approximate:
- Skill level: Intermediate
- Completion time: 6 to 10 hours
- Finished size: Approximately 12 inches (30 cm) wide across the cap and 14 inches (35 cm) tall from base to dome tip
- Construction: Worked in continuous spiral rounds for the cap and stem trunk, with the underside gills and collar ruffled directly into surface loops, finished with sewn circle dots
- Main stitches: Magic ring, slip stitch, chain, single crochet, half double crochet, double crochet, front/back loop techniques, increases, and invisible decreases
- Suggested uses: Reading nook cushion, nursery accent, cottagecore decor, plush forest companion, and thoughtful handmade holiday gift
The finished pillow size can be scaled up or down by adjusting your yarn bulk or hook size.
2. Materials and Supplies
- Yarn: Chunky / bulky chenille yarn (Category 5) for a super-soft plush pillow, or double-stranded worsted weight acrylic/cotton (Category 4) for a crisp, structured sculpture:
- Color A (Toadstool Cap): Rich Crimson Red or Burgundy (approx. 250 g)
- Color B (Stem, Gills & Dots): Cream, Oatmeal, or Natural Linen (approx. 200 g)
- Crochet hook: 4.5 mm (US 7) or 5.0 mm (US H/8) to achieve dense stitches that keep stuffing securely inside
- Stuffing: Premium polyester fiberfill (approx. 400 g)
- Base stabilizer (optional): A circle of thick craft felt or a fabric pouch filled with dry plastic pellets placed in the stem base to help the mushroom stand upright on flat surfaces
- Tapestry needle: Large blunt-ended yarn needle for assembly and attaching polka dots
- Stitch marker: Essential for marking the first stitch of each continuous spiral round
- Scissors & straight pins: For cleanly trimming ends and holding dots symmetrically before stitching
3. US Crochet Abbreviations & Stitch Meanings
- ch: Chain stitch
- sl st: Slip stitch
- sc: Single crochet
- hdc: Half double crochet
- dc: Double crochet
- inc: Increase (work 2 single crochets in the same stitch)
- dec: Invisible single crochet decrease (pick up front loops of next 2 stitches and crochet them together)
- BLO: Back loop only (work only into the rear loop of the stitch)
- FLO: Front loop only (work only into the front loop facing you to leave an unworked ridge)
- st(s): Stitch or stitches
- MR: Magic ring
- FO: Fasten off
Special Technique: Working in the Front Loop Only (FLO) for Gills
When finishing the red cap and transitioning to the cream underside, working into the front loops creates a clean outer seam rim while leaving the interior back loops accessible to anchor the gathered cream gill foundation.
4. Skills to Know Before Starting
- Continuous Round Working: Work without joining rounds with a slip stitch; continue straight into the first stitch of the new round with your stitch marker in place.
- Invisible Decrease in Bulky Yarn: Grabbing the front loops of adjacent stitches keeps decrease lines smooth and eliminates gaps in the curved mushroom dome.
- Even Stuffing Distribution: Pack polyfill in small baseball-sized clumps, pushing outwards against the walls to avoid internal lumps and ensure a symmetrical dome.
In-Progress Crafting
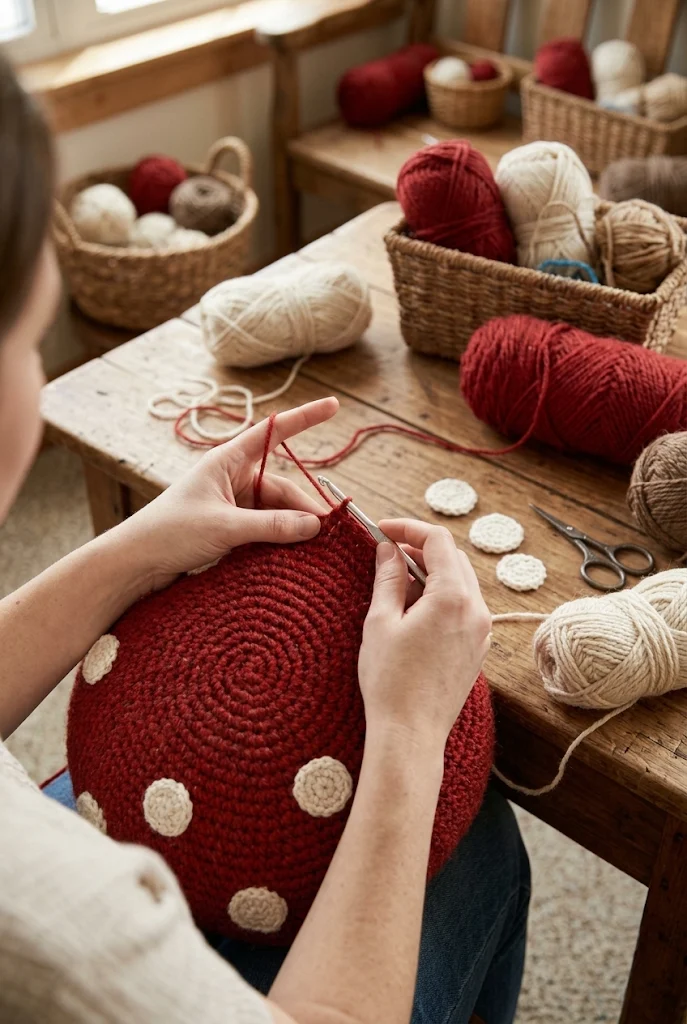
Crocheting the rounded red cap and shaping the circular spots:
5. Understanding the Mushroom Pillow Anatomy
The mushroom pillow is assembled from five components:
- Red Toadstool Cap: A broad, rounded dome that forms the primary plush cushion.
- Cream Underside & Gills: A radial plate of textured stitches that spans the bottom of the cap, creating the illusion of delicate mushroom gills.
- Stem Trunk: A sturdy, tapered cylinder that widens at the bottom base to hold the weight of the cap.
- Ruffled Skirt Ring (Annulus): A flared ruffled collar positioned just below the underside gills.
- Polka Dot Appliques: Flat, circular cream discs in varied sizes stitched across the red dome.
6. Gauge and Finished Tension
Gauge does not need to match a strict measurement, but maintaining firm stitch tension is vital:
- A flat test circle of 4 rounds (24 stitches) in single crochet should measure roughly 2.75 to 3 inches across.
- If your stitches stretch open when pressed from behind, size down by 0.5 mm on your hook.
7. Complete Step-by-Step Crochet Pattern
Part A: The Red Toadstool Cap (Color A – Red)
- Round 1: In Red, 6 sc into MR [6 sts].
- Round 2: Inc in each st around [12 sts].
- Round 3: (1 sc, inc) × 6 [18 sts].
- Round 4: (2 sc, inc) × 6 [24 sts].
- Round 5: (3 sc, inc) × 6 [30 sts].
- Round 6: (4 sc, inc) × 6 [36 sts].
- Round 7: (5 sc, inc) × 6 [42 sts].
- Round 8: (6 sc, inc) × 6 [48 sts].
- Round 9: (7 sc, inc) × 6 [54 sts].
- Round 10: (8 sc, inc) × 6 [60 sts].
- Round 11: (9 sc, inc) × 6 [66 sts].
- Round 12: (10 sc, inc) × 6 [72 sts].
- Round 13: (11 sc, inc) × 6 [78 sts].
- Round 14: (12 sc, inc) × 6 [84 sts].
- Rounds 15–22 (8 rounds): Sc in each st around [84 sts].
- Round 23: (12 sc, dec) × 6 [78 sts].
- Round 24: (11 sc, dec) × 6 [72 sts].
- Round 25: Working in FLO, sl st in each st around [72 sts].
- Fasten off Red yarn and weave in end.
Part B: The Underside Gills (Color B – Cream)
- Round 1: Attach Cream yarn to the unworked inner back loops of Round 24 of the Cap. Work (10 sc, dec) × 6 [66 sts].
- Round 2: (9 sc, dec) × 6 [60 sts].
- Round 3 (Textured Gills): Working in BLO, (1 sc, 1 dc in next st) repeat around [60 sts]. This alternates stitch heights to create radiating raised ribs.
- Round 4: (8 sc, dec) × 6 [54 sts].
- Round 5: (7 sc, dec) × 6 [48 sts].
- Round 6: (6 sc, dec) × 6 [42 sts].
- Round 7: (5 sc, dec) × 6 [36 sts].
- Stuff the red dome cap firmly with polyester fiberfill now before the opening narrows.
- Round 8: (4 sc, dec) × 6 [30 sts].
- Round 9: (3 sc, dec) × 6 [24 sts].
- Fasten off, leaving an 18-inch long tail for attaching the stem later.
Part C: The Mushroom Stem Trunk (Color B – Cream)
Worked from the bottom base upward:
- Round 1: In Cream, 6 sc into MR [6 sts].
- Round 2: Inc in each st around [12 sts].
- Round 3: (1 sc, inc) × 6 [18 sts].
- Round 4: (2 sc, inc) × 6 [24 sts].
- Round 5: (3 sc, inc) × 6 [30 sts].
- Round 6: (4 sc, inc) × 6 [36 sts].
- Round 7: (5 sc, inc) × 6 [42 sts].
- Round 8: In BLO, sc in each st around [42 sts] (forms flat sitting edge).
- Rounds 9–14 (6 rounds): Sc in each st around [42 sts].
- Round 15: (5 sc, dec) × 6 [36 sts].
- Rounds 16–20 (5 rounds): Sc in each st around [36 sts].
- Round 21: (4 sc, dec) × 6 [30 sts].
- Rounds 22–27 (6 rounds): Sc in each st around [30 sts].
- Round 28 (Collar Ridge): Working in FLO, (4 sc, inc) × 6 [36 sts].
- Round 29: Working back into unworked inside back loops of Round 27, (3 sc, dec) × 6 [24 sts].
- Rounds 30–32 (3 rounds): Sc in each st around [24 sts].
- Insert weighted pouch (if using) into the base and pack the stem firmly with fiberfill until rock-solid. Fasten off with tail.
Part D: The Ruffled Stem Ring / Collar (Color B – Cream)
- Join Cream yarn to the front loop ridge formed in Round 28 of the Stem.
- Round 1: Work 3 dc in each front loop around [108 sts].
- Round 2: Ch 1, work (1 sc in next st, ch 2, skip 1 st) around to create a delicate ruffled fringe edge.
- Fasten off and weave in tails cleanly.
Part E: Polka Dot Circles (Color B – Cream)
Make a scattered collection of spots in two distinct sizes:
- Large Dots (Make 6 to 8):
- Round 1: 6 sc in MR [6 sts].
- Round 2: Inc in each st around [12 sts].
- Round 3: (1 sc, inc) × 6 [18 sts].
- Sl st to join, FO leaving a 10-inch sewing tail.
- Small Dots (Make 6 to 8):
- Round 1: 6 sc in MR [6 sts].
- Round 2: Inc in each st around [12 sts].
- Sl st to join, FO leaving an 8-inch sewing tail.
8. Construction and Reference Specifications
- Mushroom Cap: 25 rounds in red, expanding from 6 to 84 stitches before contracting to 72 stitches.
- Underside Gills: 9 rounds in cream, decreasing from 66 down to 24 opening stitches with ribbed gill texture.
- Stem Trunk: 32 rounds in cream, expanding to a 42-stitch base and tapering to a 24-stitch neck to align with the cap.
- Ruffled Collar: 2 rounds worked directly onto the stem ridge.
- Polka Dots: 12 to 16 total circles across 2 size formats (12-stitch and 18-stitch discs).
9. Color and Styling Variations
- Classic Woodland Toadstool: Deep true red cap, antique cream stem, and bone white dots.
- Chanterelle Gold: Warm mustard gold cap with buttery cream gills and light beige dots.
- Earthy Morel / Forest Floor: Chestnut brown cap with warm taupe stem and soft ecru dots.
- Pastel Fairytale: Soft blush pink or lavender cap with off-white dots for baby nurseries.
10. Assembly and Finishing Touches
- Sewing the Dots: Arrange the large and small cream discs randomly across the red dome. Pin them flat and whipstitch the edges with a tapestry needle, burying tails inside the cap.
- Joining Cap to Stem: Align the 24-stitch opening of the cap underside with the 24-stitch opening of the stem top. Whipstitch through both thicknesses around the neck twice for structural stability.
- Fluffing the Collar: Spread the ruffled collar outward so it fans under the cap gills.
Finished Keepsake Display
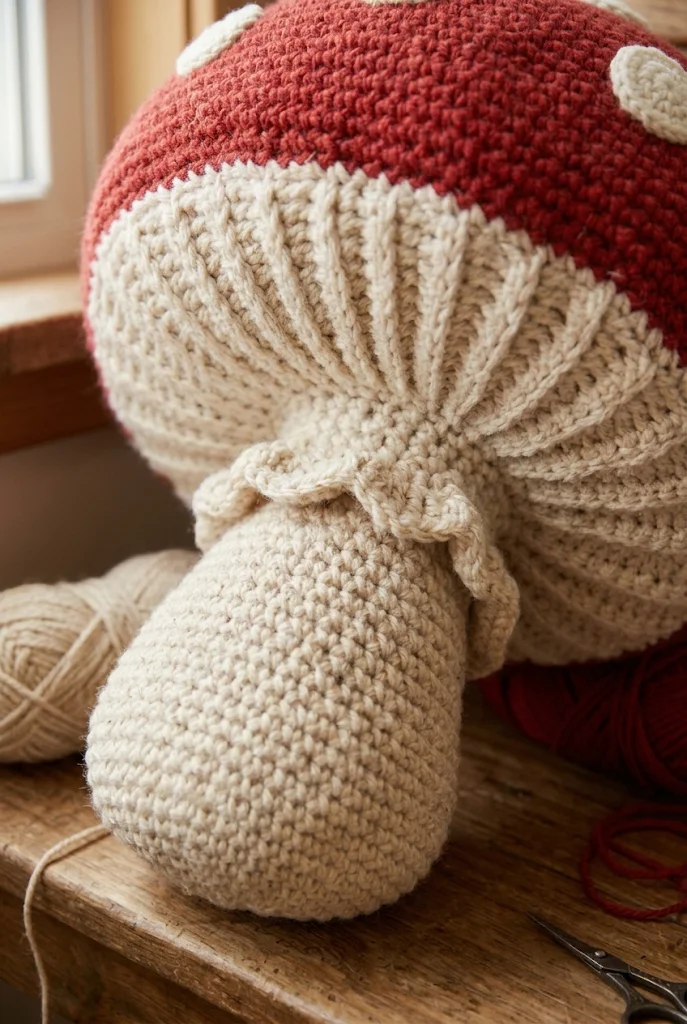
A close-up view highlighting the detailed underside gills and ruffled stem collar:
11. Troubleshooting Common Problems
- The mushroom cap flops over: The neck joint lacks stuffing. Before closing the seam between the stem and the cap, push an extra handful of dense polyfill into the junction to reinforce the stem neck.
- The stem tilts to one side: Ensure the flat base (Round 8) is pressed flat against a table while stuffing. Adding a weighted pouch of plastic pellets keeps the center of gravity low.
- The dots pucker on the curved dome: Stretch the crochet dots gently with your fingers before pinning them down, sewing around the outer rim without pulling stitches too tight.
- The underside shows visible gaps: Maintain tight tension when working Round 3 of the gills, ensuring the alternate dc and sc stitches stay compact.
12. Frequently Asked Questions
1. Can this mushroom pillow be machine washed?
Yes, if made from acrylic or cotton yarn. Place the pillow in a large pillowcase, wash on a gentle cycle with cool water, and air dry thoroughly.
2. Can I make this pattern with super bulky blanket yarn?
Yes. Using size 6 blanket yarn and a 7.0 mm hook will produce an oversized floor pouf roughly 20 inches wide with no pattern adjustments needed.
3. How do I keep the stem base completely flat?
Cut a circular cardboard or thin plastic disc matching the base diameter and place it inside the bottom of the stem before adding fiberfill.
4. Can I crochet the spots directly onto the cap instead of sewing?
Sewing separate flat discs yields the cleanest circles with raised 3D texture, but you can also embroider spots using simple French knots or duplicate stitches.
This whimsical crochet mushroom pillow brings playful woodland craftsmanship into your home. With its vibrant red cap, delicate gills, and ruffled collar, it makes an eye-catching accent piece that is just as fun to crochet as it is to display.
Leave a Comment