
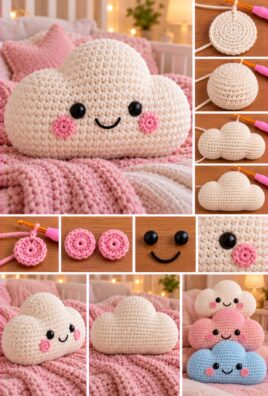
A handmade crochet cloud pillow brings a soft, whimsical touch to a bedroom, reading nook, nursery, or cozy living space. With its rounded bumps, gentle curves, and plush center, this charming cushion makes a lovely decorative accent and a thoughtful handmade gift.
This beginner-friendly pattern uses two matching cloud-shaped panels made with single crochet. You will shape the rounded lobes and shallow valleys, join the panels around the edges, and add stuffing for a soft, puffy finish. The finished pillow can be plain and minimalist or decorated with an embroidered face.
1. Project Overview
- Difficulty: Beginner to confident beginner
- Approximate finished size: 14 inches wide by 10 inches tall
- Approximate completion time: 4–7 hours
- Construction: Two matching cloud-shaped panels joined around the perimeter
- Main stitch: Single crochet
- Recommended yarn: Soft medium-weight yarn
- Approximate yarn quantity: 200–300 yards
- Stuffing: Polyester fiberfill or suitable cushion stuffing
- Optional details: Embroidered eyes, a small smile, or a contrasting border
The finished dimensions depend on your yarn, hook, tension, and stuffing. The pattern below creates a small decorative cloud with five rounded upper lobes and a gently curved lower edge.
2. Materials and Tools
Gather the following supplies before starting:
- 200–300 yards of medium-weight yarn in white, cream, pale blue, pastel pink, lavender, or another preferred color
- 4.5 mm crochet hook, or a size that creates a dense fabric
- Polyester fiberfill or suitable pillow stuffing
- Yarn needle
- Scissors
- Stitch markers
- Measuring tape
- Optional embroidery yarn in black, brown, or a contrasting color
Choosing the right yarn and hook
A soft acrylic, cotton blend, or washable yarn can work well for a decorative pillow. Choose a yarn that feels pleasant to touch and holds its stitches without becoming stiff.
The hook should create a fabric dense enough to keep the stuffing from showing through. If you can easily see large gaps between the stitches, try a smaller hook. If the fabric is too stiff to shape comfortably, try a slightly larger hook while checking that the stuffing remains covered.
If the pillow is intended for a young child, use securely embroidered facial features instead of safety eyes, buttons, beads, or other detachable small parts. Follow appropriate age-related safety guidance when choosing stuffing and decorative materials.
3. US Crochet Abbreviations
- ch: Chain
- sl st: Slip stitch
- sc: Single crochet
- inc: Increase by working two single crochet stitches into the same stitch
- dec: Decrease by combining two stitches into one
- st: Stitch
- sts: Stitches
- rep: Repeat
- RS: Right side
- WS: Wrong side
Single crochet decrease
Insert your hook into the next stitch, yarn over, and pull up a loop. Insert the hook into the following stitch, yarn over, and pull up another loop. Yarn over and pull through all three loops on the hook. This combines two stitches into one.
Pattern notes
The main panels are worked in rows, not rounds. Turning chains do not count as stitches. At the beginning of each row, chain one and work the first single crochet into the first stitch of the previous row.
The cloud outline is created by crocheting a lower center section, then building rounded lobes and shallow valleys in a planned sequence. The same row instructions are used for both panels so their edges match.
4. Gauge and Finished Dimensions
Gauge matters because the front and back panels need to match. If one panel is larger than the other, the seam may pucker or stretch, and the finished pillow may twist.
Make a gauge swatch
- Chain 22.
- Row 1: Sc in the second chain from the hook and in each remaining chain. You should have 21 stitches.
- Ch 1 and turn. Work sc in every stitch across.
- Repeat until you have at least 16 rows.
- Lay the swatch flat without stretching it and measure the center.
Aim for approximately 16 single crochet stitches and 18 rows over 4 inches. This is a target, not a guarantee; your yarn and tension may produce a different result.
If you have too many stitches across 4 inches, try a larger hook. If you have too few, try a smaller hook. The fabric should be dense, flexible, and comfortable to shape.
The approximate finished size for this project is 14 inches wide by 10 inches tall before significant compression. Stuffing can make the pillow slightly wider or rounder, so fill it gradually and measure as you go.
5. Understanding the Cloud Shape
A recognizable cloud has rounded upper lobes, shallow valleys between the lobes, and a softer, less scalloped lower edge. This pattern uses a simple outline method: first crochet a compact central panel, then build the cloud’s rounded upper lobes and lower curves with planned increases and decreases.
For a beginner-friendly result, the pattern uses five upper lobes. The center lobe is the tallest, the two adjacent lobes are slightly lower, and the outer lobes are smaller. The shallow valleys between them help distinguish the cloud from a circle or rectangle.
The most important shaping principles are:
- Increase gradually to create rounded areas rather than sharp corners.
- Decrease gradually where the outline dips inward.
- Keep the front and back panels identical.
- Use a firm, even seam around the outline.
- Avoid overstuffing, which can push the valleys outward and make the cloud look like a ball.
6. Complete Step-by-Step Crochet Pattern
A. Begin the First Cloud Panel
The panel is worked in rows. The shaping sequence creates a broad lower section and a series of rounded upper lobes.
Foundation and lower section
- Ch 41.
- Row 1: Sc in the second ch from the hook and in each remaining ch. You should have 40 sc.
- Ch 1 and turn.
- Rows 2–8: Sc in every stitch across. You should have 40 sc in each row.
This creates the lower central portion of the cloud. Keep the side edges straight and count your stitches at the end of each row.
B. Shape the Rounded Lobes
The next rows build the upper area. The stitch counts below create a gently widening shape before the top is divided into rounded sections.
- Row 9: Ch 1, sc in the first 8 sts, inc in the next st, sc in the next 22 sts, inc in the next st, sc in the final 8 sts. You should have 42 sts.
- Row 10: Ch 1, sc across. You should have 42 sts.
- Row 11: Ch 1, sc in the first 9 sts, inc in the next st, sc in the next 22 sts, inc in the next st, sc in the final 9 sts. You should have 44 sts.
- Row 12: Ch 1, sc across. You should have 44 sts.
These increases widen the upper section gradually. They do not by themselves create the full cloud outline; the rounded lobes are completed with the shaped upper edge in the next section.
C. Shape the Valleys and Outer Edges
To create a more recognizable cloud silhouette, work five rounded lobes across the upper edge. The lobes are built from separate short sections along the top of the panel. Use stitch markers to divide the 44-stitch row into sections of 8, 9, 10, 9, and 8 stitches.
Work the lobes one at a time, attaching yarn at the marked section and leaving the remaining sections unworked until their turn. For each lobe:
- Attach yarn at the first stitch of the marked section.
- Work sc across the section.
- Ch 1 and turn. Work sc across again.
- On the next row, work one sc in each of the first and last stitches and increase twice in the middle of the section, spacing the increases evenly.
- Work another row of sc across.
- Shape the top by decreasing one stitch near each end on the next row, keeping the center stitches unchanged.
- Work a final row of sc, then fasten off.
Repeat for each of the five marked sections. Make the center lobe slightly taller by adding one extra row before the final shaping. Make the two outer lobes slightly shorter by omitting one middle row.
Create shallow valleys: When the lobes are complete, use the yarn needle to sew the spaces between adjacent lobes together with a few neat stitches. Do not pull tightly; the joins should create shallow indentations rather than deep points. This produces a connected upper silhouette that can be matched on the second panel.
Important shaping check: Lay the panel flat. If the top looks too scalloped, ease the joins and reduce the depth of the valleys. If the lobes look too flat, add a little height to the center and adjacent lobes before making the second panel.
D. Complete the First Panel
Fasten off and weave in the yarn ends securely on the wrong side of the panel. Lay it flat and measure its widest point and overall height.
Check that the lower edge is broad and that the upper lobes look balanced. The center lobe should be the tallest, the two neighboring lobes should be slightly shorter, and the outer lobes should taper gently toward the sides.
If the panel is narrower or shorter than expected, make any corrections now. The second panel needs to match the first one closely for a neat seam.
E. Crochet the Second Panel
Make a second panel using the same instructions and shaping sequence.
- Repeat the foundation and lower-section rows.
- Repeat the two increase rows.
- Divide the upper edge into the same five sections.
- Crochet the lobes with the same number of rows and increases.
- Sew the valleys with the same tension and spacing.
- Fasten off and weave in the ends.
Place the two panels on top of each other with their edges aligned. Compare the width, height, lobe positions, and valley depth. If one panel is larger, check for differences in stitch tension or row count before joining the pillow.
7. Optional Cloud Face or Decorative Details
The cloud can remain plain for a simple, modern look, or you can add an embroidered face for a playful finish.
Embroider a simple face
Add facial features to one panel before joining the two panels. This makes the embroidery easier to handle and helps keep the back of the stitching hidden inside the pillow.
- Place the panel flat with the right side facing up.
- Identify the center area below the upper lobes.
- Use a yarn needle and a small amount of contrasting yarn to embroider two eyes.
- Add a small curved mouth beneath the eyes using short, neat stitches.
- Secure the yarn ends on the wrong side without pulling the fabric out of shape.
Keep the features centered and spaced evenly. Avoid placing them too close to the edge, where the seam could distort them.
For a pillow intended for a young child, embroidered features are preferable to detachable eyes or buttons. Secure the yarn ends carefully and inspect the embroidery before use.
8. Join the Two Panels
Once both panels match, join them around the perimeter. Single crochet creates a sturdy, slightly raised border, while sewing with a yarn needle produces a flatter seam.
Join with single crochet
- Place the panels together with their right sides facing outward.
- Insert the hook through corresponding edge stitches on both panels.
- Attach the yarn near the lower edge, leaving enough room to work comfortably.
- Ch 1, then work sc through both panels along the lower edge.
- Continue around the outer sides and rounded lobes, matching corresponding stitches as closely as possible.
- At the rounded sections, work slowly and distribute stitches evenly. Do not force too many stitches into a short curve.
- At each shallow valley, work into the stitches closest to the indentation. If the seam pulls sharply, add a stitch; if it ruffles, omit a stitch where appropriate.
- Leave an opening of approximately 3–4 inches along a lower section for stuffing.
Keep the panels flat as you work. The seam should be firm enough to hold the stuffing but not so tight that the cloud outline puckers.
Alternative: Sew the panels together
If you prefer a flatter finish, use a yarn needle and whipstitch through corresponding edge stitches. Keep the stitch spacing consistent and leave the same stuffing opening.
Whichever method you choose, check that the lobes and valleys remain aligned as you join the panels.
9. Stuff the Cloud Pillow
Stuffing is what gives the cloud its soft, three-dimensional appearance. Add it gradually so the lobes remain rounded and the valleys stay visible.
- Begin by adding small handfuls of fiberfill through the opening.
- Fill the center first, spreading the stuffing toward the sides.
- Add smaller amounts to each upper lobe so they are rounded without becoming hard.
- Gently distribute stuffing toward the outer edges using your fingers.
- Keep the valley areas less full than the rounded lobes. This helps preserve the cloud shape.
- Lay the pillow flat and compare the front and back outlines.
- Add or remove stuffing until the pillow feels soft and evenly filled.
For a flexible cushion, use less stuffing and allow the fabric to compress easily. For a firmer decorative pillow, add a little more, but stop before the stitches begin to stretch or the seam pulls apart.
Avoid pushing large clumps of fiberfill into the pillow at once. Smaller amounts are easier to distribute evenly and reduce the chance of lumps.
10. Close and Finish the Pillow
When the pillow is evenly stuffed, close the remaining opening.
- Align the edges of the opening.
- Continue the single crochet seam through both panels, or use a yarn needle to sew the opening closed.
- Keep the closing stitches consistent with the rest of the seam.
- Secure the yarn with a firm knot or by weaving it through several stitches on the inside edge.
- Trim the excess yarn only after checking that the closure is secure.
- Gently shape the pillow with your hands, rounding the lobes and pressing the valleys inward slightly.
Inspect the entire seam. No stuffing should be visible, and the panels should not separate when the pillow is gently squeezed. If you notice gaps, close them with a few additional stitches.
11. Customization Ideas
Once you are comfortable with the basic pattern, try a few variations.
- Classic white cloud: Use white yarn for a simple, airy look.
- Cream or beige cloud: Choose a warm neutral for a softer decor style.
- Pastel colors: Pale blue, pink, lavender, and yellow create a playful accent.
- Different sizes: Use a thicker yarn and an appropriately sized hook for a larger pillow, or finer yarn and a smaller hook for a smaller one. Make a gauge swatch first.
- Plain or smiling cloud: Leave the pillow undecorated or add a securely embroidered face.
- Contrasting border: Work the joining seam in a complementary color for a defined outline.
- Textured yarn: A soft textured yarn can create a fluffy appearance, but make sure you can see your stitches clearly enough to maintain even shaping.
- Coordinating decor: Make matching star or moon cushions using separate patterns designed for those shapes.
Changing the yarn weight, hook size, or number of shaping rows affects the final dimensions. For predictable sizing, adjust one feature at a time and measure the panel before making the second one.
12. Troubleshooting
| Problem | Likely cause | How to fix it |
|---|---|---|
| The cloud looks like a circle | The upper lobes are too similar in size or the valleys are not defined | Make the center lobe taller, keep the outer lobes smaller, and gently shape the indentations between them. |
| The lobes are uneven | The sections have different row counts or stitch tension | Compare each lobe and adjust the row count or tension before making the second panel. |
| The valleys are too deep | The joins between lobes are pulled too tightly | Loosen the joining stitches and sew the indentations with less tension. |
| The valleys are too shallow | The lobes are too close together or the joins are too loose | Refine the indentation with a few small stitches, taking care not to create a sharp point. |
| The panels do not match | The stitch tension, row count, or lobe shaping differs | Lay the panels together and correct differences before joining. |
| The edges curl | The hook may be too small or the tension too tight | Try a larger hook and keep your stitches relaxed and even. |
| The seam puckers around curves | Too many stitches were worked into a short section or the seam is too tight | Redistribute the joining stitches and loosen the tension around curved edges. |
| Stuffing shows through | The fabric is too loose or the pillow is overfilled | Use a smaller hook if needed, and remove stuffing until the fabric sits comfortably. |
| The pillow is lumpy | Stuffing was added in large clumps | Open the stuffing gap if necessary and redistribute the filling in small amounts. |
| The cloud loses its shape | The pillow is overstuffed or the yarn stretches easily | Reduce the filling, reshape the lobes, and allow the pillow to rest without compression. |
| The closing seam looks bulky | The closing stitches are too tight or uneven | Use a yarn needle to close the opening with evenly spaced stitches and weave in the yarn neatly. |
13. Care and Maintenance
Care for your finished cloud pillow according to the yarn and stuffing labels.
- Cleaning: Spot-clean when suitable for your materials. If the yarn and stuffing are washable, follow their recommended washing instructions.
- Gentle handling: Avoid twisting or squeezing the pillow aggressively, as this can distort the seams and rounded lobes.
- Drying: Allow the pillow to dry completely before using or storing it. If the materials permit washing, reshape the cloud while damp and support it during drying.
- Storage: Keep the pillow in a dry place and avoid compressing it under heavy objects for long periods.
- Reshaping: Occasionally fluff the filling gently and press the shallow valleys back into shape if they have become too rounded.
Do not assume that the entire pillow is machine-washable simply because the yarn is washable. The stuffing and any decorative materials must also tolerate the cleaning method.
14. Frequently Asked Questions
Is a crochet cloud pillow suitable for beginners?
Yes. The main stitches are simple, and the project provides practice with shaping, joining, stuffing, and finishing. The upper lobes require careful attention, so stitch markers and consistent row counts are helpful.
How do I make the cloud shape more recognizable?
Create a taller center lobe, two slightly shorter neighboring lobes, and smaller outer lobes. Keep the valleys shallow and distinct, and avoid stuffing them as fully as the rounded sections.
Can I use a different yarn weight?
Yes. Use a suitable hook for the yarn and make a gauge swatch first. A thicker yarn generally creates a larger pillow, while finer yarn creates a smaller one. The finished dimensions will vary.
How much stuffing should I use?
Use enough fiberfill to round the lobes and fill the center without stretching the stitches. Add small amounts at a time and check the silhouette frequently.
How do I make the two panels identical?
Use the same yarn, hook, stitch counts, row counts, and shaping sequence for both panels. Compare their outlines before joining them.
How can I keep the seams neat around the curves?
Match corresponding edge stitches, work slowly around the lobes, and adjust the stitch distribution where the curve changes direction. Avoid pulling the yarn too tightly.
Can I add an embroidered face?
Yes. Embroider the eyes and mouth on one panel before joining the pillow. Keep the features centered and secure the yarn ends on the wrong side.
How can I make the pillow larger or smaller?
Change the yarn weight and hook size, or adjust the panel dimensions and shaping rows. Keep the same general relationship between the center lobe, neighboring lobes, and outer lobes so the cloud silhouette remains balanced.
15. Quick Pattern Summary
Materials
- Approximately 200–300 yards of medium-weight yarn
- 4.5 mm crochet hook, adjusted for gauge
- Polyester fiberfill
- Yarn needle, scissors, stitch markers, and measuring tape
Abbreviations
- ch: Chain
- sl st: Slip stitch
- sc: Single crochet
- inc: Two sc in the same stitch
- dec: Combine two stitches into one
- st or sts: Stitch or stitches
- rep: Repeat
- RS: Right side
- WS: Wrong side
Gauge and size
- Target gauge: Approximately 16 sc stitches and 18 rows over 4 inches
- Approximate finished size: 14 inches wide by 10 inches tall
First panel
- Ch 41.
- Row 1: Sc in the second ch and in each remaining ch for 40 sc.
- Rows 2–8: Sc across for 40 sc.
- Row 9: Sc in the first 8 sts, inc, sc in the next 22 sts, inc, sc in the final 8 sts for 42 sts.
- Row 10: Sc across for 42 sts.
- Row 11: Sc in the first 9 sts, inc, sc in the next 22 sts, inc, sc in the final 9 sts for 44 sts.
- Row 12: Sc across for 44 sts.
- Divide the upper edge into five marked sections and shape the lobes as described in the full instructions.
- Fasten off and weave in the ends.
Second panel
- Repeat the same panel instructions and shaping sequence.
- Match the width, height, and lobe positions before joining.
Assembly
- Place the panels together with their right sides outward.
- Join the perimeter with single crochet or a yarn needle.
- Leave a 3–4-inch opening.
- Add stuffing gradually, filling the lobes and center while keeping the valleys less full.
- Close the opening securely.
- Shape the cloud and inspect the seams.
Optional details
- Embroidered eyes and a small mouth
- Contrasting border
- Pastel colors or textured yarn
Conclusion
A crochet cloud pillow is a charming way to add handmade comfort to your home. With soft yarn, careful shaping, matching panels, and evenly distributed stuffing, you can create a decorative cushion with rounded lobes and a gentle cloud silhouette.
Take your time when shaping the upper edge and joining the panels. These details make the biggest difference in the finished appearance, and a little patience will help you create a cloud pillow that looks lovely in a bedroom, reading corner, or cozy living space.


Leave a Comment