
Crochet wall art is a beautiful way to add texture, warmth, and personality to your home. Whether you prefer modern geometric designs, colorful flowers, or minimalist yarn decorations, handmade crochet wall hangings can turn a simple wall into a cozy focal point.
This beginner-friendly crochet wall art tutorial explains how to create a decorative wall hanging using basic crochet stitches and simple finishing techniques. You can customize the colors, dimensions, and design to match your interior style.
In this tutorial, we will make a rectangular crochet wall hanging with a textured stitch pattern, a wooden dowel for hanging, and optional fringe along the bottom edge.
Table of Contents
Materials
To make your crochet wall art, you will need:
- Worsted-weight cotton yarn in your main color
- Small amounts of yarn in two contrasting colors (optional)
- A crochet hook suitable for your yarn, such as 4.0 mm
- A wooden dowel approximately 25–30 cm long
- Scissors
- A tapestry needle
- Measuring tape
- Yarn for the fringe (optional)
- A wall hook or suitable hanging hardware
Tip: Cotton yarn works well for wall art because it holds its shape and displays stitch texture clearly. Choose colors that complement your room.
Abbreviations
This pattern uses U.S. crochet terminology.
- ch: Chain
- sc: Single crochet
- dc: Double crochet
- sl st: Slip stitch
- st(s): Stitch(es)
- rep: Repeat
- RS: Right side
- WS: Wrong side
Notes Before You Start
- The wall hanging is worked flat in rows from the bottom upward.
- Turn your work at the end of each row.
- The turning chain does not count as a stitch in this pattern.
- The finished width depends on your yarn, hook, and tension.
- Color changes are optional; you can make the entire piece in one color.
Free Crochet Wall Art Pattern
This simple design uses single crochet stitches for a firm foundation and double crochet stitches to create a textured central section.
Step 1: Create the Foundation Chain
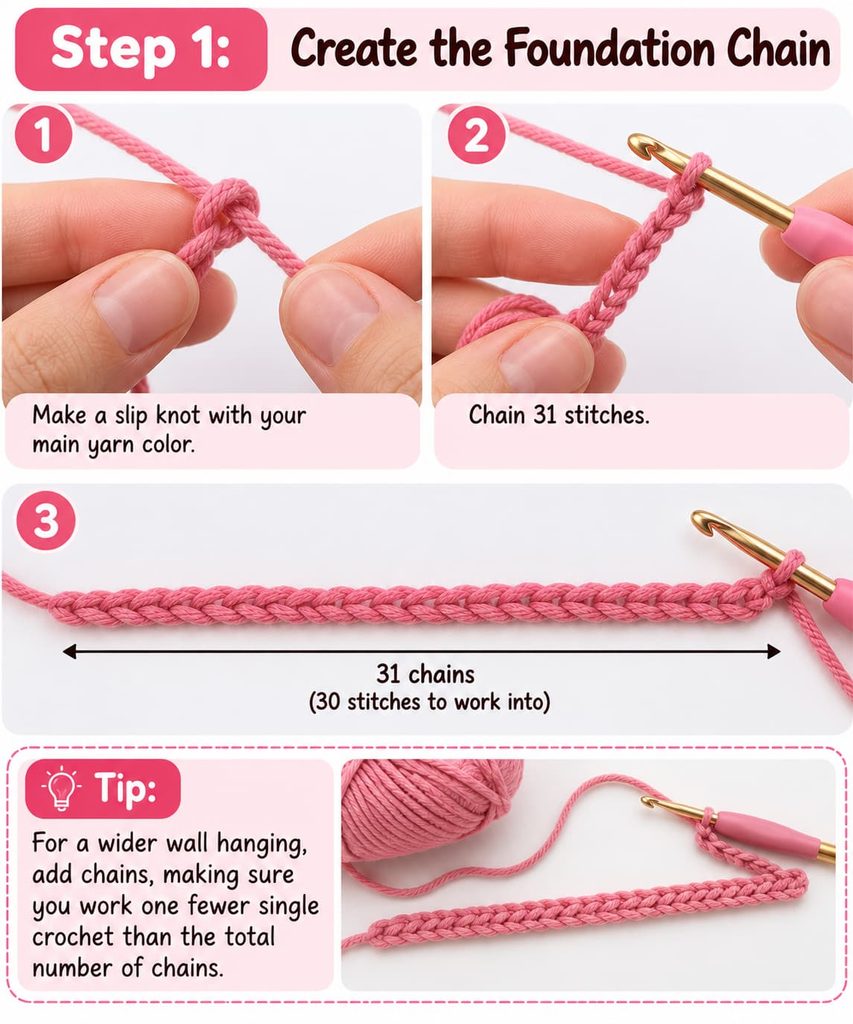
Using your main yarn color, make a slip knot and chain 31 stitches.
This foundation chain gives you 30 stitches to work into.
For a wider wall hanging, add chains, making sure you work one fewer single crochet than the total number of chains.
Step 2: Crochet the First Row
Insert your hook into the second chain from the hook.
- Make 1 single crochet in that chain.
- Make 1 single crochet in each remaining chain.
- You should have 30 single crochet stitches.
Chain 1 and turn your work.
Step 3: Establish the Base
For Rows 2–4:
- Make 1 single crochet in the first stitch.
- Make 1 single crochet in every remaining stitch.
- Check that you still have 30 stitches at the end of each row.
- Chain 1 and turn after Rows 2 and 3.
After Row 4, fasten off if you want to change colors. Otherwise, continue with the same yarn.
Step 4: Create the Textured Section
Join your contrast color, if using one, with a slip knot and work into the first stitch of Row 5.
For Rows 5–14:
- Chain 2. This turning chain does not count as a stitch.
- Make 1 double crochet in the first stitch.
- Make 1 double crochet in each remaining stitch.
- You should have 30 double crochet stitches in every row.
- At the end of each row, chain 2 and turn, except after Row 14.
This section creates a raised texture that contrasts with the single crochet border.
Optional color design: Change colors every two rows to create horizontal stripes. Always complete the final stitch of the old color before joining the new color.
Step 5: Crochet the Top Border
Join your main color again if you changed colors.
For Rows 15–18:
- Chain 1 and turn.
- Make 1 single crochet in each stitch across.
- Count your stitches to confirm that you have 30 single crochet stitches per row.
- Chain 1 and turn after Rows 15–17.
After Row 18, fasten off and pull the yarn through the final loop.
You now have a rectangular crochet panel with a textured center and a simple border.
Step 6: Weave in the Ends
Thread each loose yarn end onto a tapestry needle.
Weave the yarn through several stitches on the wrong side of the fabric, changing direction to secure it. Trim the remaining yarn without cutting into the crochet stitches.
Check the edges and gently stretch the panel into a rectangle.
Step 7: Attach the Wooden Dowel
Lay the panel flat with the right side facing you.
- Place the wooden dowel along the top edge.
- Fold the top edge over the dowel by approximately 2 cm.
- Use matching yarn and a tapestry needle to sew the folded edge to the back of the panel.
- Keep the stitches loose enough that the panel hangs naturally but secure enough to support its weight.
Make sure the dowel can support the finished piece before hanging it.
Step 8: Add Optional Fringe
To add fringe to the bottom edge:
- Cut several lengths of yarn, each approximately 20 cm long.
- Take two or three strands together.
- Fold the strands in half.
- Insert a crochet hook through a stitch along the bottom edge.
- Pull the folded loop through the stitch.
- Pass the loose ends through the loop and tighten gently.
- Repeat at evenly spaced intervals along the bottom edge.
Trim the fringe evenly using scissors.
You can leave the wall hanging without fringe for a clean, modern finish.
Step 9: Add a Hanging Cord
Cut a length of yarn approximately 40–50 cm long, adjusting it to suit your desired hanging height.
Tie each end securely around one end of the wooden dowel. Make sure both sides are balanced so the wall hanging hangs straight.
Alternatively, use a suitable wall hook and hanging hardware that can support the weight of the finished piece.
Finishing Your Crochet Wall Art
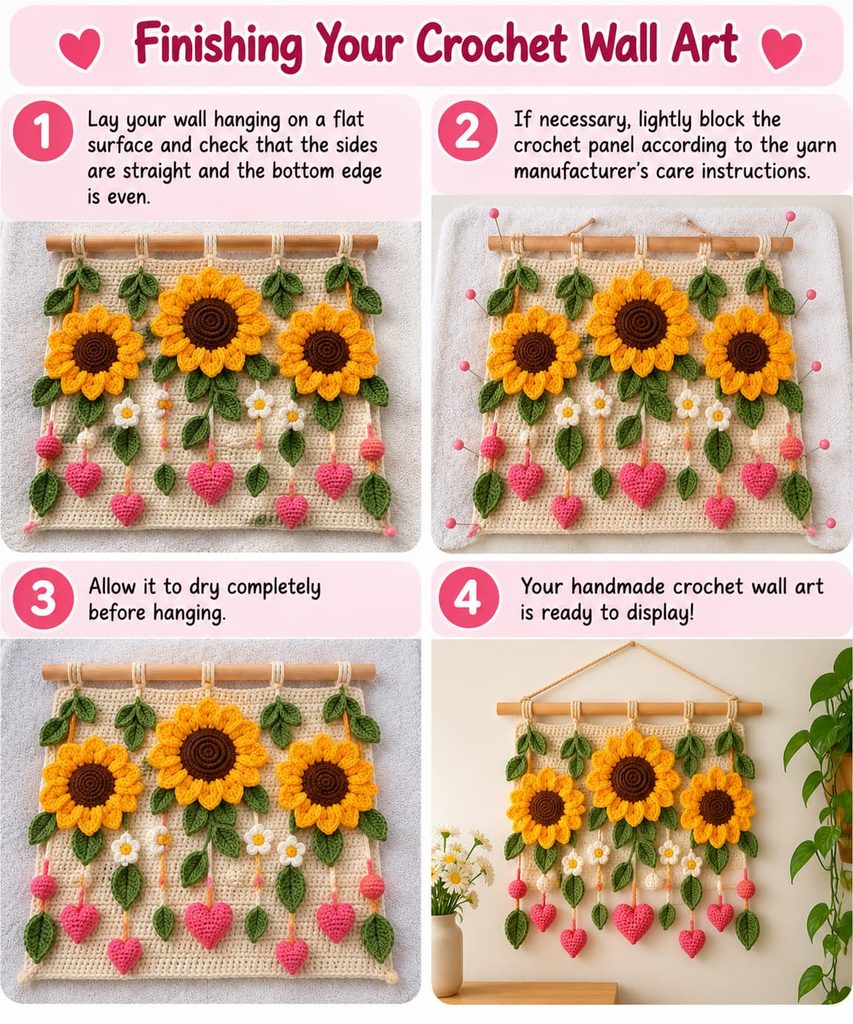
Lay your wall hanging on a flat surface and check that the sides are straight and the bottom edge is even.
If necessary, lightly block the crochet panel according to the yarn manufacturer’s care instructions. Allow it to dry completely before hanging.
Your handmade crochet wall art is ready to display!
Tips for a Beautiful Result
- Choose a cohesive palette: Combine neutral shades with one accent color for a modern look.
- Keep your edges straight: Count the stitches at the end of each row.
- Adjust the dimensions: Add foundation chains for more width and rows for more height.
- Experiment with texture: Try alternating single crochet and double crochet sections.
- Use contrasting yarn: A different color can highlight the central design.
- Secure the hanging hardware: Ensure that the dowel, cord, and wall hook can safely support the finished piece.
Frequently Asked Questions
Is this crochet wall art pattern suitable for beginners?
Yes. The pattern uses basic stitches and straightforward rows. Beginners should be comfortable with chain stitches, single crochet, double crochet, and fastening off.
Can I make the wall hanging larger?
Yes. To increase the width, start with more foundation chains and work one single crochet into each chain after the first. To increase the height, add rows while maintaining the same stitch count.
What yarn is best for crochet wall art?
Cotton yarn is a good choice because it provides clear stitch definition and holds its shape. Acrylic yarn can also work well for lightweight decorative pieces.
Can I create a different design?
Absolutely. You can incorporate stripes, simple geometric shapes, floral motifs, or textured stitch sections. For complex motifs, plan the stitch counts and color changes before starting.
How do I keep my crochet wall hanging straight?
Maintain consistent tension, count each row, and block the finished panel if the yarn allows it. Attach the wooden dowel evenly across the top edge.
Final Thoughts
Crochet wall art is a rewarding project that combines creativity with practical home decoration. With a few basic stitches, a wooden dowel, and your favorite yarn colors, you can create a handmade wall hanging that complements your space.
Experiment with different textures, colors, and fringe styles to develop a design that reflects your personal taste.
Happy crocheting!
Leave a Comment