
A handmade baby crochet tunic is a beautiful addition to any little one’s wardrobe. With its soft texture, comfortable fit, and delicate handmade details, a crochet tunic makes a lovely outfit for everyday wear, family gatherings, or a special occasion.
This baby crochet tunic pattern features a simple design with a comfortable neckline, a loose-fitting body, and a gently flared shape. You can customize it with your favorite yarn colors, decorative buttons, or a pretty border to create a unique garment.
The pattern is designed as a beginner-friendly project for crocheters who are familiar with basic stitches. The instructions below explain the construction process, from creating the upper section to joining the body and finishing the edges.
Important: Baby clothing requires an accurate fit and comfortable finishing. The instructions below describe a construction method, but they are not a fully tested, size-graded garment pattern. Check measurements and make a gauge swatch before using the tunic for a baby.
Table of Contents
Materials
To make a baby crochet tunic, you will need:
- Soft baby-weight yarn suitable for garments
- A crochet hook appropriate for your yarn
- Scissors
- A tapestry needle
- Measuring tape
- Stitch markers
- Optional: soft yarn in a contrasting color for the border
Choose yarn that is washable, comfortable against sensitive skin, and suitable for the intended season.
Tip: Cotton or a soft cotton blend can be a good choice for warmer weather. A lightweight, soft yarn blend may be suitable for cooler weather.
Abbreviations
This pattern uses U.S. crochet terminology.
- ch: Chain
- sl st: Slip stitch
- sc: Single crochet
- hdc: Half double crochet
- dc: Double crochet
- st(s): Stitch(es)
- sk: Skip
- rep: Repeat
- RS: Right side
- WS: Wrong side
Notes Before You Start
- Measure the baby’s chest, shoulder width, and desired tunic length before beginning.
- Make a gauge swatch using the stitch pattern you plan to use.
- Check the yarn label for washing and care instructions.
- Keep the neckline and armholes comfortable, without tight edges.
- Avoid small detachable decorations, buttons, or other embellishments that could pose a choking risk.
- The exact stitch counts and dimensions must be calculated for the intended size and yarn.
Free Baby Crochet Tunic Pattern
This tunic construction uses two upper panels and a wider lower body. The front and back are worked separately, joined at the shoulders, and then joined at the sides to form the garment.
Step 1: Take Measurements and Make a Gauge Swatch
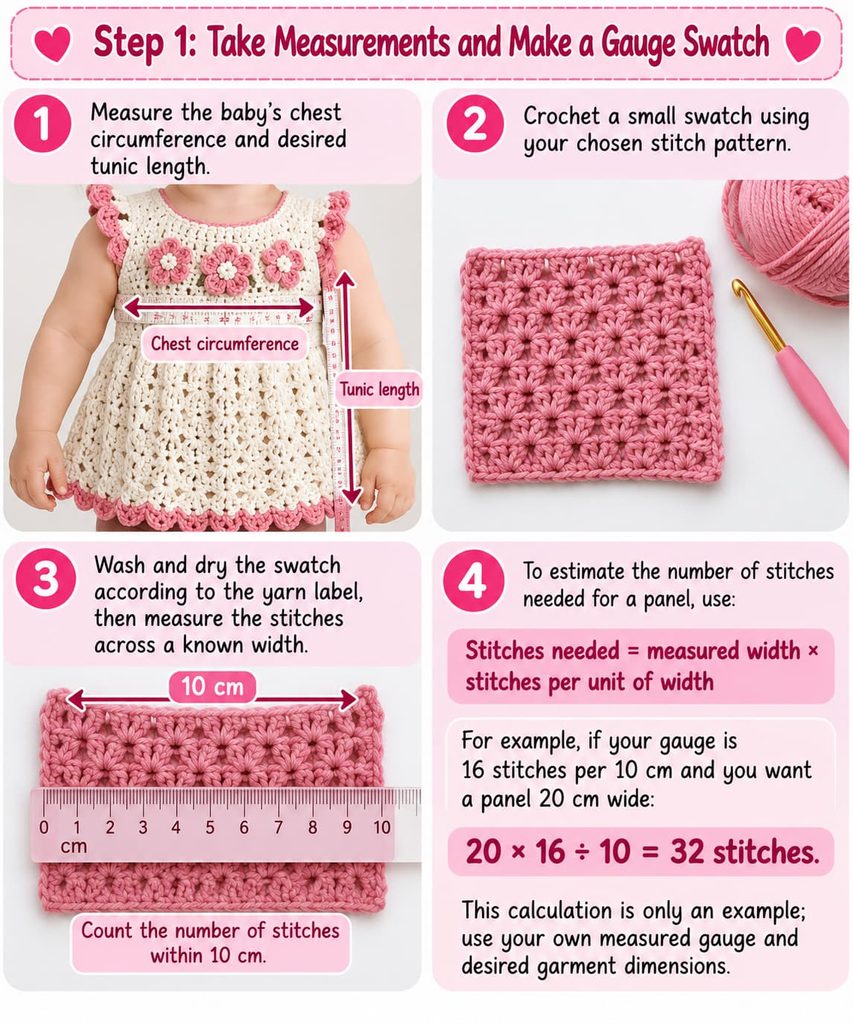
Measure the baby’s chest circumference and desired tunic length.
Crochet a small swatch using your chosen stitch pattern. Wash and dry it according to the yarn label, then measure the stitches across a known width.
To estimate the number of stitches needed for a panel, use:
Stitches needed = measured width × stitches per unit of width
For example, if your gauge is 16 stitches per 10 cm and you want a panel 20 cm wide:
20 × 16 ÷ 10 = 32 stitches.
This calculation is only an example; use your own measured gauge and desired garment dimensions.
Step 2: Crochet the Back Panel
Begin with a foundation chain calculated from the desired back-panel width.
For the first row:
- Work the selected stitch pattern across the foundation chain.
- Count your stitches and confirm that the row is straight.
- Turn your work as required by the stitch pattern.
Continue working in rows until the upper back reaches the intended depth from the lower edge to the armholes.
Keep the stitch count consistent and measure the panel regularly.
Step 3: Shape the Armholes
Once the upper back reaches the required depth, shape the armholes according to the baby’s measurements and the intended sleeve opening.
A simple method is to leave a section unworked at each side of the upper panel, then continue working the center section.
The number of stitches to leave unworked depends on the desired armhole depth and the stitch gauge. Do not use arbitrary stitch counts for a garment intended to fit a baby.
Continue until the back panel reaches the required shoulder height.
Step 4: Crochet the Front Panel
Make a second panel following the same lower width and upper-body depth as the back.
Work the same stitch pattern and maintain the same gauge.
If you want a rounded or split neckline, shape the front opening near the top by working the two shoulder sections separately. Leave the center stitches unworked to create the neckline opening.
Make sure the front and back shoulder edges align before joining them.
Step 5: Join the Shoulders
Place the front and back panels together with the right sides facing each other.
Using a tapestry needle and matching yarn, sew the shoulder seams securely.
Alternatively, use slip stitches if the chosen yarn and fabric produce a comfortable, flexible seam.
Turn the garment right side out and check that the neckline opening is wide enough to pass comfortably over the baby’s head.
Step 6: Create the Tunic Body
Join the front and back panels at the sides, leaving the armholes open.
To create a flared lower section, work into the lower edge of the joined upper body.
First, distribute your stitches evenly around the lower edge. Then work one round or row of your chosen stitch pattern.
For a gradual flare, add increases at regular intervals. The number of increases depends on the desired width and stitch gauge, so measure the garment as you work.
Continue until the tunic reaches your desired length.
Step 7: Finish the Neckline
Join the yarn at the neckline edge.
Work a round of single crochet stitches evenly around the opening, placing additional stitches at curved areas if needed to prevent puckering.
Join the round with a slip stitch if working in continuous rounds.
Check the neckline carefully. It should lie flat and remain comfortable without stretching tightly around the baby’s head or neck.
Step 8: Finish the Armholes
Join yarn at one armhole edge.
Work single crochet stitches evenly around the opening. Avoid adding too many stitches, which may cause the edge to ruffle, or too few, which may make it pull inward.
Repeat for the second armhole and compare both edges to ensure they are similar in size.
Step 9: Add a Decorative Border
For a simple finish, work one round of single crochet around the bottom edge.
If you prefer a more decorative appearance, you can use a shell border or another stitch pattern, provided it does not make the edge too stiff or heavy.
Fasten off and weave in all yarn ends securely.
Step 10: Check the Fit and Finish
Lay the tunic flat and compare the finished measurements with your original measurements.
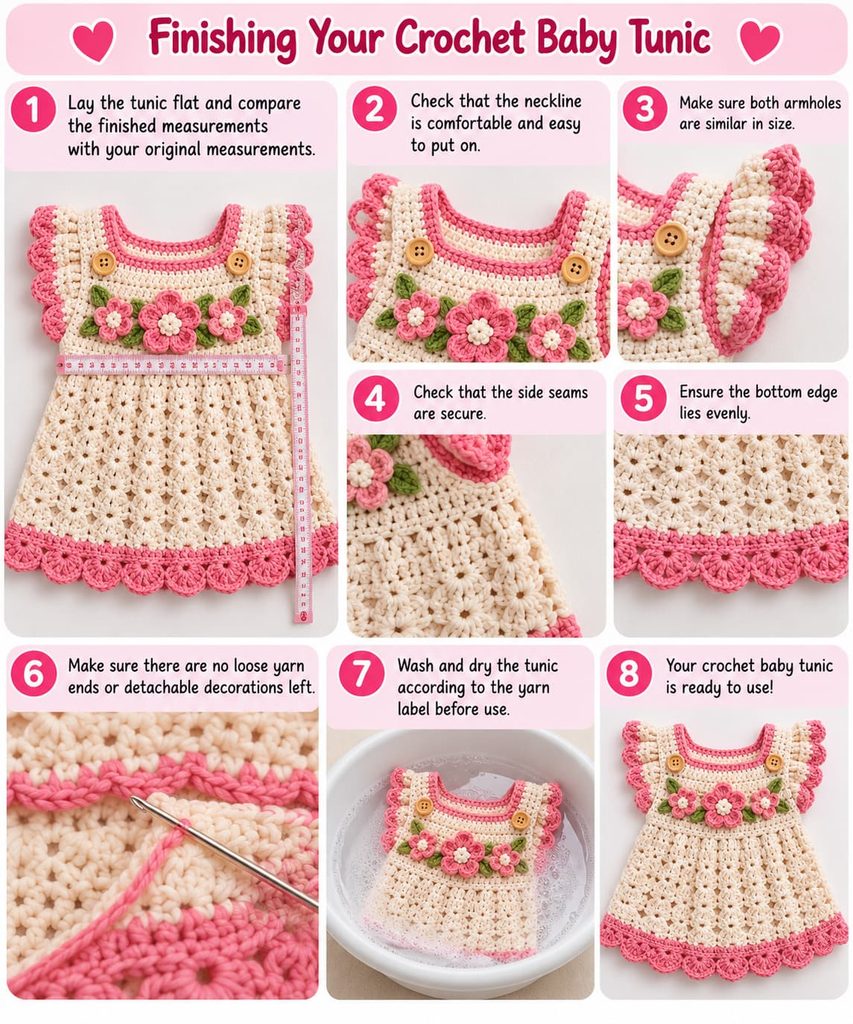
Check that:
- The neckline is comfortable and easy to put on.
- Both armholes are similar in size.
- The side seams are secure.
- The bottom edge lies evenly.
- No loose yarn ends or detachable decorations remain.
Wash and dry the tunic according to the yarn label before use.
Tips for a Beautiful Baby Tunic
- Choose soft yarn: Comfort is especially important for baby garments.
- Check your gauge: A small difference in gauge can significantly change the finished fit.
- Measure as you work: Compare the front and back panels regularly.
- Keep the fabric flexible: Avoid a hook size that produces stiff or uncomfortable fabric.
- Use baby-safe finishing: Secure loose ends and avoid small detachable parts.
- Plan for movement: A tunic should allow comfortable movement around the shoulders and chest.
Frequently Asked Questions
Is this baby crochet tunic pattern suitable for beginners?
The construction method is suitable for crocheters familiar with basic stitches, but shaping armholes and necklines requires careful measuring. A fully graded, tested pattern is preferable if you need exact instructions for a specific baby size.
What yarn is best for a baby crochet tunic?
Soft, washable baby yarn is a practical choice. Cotton and cotton blends are often suitable for warm weather, while some lightweight blends offer more warmth.
How do I choose the correct size?
Measure the baby’s chest and desired garment length, then calculate the panel dimensions using your stitch gauge. Compare the finished measurements with an appropriate baby-size measurement guide.
Can I make the tunic longer?
Yes. Continue the lower-body section until the desired length is reached, while checking the width and overall fit.
Can I add sleeves?
Yes. Short sleeves or longer sleeves can be added by working into the armhole openings. Sleeve stitch counts and shaping must be calculated according to the armhole size and gauge.
Final Thoughts
A baby crochet tunic can be a lovely handmade garment, combining a simple silhouette with personalized colors and decorative details. By taking accurate measurements, checking your gauge, and finishing every seam carefully, you can create a comfortable garment tailored to your chosen design.
For a publishable, fully step-by-step pattern with exact stitch counts, the intended baby size and a tested gauge are essential.
Happy crocheting!
Leave a Comment