
Learning how to hold a crochet hook is one of the first steps toward enjoying crochet. When you are new to the craft, coordinating the hook, yarn, and both hands can feel awkward. You might find yourself gripping the hook too tightly, struggling to guide the yarn, or wondering why your stitches keep changing size. These challenges are a normal part of learning.
The good news is that you do not need a perfect-looking hand position to crochet successfully. A relaxed grip, comfortable movements, and steady yarn tension are much more important than copying someone else’s technique.
There are two common ways to hold a crochet hook: the pencil grip and the knife grip. Both can work well, and you may find that one feels more natural than the other. In this guide, you will learn how to hold the hook, control the yarn, coordinate both hands, and practice your first chain stitches comfortably.
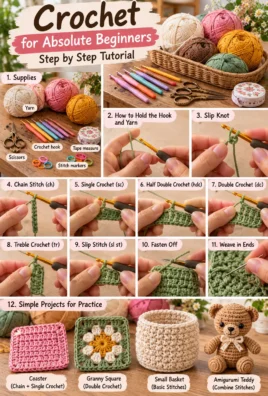
1. What You Need Before You Start
You do not need expensive tools to learn crochet. A few simple supplies are enough to begin practicing.
- Crochet hook: Start with a comfortable hook that matches your yarn. A 5 mm hook is a useful starting point for many medium-weight yarns, but check the yarn label.
- Smooth, medium-weight yarn: Choose yarn that is easy to see and handle.
- Scissors: For cutting yarn when needed.
- Practice yarn: A small amount is sufficient for your first exercises.
- Stitch markers: Optional, but useful when you begin learning stitches and patterns.
Choose beginner-friendly yarn
Light-colored, smooth yarn makes it easier to see the loops and stitches as you work. Cream, pale blue, or light green can be good choices.
For your first practice sessions, avoid very dark yarn, fuzzy yarn, highly textured yarn, or yarn that feels extremely slippery. These types can make individual stitches harder to see or control.
Choose a hook that feels comfortable in your hand and allows the yarn to slide without excessive effort. You can begin learning with inexpensive supplies and decide later whether a different hook style suits you better.
2. Understanding the Crochet Hook
A standard crochet hook has several parts. Knowing their names will help you understand how the hook moves through the yarn.
Hook tip
The end that enters a loop or stitch and catches the working yarn.
Throat
The narrower section just below the tip. Its shape helps guide the yarn as you pull it through loops.
Shaft
The section where the loops sit while you crochet. Keeping the loops on the shaft helps you maintain a more consistent size.
Grip or thumb rest
A flattened or shaped section that can help position your thumb and stabilize the hook.
Handle
The part you hold in your hand. It may be slim and straight or wider and ergonomically shaped.
Crochet hooks come in different shapes, weights, and materials. Some have smooth, narrow handles, while others have larger grips designed to feel more substantial in the hand.
The best handle is not necessarily the most expensive or the one that looks most comfortable. What matters is how it feels when you hold it and whether you can control the hook without squeezing too tightly.
3. The Two Main Ways to Hold a Crochet Hook
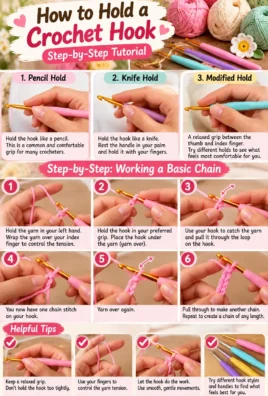
Most crocheters start with one of two grips: the pencil grip or the knife grip. You can try both and choose whichever feels more comfortable.
Method One: The Pencil Grip
The pencil grip resembles the way many people hold a pencil when writing. The hook rests between the thumb and index finger, with the middle finger helping support it.
Step 1: Relax your hand.
Let your fingers rest naturally. Avoid spreading them widely or curling them into a rigid position.
Step 2: Position the hook.
Hold the hook between your thumb and index finger, much as you would hold a pencil. Place your fingers where they can control the hook without covering the working area.
Step 3: Add support.
Allow the hook to rest lightly against your middle finger. Your thumb and index finger guide the hook while the middle finger provides stability.
Step 4: Keep the hook ready.
Point the hook tip toward the working yarn and the loop you need to work into. Let your fingers and wrist move naturally as you catch and draw through the yarn.
Step 5: Loosen your grip.
Hold the hook securely enough to control it, but not so tightly that your fingers become tense. You should be able to adjust the hook slightly without repositioning your whole hand.
Who might prefer the pencil grip?
Some crocheters like the pencil grip because it allows small, controlled movements of the fingers. It may feel familiar if you already hold writing tools this way.
However, do not force your hand into a rigid pencil-like position. If your fingers feel cramped or your wrist feels strained, adjust the angle or try the knife grip instead.
Method Two: The Knife Grip
The knife grip resembles the way you might hold a table knife. Your palm sits more over the hook handle, and the hand guides the hook using a combination of finger and wrist movement.
Step 1: Rest your hand over the handle.
Position your palm more above the hook rather than holding it entirely between your fingertips.
Step 2: Wrap your fingers comfortably.
Place your thumb and fingers around the handle. Your fingers should guide the hook without squeezing it tightly.
Step 3: Use the thumb rest if available.
If your hook has a thumb rest, let your thumb rest there naturally. You do not need to place your thumb on a specific point if another position feels more comfortable.
Step 4: Guide the hook gently.
Use small finger movements and, when needed, gentle wrist movement to turn the hook, catch the yarn, and pull it through a loop.
Step 5: Stay relaxed.
Keep your hand and wrist comfortable. The hook should feel controlled, not locked into your palm.
Who might prefer the knife grip?
Some crocheters prefer the knife grip because it allows them to guide the hook with broader hand movements. Others find it comfortable when using hooks with wider handles.
The knife grip is not automatically better for larger projects or faster crocheting. Your comfort, control, and natural movement are what matter.
Comparing the Two Grips
| Feature | Pencil grip | Knife grip |
|---|---|---|
| Hand position | Hook held mainly between the thumb and fingers | Palm positioned more over the handle |
| Movement style | Often uses small finger movements | Often combines finger and wrist movements |
| Possible preference | Familiar to people who hold pencils comfortably | Familiar to people who hold utensils with a palm-over-handle grip |
| Practical consideration | May feel precise but uncomfortable if held too rigidly | May feel stable but uncomfortable if the handle is squeezed |
| Best choice | The grip that feels natural and controlled | The grip that feels natural and controlled |
You can experiment with both methods and adapt your grip as your skills develop. You do not have to commit to one grip forever.
4. How to Hold the Yarn With Your Other Hand
Your hook hand controls the crochet hook. Your other hand guides the working yarn and helps regulate tension.
The working yarn is the strand connected to the ball of yarn. The short loose end left over from making a slip knot is called the tail.
If you are right-handed, you will usually hold the hook in your right hand and guide the yarn with your left. If you are left-handed, you will usually reverse this arrangement.
A simple way to position the yarn
- Find the working yarn. Identify the strand leading from your yarn ball to the loop on your hook.
- Hold the yarn lightly. Use the fingers of your non-hook hand to guide the strand. Do not squeeze it between your fingers.
- Choose a comfortable path. You might guide the yarn around your little finger, across your palm, and toward your index finger. Alternatively, you can pass it between different fingers if that feels more natural.
- Use your index finger to guide the strand. Keep the working yarn where your hook can catch it easily.
- Support the crochet work. Use your remaining fingers and thumb to hold the slip knot, chain, or fabric near the area where you are working.
- Let the yarn feed smoothly. Allow a little yarn to move from the ball as you form each stitch.
There is no single correct arrangement for your yarn hand. Some crocheters wrap the yarn around their little finger; others guide it between two fingers without wrapping it at all.
The goal is to create gentle resistance. Your yarn should not fall completely slack, but it should not be pulled so tightly that it restricts the movement of your hook.
If the yarn feels too loose
Try guiding the strand more consistently between your fingers. You can also raise your index finger slightly to control the yarn’s path. Make small adjustments rather than wrapping the yarn more tightly around every finger.
If the yarn feels too tight
Loosen your finger position and allow more yarn to slide through your hand. If the yarn is wrapped several times around a finger, remove a wrap and see whether the strand feeds more freely.
Remember: Your yarn hand controls the resistance, while your hook hand controls the movement. Both hands work together to make comfortable, even stitches.
5. How to Coordinate Both Hands
At first, using both hands at once may feel unfamiliar. You do not need to move every finger independently. Small, controlled movements are enough to get started.
For a basic yarn-catching movement, the sequence is generally as follows:
- Position the hook. Guide the hook tip toward the loop or space where the next stitch belongs.
- Insert the hook. Move it through the appropriate loop or space, depending on the stitch you are making.
- Catch the working yarn. Rotate or position the hook so its tip catches the strand.
- Guide the yarn. Let your non-hook hand provide enough slack for the yarn to move through.
- Draw the yarn through. Move the hook gently to pull the strand through the loop or space.
- Adjust the work. Use the fingers of your non-hook hand to stabilize the fabric and keep the working area close enough to reach comfortably.
The exact movements depend on the stitch. For example, a chain stitch requires you to pull the working yarn through the loop already on your hook. A double crochet requires additional yarn-over and pull-through movements.
Do not worry about speed. Focus first on making the movement smooth enough that the hook does not snag the yarn and your fingers do not have to force it through.
As you practice, your hands will begin to coordinate more naturally. Pause whenever you need to reset your grip or adjust the yarn.
6. How to Maintain Comfortable Yarn Tension
Yarn tension is the amount of resistance you apply to the working yarn while making stitches. It affects the size, flexibility, and appearance of your crochet.
You do not need to maintain a precise numerical tension while learning. Instead, aim for loops that are secure enough to stay on the hook but loose enough to work through comfortably.
If your tension is too tight
You may notice that:
- The hook is difficult to insert into loops.
- Pulling yarn through feels difficult.
- Your starting chain becomes stiff.
- It is hard to work into stitches on the next row.
- Your fingers, hand, or wrist begin to feel strained.
How to improve it:
- Relax your grip on the hook.
- Let more yarn feed through the fingers of your non-hook hand.
- Avoid pulling every new loop tightly against the hook.
- Keep the loops on the shaft rather than tightening them around the narrow throat.
- Slow down and reset your hands if you notice yourself squeezing.
A stitch should sit securely on the hook without being cinched tight.
If your tension is too loose
You may notice that:
- The loops become unusually large.
- Stitches vary considerably in size.
- Your work looks uneven.
- The hook slips out of loops frequently.
- Your starting chain has large, inconsistent openings.
How to improve it:
- Guide the working yarn through your fingers more consistently.
- Pay attention to the size of the loop on the hook shaft.
- Keep your hands in a comfortable, repeatable position.
- Slow down enough to complete each movement carefully.
Do not try to solve loose tension by squeezing the hook harder. Focus on controlling the yarn and the size of each loop.
How to find a balanced tension
Practice making several chain stitches and inspect the result. The chain should be flexible enough to bend, and your hook should be able to enter the chain stitches without excessive effort.
If the chain is stiff, loosen your tension. If the loops are so large that the chain is difficult to control, guide the yarn more consistently.
Your tension may change as you become more familiar with the hook. That is normal. The goal is steady, comfortable control, not identical stitches from the very first attempt.
7. A Step-by-Step Practice Exercise
This exercise helps you practice holding the hook, guiding the yarn, and coordinating both hands before moving on to a larger project.
Step 1: Prepare the yarn and make a slip knot
A slip knot creates the first adjustable loop on your hook.
- Leave a yarn tail about 6 inches long.
- Form a loose loop with the yarn, crossing one strand over the other.
- Pull a small bight of yarn—the folded section of the strand—through the loop to create a new loop.
- Place the new loop on your hook.
- Gently pull the working yarn and tail to adjust the knot around the hook.
The knot should fit around the hook without gripping it tightly. You should be able to move the hook through the loop without forcing it.
Do not pull the knot so tight that the hook becomes difficult to move. The loop needs enough room to slide along the shaft.
Step 2: Test both hook grips
Hold the hook using the pencil grip for a few moments. Relax your fingers and make a few small movements as if you were catching yarn.
Next, try the knife grip. Notice how your fingers and wrist move in this position.
Ask yourself:
- Which grip feels more natural?
- Can I turn the hook without squeezing it?
- Does my wrist feel relaxed?
- Can I keep the hook tip under control?
Choose the grip that feels comfortable for now. You can change it later if you discover a better position.
Step 3: Practice guiding the yarn
Hold the working yarn in your non-hook hand. Try guiding it across your fingers or around your little finger, whichever arrangement feels natural.
Move a little yarn through your fingers, then let it stop. Repeat this several times without making stitches.
The yarn should move when you need more of it but remain controlled enough that it does not become completely slack.
Step 4: Make chain stitches
A chain stitch creates a small link of yarn. A series of chain stitches forms a chain that is often used to begin a crochet project.
- Hold the hook and yarn comfortably.
- Use the hook to catch the working yarn. This movement is called a yarn over.
- Draw the caught yarn through the loop already on your hook.
- You have made one chain stitch.
- Repeat the yarn-over and pull-through movement to make more chains.
Keep the original working loop on the hook. After each chain stitch, adjust the yarn gently so the new chain is secure without being tight.
Try making a chain of 10–15 stitches. If the chain becomes stiff, relax your grip and allow more yarn to feed through. If the loops become too large, guide the yarn more consistently.
Step 5: Check your results
Look at your chain and consider these questions:
- Are the loops reasonably similar in size?
- Can you bend the chain without it feeling stiff?
- Does the hook move through the loops comfortably?
- Are you holding the hook without squeezing?
- Does the yarn feed smoothly through your fingers?
Your first chain may be uneven. That is completely normal. The purpose of this exercise is to develop coordination and a comfortable grip, not to produce a perfect piece of crochet.
If you become frustrated, put the hook down, relax your hands, and try again later.
8. Common Mistakes When Holding a Crochet Hook
Beginners often make small adjustments to their grip as they learn. The following table can help you recognize common problems and make practical corrections.
| Common mistake | Why it happens | How to correct it |
|---|---|---|
| Gripping the hook too tightly | You may be trying to prevent the hook from slipping. | Relax your fingers and hold the hook firmly enough to control it without squeezing. |
| Holding the hook too far from the working area | Your hand may be positioned too far back on the handle. | Move your fingers to a comfortable position where you can control the hook tip easily. |
| Keeping the wrist rigid | You may be concentrating on holding the hook still. | Allow small, natural wrist and finger movements instead of locking your hand into one position. |
| Wrapping yarn too tightly around your fingers | You may be trying to control tension by restricting the yarn. | Remove an extra wrap or loosen your fingers so the yarn can feed smoothly. |
| Letting yarn slide without enough control | The yarn is not being guided consistently. | Adjust the path of the yarn through your fingers to provide gentle resistance. |
| Pulling every stitch too tight | You may be tightening each loop immediately after making it. | Keep the loop on the hook shaft at a manageable size instead of cinching it around the throat. |
| Changing grip repeatedly during each stitch | You may not yet feel confident with either grip. | Choose one comfortable position for a short practice session and change it only when necessary. |
| Holding the work too far from the hook | Your fingers may be gripping the fabric at a distant point. | Support the work close to the active stitch without blocking the hook’s path. |
| Copying another crocheter’s exact finger position | You may assume there is only one correct technique. | Adapt the grip to your hand size, comfort, and natural movement. |
| Practicing too quickly | You may be trying to develop speed before coordinating both hands. | Slow down and focus on smooth, controlled movements. |
You do not need to correct every habit at once. Choose one adjustment, practice it for a short time, and see whether it makes crocheting easier.
9. How to Reduce Hand Fatigue
Crochet should feel manageable, not like a test of how long you can hold a tool without moving. A few simple habits can help you work more comfortably.
- Relax your shoulders. Avoid lifting them toward your ears or leaning forward unnecessarily.
- Avoid squeezing. Use only as much pressure as you need to control the hook.
- Use gentle movements. Let your fingers and wrist move naturally rather than forcing every stitch.
- Take regular breaks. Put the hook down periodically and allow your hands to rest.
- Adjust your grip when needed. If a position starts to feel uncomfortable, try a different angle or switch grips.
- Choose a comfortable handle. A larger ergonomic handle may feel better to some people, while others prefer a slim hook.
- Support your project. Use your non-hook hand to hold the fabric close to the working area so the hook hand does not have to support everything.
- Stop when discomfort develops. Do not push through pain in an attempt to finish a row.
Persistent or recurring pain, numbness, tingling, or weakness should not be ignored. Stop crocheting and seek appropriate medical advice if these symptoms persist or return. No particular grip can guarantee that discomfort or injury will be prevented.
10. Choosing a Comfortable Crochet Hook
The right hook can make practicing more enjoyable. Different materials and handle shapes feel different in the hand, so consider both comfort and how the yarn moves over the hook.
Straight aluminum hooks
These are common, lightweight, and generally allow yarn to glide smoothly. Their slim handles may suit people who prefer a pencil grip, although some find them less comfortable to hold for long periods.
Plastic hooks
Plastic hooks are often lightweight and available in many colors and shapes. The feel of the surface and the way yarn glides across it vary between hooks.
Wooden or bamboo hooks
These may feel warm and comfortable to hold. Their surface can provide a different amount of friction from metal or plastic, which may affect how easily particular yarns slide.
Ergonomic hooks
These usually have a wider or specially shaped handle intended to provide a different grip surface. Some people find the extra handle volume comfortable; others prefer a slimmer tool.
What should you consider?
When choosing a hook, consider:
- Handle size: Can you hold it without curling your fingers tightly?
- Weight: Does the hook feel easy to move?
- Surface: Does it feel comfortable and secure in your hand?
- Yarn glide: Can you catch and pull the yarn through loops smoothly?
- Personal preference: Does the shape work with your natural grip?
You do not need to buy a specialized hook before learning the basics. Start with a hook that matches your yarn, practice both grips, and decide whether another handle shape would be useful.
11. Tips for Left-Handed Crocheters
Left-handed crocheters can use the same principles of relaxed grip, comfortable movement, and controlled yarn tension.
If you are left-handed, you will usually hold the crochet hook in your left hand and guide the working yarn with your right hand.
Keep these tips in mind:
- Hold the hook naturally in your left hand. Try both the pencil grip and the knife grip, adjusting them to suit your hand.
- Guide the yarn with your right hand. Choose a comfortable path through your fingers that allows the yarn to feed smoothly.
- Avoid forcing a right-handed arrangement. You do not need to copy the exact finger position of a right-handed crocheter.
- Use suitable instructions when needed. Some crochet patterns and stitch demonstrations are written for right-handed work. Instructions adapted for left-handed crocheters may make stitch direction and turning easier to understand.
The basic goal is to control the hook with one hand while the other hand guides the yarn and supports the work. This article focuses on grip and coordination rather than providing a complete left-handed crochet pattern.
12. Frequently Asked Questions
1. What is the easiest way to hold a crochet hook for beginners?
Try both the pencil grip and the knife grip. Start with the position that feels natural, keep your fingers relaxed, and practice making a few chains. The easiest grip is the one that gives you comfortable control without excessive squeezing.
2. Is the pencil grip or knife grip better?
Neither is universally better. The pencil grip often uses small finger movements, while the knife grip may involve broader hand movements. Both can produce good crochet stitches when used comfortably.
3. Which hand should hold the crochet hook?
Most right-handed crocheters hold the hook in their right hand, while most left-handed crocheters hold it in their left. However, personal comfort and coordination are more important than following a rigid rule.
4. Which hand controls the yarn?
Usually, the hand opposite the hook guides the working yarn and helps regulate tension. This hand also supports the crochet work near the active stitch.
5. How tightly should I hold a crochet hook?
Hold it securely enough to control its movement, but do not squeeze it. You should be able to make small adjustments with your fingers and move your wrist naturally.
6. Why does my hand hurt when I crochet?
Discomfort can be associated with gripping too tightly, repetitive movement, an uncomfortable position, or practicing for too long without a break. Stop if discomfort develops, and seek appropriate medical advice if pain or other symptoms persist or recur.
7. How can I stop my stitches from becoming too tight?
Relax your hook hand, allow the working yarn to feed through your other hand, and avoid pulling each loop tightly against the hook. Keep loops at a manageable size on the shaft.
8. Why does my yarn keep slipping through my fingers?
Your yarn hand may not be providing enough consistent resistance. Try changing the yarn’s path through your fingers or adjusting your index finger position. Avoid solving the problem by wrapping the yarn so tightly that it cannot move freely.
9. Do ergonomic crochet hooks help?
Some people find wider or specially shaped handles more comfortable, while others prefer standard slim hooks. An ergonomic hook may be worth trying if your current handle feels awkward, but comfort varies from person to person.
10. Can I change my crochet grip after learning one method?
Yes. You can change grips or make small adjustments at any time. If your current position becomes uncomfortable or makes the hook difficult to control, experiment with another position.
11. How should left-handed people hold a crochet hook?
Left-handed crocheters usually hold the hook in the left hand and guide the yarn with the right. Try the same two basic grips and choose the one that feels natural. Left-handed instructions can help when stitch direction matters.
12. How long does it take to become comfortable holding a crochet hook?
It varies. Some people become more comfortable after a few short practice sessions, while others need more time. Regular, gentle practice can help coordination develop, but there is no guaranteed timeline.
13. A Simple Beginner Practice Routine
Use this flexible routine whenever you want to practice your grip and hand coordination. You do not need to complete every step in one sitting.
Your crochet practice checklist
0 of 5
Check your grip
Hold the hook in your preferred position and relax your fingers and shoulders.
Practice yarn handling
Guide the working yarn through your fingers and allow it to feed smoothly.
Make a short chain
Create 10–15 chain stitches, focusing on a manageable loop size.
Review your stitches
Check whether the chain is flexible and whether the loops are reasonably consistent.
Rest when needed
Put the hook down if your hand feels uncomfortable, and resume only when you feel ready.
Reset checklist
Treat this routine as a guide rather than a strict schedule. You can practice for a few minutes at a time and repeat the steps whenever they feel useful. Stop and rest if your hands become uncomfortable.
14. Conclusion
Learning how to hold a crochet hook comfortably takes practice, but you do not need to get everything right immediately. A relaxed grip is more useful than a rigid, perfect-looking hand position, and both the pencil grip and knife grip are valid options.
Focus on three things as you practice: hold the hook without squeezing, guide the working yarn with gentle and consistent tension, and allow both hands to work together through small, controlled movements.
Your first chain may be uneven, and that is fine. Each short practice session gives you another opportunity to find a comfortable position and build coordination.
Which grip do you prefer: the pencil grip or the knife grip? Share your favorite technique or any tips that helped you feel more comfortable when you first learned to crochet!
Leave a Comment