
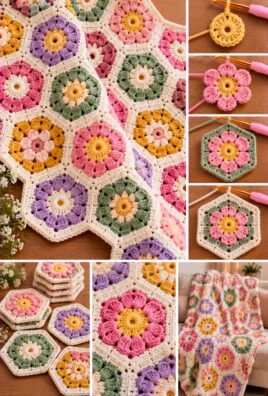
A crochet hexagon motif is a versatile six-sided design that can be used to create beautiful handmade projects. With its six corners and repeating stitch pattern, it is a lovely choice for blankets, cushion covers, bags, cardigans, and decorative accessories.
This beginner-friendly tutorial uses a classic granny-style hexagon made with double crochet clusters and chain spaces. Once you learn the repeating rounds, you can make matching motifs in your favorite colors and join them together to create larger projects.
1. Project Overview
- Project name: Crochet Hexagon Motif
- Skill level: Beginner
- Construction: Worked in joined rounds from the center outward
- Recommended yarn: Medium-weight category 4 yarn
- Fiber: Acrylic, cotton, or an acrylic-cotton blend
- Recommended hook: 5 mm, or the size needed to achieve your preferred tension
- Estimated finished size: Approximately 5–6 inches across the widest points
- Estimated time: 30–60 minutes per motif
- Estimated yarn requirement: Approximately 20–35 yards per motif
- Main techniques: Chain stitches, double crochet clusters, chain spaces, slip-stitch joins, and color changes
Measurements, yarn quantities, and completion times are estimates. Actual results depend on yarn thickness, hook size, tension, and the number of rounds worked.
2. Materials and Supplies
Before beginning, gather the following supplies:
- Medium-weight yarn in one or more colors
- A 5 mm crochet hook
- Scissors
- Yarn needle
- Measuring tape
- Optional stitch markers
Choosing yarn and a hook
Smooth yarn makes it easier to see your stitches and identify the six corners. Acrylic yarn is affordable and available in many colors, while cotton produces a firmer motif with clearly defined stitches.
Your hook size affects both the dimensions and drape of the motif. A larger hook generally creates a looser fabric, while a smaller hook creates a denser fabric.
If your hexagon curls inward, your tension may be too tight. If the edges become wavy, you may be working too many stitches or using a hook that is too large for your yarn and tension.
Planning color changes
For a simple single-color motif, use the same yarn throughout.
For a multicolored motif, change colors at the end of a round. Fasten off the old color after joining, then attach the new color in a corner space. Weave in the ends with a yarn needle when the motif is complete.
3. US Crochet Abbreviations
This pattern uses standard US crochet terminology.
| Abbreviation | Meaning |
|---|---|
| ch | Chain |
| sl st | Slip stitch |
| sc | Single crochet |
| dc | Double crochet |
| st | Stitch |
| sts | Stitches |
| sp | Space |
| ch-sp | Chain space |
| rep | Repeat |
| rnd | Round |
| sk | Skip |
| FO | Fasten off |
Understanding stitches and chain spaces
A stitch is a completed crochet stitch, such as a double crochet. A chain space is the open gap beneath a chain stitch or chain sequence.
In this pattern, a group of three double crochet stitches is called a 3-dc cluster. The three double crochet stitches are worked together in the same designated space, but each stitch counts individually.
The beginning chain 3 counts as the first double crochet of the first cluster. At the end of each round, join with a slip stitch to the top of that beginning chain 3. The joining slip stitch does not count as an additional double crochet.
Basic techniques
Double crochet: Yarn over, insert the hook into the indicated stitch or space, yarn over and pull up a loop, yarn over and pull through two loops, then yarn over and pull through the remaining two loops.
Slip-stitch join: Insert the hook into the indicated stitch, yarn over, and pull through both the stitch and the loop on the hook.
Chain space: Work the next stitches into the open gap beneath the chain rather than into the chain stitch itself.
Fasten off: Cut the yarn, leaving a tail, and pull the tail through the final loop to secure it.
4. Gauge and Finished Motif Size
For this granny-style hexagon, aim for an approximate finished width of 5–6 inches after completing four rounds with medium-weight yarn and a 5 mm hook.
To check your gauge, crochet one complete motif and measure it:
- Across opposite corners: Measure from one outer corner straight across to the opposite outer corner.
- Across opposite sides: Measure between two opposite flat sides.
- Corner check: Confirm that the motif has six evenly spaced corners.
The exact dimensions will vary with yarn, hook size, tension, and the number of rounds.
If you plan to make a blanket or garment, crochet a sample motif before making the full set. This will help you estimate how many motifs you need.
5. Understanding the Hexagon Structure
A hexagon has six outer corners and six sides.
This pattern begins with a small central ring. The first round creates six groups of double crochet separated by chain spaces. These chain spaces form the six corner positions.
As the motif grows, each corner receives a larger group of stitches. The spaces between the corners form the six sides, and additional clusters expand those sides in later rounds.
The key to a neat hexagon is to keep the six corner spaces evenly distributed. Each corner must be shaped in the same way so that the motif remains symmetrical.
6. Complete Round-by-Round Hexagon Pattern
This pattern uses the classic granny-style construction with three-double-crochet clusters. Work in joined rounds, turning is not required.
The pattern is written for one motif in a single color. You can change colors between rounds if desired.
Round 1: Create the center
- Make a magic ring. Alternatively, chain 4 and join with a slip stitch to form a small ring.
- Chain 3. This counts as the first double crochet.
- Work 2 double crochet into the ring.
- Chain 2.
- Work 3 double crochet into the ring, then chain 2.
- Repeat the previous step four more times.
- Join with a slip stitch to the top of the beginning chain 3.
End-of-round count: Six 3-dc clusters and six chain-2 spaces.
You should have six groups of double crochet arranged around the center. Each chain-2 space marks one corner position.
Round 2: Build the six corners
- Slip stitch across the next two double crochet stitches to reach the first chain-2 corner space. If needed, slip stitch into the corner space itself.
- Chain 3. This counts as the first double crochet.
- Work 2 double crochet into the same corner space.
- Chain 2.
- Work 3 double crochet into the same corner space. You have completed one corner group: 3 dc, chain 2, 3 dc.
- Chain 1.
- Repeat steps 3–6 in each of the remaining five corner spaces, adjusting the beginning of the repeat so that each corner receives the same 3-dc, chain-2, 3-dc group and neighboring corner groups are separated by chain 1.
- Join with a slip stitch to the top of the beginning chain 3.
End-of-round count: Six corner groups, each containing two 3-dc clusters separated by a chain-2 space, with chain-1 spaces between adjacent corner groups.
The six corner spaces remain evenly spaced. The chain-1 spaces between the corner groups form the starting positions for the next round’s side clusters.
Round 3: Add the first side clusters
- Slip stitch across the next two double crochet stitches and into the next chain-2 corner space.
- Chain 3, then work 2 double crochet into the same corner space.
- Chain 2.
- Work 3 double crochet into the same corner space to complete the corner.
- Chain 1.
- Work 3 double crochet into the next chain-1 space between corner groups.
- Chain 1.
- Repeat the corner group and side cluster sequence around the motif: work 3 dc, chain 2, 3 dc in each corner space, and work 3 dc in each side chain-1 space, using chain 1 to separate adjacent groups.
- Join with a slip stitch to the top of the beginning chain 3.
End-of-round count: Six corner groups and six side clusters.
The hexagon should now have six clear corners and six sides. Each side has one cluster between its two corner groups.
Round 4: Expand the sides
- Slip stitch across the next two double crochet stitches and into the next chain-2 corner space.
- Chain 3, then work 2 double crochet into the same corner space.
- Chain 2.
- Work 3 double crochet into the same corner space to complete the corner.
- Chain 1.
- Work 3 double crochet into each chain-1 space along the side until you reach the next corner.
- Chain 1 before working the next corner group.
- Repeat the same corner and side sequence around the motif.
- Join with a slip stitch to the top of the beginning chain 3.
End-of-round count: Six corner groups, with the number of side clusters increasing as the motif expands.
The corner spaces remain the same size, while additional side clusters make the hexagon larger.
Round 5 and additional rounds
To make a larger motif, continue using the same granny-style structure.
For each new round:
- Work 3 double crochet, chain 2, and 3 double crochet into each corner space.
- Work 3 double crochet into each chain-1 space along the sides.
- Separate neighboring clusters with chain 1.
- Join the round with a slip stitch to the top of the beginning chain 3.
As the motif grows, each side gains another cluster position. Continue until the hexagon reaches your desired dimensions.
Important pattern note: The round instructions above describe the intended granny-style structure, but the transitions between the corner groups and side spaces need a fully specified stitch-by-stitch sequence to guarantee correct placement in every round. If you are making motifs for a large project, verify the placement and stitch count on a sample before producing all the pieces.
7. Changing Colors
Changing colors can create a striped or multicolored hexagon.
Simple two-color sequence
- Round 1: Color A
- Round 2: Color B
- Round 3: Color A
- Round 4: Color B
Repeat the sequence if you are adding more rounds.
How to change colors
- Complete the final cluster of the current round.
- Join the round with a slip stitch.
- Cut the yarn, leaving a tail long enough to weave in.
- Attach the new color in a corner space with a slip knot on the hook.
- Work the beginning chain and stitches for the next round.
- Weave in both yarn tails securely on the wrong side of the motif.
For a neater color change, you can begin the final joining slip stitch with the new color by drawing the new yarn through the last loop of the old color. This reduces the visible color break.
8. Finishing the Motif
When the motif reaches the desired size:
- Join the final round with a slip stitch.
- Cut the yarn, leaving a tail.
- Pull the tail through the loop to fasten off.
- Thread the tail onto a yarn needle.
- Weave the tail through several stitches on the wrong side.
- Trim any remaining excess yarn carefully.
Lay the motif flat and check that all six corners are clearly defined. Gently adjust the sides with your fingers.
Blocking
Blocking can help improve the shape and make multiple motifs more consistent.
- For cotton, damp blocking is often suitable.
- For acrylic, follow the yarn label and avoid high heat.
- For other fibers, use the care method recommended by the manufacturer.
Pin the six corners evenly and allow the motif to dry completely. Do not stretch it beyond its natural dimensions.
9. Troubleshooting
The motif curls inward
Likely cause: Your tension may be too tight, or the motif may not have enough space between clusters.
Solution: Try a larger hook and check that each side and corner has the required chain spaces.
The motif becomes wavy
Likely cause: Too many stitches or chain spaces may have been added.
Solution: Count the corner groups and side clusters. Make sure you work only the specified stitches in each space.
The hexagon looks like a circle
Likely cause: The six corner positions are not clearly established.
Solution: Check that there are exactly six corner spaces and that every corner uses the same stitch group.
The motif has more or fewer than six corners
Likely cause: A corner space may have been skipped or an extra corner group may have been added.
Solution: Use stitch markers to identify the six corner positions and count them at the end of every round.
The corners are uneven
Likely cause: The corner stitch groups may have different stitch counts, or your tension may vary.
Solution: Make each corner group identical and avoid pulling the yarn tighter at one corner than another.
The sides are not symmetrical
Likely cause: Side clusters may have been placed inconsistently.
Solution: Check that the clusters are worked in the intended side spaces and that the same sequence is repeated on all six sides.
Gaps appear where rounds are joined
Likely cause: The joining slip stitch may be too loose, or the beginning chain may be misplaced.
Solution: Keep the join neat and weave in the yarn tail to secure the area.
The motif becomes too large or too small
Likely cause: Yarn thickness, hook size, tension, or the number of rounds may differ from the sample.
Solution: Check your gauge and adjust the hook size or round count before making more motifs.
Color changes leave visible holes
Likely cause: The new color may have been attached loosely.
Solution: Secure the new yarn carefully and weave in the tails on the wrong side.
The motif does not lie flat after finishing
Likely cause: Uneven tension, incorrect stitch placement, or insufficient blocking.
Solution: Review the corner and side counts, then block gently if the yarn permits.
10. Customization and Uses
Crochet hexagons are useful for many projects because they can be repeated and joined in different arrangements.
Hexagon blankets
Make a collection of matching or contrasting motifs and join them into rows. Hexagon layouts create staggered edges, so plan the arrangement and border before assembling the blanket.
Cushion covers
Use motifs in coordinated colors to create a decorative front panel. Add a fabric or crochet backing to complete the cover.
Crochet bags
Join motifs to form the body of a bag, then add a lining and handles if needed. Choose a firm yarn and dense stitches for better structure.
Garments and cardigans
Hexagons can be joined to form wearable pieces. Make sure the motifs are consistent in size and that the layout provides the desired fit.
Decorative table pieces
Smaller motifs can be joined into table runners, placemats, or decorative mats. Cotton yarn is a practical choice for these projects.
Small accessories
Use a small hexagon as a coaster, applique, or decorative patch. Finer yarn and a smaller hook can create a smaller motif, though the final size will depend on your gauge.
Experiment with colors and yarn
Try alternating colors between rounds, making a larger motif by adding rounds, or using a different yarn weight. Remember that changing yarn and hook size affects the dimensions, drape, and stitch definition.
11. Joining Multiple Hexagons
Before joining several motifs, make sure they are as close as possible in size and shape.
Common joining methods include:
- Slip-stitch join: Creates a defined seam with relatively little bulk.
- Single-crochet join: Creates a stronger, more raised seam.
- Yarn-needle seam: Offers a flatter finish when the edges are aligned carefully.
Match corresponding sides and corners before joining. For a blanket, arrange the motifs on a flat surface first and plan how the staggered outer edges will be finished with a border.
12. Compact Pattern Summary
- Start: Make a magic ring or chain 4 and join into a ring.
- Round 1: Work six 3-dc clusters, separated by chain-2 spaces.
- Round 2: Work 3 dc, chain 2, 3 dc in each corner space, with chain-1 spaces between corner groups.
- Round 3: Repeat the corner group and add 3-dc clusters in the side chain-1 spaces.
- Round 4: Continue working corner groups and side clusters, adding side clusters as the motif expands.
- Additional rounds: Repeat the same corner-and-side structure until the desired size is reached.
- Finish: Join, fasten off, weave in ends, and block if appropriate.
This summary reflects the intended construction framework. For fully reproducible results, the corner transitions and side-space placements must be specified consistently for each round.
13. Frequently Asked Questions
Is a crochet hexagon motif suitable for beginners?
Yes. The basic stitches are beginner-friendly, and the repeating structure becomes easier with practice. Keeping the six corner positions consistent is the main skill to focus on.
How do I make exactly six corners?
Establish six evenly spaced corner spaces in the first round and preserve those same six positions in every subsequent round.
Why is my hexagon curling?
Your hook may be too small, your tension may be too tight, or the pattern may not provide enough space between stitch groups. Check the stitch placement and try a larger hook if needed.
How can I make a larger hexagon?
Add more rounds using the same corner structure and extend the sides with additional clusters. Each extra round increases the motif’s dimensions.
Can I change colors between rounds?
Yes. Fasten off the old color after joining, attach the new color in a corner space, and weave in the ends securely.
How do I keep every motif the same size?
Use the same yarn, hook, stitch pattern, and tension for every motif. Measure the finished pieces and block them to consistent dimensions when the fiber allows.
What projects can I make with hexagon motifs?
You can make blankets, cushion covers, bags, garments, table accessories, and decorative patches.
Do I need to block every motif before joining?
Blocking is optional, but it can help align the edges and improve consistency. It is particularly useful when making blankets or garments from many motifs.
14. Conclusion
A crochet hexagon motif is a versatile building block for beautiful handmade projects. Once you become comfortable with the repeating rounds, you can experiment with colors, textures, and different project layouts. Take your time checking the six corners and keeping your motifs consistent, and you will be ready to explore the many possibilities of hexagon crochet.
Pattern note: This article explains the intended granny-style hexagon structure, but the round-by-round shaping is not fully stitch-count verified. A complete production-ready pattern needs exact, consistent corner and side-space instructions before it can be followed reliably without adjustment.
Leave a Comment