
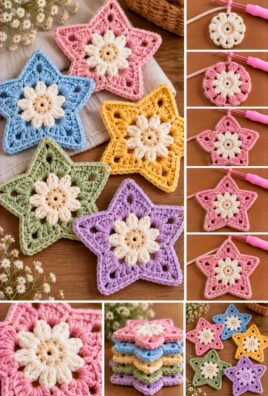
Crochet star motifs are versatile little projects that can add a handmade touch to blankets, garlands, ornaments, cushions, bunting, and decorative appliqués. This beginner-friendly pattern creates a five-pointed star with a defined center, five evenly spaced points, and valleys between the points. Make it in a single color or experiment with contrasting shades to suit different seasons and projects.
1. Project Overview
- Skill level: Beginner to confident beginner
- Approximate completion time: 30–60 minutes
- Approximate finished size: 4–5 inches across, point to point
- Construction: Worked in rounds from the center outward
- Main stitches: Single crochet, half double crochet, and double crochet
- Suggested uses: Blankets, garlands, ornaments, appliqués, cushions, and decorative panels
The finished size depends on the yarn, hook size, stitch tension, and any optional border. The pattern uses a central ring and a five-repeat point round to create the star’s silhouette.
2. Materials and Supplies
You will need:
- Approximately 20–30 yards of medium-weight yarn
- A crochet hook suitable for your yarn, such as a 5 mm hook
- Scissors
- Tapestry needle
- Measuring tape
- Stitch markers, if helpful
Smooth, medium-weight yarn is a practical choice for a first motif because the stitches are easy to see and count. Cotton yarn can create a firm, defined star, while acrylic yarn may offer a softer feel. Different fibers and yarn weights will produce different sizes and levels of flexibility.
Choose a hook that creates a fabric firm enough to hold its shape without making the stitches difficult to work. If the fabric is too loose, the points may look floppy; if it is too tight, the star may curl or become difficult to shape.
3. US Crochet Abbreviations
| Abbreviation | Meaning |
|---|---|
| MR | Magic ring |
| ch | Chain |
| sl st | Slip stitch |
| sc | Single crochet |
| hdc | Half double crochet |
| dc | Double crochet |
| st(s) | Stitch(es) |
| sp | Space |
| rep | Repeat |
| FO | Fasten off |
4. Skills Needed Before Starting
Before beginning, practice making a slip knot, crocheting chain stitches, working single crochet and double crochet, and joining rounds with a slip stitch. You will also need to recognize chain spaces, count stitches, fasten off, and weave in yarn ends.
If you are new to crochet, make a small swatch using single crochet and double crochet. Practice inserting the hook into a chain space and working several stitches into the same space. These skills will help you create the star’s points neatly.
An alternative to the magic ring
If you prefer not to use a magic ring, chain 4 and join the first and last chains with a slip stitch to form a small loop. Work the first round into the center of that loop. The opening may be slightly larger than a tightly closed magic ring, so weave in the yarn tail securely to close it as much as possible.
5. Understanding the Star Motif
This pattern has three main parts:
- Center: A small ring filled with five groups of double crochet stitches.
- Five points: Each point is formed in a chain space using stitches of different heights, with a chain at the tip.
- Valleys: Slip stitches between the points help create the inward curves of the star.
The key to a recognizable five-pointed star is repeating the same point sequence exactly five times. Each point uses the same stitch heights and chain space, helping the finished outline look balanced.
The pattern is worked in two main rounds after making the center ring. The first round establishes five evenly spaced spaces; the second round shapes those spaces into points.
6. Gauge and Finished Size
Gauge is less critical for a single decorative star than for a fitted garment, but it matters when you plan to make several motifs for a blanket or other project.
For this pattern, use your chosen yarn and hook to make one complete star. The sample is approximately 4–5 inches from the tip of one point to the tip of the opposite point, depending on yarn and tension.
Measure the star across its widest point and compare it with any other motifs you intend to join. To make a smaller star, use finer yarn and a smaller hook. For a larger star, use heavier yarn and a suitable hook.
You can also add an optional border to increase the finished dimensions slightly. Keep the same five-point construction so that the star retains its recognizable shape.
7. Complete Step-by-Step Crochet Pattern
Round 1: Create the Center
Make a magic ring.
Round 1: Chain 1, then work 15 single crochet stitches into the ring. Pull the yarn tail to close the center as tightly as possible. Join with a slip stitch to the first single crochet.
You should have 15 single crochet stitches.
The chain 1 at the beginning does not count as a stitch. This round creates a firm center for the five points.
If you are using the chain-loop alternative, work the same 15 single crochet stitches into the center of the loop and join in the same way.
Round 2: Establish the Five Star Points
In this round, create five groups of double crochet stitches separated by chain spaces. These spaces will become the tips of the star.
Round 2: Chain 3. Work 2 double crochet stitches into the same stitch as the joining slip stitch. Chain 2.
Skip the next 2 stitches, then work 3 double crochet stitches into the next stitch. Chain 2.
Repeat the sequence of skipping 2 stitches, working 3 double crochet stitches into the next stitch, and chaining 2 until you have five groups of 3 double crochet stitches, each separated by a chain-2 space.
Because the first group was made at the beginning of the round, you will need to finish the final repeat carefully so that the groups remain evenly spaced around the center. Join with a slip stitch to the top of the beginning chain-3.
You should have five groups of 3 double crochet stitches and five chain-2 spaces.
The chain-3 at the beginning counts as the first double crochet of the first group. Therefore, the first group contains the beginning chain-3 and 2 actual double crochet stitches.
Important: The spacing instructions in this round must be adjusted to the 15-stitch center so that five groups are distributed evenly. If you find that the groups do not align cleanly, do not force the final repeat. Undo the round and reposition the groups evenly around the center before continuing.
Round 3: Form the Five Points
This round transforms the five chain spaces into five star points.
Each point is worked into one chain-2 space. The sequence uses shorter stitches near the base and taller stitches near the tip, with a chain at the tip to sharpen the point.
Point sequence: Work 1 single crochet, 1 half double crochet, 1 double crochet, chain 2, 1 double crochet, 1 half double crochet, and 1 single crochet into the same chain-2 space.
To work the round:
- Join the yarn if you are changing colors, or begin with a slip stitch in the first chain-2 space.
- Work the complete point sequence into that chain-2 space.
- Slip stitch into the center double crochet of the next group of 3 double crochet stitches to form a valley.
- Work the complete point sequence into the next chain-2 space.
- Slip stitch into the center double crochet of the next group.
- Continue around the motif until all five chain spaces contain a point sequence.
After completing the fifth point, join with a slip stitch at the base of the first point.
You should have exactly five points, each with a chain-2 tip. The slip stitches between points form the valleys.
Round 4: Check and Refine the Outer Shape
The star is complete after Round 3. An additional round is not required for the basic design.
Lay the motif flat and inspect all five points. They should have similar lengths and widths, and the valleys should be visible between them.
If one point is noticeably larger than the others, check whether the point sequence was worked into the correct chain space. If a valley is too shallow, make sure the slip stitch was placed into the center double crochet between the two points.
Do not pull the yarn tightly when joining. Excessive tension can cause the center to curl or make the points fold inward.
8. Optional Border
A border can make the motif look more finished, especially when you plan to sew it onto a blanket or use it as an appliqué. However, a border is optional because the five points already have a defined edge.
To add a simple border:
- Join the border yarn at the base of one point.
- Work single crochet stitches evenly along the side of the point toward its tip.
- At the chain-2 tip, work 3 single crochet stitches into the chain space.
- Continue down the other side of the point.
- Work a slip stitch into the valley between the points.
- Repeat around all five points.
- Join with a slip stitch and fasten off.
Adjust the number of single crochet stitches along each side according to the spaces available. Avoid adding too many stitches, as this can make the edge ripple. If the border pulls the points inward, loosen your tension or remove the border.
9. Stitch Counts and Construction Reference
| Round | Main stitches | Expected count or structure | Purpose |
|---|---|---|---|
| Round 1 | Single crochet | 15 sc | Creates the center |
| Round 2 | Double crochet and chain spaces | Five groups of 3 dc and five chain-2 spaces | Establishes the five-point layout |
| Round 3 | sc, hdc, dc, ch 2, dc, hdc, sc | Five identical point sequences | Forms the five points and valleys |
| Optional border | Single crochet and slip stitch | Five bordered points | Refines the outer edge |
The essential count is five groups in Round 2 and five matching point sequences in Round 3. Keep the groups evenly distributed and check the shape before adding an optional border.
10. Color Changes and Variations
Single-color star
Use one yarn color for the entire motif. This makes the star quick to finish and highlights the shape created by the different stitch heights.
Contrasting center and points
Work the center in one color and the point round in another. Change colors at the start of Round 3, joining the new yarn into a chain space.
Two-color star
Use one color for the center and another for both the point round and optional border. Weave in the ends securely on the wrong side.
Seasonal colors
Choose metallic-effect yarn suitable for crochet, or use festive colors for holiday ornaments. Check that the yarn remains easy to work with and that the motif retains its shape.
Smaller star
Use finer yarn and a smaller hook to create a small motif for garlands, appliqués, or lightweight decorations. The stitch sequence remains the same.
When changing colors, complete the final pull-through of the joining slip stitch with the new color if you want a cleaner transition. Avoid leaving long loose ends on the back of the motif.
11. Finishing the Motif
When the star is complete, fasten off and leave a short tail for weaving in.
Thread the tail through a tapestry needle and weave it through several stitches on the wrong side. Change direction once or twice to help secure it, then trim the excess yarn.
Pull the center ring closed firmly, but do not distort the stitches around it.
Gently shape the five points with your fingers. If the star curls, use a blocking method suitable for your yarn fiber. Pin the points and valleys into shape on a suitable surface, following the yarn manufacturer’s care instructions.
Natural fibers and synthetic fibers may respond differently to heat and moisture, so avoid using high heat unless the yarn label specifically permits it. Let the motif dry completely before removing pins.
12. Troubleshooting Common Problems
| Problem | Likely cause | Practical correction |
|---|---|---|
| The star has fewer or more than five points | The point sequence was repeated the wrong number of times | Count the five chain spaces before beginning the point round. |
| The points are uneven | Stitches or spaces were skipped, or tension changed | Work the same sequence into every chain space and keep your tension consistent. |
| The valleys are too shallow | The slip stitches between points are missing or misplaced | Place one slip stitch into the center double crochet between adjacent point spaces. |
| The star curls inward | The center is too tight or the stitches are worked too firmly | Relax your tension and block the motif if suitable for the yarn. |
| The edges become wavy | Too many stitches were added in the optional border | Reduce the number of border stitches along the sides. |
| The center ring leaves a large hole | The ring was not tightened or the yarn tail was not secured | Pull the tail firmly and weave it in securely. |
| The motif looks too rounded | The points are not pronounced enough | Keep the chain-2 tip and use the full point sequence in each space. |
| The stitches become too tight | The hook may be too small or tension too firm | Try a larger hook or relax your grip. |
| The border distorts the points | Too many stitches were added at the tips or sides | Use only 3 sc at each tip and fewer stitches along the sides if needed. |
13. Joining Multiple Star Motifs
Crochet stars can be joined to create blankets, garlands, bunting, cushions, or decorative panels.
Before joining several motifs, make sure they are similar in size. If necessary, block them gently using a method suitable for the yarn. Consistent dimensions make it easier to align the points and valleys.
For a simple join, place two stars together and sew them along selected edges with a tapestry needle. Use small, even stitches and keep the yarn tension relaxed enough to avoid puckering.
You can also join motifs with slip stitches or single crochet along the edges. A crochet join creates a more visible seam and may add a decorative outline.
For a blanket or cushion, decide whether you want visible gaps between the stars or a close, continuous arrangement. Some projects may need a backing or lining, especially if the motifs have open spaces or are intended to contain stuffing.
For a garland, attach each star to a crocheted chain or a suitable cord. Secure the attachment points well so the stars hang evenly.
14. Compact Written Pattern
Materials: Medium-weight yarn, suitable crochet hook, scissors, tapestry needle, and optional stitch markers.
Round 1: Make a magic ring. Ch 1 and work 15 sc into the ring. Pull the ring closed and join with a sl st to the first sc.
Round 2: Ch 3 and work 2 dc into the same stitch. Ch 2. Work five evenly spaced groups of 3 dc, separated by ch-2 spaces, around the center. Join with a sl st to the top of the beginning ch-3.
Round 3: In each of the five chain-2 spaces, work 1 sc, 1 hdc, 1 dc, ch 2, 1 dc, 1 hdc, and 1 sc. Between points, sl st into the center dc of the next group. Repeat until all five points are complete.
Optional border: Work sc evenly along both sides of each point, 3 sc into each tip space, and a sl st into each valley. Join, fasten off, and weave in the ends.
Finish: Close the center ring, shape the five points, and block if appropriate for the yarn.
15. Frequently Asked Questions
1. Is this star motif suitable for beginners?
Yes. It uses basic crochet stitches and a repeated point sequence. Practice the stitches and counting first if you are new to crochet.
2. How many points does the pattern create?
The intended design has five points. The point round must be worked into five evenly spaced chain spaces.
3. How do I make all five points even?
Use the same stitch sequence in each space and maintain consistent tension. Check the motif before adding a border.
4. Can I crochet the star without a magic ring?
Yes. Chain 4 and join with a slip stitch to make a small loop, then work the center stitches into the loop.
5. How can I make the motif smaller or larger?
Change the yarn weight or hook size. For a consistent star shape, preserve the five-point construction and use the same sequence for each point.
6. Why does my star curl?
The center may be too tight, or your tension may be too firm. Check the stitches and consider gentle blocking suitable for your yarn.
7. Is blocking necessary?
Not always. Blocking can help the points and valleys lie flat, but it should be appropriate for the yarn fiber.
8. Can I use the motif in a blanket?
Yes. Crochet several stars, measure them for consistency, and join them with a tapestry needle or crochet seam.
9. How do I join several star motifs?
Align the points and valleys, then sew or crochet the edges together with even tension. Block or measure the motifs first if their sizes vary.
10. Which yarn works best for a defined star shape?
Smooth medium-weight yarn is a good starting choice. Choose a hook that produces a firm fabric without making the stitches too tight.
16. Conclusion
A crochet star motif is a small, satisfying project that can become part of many larger creations. With five evenly spaced points, a neat center, and a clean finish, your star can be used for decorations, blankets, garlands, and more. Try different yarn colors and sizes to create a collection of stars that suits your own crochet style.
Leave a Comment