
A slip knot is one of the first skills to learn when starting crochet. It creates an adjustable loop that fits onto your crochet hook and provides a starting point for many crochet projects. Once you understand how to make one, you’ll be ready to practice your first chain stitches and begin exploring crochet.
In this beginner-friendly tutorial, you’ll learn how to make a slip knot step by step, adjust its size, place it correctly on your hook, and fix common mistakes.
1. Tutorial Overview
- Skill: Making a crochet slip knot
- Skill level: Beginner
- Approximate learning time: 5–10 minutes, although beginners may need extra practice
- Materials: Smooth yarn and a suitable crochet hook
- What you’ll learn: Creating the loop, forming the knot, adjusting its size, and preparing to crochet
- Finished result: An adjustable loop that sits comfortably around the crochet hook
You do not need to know any crochet stitches before learning this technique. A little patience and a few repetitions are enough to get started.
2. Materials Needed
You only need two basic supplies.
- Yarn: Choose smooth, medium-weight yarn in a light or bright color. Smooth yarn makes it easier to see the strands and understand how they cross.
- Crochet hook: Choose a hook appropriate for your yarn. A hook around 5 mm is a practical starting point for many medium-weight yarns.
Scissors are optional. You do not need them to make the slip knot itself.
For your first attempts, avoid very fuzzy, slippery, or extremely thin yarn because it can be harder to see and control.
3. Understanding the Slip Knot
A slip knot is an adjustable knot that creates a loop. Unlike an ordinary fixed knot, its loop can become larger or smaller when you pull the appropriate strand of yarn.
When crocheting, the loop sits on your hook. It should be secure enough to stay in place but loose enough for the hook to move smoothly.
Before beginning, learn these two important terms:
- Working yarn: The strand connected to the ball or skein of yarn. You will use this strand to make your crochet stitches.
- Yarn tail: The short, loose end of yarn that does not lead to the ball.
Keep these strands separate in your mind as you work. Knowing which strand is which will help you form the knot correctly and adjust the loop without confusion.
4. Step-by-Step Instructions: How to Make a Slip Knot
Follow these steps slowly the first few times. You can make the knot using only your fingers before placing it on your crochet hook.
Step 1: Prepare the Yarn
Pull a short length of yarn from the ball and let the loose end hang freely.
Leave approximately 4–6 inches of yarn for the tail. This gives you enough yarn to hold comfortably while forming the knot.
Identify the working yarn leading to the ball and the yarn tail. Hold the two strands gently so you can move them without pulling the yarn tight.
Step 2: Make a Loop
Keep the yarn crossing loose enough to see clearly.
- Hold the yarn tail in one hand and the working yarn in the other.
- Bring the yarn tail across the front of the working yarn to create a loop.
- Let the tail cross over the working yarn, forming a clear crossing point.
- Hold that crossing point between your fingers so the loop does not fall apart.
You should now have a loop with two strands crossing near its base. Keep the loop open rather than tightening it.
Step 3: Pull a Strand Through the Loop
- Keep holding the crossing point firmly but gently.
- Reach through the original loop with your fingers.
- Grab a small section of the working yarn, the strand connected to the ball.
- Pull that section back through the original loop to create a new loop.
Do not pull the entire working strand through. You only need to draw a small section through so it forms a new loop.
The original loop should remain around the base of the new loop. If the crossing point starts to loosen, pause and reposition your fingers before continuing.
Step 4: Form the Slip Knot
Hold the new loop with one hand and gently pull the yarn tail with the other.
The original loop will tighten around the base of the new loop, creating the knot. Keep holding the new loop so it does not disappear while the knot forms.
You should now see:
- One adjustable loop at the top.
- A small knot directly beneath the loop.
- Two strands extending from the knot: the working yarn and the yarn tail.
The loop should not be completely closed. If it becomes too small, gently pull the working yarn to enlarge it again.
Step 5: Place the Loop on the Crochet Hook
- Hold your crochet hook in your dominant hand.
- Slide the adjustable loop over the hook head and onto the shaft.
- Hold the working yarn and yarn tail separately.
- Gently pull the working yarn to make the loop smaller around the hook.
- Stop when the loop rests comfortably around the shaft.
The loop should fit close to the hook without squeezing it tightly. You should be able to move the hook inside the loop without struggling.
If the loop is too loose, gently adjust it using the working yarn. If it is too tight, relax the tension and enlarge it slightly.
Step 6: Check the Finished Slip Knot
Before making your first chain stitch, check the knot carefully.
- Make sure the loop is around the shaft of the hook, not caught tightly around the hook head.
- Check that the knot sits just below the loop.
- Move the hook gently inside the loop.
- Adjust the loop until it slides comfortably without falling off.
- Confirm that you can identify the working yarn and the yarn tail.
Your slip knot is ready when the loop stays on the hook but remains adjustable.
Remember: The slip knot itself is generally not counted as a chain stitch in standard beginner crochet instructions. The chain stitches begin when you yarn over and pull through the loop on your hook.
5. An Alternative Slip Knot Method: Using Your Fingers
If the first method feels awkward, try forming the loop around your fingers. This is another way to make an adjustable slip knot.
- Hold the yarn tail in one hand, leaving several inches free.
- Wrap the working yarn loosely around two fingers to form a loop.
- Cross the working yarn over the tail near the point where the strands meet.
- Use your free fingers to reach through the loop and catch a small section of the working yarn.
- Pull that section through the original loop to form a new loop.
- Slide the loop off your fingers while holding the new loop securely.
- Gently pull the yarn tail to tighten the knot beneath the new loop.
- Place the new loop onto your crochet hook and adjust it with the working yarn.
The result should be an adjustable loop with a small knot below it. If the loop closes completely and cannot be enlarged again, loosen it and try once more.
Both methods produce the same basic result. Choose whichever method feels more comfortable after practicing.
6. Common Slip Knot Mistakes and How to Fix Them
The loop falls apart before the knot forms
Likely cause: You are not holding the crossing point securely enough.
How to fix it: Hold the crossing point between your thumb and index finger while pulling the new loop through. Keep the original loop open until the knot begins to form.
The knot becomes too tight
Likely cause: You pulled the yarn tail too firmly or tightened the loop before placing it on the hook.
How to fix it: Loosen the knot gently and adjust the loop after placing it on the hook. Aim for a comfortable fit rather than a tight knot.
The loop is too large around the hook
Likely cause: You have not adjusted the loop enough after placing it on the hook.
How to fix it: Hold the hook steady and gently pull the working yarn until the loop sits closer to the shaft. Avoid pulling so hard that the loop becomes difficult to move.
The knot will not tighten or loosen smoothly
Likely cause: The strands may be twisted, crossed incorrectly, or caught tightly against each other.
How to fix it: Remove the knot and start again. Keep the crossing point visible and form a new loop by pulling a section of the working yarn through the original loop.
You pull the yarn tail instead of the working yarn
Likely cause: The two strands are difficult to distinguish.
How to fix it: Follow the working yarn back to the ball before adjusting the loop. Use the working yarn to make the loop smaller around the hook, and use the tail to help tighten the knot beneath it.
The yarn strands become twisted or tangled
Likely cause: The strands have crossed several times while you were forming the loop.
How to fix it: Let the yarn relax, separate the working yarn from the tail, and recreate one clear crossing point. Avoid wrapping the yarn repeatedly around your fingers.
You accidentally make a fixed knot
Likely cause: The loop was tightened completely, or the wrong strand was pulled through.
How to fix it: Undo the knot and repeat the steps, making sure you pull a section of the working yarn through the original loop to create the adjustable loop.
The yarn slips out while placing the loop on the hook
Likely cause: The loop is too loose or you are not holding it securely.
How to fix it: Hold the new loop between your fingers while sliding it onto the hook. Adjust it gently once the loop is sitting on the shaft.
7. How Tight Should a Slip Knot Be?
A slip knot should be snug enough to stay on your crochet hook but loose enough to slide along the shaft without resistance.
If the loop is too tight, the hook will struggle to move through it, and making the first chain stitches can become frustrating. If the loop is too loose, it may slip off the hook or become difficult to control.
Try this simple test:
- Place the loop on your hook.
- Hold the working yarn and tail gently.
- Move the hook slightly inside the loop.
- Check that the loop can become smaller or larger with a gentle adjustment.
- Stop tightening when the loop rests comfortably against the hook shaft.
You do not need to pull the knot as tightly as possible. Good crochet tension comes from keeping the yarn controlled while allowing the hook to move freely.
8. What Comes After the Slip Knot?
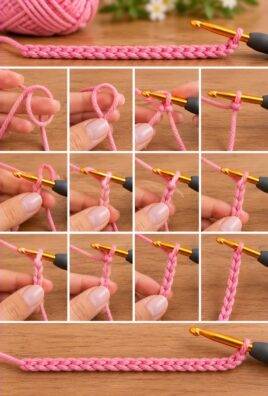
Once the slip knot is on your hook, the next common step is making a starting chain.
The starting chain creates a foundation for many crochet patterns. To make the first chain stitch:
- Hold the crochet hook with the slip knot resting on its shaft.
- Bring the working yarn over the hook. This movement is called a yarn over.
- Use the hook to catch the working yarn.
- Pull the yarn through the loop already on the hook.
You have now made your first chain stitch. The original slip knot remains below it and is not usually counted as a chain stitch.
Continue making chain stitches by repeating the yarn-over and pull-through movement.
Many beginner patterns start with a slip knot and a foundation chain. However, not every crochet technique begins this way; some methods start with a ring or another foundation.
9. Practice Exercise for Beginners
The easiest way to become comfortable with a slip knot is to repeat the process a few times before starting a larger crochet project.
Try this simple exercise:
- Take your smooth yarn and make one slip knot using the main method.
- Place the loop on your crochet hook.
- Adjust the loop until it fits comfortably around the hook shaft.
- Loosen and tighten the loop gently to understand how it behaves.
- Remove the loop from the hook and undo the knot.
- Repeat the process five to ten times, or until the hand movements begin to feel natural.
Do not worry if the first few attempts are awkward. Your fingers are learning to coordinate the yarn strands, loop, and hook. Slow, careful practice is more helpful than pulling the yarn tightly or rushing through the steps.
10. Frequently Asked Questions
1. What is a slip knot in crochet?
A slip knot is an adjustable knot that forms a loop for your crochet hook. It is commonly used as the starting point for a foundation chain and many beginner crochet projects.
2. Is a slip knot necessary for every crochet project?
No. Many crochet projects begin with a slip knot, but some techniques begin with a magic ring or another starting method. Follow the instructions for your chosen pattern.
3. Does the slip knot count as the first chain stitch?
Usually, no. The slip knot is the starting loop on your hook. The first chain stitch is made when you yarn over and pull the working yarn through that loop.
4. Which yarn strand should I pull to tighten the loop?
Use the working yarn, the strand connected to the ball, to adjust the loop around the hook. Pull the yarn tail gently when you need to tighten the knot beneath the loop.
5. How tight should the slip knot be around the hook?
It should be snug but not tight. The hook should move freely inside the loop, and you should be able to adjust the loop without struggling.
6. Why does my slip knot keep coming undone?
The crossing point may not be held securely, or the new loop may not have been pulled through correctly. Hold the crossing point firmly and pull a small section of the working yarn through the original loop before tightening the knot.
7. Can I make a slip knot without a crochet hook?
Yes. You can form the slip knot using your fingers, then place the adjustable loop on your hook. You only need the hook when you are ready to begin crocheting.
8. What is the difference between a slip knot and a slip stitch?
A slip knot is an adjustable starting knot used to place a loop on your hook. A slip stitch is an actual crochet stitch made by inserting the hook into a stitch or space, catching the yarn, and pulling it through the fabric and the loop on the hook.
9. Can I undo a slip knot after making it?
Yes. A slip knot is adjustable and can usually be loosened and undone by relaxing the loop and pulling the appropriate strand. If it becomes tangled or fixed too tightly, it may be easier to start again.
10. What should I learn after making a slip knot?
The next useful skill is the chain stitch. After that, practice single crochet, double crochet, and slip stitches. These basic techniques will help you understand many beginner crochet patterns.
Conclusion
Learning how to make a slip knot is a small but important first step in crochet. Remember to keep track of the working yarn and yarn tail, form the adjustable loop carefully, and avoid tightening it too much around the hook.
Practice slowly until the movement feels comfortable. Once you can make and adjust a slip knot confidently, you are ready to begin your first chain stitches and continue learning crochet one step at a time.
Leave a Comment