
Crochet is a relaxing, creative craft that allows you to turn a strand of yarn into useful and beautiful items using just a hook and a few basic techniques. If you have never crocheted before, you can start with a simple chain, learn a few stitches, and gradually build your skills until you can make small projects of your own.
Unlike knitting, which typically uses two needles and several active loops, crochet generally uses one hook and works with one active loop at a time. You pull yarn through loops to create stitches, building a fabric row by row or round by round.
Your first stitches may look uneven, your chain may be too tight, or you may lose track of where a row begins. These are normal parts of learning. You do not need perfect stitches on your first day. The goal is to become comfortable holding the hook, controlling the yarn, and recognizing the basic shapes of crochet stitches.
In this tutorial, you will learn how to choose your supplies, hold the hook and yarn, make a slip knot and chain, crochet the essential stitches, read simple written patterns, count stitches, correct common mistakes, and complete your first small crochet project.
1. What You Need to Start Crocheting
You do not need many supplies to begin. A few basic tools are enough for your first practice session.
- Smooth, light-colored yarn: Choose yarn that makes the stitches easy to see.
- Medium-weight yarn: Worsted-weight yarn, often labeled medium or category 4, is a practical starting choice.
- Crochet hook: Try a 5 mm or 5.5 mm hook, depending on the yarn label.
- Small scissors: Use these to cut the yarn when finishing.
- Blunt-tip yarn needle: This helps you hide loose yarn ends inside the finished fabric.
- Ruler or measuring tape: Use it to measure your practice piece.
- Stitch markers: These are optional clips or markers that help identify important stitches.
Why smooth, medium-weight yarn is a good choice
Smooth yarn makes it easier to see the small V-shaped loops that form each stitch. Medium-weight yarn is usually thick enough to handle comfortably without being as bulky as very thick yarn.
Very thin yarn can make the stitches difficult to see and may require more precise movements. Dark yarn can hide stitch details, while fuzzy or novelty yarn can make it harder to identify where the hook should enter.
For your first project, choose a smooth yarn in a light or medium shade. You can experiment with textured and darker yarns after you become more familiar with the stitches.
Understanding yarn weight, fiber, and hook size
Yarn weight refers to the thickness category of the yarn. Lightweight yarn is thinner, while bulky yarn is thicker. Worsted weight is a medium category commonly used for practice projects.
Fiber content describes the material used to make the yarn. Common options include acrylic, cotton, wool, and blends. Acrylic is widely available, cotton is often used for household items, and wool blends contain wool combined with another fiber. The best choice depends on the project and the yarn’s care instructions.
Hook size refers to the size of the hook, usually given in millimeters. A yarn label often suggests a suitable hook size. Treat that suggestion as a starting point rather than a strict rule because your tension and the fabric you want to create also matter.
2. Understanding Crochet Hooks and Yarn
The main parts of a crochet hook
- Hook tip: The curved end that catches the yarn.
- Throat: The part that guides the yarn into and through loops.
- Shaft: The section that determines the size of the loops as you work.
- Grip or handle: The part you hold in your hand.
Hooks can be made from aluminum, plastic, wood, or other materials. Aluminum hooks often feel smooth, while plastic hooks may feel lighter. Ergonomic hooks have shaped handles designed to offer a different grip. There is no single best material for everyone; choose one that feels comfortable in your hand.
Common yarn fibers
- Acrylic: Often available in a wide range of colors and yarn weights.
- Cotton: Frequently used for items such as dishcloths and coasters.
- Wool and wool blends: Common choices for warm accessories and garments.
Different yarns can behave differently, so check the label for care instructions and recommended hook sizes.
Finding the end of the yarn
The strand you crochet with is called the working yarn. It leads back to the ball or skein. The yarn tail is the loose end left when starting or finishing a project.
Find one end of the yarn and pull a short length free. If the yarn tangles or the ball begins rolling around, place it in a bowl or bag so it can feed out more easily. Pull enough yarn to work comfortably, but avoid pulling out a very long length that may tangle.
3. How to Hold the Crochet Hook
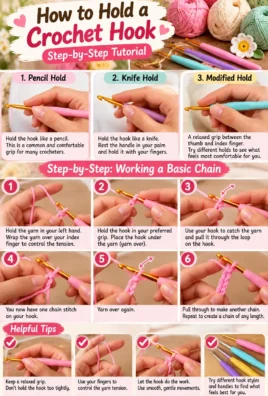
There are two common ways to hold a crochet hook: the pencil grip and the knife grip. Neither is universally correct.
The pencil grip
Hold the hook much as you might hold a pencil. Rest the handle between your fingers and use your thumb and index finger to guide it. This position may feel natural if you are accustomed to writing with a pencil.
The knife grip
Hold the hook more like a table knife. Your hand rests over the handle, and your fingers guide the hook from above.
Find a comfortable position
- Hold the hook in your preferred hand.
- Rest your thumb and index finger near the grip area.
- Keep your wrist relaxed rather than sharply bent.
- Allow the hook to rotate slightly as you catch and pull the yarn.
- Try both grips for a few minutes and choose the one that gives you control without discomfort.
Avoid squeezing the hook too tightly. A firm but relaxed grip makes it easier to move the hook through loops. If your hand becomes uncomfortable, pause, relax your fingers, and take a short break.
4. How to Hold and Control the Yarn
Your other hand guides the yarn and helps regulate tension.
Tension is how tightly or loosely you hold the working yarn while making stitches. Consistent tension helps your stitches look similar in size.
A beginner-friendly method is to hold the working yarn between the fingers of your non-hook hand and guide it toward the hook. You can let it pass over one finger and between others, or use another arrangement that feels natural.
Try this:
- Hold the starting loop or chain with your thumb and middle finger.
- Guide the working yarn with your index finger.
- Let the yarn slide through your fingers as you crochet.
- Adjust your finger position if the yarn feels too loose or too tight.
- Keep your hand relaxed so the yarn can move smoothly.
If the stitches are difficult to work into, you may be holding the yarn too tightly. If the loops are enormous and hard to control, you may need a little more tension. Do not try to solve these problems by squeezing harder. Small adjustments and practice are more effective.
5. How to Make a Slip Knot
A slip knot creates the starting loop that sits on your crochet hook. It is not normally counted as a completed crochet stitch.
- Leave a yarn tail several inches long.
- Make a loop by crossing one part of the yarn over the other.
- Reach through the loop and pull a section of yarn through it to form a second loop.
- Place the new loop onto your crochet hook.
- Gently pull the yarn tail and working yarn to tighten the knot around the hook.
The loop should be secure but not tight. You should be able to move it along the shaft of the hook without forcing it.
Different slip-knot methods exist, but this version is enough to get started.
6. How to Make a Chain Stitch
The chain stitch is abbreviated as ch. Chains are used to begin many crochet projects and to create spaces between stitches.
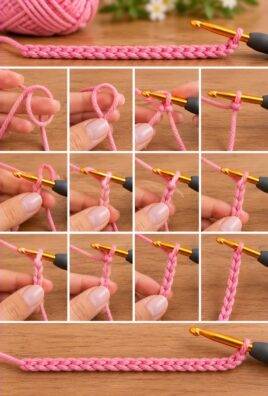
Make your first chain
- Place the slip knot on the hook.
- Hold the hook comfortably and guide the working yarn with your other hand.
- Bring the working yarn over the hook. This movement is called a yarn over.
- Rotate the hook slightly so it catches the yarn.
- Pull the caught yarn through the loop already on the hook.
- You have made one chain stitch.
- Repeat the yarn-over and pull-through movement to make more chains.
Each completed chain forms a small V-shaped link. The loop remaining on the hook is the active loop and does not count as a chain stitch.
Practice exercise: Chains of 10 and 20
First, make a chain of 10 stitches. Count the V-shaped links below the active loop. Then make a second chain of 20 stitches.
Do not worry if the chains look uneven. Focus on keeping the loops similar in size and leaving enough room for the hook to move comfortably.
Fixing common chain problems
- Too tight: Relax the hand guiding the yarn. Try making each loop a little larger.
- Too loose: Hold the yarn with slightly more control and avoid pulling up oversized loops.
- Twisted: Lay the chain flat and check that the V-shaped links face the same way. A chain may twist as you work, so reposition it gently.
- Uneven: Slow down and aim for a consistent loop size. A few practice chains are often more useful than trying to perfect the first one.
7. How to Insert the Hook into a Stitch
Before learning more stitches, you need to know where to place the hook.
A completed crochet stitch usually has a small V shape at its top. These two strands are often called the top loops.
Depending on the pattern, you may be asked to work:
- Into a stitch: Insert the hook beneath the specified top loops of a completed stitch.
- Into a chain space: Insert the hook into the opening formed by chain stitches.
- Around part of a stitch: Some patterns ask you to work around a post or another section of a stitch rather than through its top loops.
For the beginner stitches in this tutorial, you will usually insert the hook under the top loops of a stitch or into a chain as directed.
Look carefully before inserting the hook. Push the hook through the opening rather than splitting the yarn strands. If the hook catches only part of the yarn, withdraw it gently and try again.
The pattern’s instructions determine the insertion point. Working into the wrong place can change the stitch count and the shape of your fabric.
8. How to Make the Single Crochet Stitch
The single crochet stitch, abbreviated as sc, is one of the most useful basic stitches in US crochet. It creates a relatively short, compact fabric and is a good first stitch to practice after the chain.
Step-by-step single crochet
- Make a foundation chain of the required length.
- Insert the hook into the second chain from the hook. Do not count the active loop on the hook as a chain.
- Yarn over and pull the yarn through the chain. You should now have two loops on your hook.
- Yarn over again.
- Pull the yarn through both loops.
- You have completed one single crochet stitch.
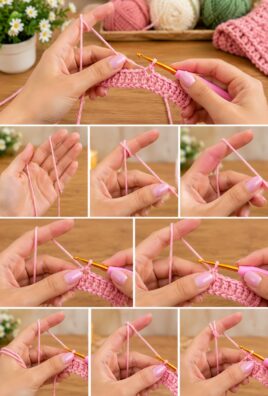
- Insert the hook into the next chain and repeat until you reach the end.
Practice exercise: Make 10 single crochet stitches
- Make a chain of 11 stitches.
- Insert the hook into the second chain from the hook.
- Work one single crochet in that chain.
- Work one single crochet in each remaining chain.
- When you reach the end, count the stitches across the row.
You should have 10 single crochet stitches. The starting chain does not count as a single crochet stitch in this exercise.
Start a second row
- Chain one.
- Turn your work so the other side faces you.
- Find the first single crochet stitch at the edge of the row.
- Work one single crochet into that first stitch.
- Work one single crochet into each remaining stitch across the row.
You should have 10 single crochet stitches again. The chain-one turning chain is not counted as a stitch.
At the end of every row, count the top V-shaped loops. If you have 10, your row is correct. Repeat the process for a few rows, checking that the edges stay straight.
9. How to Make the Half Double Crochet Stitch
The half double crochet stitch, abbreviated as hdc, is taller than single crochet but shorter than double crochet. It is useful when you want a fabric with a little more height.
Step-by-step half double crochet
- Make a foundation chain.
- Yarn over once.
- Insert the hook into the third chain from the hook.
- Yarn over and pull up a loop. You should now have three loops on the hook.
- Yarn over again.
- Pull the yarn through all three loops at once.
- You have completed one half double crochet stitch.
Repeat the steps in the next chain.
Practice exercise: Make 9 half double crochet stitches
- Make a chain of 11 stitches.
- Yarn over once.
- Insert the hook into the third chain from the hook.
- Complete one half double crochet.
- Work one half double crochet into each remaining chain.
You should have 9 half double crochet stitches in the first row. For this exercise, the initial two chains provide the starting height but do not count as a stitch.
Start the next row
- Chain two.
- Turn your work.
- Work the first half double crochet into the first stitch of the previous row.
- Work one half double crochet into each remaining stitch across.
- Count your stitches at the end of the row.
You should have nine half double crochet stitches. In this exercise, the turning chain is not counted as a stitch, so the first stitch of the new row is worked directly into the first stitch of the previous row.
Turning-chain conventions vary between patterns. Some patterns count the turning chain as a stitch; others do not. Always follow the convention stated in the pattern and use it consistently.
10. How to Make the Double Crochet Stitch
The double crochet stitch, abbreviated as dc in US terminology, is taller than single crochet and half double crochet. It creates a more open fabric and is used in many projects, including granny squares and blankets.
Step-by-step double crochet
- Make a foundation chain.
- Yarn over once.
- Insert the hook into the fourth chain from the hook.
- Yarn over and pull up a loop. You should now have three loops on the hook.
- Yarn over and pull through the first two loops. Two loops remain.
- Yarn over again and pull through the remaining two loops.
- You have completed one double crochet stitch.
Practice exercise: Make 9 double crochet stitches
- Make a chain of 12 stitches.
- Yarn over.
- Insert the hook into the fourth chain from the hook.
- Complete one double crochet.
- Work one double crochet into each remaining chain.
You should have 9 double crochet stitches. In this exercise, the first three chains provide the starting height and are not counted as a stitch.
Start the next row
- Chain three.
- Turn your work.
- Work the first double crochet into the first stitch of the previous row.
- Work one double crochet into each remaining stitch.
- Count the stitches at the end.
You should have nine double crochet stitches. The chain-three turning chain is not counted as a stitch in this exercise.
This is one common way to work double crochet rows, but some patterns count the turning chain as a stitch. If a pattern says that the turning chain counts, the placement of the first stitch will be different.
11. Other Useful Beginner Techniques
Once you understand the chain, single crochet, half double crochet, and double crochet, a few additional techniques will help you complete projects.
Slip stitch (sl st)
A slip stitch is short and is often used to join rounds or move across stitches without adding much height.
- Insert the hook into the specified stitch or space.
- Yarn over.
- Pull the yarn through the stitch or space and through the loop already on the hook.
You should have one active loop remaining.
Turning the work
At the end of a row, a pattern may tell you to turn. This means flipping the crochet fabric so you can work back across it. Most flat beginner projects use a turning chain before the next row.
Fastening off
When your project is complete:
- Cut the yarn, leaving a tail several inches long.
- Pull the cut end through the active loop.
- Pull gently to secure it.
Do not cut the yarn before leaving a tail long enough to weave in.
Weaving in yarn ends
Thread the tail through a yarn needle. Pass the needle through several stitches on the back of the fabric, then change direction where possible. Pull the tail snugly without gathering the fabric. Trim the excess yarn after it is secure.
Joining yarn
When you run out of yarn or want to change colors, attach a new strand at the point specified by your pattern. A simple method is to make a loop with the new yarn, place it on the hook, and complete the next stitch with it. Leave tails long enough to weave in securely.
12. How to Read a Written Crochet Pattern
Crochet patterns use abbreviations to keep instructions short. Learning a few common terms will help you understand many beginner patterns.
- ch: Chain
- sc: Single crochet
- hdc: Half double crochet
- dc: Double crochet
- sl st: Slip stitch
- st: Stitch
- sts: Stitches
- rep: Repeat
- sk: Skip
- sp: Space
- RS: Right side, the side intended to face outward
- WS: Wrong side, the opposite side
This tutorial uses US crochet terminology. UK terminology uses some of the same names for different stitches, so check which system a pattern follows before starting.
Understanding common pattern symbols and wording
- Asterisks: An asterisk often marks the beginning of a section that must be repeated.
- Parentheses: Parentheses may group instructions or show a stitch count.
- Brackets: Brackets can group a set of instructions that must be repeated or clarify a sequence.
- “Repeat across”: Work the specified stitch or sequence in every appropriate stitch or space until you reach the end of the row.
The exact meaning of symbols can vary between designers, so read the pattern’s notes before you begin.
Example: “Ch 1, turn, sc in each st across”
This instruction means:
- Make one chain stitch.
- Flip your work to face the opposite direction.
- Work one single crochet into the first stitch.
- Work one single crochet into every remaining stitch across the row.
If your previous row contains 20 stitches and the turning chain does not count as a stitch, you should finish with 20 single crochet stitches.
13. Counting Stitches and Keeping Straight Edges
Stitch counting is especially important when making rectangular practice pieces. If you skip a stitch at the beginning or end of a row, your project may become narrower. If you accidentally work two stitches into one stitch, it may become wider.
How to count stitches
Look at the top edge of your row. Each completed stitch usually forms a V-shaped pair of loops. Count each V as one stitch.
Do not count the active loop on your hook. In the practice exercises in this tutorial, turning chains are not counted as stitches.
Finding the first and last stitch
The first stitch can be difficult to see because it sits close to the turning chain. The last stitch may also be easy to miss at the far edge.
After turning, look for the first V-shaped stitch immediately beside the turning chain. At the end of the row, check the final stitch before the edge. If needed, place a stitch marker in the first or last stitch to make it easier to recognize.
Example: Keeping a swatch the same width
Suppose you begin with 20 single crochet stitches.
- Row 1: 20 single crochet stitches.
- Row 2: 20 single crochet stitches.
- Row 3: 20 single crochet stitches.
- Row 4: 20 single crochet stitches.
Every row should contain 20 stitches. If you count 19, you may have skipped one. If you count 21, you may have worked an extra stitch.
Count each row until you can reliably identify the first and last stitches without assistance.
14. Understanding Gauge and Finished Size
Gauge means the number of stitches and rows within a measured area of crochet fabric. For example, a pattern might specify how many stitches and rows should fit within a 4-inch square.
Gauge matters most for projects that need a particular size, such as fitted garments, hats, and blankets with specific dimensions. For a practice swatch, matching a precise gauge is less important than learning to make consistent stitches.
How to check gauge
- Crochet a small swatch using the yarn, hook, and stitch specified by your pattern.
- Lay it flat without stretching it.
- Measure the number of stitches across a known width.
- Measure the number of rows across a known height.
- Compare your measurements with the pattern’s gauge, if one is provided.
If your stitches are too tight and your swatch is smaller than expected, try a larger hook. If your stitches are too loose and the swatch is larger than expected, try a smaller hook. Make another swatch to check the result.
Yarn weight, hook size, stitch type, and personal tension all affect the finished dimensions.
A simple estimate for fabric width is:
Estimated fabric width ≈ number of stitches across multiplied by the average width of one stitch.
This is a planning guide, not a guarantee. Measure your actual fabric whenever the final size matters.
15. First Complete Beginner Project: A Small Crochet Square
Now that you have learned the basic stitches, it is time to put them together in a simple project. This small square uses only single crochet stitches, so you can concentrate on keeping your stitch count consistent and learning to turn your work.
Project details
- Skill level: Absolute beginner
- Stitch used: US single crochet
- Estimated finished size: Approximately 4–5 inches wide, depending on yarn, hook, tension, and row count
- Construction: Worked back and forth in rows
- Goal: Practice making straight edges and a consistent fabric
Materials
- Smooth worsted-weight yarn in a light color
- 5 mm or 5.5 mm crochet hook, depending on the yarn label
- Scissors
- Blunt-tip yarn needle
- Ruler or measuring tape
Step 1: Make the foundation chain
- Make a slip knot and place it on your hook.
- Chain 21 stitches.
- Count the 21 V-shaped chain links below the active loop.
This foundation chain will produce 20 single crochet stitches in the first row because you will skip the first chain nearest the hook.
Step 2: Work Row 1
- Insert your hook into the second chain from the hook.
- Work one single crochet stitch.
- Work one single crochet into each remaining chain.
- Continue until you reach the end of the foundation chain.
Row 1 count: 20 single crochet stitches.
Count the stitches before continuing. If you have fewer or more than 20, check whether you skipped a chain or accidentally worked twice into one chain.
Step 3: Work Row 2
- Chain one.
- Turn your work.
- Insert the hook into the first single crochet stitch of the previous row.
- Work one single crochet.
- Work one single crochet into every remaining stitch across the row.
- Count the stitches before starting the next row.
Row 2 count: 20 single crochet stitches.
The chain-one turning chain does not count as a stitch. Work into the first stitch rather than skipping it.
Step 4: Work the remaining rows
Repeat the same process for Rows 3 through 20:
- Chain one.
- Turn your work.
- Work one single crochet into the first stitch.
- Work one single crochet into every remaining stitch.
- Confirm that the row contains 20 single crochet stitches.
For this project, use the same instructions for every row. Do not add or remove stitches at the edges.
After Row 20, lay the piece flat and compare its width and height. If it is not quite square, continue adding rows one at a time until the height is close to the width. Each additional row must still contain 20 single crochet stitches.
The number of rows is a guide rather than a guaranteed measurement, because stitch height and width vary between crocheters.
Step 5: Finish the square
- After your final row, cut the yarn, leaving a tail several inches long.
- Pull the cut end through the active loop.
- Tighten gently to secure the yarn.
- Thread the tail through your yarn needle.
- Weave the tail through several stitches on the back of the square.
- Secure and weave in the starting tail in the same way.
- Trim the excess yarn without cutting into the stitches.
- Lay the square flat and measure its width and height.
Your first square is complete. Small variations in stitch size or edge shape are normal. The important achievement is learning to create a fabric with a consistent stitch count.
16. Common Beginner Mistakes and How to Fix Them
Mistakes are part of learning crochet. You can usually correct them by identifying where the problem began and carefully undoing a few stitches.
The starting chain is too tight
Likely cause: You are pulling the yarn too firmly after every chain stitch.
Solution: Relax the hand controlling the yarn and allow the hook to create a slightly larger loop. If necessary, make a new foundation chain rather than struggling with one that is difficult to insert the hook into.
The fabric curls at the edges
Likely cause: The stitches may be too tight, or you may have missed stitches near the edges.
Solution: Count the stitches in each row. If the count is correct, try loosening your tension or using a slightly larger hook.
The project becomes wider or narrower
Likely cause: You may be adding extra stitches or missing the first or last stitch of a row.
Solution: Count each row. If the number changes unexpectedly, inspect the edges and correct the row where the count first changed.
Stitches are difficult to identify
Likely cause: Your yarn may be dark, fuzzy, or textured, or your stitches may be too tight.
Solution: Practice with smooth, light-colored yarn. Look for the V-shaped top loops and use a stitch marker to identify the first or last stitch.
The hook splits the yarn
Likely cause: The hook tip is passing through the individual strands rather than through the stitch opening.
Solution: Withdraw the hook gently, find the correct opening, and insert it again. Guide the hook through the stitch rather than forcing it.
Loops keep slipping off the hook
Likely cause: The active loop may be too large, or the hook is moving in a way that allows the yarn to slide off.
Solution: Keep the active loop comfortably around the shaft and rotate the hook slightly when pulling yarn through. Avoid making the loop so tight that the hook cannot move.
Stitches are too tight to work into
Likely cause: You may be pulling the yarn too tightly after each stitch.
Solution: Allow the loops to rest on the shaft instead of tightening them against the narrow throat. If the fabric remains too tight, try a larger hook.
The fabric has large gaps
Likely cause: Your loops or chain stitches may be too loose, or the hook may be large relative to the yarn.
Solution: Practice keeping loops a consistent size. If the fabric is still too open for your intended project, try a smaller hook and make another sample.
The stitch count changes unexpectedly
Likely cause: A stitch may have been skipped, or you may have worked two stitches into the same stitch by mistake.
Solution: Stop and count the current row. If the count is wrong, undo the stitches to the point where the mistake occurred and work them again.
The finished piece looks uneven
Likely cause: Your tension may change as you work, or the edges may contain missed or extra stitches.
Solution: Count every row, maintain a relaxed grip, and measure the piece periodically. Minor unevenness may improve with practice, but blocking will not correct a wrong stitch count.
The slip knot or first loop becomes too tight
Likely cause: You have tightened the knot or active loop excessively.
Solution: Gently loosen the loop so it can slide along the hook. If the slip knot is too tight to adjust, remove it and make another one.
The yarn tangles while working
Likely cause: Too much yarn may have been pulled out of the ball, or the ball may be rolling and twisting.
Solution: Pull out shorter lengths as needed. Place the ball in a bowl or bag to keep it stable, and pause occasionally to let twists work themselves out.
Remember that undoing a few stitches is normal. It is often easier to correct a mistake immediately than to continue building rows on top of it.
17. How to Fix Mistakes and Undo Stitches
Undoing stitches is often called frogging. It allows you to return to an earlier point when you notice a mistake.
How to undo a few stitches
- Stop crocheting and identify the active loop on your hook.
- Remove the hook carefully without pulling the loop through the fabric.
- Hold the fabric and pull the working yarn gently to open the most recent stitch.
- Continue pulling the yarn one stitch at a time until you reach the place you want to correct.
- Stop and check the remaining stitches.
- Place the active loop back onto the hook without twisting it.
- Resume crocheting from that point.
Pull gently rather than yanking the yarn. If the strand catches, look for a loop that has become tangled around another stitch and release it carefully.
What if you drop the active loop?
If the active loop slips off the hook, do not pull the working yarn. Find the loop and place it back on the hook. Check that it is not twisted and that it remains connected to the working yarn.
If you need to set the project down, leave the hook in the active loop or use a stitch marker to secure the loop temporarily. This helps prevent the fabric from unraveling accidentally.
18. Building Confidence Through Practice
You do not have to learn every stitch in one sitting. A short, focused practice session can be more manageable than trying to master everything at once.
A flexible five-session practice plan
1
Get comfortable with the hook and yarn
Practice holding the hook, guiding the working yarn, making slip knots, and creating chains of 10 and 20 stitches.
2
Practice single crochet
Make several short rows and count every stitch. Focus on finding the first and last stitches.
3
Try half double crochet and double crochet
Learn the yarn-over movements and notice how the height of each stitch changes.
4
Make a practice swatch
Work several rows using one stitch, keep the count consistent, and measure the fabric.
5
Finish a small project
Complete the beginner square, fasten off, weave in the ends, and check the finished dimensions.
This is a suggestion, not a deadline. You may need more time for one skill and less for another. Focus on comfortable hand movements, clear stitch placement, and consistent counting before moving on to complicated patterns.
19. What to Make After Learning the Basics
Once you can make a foundation chain, work basic stitches, and keep a consistent stitch count, you can try simple projects that reinforce those skills.
- Dishcloth: Practice rows of single crochet or half double crochet. Check that the edges remain straight.
- Basic scarf: Repeat rows of one stitch to build consistency and learn how to manage a longer piece of fabric.
- Small coaster: Practice making a compact square or rectangle and finishing the edges neatly.
- Beginner granny square: Combine double crochet clusters and chain spaces to create a square motif.
- Simple headband: Practice making a rectangular strip and joining its ends.
- Basic crochet pouch: Learn to make two matching panels or one folded rectangle and join the edges.
- Small blanket: Repeat rows across a wider foundation chain to practice stitch counting over a larger area.
Choose a project that uses techniques you already understand, with only one or two new skills to learn. Clear instructions and limited shaping will help you build confidence.
20. Frequently Asked Questions
Can I learn crochet if I have never done any needlecraft?
Yes. Crochet can be learned from scratch. Begin with a slip knot and chain, then practice single crochet before moving on to taller stitches. You do not need previous knitting or sewing experience.
What is the easiest crochet stitch for beginners?
The chain stitch is usually the easiest movement to practice first. Single crochet is a useful first fabric stitch because it introduces inserting the hook into a stitch, pulling up a loop, and completing a stitch.
Which yarn is best for learning crochet?
Smooth, medium-weight yarn in a light or medium color is a practical choice. It makes the stitches easier to see and is comfortable to handle. Very thin, dark, fuzzy, or novelty yarn may make stitch placement more difficult.
What crochet hook size should I start with?
Try a 5 mm or 5.5 mm hook with worsted-weight yarn, checking the yarn label for its recommendation. You can adjust the size if your stitches are too tight or too loose.
How long does it take to learn the basic stitches?
It varies from person to person. You may understand the movements after a short practice session, but consistent tension and stitch placement usually take additional practice. There is no need to rush.
Why is my crochet chain too tight?
You may be pulling the working yarn too firmly or tightening each loop against the narrow part of the hook. Try allowing each new loop to sit comfortably on the shaft. If the chain is difficult to work into, make a new one with a more relaxed tension.
Why does my crochet project keep getting wider or narrower?
The most common reason is a changing stitch count. Missing the first or last stitch can make the fabric narrower, while accidentally adding stitches can make it wider. Count each row and check the edges.
What is the difference between US and UK crochet terminology?
Some stitch names refer to different stitches in the two systems. For example, a US single crochet is called a UK double crochet, while a US double crochet is called a UK treble crochet. Always check which terminology a pattern uses.
How do I know where to insert the hook?
Look for the stitch or space named in the instructions. For many beginner stitches, insert the hook beneath the top V-shaped loops of the stitch. If the pattern specifies a chain space, insert the hook into that opening instead.
Do I need to count stitches in every row?
When you are learning, counting each row is helpful. It allows you to notice mistakes before they affect the shape of the project. As you become more confident, you may recognize the stitch placement more easily, but counting remains useful for projects that need a particular size.
What should I make after my first practice swatch?
Try a small coaster, dishcloth, scarf, or granny square. Choose a project that repeats the stitches you already know and introduces as few new techniques as possible.
How do I finish a crochet project securely?
Cut the yarn while leaving a tail, pull the cut end through the active loop, and tighten gently. Then use a yarn needle to weave the tail through several stitches on the back of the fabric.
21. Final Encouragement
Learning crochet is a process of small, repeatable movements. Each chain helps you understand how the yarn moves through a loop, and every row of single crochet teaches you more about stitch placement, tension, and counting.
Your first project may not have perfectly even edges, and that is fine. Keep practicing with a yarn and hook that feel comfortable, check your stitch counts, and undo mistakes when necessary. As the basic movements become familiar, you will be ready to explore more stitches, textures, colors, and patterns.
Most importantly, enjoy the process of turning a simple strand of yarn into something you made yourself.
Leave a Comment