
The single crochet stitch is one of the most important stitches to learn when starting your crochet journey. It creates a compact, sturdy fabric that works beautifully for dishcloths, blankets, bags, amigurumi, and many other handmade projects.
In this beginner-friendly tutorial, you will learn how to hold your hook and yarn, make a foundation chain, crochet a single crochet stitch step by step, and continue working neat rows. With a little practice, you will have the skills needed to begin a wide variety of crochet projects.
1. Materials and Tools
Before you begin, gather these basic supplies:
- Yarn: Medium-weight yarn, such as category 4 worsted-weight yarn.
- Crochet hook: A hook that matches your yarn and feels comfortable in your hand.
- Scissors: For cutting the yarn.
- Yarn needle: For weaving in the loose ends when your practice swatch is finished.
Choosing yarn and a hook
Smooth, light-colored yarn is ideal for beginners because it makes individual stitches easier to see. Dark or fuzzy yarn can hide the small loops you need to identify when inserting your hook.
Check the yarn label for the recommended crochet hook size. Medium-weight yarn often works well with a hook around 5 mm, although the best size depends on the yarn and your tension.
Your stitches should be firm enough to form a neat fabric but loose enough that you can insert your hook comfortably.
2. US Crochet Terminology and Abbreviations
This tutorial uses US crochet terminology. One important difference is that the US single crochet stitch is called a double crochet in UK crochet terminology.
Here are the abbreviations used throughout the tutorial.
| Abbreviation | Meaning |
|---|---|
| sc | Single crochet |
| ch | Chain |
| st | Stitch |
| sts | Stitches |
| yo | Yarn over |
| rep | Repeat |
Understanding your yarn
There are two yarn ends to recognize:
- Working yarn: The yarn connected to the ball or skein. You use it to make stitches.
- Yarn tail: The short loose end left over from making the slip knot or fastening off.
Keep the working yarn moving freely as you crochet, and avoid accidentally crocheting with the yarn tail.
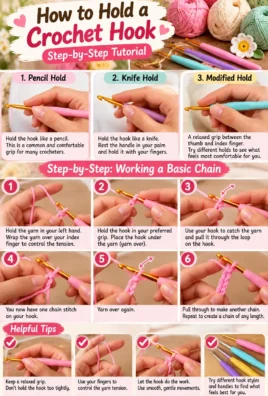
3. How to Hold the Crochet Hook and Yarn
There is no single correct way to hold a crochet hook. The best method is the one that feels comfortable and allows you to move the hook without straining your fingers.
The pencil hold
Hold the hook as you would hold a pencil. Rest it between your thumb and index finger, supporting it with your middle finger.
This position gives you a familiar grip and allows small, controlled movements.
The knife hold
Hold the hook as you would hold a table knife. Place your thumb and fingers around the handle and guide the hook with your wrist and hand.
Some crocheters find this grip more comfortable for longer sessions.
How to guide the yarn
Hold your work between your thumb and fingers. Use the fingers of your other hand to guide the working yarn, allowing it to pass smoothly toward the hook.
The yarn should have enough tension to form stitches but should not be pulled so tightly that it becomes difficult to insert the hook.
Experiment with both hook holds and different ways of guiding the yarn until you find a comfortable position.
4. How to Make a Slip Knot
A slip knot creates the starting loop for your crochet work. It is not a single crochet stitch.
Follow these steps:
- Leave a yarn tail approximately 6 inches long.
- Make a loop with the yarn, crossing the working yarn over the tail.
- Reach through the loop and pull a small section of the working yarn through it.
- Place the new loop on your crochet hook.
- Pull gently on the working yarn to tighten the loop around the hook.
- Adjust the loop so it slides along the hook without being too loose or too tight.
You should be able to move the loop along the hook comfortably. It should not grip the hook so tightly that you struggle to work through it.
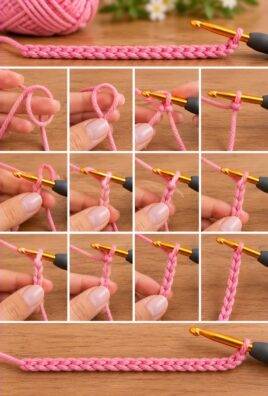
5. How to Crochet a Foundation Chain
The foundation chain creates the starting edge for your first row of single crochet stitches.
Step-by-step instructions
- Hold the hook with the slip knot on it.
- Bring the working yarn over the hook from back to front. This is called a yarn over.
- Use the hook to catch the working yarn.
- Pull the yarn through the loop already on the hook.
- You have made one chain stitch.
- Repeat the yarn-over movement and pull the yarn through the loop again to make another chain.
- Continue until you have the desired number of chain stitches.
Each time you pull the yarn through the loop, you create one completed chain stitch.
How to count your chain stitches
Look at the chain below the loop on your hook. Each completed chain usually looks like a small V.
Count these V-shaped stitches along the chain. Do not count the loop currently on your hook because it is the working loop, not a completed chain stitch.
Practice chain
Make a foundation chain of 12 chain stitches.
Count carefully from the first completed chain near the slip knot to the last completed chain near the hook.
Try to keep the chains even. If they are too tight, inserting the hook into them during the first row can become difficult. If you tend to make tight chains, consciously relax your fingers or try a slightly larger hook just for the foundation chain.
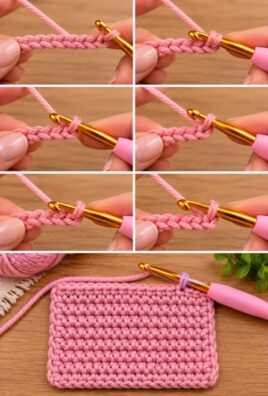
6. How to Crochet a Single Crochet Stitch
The single crochet stitch is compact and simple once you understand the sequence of movements.
Each stitch follows the same basic process: insert the hook, yarn over, pull up a loop, yarn over again, and pull through both loops.
Step 1: Insert the hook
Hold your foundation chain so the small V-shaped chain stitches are easy to see.
For this beginner practice row, insert the hook into the second chain from the hook.
Remember that the loop already on your hook does not count as a chain stitch. Start counting from the first completed chain immediately below that loop.
Push the hook under the top loops of the second chain from the hook.
Step 2: Yarn over
Bring the working yarn over the hook from back to front.
Make sure the hook catches the working yarn securely.
Step 3: Pull up a loop
Pull the yarn back through the chain.
You should now have two loops on your hook: the original loop and the new loop you just pulled through the chain.
Keep both loops on the hook.
Step 4: Yarn over again
Bring the working yarn over the hook once more.
The hook should catch the yarn securely so you can pull it through both loops.
Step 5: Pull through both loops
Draw the new yarn-over through both loops on your hook.
You should now have just one loop remaining on the hook.
Your first single crochet stitch is complete!
Step 6: Repeat the stitch
Move to the next chain in your foundation chain.
Repeat the same sequence:
- Insert the hook into the next chain.
- Yarn over.
- Pull up a loop so that two loops are on the hook.
- Yarn over again.
- Pull through both loops, leaving one loop on the hook.
Continue across the foundation chain until you reach the final chain.
Take your time. It is more important to understand the movements and place the stitches correctly than to crochet quickly.
7. Practice Your First Row of Single Crochet
Now put the steps together to create your first row.
Step 1: Make the foundation chain
Chain 12.
Count the 12 completed chain stitches carefully, excluding the loop on your hook.
Step 2: Work the first single crochet
Insert your hook into the second chain from the hook.
Make one single crochet by following the five movements described above.
Step 3: Continue across the chain
Work one single crochet into each remaining chain.
As you work, check that you are inserting your hook into a new chain each time rather than returning to a chain you have already used.
Step 4: Count your stitches
When you reach the end, count the completed single crochet stitches.
You should have 11 single crochet stitches because you started with 12 chains and skipped the first chain next to the hook when placing the first stitch.
This is normal for the practice method used in this tutorial.
Step 5: Examine your work
Your first row may look a little uneven. The foundation chain can twist, and the stitches may vary slightly in height or tension.
Do not worry if your first attempt is not perfect. The goal is to recognize each stitch and learn how to work into the next chain.
8. How to Turn and Crochet the Second Row
Once you finish the first row, you can begin another row of single crochet stitches.
For this practice swatch, the turning chain does not count as a stitch.
Step 1: Make one turning chain
When you reach the end of the row, chain 1.
This creates a little height so you can begin the next row comfortably.
Step 2: Turn your work
Rotate your work so the opposite side faces you and the row you just completed is ready to work into.
Keep the hook in the working loop.
Step 3: Find the first stitch
Look at the top edge of the row. Each completed single crochet stitch has two top loops that usually look like a small V.
The first stitch is the one closest to the hook at the beginning of the new row. Do not skip it.
Step 4: Insert the hook
Insert your hook under both top loops of the first stitch.
Unless a pattern tells you otherwise, working under both loops is the standard way to crochet a single crochet stitch into the next row.
Step 5: Make a single crochet
Yarn over and pull up a loop. You should have two loops on your hook.
Yarn over again and pull through both loops, leaving one loop on the hook.
You have made the first single crochet of your second row.
Step 6: Continue across
Work one single crochet into each stitch across the row.
Make sure you work into the final stitch at the far edge. This last stitch can be easy to miss because it may look slightly different from the stitches in the middle of the row.
When you finish, you should still have 11 single crochet stitches.
Step 7: Repeat for more rows
Chain 1, turn your work, and crochet one single crochet into every stitch across.
Continue for several rows, counting after each row. Your stitch count should remain at 11 stitches throughout this basic practice swatch.
9. How to Recognize a Single Crochet Stitch
Learning to identify stitches makes it easier to keep your rows straight.
Look for the small V
At the top of a completed single crochet stitch, you will usually see two strands forming a small V. These are the top loops.
When starting the next row, insert your hook under both loops unless the pattern specifies a different placement.
Understand the difference between stitches and loops
- Completed stitch: A single crochet that has been fully made and appears along the row.
- Working loop: The single loop currently on your hook. It is not counted as a completed stitch.
- Chain space: An opening created by chain stitches. It is not the same as an individual stitch.
- Row edge: The end of the row, where the first or last stitch is located.
How to count stitches
Lay your work flat and look along the top edge. Count each small V-shaped stitch from one side to the other.
Do not count the loop on the hook. Also, avoid counting the vertical parts of the stitches as separate stitches.
At the row edges, check carefully for the first and last stitches. These are common places for beginners to accidentally skip a stitch or work two stitches into one.
10. How to Maintain Even Tension
Tension describes how tightly or loosely you hold the yarn while making stitches. Consistent tension helps your crochet fabric look neat and keeps the rows a similar size.
Keep your grip relaxed
Avoid squeezing the hook or yarn too tightly. A relaxed grip makes it easier to move the hook and form stitches of similar size.
Make a comfortable foundation chain
The foundation chain should not be much tighter than the stitches worked into it. Tight chains can make the bottom edge narrow and difficult to crochet into.
Keep the yarn moving smoothly
Guide the working yarn through your fingers so it feeds steadily. Try to maintain the same amount of tension throughout the row.
Pull up loops to a consistent height
When you pull up a loop through a chain or stitch, bring it to a comfortable height on the hook. Very short loops can make the stitches tight, while excessively long loops can make them loose and uneven.
Use the same hook and yarn
For your practice swatch, keep the same yarn and hook throughout the rows. This makes it easier to develop a consistent stitch size.
Remember that uneven stitches are completely normal when you are learning. With practice, your movements will become smoother and your fabric will become more consistent.
11. Common Single Crochet Mistakes and How to Fix Them
Mistake 1: Inserting the hook into the wrong chain
Why it happens: The foundation chain can twist, making it difficult to see the individual V-shaped stitches.
How to fix it: Lay the chain flat and identify the second chain from the hook, excluding the working loop. If you have already started in the wrong place, carefully undo the stitch and try again.
Mistake 2: Pulling through only one loop at the final step
Why it happens: The hook may catch only part of the yarn or move through the loops incorrectly.
How to fix it: After the second yarn over, guide the hook through both loops on the hook. A completed single crochet should leave one working loop on your hook.
Mistake 3: The stitch is too tight to work into
Why it happens: You may be pulling the working yarn too tightly or making the loop too small.
How to fix it: Relax your grip and pull up the loop to a comfortable height. If the problem continues, try a slightly larger hook.
Mistake 4: The foundation chain is too tight
Why it happens: Beginners often pull the yarn tightly after each chain stitch.
How to fix it: Practice making chains with a looser grip. You can also use a hook one size larger for the foundation chain, then switch back to your regular hook for the first row.
Mistake 5: The stitch count decreases with each row
Why it happens: You may be missing the first or last stitch, especially near the edges.
How to fix it: Count the stitches at the end of every row. Identify the first and last stitches before working into them. Use stitch markers at the edges if necessary.
Mistake 6: The edges become uneven
Why it happens: Skipping stitches, adding extra stitches, or inconsistent tension can make the sides slant.
How to fix it: Make one single crochet into every stitch across. Count your stitches regularly and keep your turning chain separate from the stitch count.
Mistake 7: You accidentally skip the first stitch
Why it happens: The first stitch may be close to the turning chain and can be difficult to recognize.
How to fix it: After turning, look for the first small V-shaped stitch at the edge of the row. Work directly into it rather than skipping to the next stitch.
Mistake 8: You work two stitches into the same stitch
Why it happens: You may mistake one stitch’s top loops for two separate stitches.
How to fix it: Identify the small V at the top of each completed stitch and work only one single crochet into each V. If you notice an extra stitch, undo the incorrect stitch and repeat it in the right place.
Mistake 9: You catch only one top loop
Why it happens: The hook may slide under only the front loop or back loop.
How to fix it: For this practice swatch, insert the hook under both top loops of the stitch. Check the hook placement before making each stitch.
12. How to Fasten Off
When you have finished practicing, you can fasten off to secure your work.
- Complete the final single crochet stitch.
- Cut the working yarn, leaving a tail approximately 6 inches long.
- Yarn over or use the hook to pull the cut tail all the way through the working loop.
- Pull the tail gently to secure the final stitch.
- Thread the tail onto a yarn needle.
- Weave the tail through several stitches on the back of the swatch, changing direction once to help secure it.
- Trim the excess yarn without cutting into the fabric.
If your swatch has a starting tail, weave that end into the fabric as well.
Fastening off is different from making a slip stitch. A slip stitch is a crochet stitch used to join or move across stitches. Fastening off secures the final loop after you have finished crocheting.
13. How to Practice and Improve
The best way to become comfortable with single crochet is to repeat the same simple movements.
Try this practice routine:
- Make a foundation chain of 12 stitches.
- Crochet one row of single crochet, beginning in the second chain from the hook.
- Count your stitches. You should have 11.
- Chain 1 and turn.
- Crochet another row, working into every stitch across.
- Count again to make sure you still have 11 stitches.
- Repeat until you have several rows.
- Examine the edges and compare the size of your stitches.
- Undo and redo any stitches that you want to practice.
You can also practice making a longer swatch once you feel comfortable. A larger piece gives you more opportunities to recognize the top loops, maintain even tension, and identify the first and last stitches of each row.
There is no need to rush. Building a good foundation now will make more complicated crochet projects much easier later.
14. Frequently Asked Questions
What is a single crochet stitch?
A single crochet is a basic US crochet stitch that creates a compact fabric. To make it, insert the hook into a chain or stitch, yarn over and pull up a loop, then yarn over again and pull through both loops on the hook.
Is single crochet suitable for beginners?
Yes. Single crochet is one of the fundamental stitches beginners learn. Once you understand the movements and can recognize the top loops, you can use it in many different projects.
How many chains should I make to practice?
A foundation chain of 12 stitches is a manageable starting point. Working your first single crochet into the second chain from the hook gives you 11 stitches in the first row.
Why does my first row look uneven?
The foundation chain can twist, and it may be harder to maintain consistent tension when you are first learning. Practice making relaxed chains and work slowly into each chain. The fabric usually becomes more even with practice.
Does the turning chain count as a stitch in this tutorial?
No. For this practice swatch, make one turning chain at the beginning of each new row, but do not count it as a single crochet stitch.
How do I keep the edges straight?
Work one single crochet into every stitch across the row, including the first and last stitches. Count the stitches at the end of each row and use stitch markers at the edges if you find them difficult to identify.
Why are my single crochet stitches so tight?
You may be pulling the working yarn too firmly or making the loops too small. Relax your grip, allow the yarn to move more freely, and pull up each loop to a comfortable height. A larger hook may also help.
What is the difference between US single crochet and UK double crochet?
They are the same stitch, but the terminology differs between the two systems. The US single crochet is called a double crochet in UK terminology, so always check which terminology a pattern uses.
Do I need to turn my work after every row?
For the flat practice swatch in this tutorial, yes. Make one turning chain, turn the work, and crochet across the next row. Other projects may be worked in continuous rounds or joined rounds instead.
Can I use single crochet for amigurumi?
Yes. Single crochet is widely used for amigurumi because it creates a compact fabric that helps keep stuffing inside. A smaller hook may be needed to make the stitches dense enough for a stuffed toy.
15. Quick Reference: Single Crochet
Keep this short guide nearby while practicing.
Stitch abbreviation: sc
Basic stitch sequence:
- Insert the hook into the second chain from the hook for the first row, or under both top loops of the indicated stitch for later rows.
- Yarn over.
- Pull up a loop. You now have two loops on the hook.
- Yarn over again.
- Pull through both loops. One loop remains on the hook.
First practice row: Start with 12 chain stitches. Work one single crochet into each chain, beginning in the second chain from the hook. You should finish with 11 single crochet stitches.
Next row: Chain 1, turn, and work one single crochet into every stitch across, including the first and last stitches. The turning chain does not count as a stitch.
Finishing: Cut the yarn, pull the tail through the final loop, tighten gently, and weave in the loose ends with a yarn needle.
Conclusion
Learning the single crochet stitch is an important first step toward creating your own handmade crochet projects. Once you understand how to insert the hook, pull up a loop, and finish the stitch, you can begin building rows of neat, sturdy fabric.
Start with a short foundation chain, practice a few rows, and count your stitches as you go. Your first swatch does not need to be perfect. With patience and repetition, your tension will become more consistent, your edges will improve, and you will feel more confident moving on to your next crochet project.
Leave a Comment