
Vintage granny squares have a timeless charm that makes them perfect for cozy blankets, colorful cardigans, handmade bags, cushions, scarves, and other crochet projects. Their familiar clusters of double crochet stitches and clearly defined corners create a classic geometric design that never goes out of style.
In this beginner-friendly tutorial, you will learn how to crochet a traditional granny square in joined rounds, create four neat corners, change colors for a vintage-inspired appearance, and finish your square for use in larger projects. Once you master the basic pattern, you can repeat it to make as many matching squares as you need.
1. Project Overview
- Difficulty level: Beginner
- Approximate finished size: 5–6 inches square after four rounds
- Approximate completion time: 30–60 minutes per square
- Construction method: A center ring worked in joined rounds
- Main stitches: Chain, slip stitch, and double crochet
- Color options: One color for a traditional textured square or multiple colors for a vintage patchwork appearance
This design begins with a small center ring and expands outward. Each round has four corner spaces that keep the motif square, while groups of double crochet stitches fill the sides.
You can make several identical squares for a blanket or use different color combinations to create a more eclectic vintage look.
2. Materials and Tools
Gather the following supplies before you begin:
- Yarn: Approximately 25–40 yards of medium-weight yarn for one square, depending on its size and your tension
- Crochet hook: A 5 mm hook is a useful starting point for medium-weight yarn
- Scissors: For cutting the yarn
- Yarn needle: For weaving in loose ends
- Stitch marker: Optional, for marking the beginning of each round
- Measuring tape: Optional, for checking the finished dimensions
Choosing vintage-inspired yarn colors
Vintage granny squares look beautiful in harmonious, slightly muted shades. Try one of these combinations:
- Cream and dusty rose
- Muted mustard and sage green
- Burgundy and beige
- Soft blue and ivory
- Terracotta and warm brown
- Lavender and pale gray
For a classic look, choose smooth acrylic, cotton, or a soft acrylic-cotton blend. Smooth yarn makes the stitches easier to see and count, especially when you are learning.
Textured yarn can create an interesting finish, but fuzzy or plush fibers may hide the chain spaces where the corners are formed.
A firm, even fabric helps the square keep its shape. If your stitches are too loose, try a smaller hook. If they are too tight, try a larger hook.
When making a larger project, use the same yarn weight and hook size for every square so the motifs are easier to join.
3. US Crochet Abbreviations
This pattern uses US crochet terminology throughout.
| Abbreviation | Meaning |
|---|---|
| ch | Chain |
| sl st | Slip stitch |
| dc | Double crochet |
| st | Stitch |
| sts | Stitches |
| sp | Space |
| ch-sp | Chain space |
| rep | Repeat |
| rnd | Round |
Understanding the stitches
Chain (ch): Yarn over and pull the yarn through the loop on your hook.
Slip stitch (sl st): Insert your hook into the indicated stitch or space, yarn over, and pull through both the stitch or space and the loop on your hook.
Double crochet (dc): Yarn over, insert your hook into the indicated stitch or space, yarn over and pull up a loop, yarn over and pull through the first two loops, then yarn over and pull through the remaining two loops.
Chain space (ch-sp): The opening created by chain stitches. In this pattern, chain spaces form the corners of the square.
Granny cluster: A group of three double crochet stitches worked into the same space.
The starting chain at the beginning of each round does not count as a double crochet stitch. In this pattern, the starting chain is made only to position the yarn and hook for the next stitches.
4. Gauge and Finished Size
A formal gauge swatch is not essential for a single decorative granny square. However, checking your measurements is helpful if you plan to make a blanket, cardigan, or other project that uses multiple motifs.
With medium-weight yarn and a 5 mm hook, four rounds may produce a square approximately 5–6 inches wide. This is only an estimate; yarn thickness, hook size, and stitch tension all affect the result.
To measure your square, place it on a flat surface and measure from one side to the opposite side through the center. Check the width and height to make sure they are approximately equal.
If you want larger squares, continue repeating the established round pattern. Every new round adds another layer of granny clusters along the sides while maintaining the four corner spaces.
For matching squares, use the same yarn, hook, stitch pattern, and tension throughout the project.
5. Understanding the Vintage Granny Square
A traditional granny square has a simple structure that becomes easy to recognize after a few rounds.
The center ring
The center ring forms the starting point of the square. The first round of stitches is worked into this ring.
The first round
The first round establishes four groups of double crochet stitches arranged around the center. Chain spaces between the groups create the framework for the corners.
The four corners
Each corner is made with a chain space between two granny clusters. In later rounds, these corner spaces receive the same corner sequence, allowing the square to grow evenly.
The sides
The spaces between corners are filled with granny clusters. As the square grows, each side gains another cluster.
Why the corners matter
The four corner spaces are the key to maintaining the square shape. If you accidentally work a side cluster into a corner space or skip a corner, the motif may become distorted.
For this pattern, the corner sequence is consistent throughout: a granny cluster, chain 2, and another granny cluster in the same corner space.
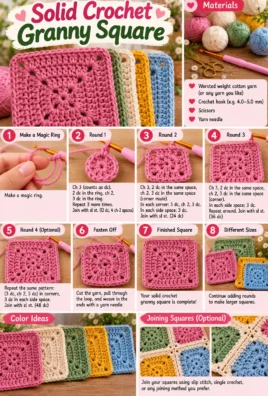
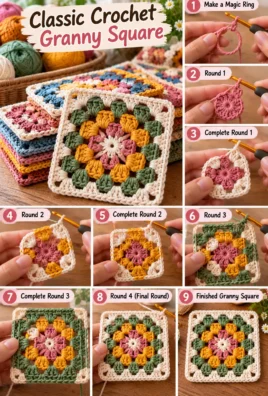
6. Complete Step-by-Step Vintage Granny Square Pattern
This pattern uses a small chain ring, followed by joined rounds. Each round begins with a chain that does not count as a stitch, and each round is joined with a slip stitch.
A. Create the Center Ring
- Make a slip knot and place it on your hook.
- Chain 4.
- Insert your hook into the first chain you made.
- Make a slip stitch to join the chain into a ring.
You now have a small center ring.
Keep the ring open enough to work into comfortably, but do not make it so loose that the center looks untidy.
B. Round One: Form the Center
This round establishes four groups of double crochet stitches around the center ring.
- Chain 3. This starting chain does not count as a stitch.
- Work 2 double crochet stitches into the center ring. These stitches and the starting chain form the first group.
- Chain 2.
- Work 3 double crochet stitches into the center ring.
- Chain 2.
- Work 3 double crochet stitches into the center ring.
- Chain 2.
- Work 3 double crochet stitches into the center ring.
- Chain 2.
- Slip stitch into the top of the first double crochet stitch to join the round.
Round 1 check:
- Four groups of three double crochet stitches
- Four chain-2 spaces
- Twelve actual double crochet stitches
- One starting chain-3 that does not count as a stitch
The four chain-2 spaces will become the corners of your square.
Spread the groups evenly around the center ring. If the ring looks loose, you can gently tighten the starting tail later.
C. Round Two: Establish the Four Corners
In this round, work a granny cluster into each chain-2 space from the previous round. Each corner receives two clusters separated by chain 2.
- Slip stitch across the top of the next two double crochet stitches and into the first chain-2 space. This positions your yarn in the corner space.
- Chain 3. This chain does not count as a stitch.
- Work 2 double crochet stitches into the same chain-2 space.
- Chain 2.
- Work 3 double crochet stitches into the same space. You have completed the first corner.
- Chain 1.
- Work 3 double crochet stitches into the next chain-2 space.
- Chain 2.
- Work 3 double crochet stitches into that same space. You have completed the second corner.
- Chain 1.
- Work 3 double crochet stitches into the next chain-2 space.
- Chain 2.
- Work 3 double crochet stitches into that same space. You have completed the third corner.
- Chain 1.
- Work 3 double crochet stitches into the final chain-2 space.
- Chain 2.
- Work 3 double crochet stitches into that same space. You have completed the fourth corner.
- Chain 1.
- Slip stitch into the top of the first actual double crochet stitch to join the round.
Round 2 check:
- Four corners
- Two granny clusters at each corner
- Four chain-2 corner spaces
- Four chain-1 spaces between the corners
Each corner contains six double crochet stitches arranged as two clusters, with a chain-2 space between them.
The chain-1 spaces between the corners will receive the side clusters in the next round.
D. Round Three: Expand the Square
In this round, work the established corner sequence into every corner space and add a granny cluster to each side space.
- Slip stitch across the next two double crochet stitches and into the first chain-2 corner space.
- Chain 3. This starting chain does not count as a stitch.
- Work 2 double crochet stitches into the same corner space.
- Chain 2.
- Work 3 double crochet stitches into the same corner space.
- Chain 1.
- Work 3 double crochet stitches into the next chain-1 side space.
- Chain 1.
- Work 3 double crochet stitches into the next chain-2 corner space.
- Chain 2.
- Work 3 double crochet stitches into that same corner space.
- Chain 1.
- Work 3 double crochet stitches into the next chain-1 side space.
- Chain 1.
- Continue around the square, repeating the same sequence for each corner and side space.
- After completing the fourth corner and the final side cluster, join with a slip stitch into the top of the first actual double crochet stitch.
Round 3 check:
- Four corners, each made with two clusters separated by chain 2
- Two side clusters along each side
- Chain-1 spaces between neighboring clusters
- Four chain-2 corner spaces
The square now has a more recognizable granny-square structure, with the sides expanding evenly between the four corners.
E. Round Four and Beyond: Continue Expanding
For each additional round, use the same structure:
- Work the corner sequence into every chain-2 corner space.
- Work one granny cluster into every chain-1 side space.
- Chain 1 between clusters along the sides.
- Chain 2 between the two clusters that form each corner.
- Join the round with a slip stitch into the first actual double crochet stitch.
At each corner, the sequence remains:
Three double crochet stitches, chain 2, three double crochet stitches in the same corner space.
Along each side, work a granny cluster into every chain-1 space from the previous round.
As the square grows, each side gains one additional granny cluster compared with the previous round. Keep the chain spaces clear so the corners remain easy to identify.
F. Stitch Count and Shape Verification
Rather than counting every double crochet stitch across the entire square, it is often easier to count clusters and spaces.
After Round 1, you should have four groups of three double crochet stitches and four chain-2 spaces.
After Round 2, you should have four corners, each made of two clusters, and one chain-1 space between each pair of neighboring corners.
After Round 3, each side has two side clusters between its corner structures. Later rounds add another side cluster to each side.
Check that:
- There are always four corner spaces.
- Every corner has two granny clusters separated by chain 2.
- Every side cluster is worked into a chain-1 side space.
- Each round is joined at the same point.
- The square lies flat without severe curling or ruffling.
If the square does not lie flat, check your stitch placement and tension before adding more rounds.
7. Vintage Color Changes
Color changes can give your granny square a classic patchwork appearance. You can use one color throughout or change colors at the end of each round.
Option One: Single-Color Square
For a traditional, textured square, use one color for every round.
This is a good option for beginners because you can focus on stitch placement and corner formation without managing multiple yarn ends.
Option Two: Multicolor Vintage Square
Try assigning different colors to the center, middle rounds, and outer edge. For example:
- Round 1: Dusty rose
- Round 2: Muted mustard
- Round 3: Sage green
- Round 4: Cream
You can change the colors to match your preferred palette.
How to change colors at the end of a round
For a neat color change, finish the final joining slip stitch of the current round using the new color.
- Insert your hook into the stitch where the round is joined.
- Yarn over with the new color and pull it through the stitch and the loop on your hook.
- Tighten the old color gently.
- Continue the next round with the new color.
Leave a yarn tail long enough to weave in securely. Avoid tying bulky knots directly at the edge of the square.
If you prefer to fasten off each color, cut the old yarn after joining the round and secure the end. Attach the new color in the appropriate corner space, then continue the next round.
Weave in the ends with a yarn needle, following the direction of nearby stitches and changing direction once to help secure the yarn.
8. Edging and Finishing
When your square reaches the desired size, finish the final round and secure the yarn.
For a simple border, you can add one round of single crochet around the square. Work evenly along the sides and place enough stitches in each corner to keep the square flat. A practical starting point is to work three single crochet stitches into each chain-2 corner space.
If the border pulls the corners inward, use a little more room in the corner spaces. If the edges ripple, reduce the number of stitches along the sides or relax your tension.
To fasten off:
- Complete the final stitch.
- Cut the yarn, leaving a tail.
- Pull the tail through the final loop.
- Thread the tail onto a yarn needle.
- Weave it into several stitches on the back of the square.
Inspect the motif for loose ends, gaps, or uneven corners. Keep the corners clearly defined and avoid pulling the border too tightly.
9. Blocking the Granny Square
Blocking helps a granny square look neater and makes multiple squares easier to join.
Step 1: Arrange the square
Place the square on a flat surface and gently spread the fabric into its intended shape.
Step 2: Straighten the sides
Smooth each side with your hands and adjust the corners until the square looks balanced.
Step 3: Measure the motif
Measure from one side to the opposite side. Check both the width and height.
If you are making multiple squares, aim for a consistent finished size.
Step 4: Pin if appropriate
If the yarn care label allows it, pin the square to a blocking mat, gently defining the four corners and straightening the sides.
Do not stretch the stitches excessively to force the square to a particular measurement.
Step 5: Let it dry completely
Use a blocking method appropriate for the yarn fiber. Some fibers tolerate gentle wet blocking, while others may be damaged by heat or steam. Follow the yarn manufacturer’s care instructions.
Allow the square to dry fully before removing the pins.
10. Joining Vintage Granny Squares
When you have made enough squares for your project, you can join them into a blanket, cardigan, bag, cushion, or scarf.
Prepare the squares
Before joining, check that all squares have approximately the same dimensions. Block them if appropriate, weave in loose ends, and arrange them in your preferred color order.
Slip-stitch joining
Slip-stitch joining creates a relatively flat seam.
- Place two squares next to each other with the sides you want to join aligned.
- Attach the yarn at one corner.
- Insert your hook through the corresponding edge stitch or chain space of both squares.
- Yarn over and pull through both layers and the loop on your hook.
- Continue working slip stitches through matching edge stitches or spaces.
- Keep the tension relaxed so the seam does not pull the squares together too tightly.
- Secure the yarn when you reach the other corner.
Repeat the process to join the remaining squares.
Single-crochet joining
For a more raised, decorative seam, join the squares with single crochet.
Place the squares together and work single crochet stitches through corresponding edge stitches or spaces. Keep the number of stitches consistent along both sides and align the corners carefully.
This method creates a visible ridge that can complement a vintage design.
Tips for neat joins
- Match corner spaces carefully.
- Align the edges before starting.
- Avoid pulling the joining yarn too tightly.
- Keep the same joining method throughout the project.
- Check the fabric regularly for puckering or gaps.
The joining method affects the finished appearance, so choose one that suits the look you want.
11. Vintage-Inspired Design Variations
Once you are comfortable with the basic granny square, try adapting the colors and size.
Muted traditional colors
Combine cream, dusty rose, sage green, muted mustard, or burgundy for a soft vintage appearance.
Bright retro colors
Choose stronger shades such as orange, turquoise, yellow, and red for a cheerful retro-inspired square.
Solid color with contrasting edging
Crochet the square in one color and use a contrasting shade for the final border. This emphasizes the square’s outline.
Multicolor center with a neutral outer round
Use several colors in the center and middle rounds, then finish with cream, beige, or gray for a balanced look.
Larger squares for blankets
Continue the established round repeat until the square reaches the desired size. Every round adds another side cluster between the corners.
Smaller squares for accessories
Use finer yarn and a smaller hook to make compact squares for bags, pouches, or other accessories. Check your tension so the stitches remain clear and the square stays flat.
Alternating color arrangements
For a blanket, alternate squares with different center colors while keeping the outer rounds the same. This creates a coordinated design without making every square identical.
Whenever you change yarn weight or hook size, remember that the finished dimensions will also change.
12. Troubleshooting
The square becomes round instead of square
Likely cause: The corner spaces may not be distinct, or the corner clusters may have been worked incorrectly.
Solution: Check that each corner has two granny clusters separated by chain 2. Work side clusters only into the chain-1 side spaces.
The corners curl or pull inward
Likely cause: Your tension may be too tight, or the corner chain spaces may be too short.
Solution: Keep the chain-2 corner spaces consistent and avoid tightening the stitches around them. Check whether the fabric lies flat before continuing.
The edges ripple
Likely cause: There may be too many stitches along the sides, or the fabric may be worked too loosely.
Solution: Check that you are working one cluster into each side chain space rather than adding clusters between spaces. Adjust your hook or tension if needed.
The stitch count is incorrect
Likely cause: A corner or side space may have been skipped, or a cluster may have been placed in the wrong space.
Solution: Count the four corners first, then check the side clusters between them. This is usually easier than counting every double crochet stitch.
The corners contain large holes
Likely cause: The chain-2 spaces are naturally open, but very loose tension can make them larger than intended.
Solution: Keep the chains and surrounding stitches consistent. Avoid pulling the yarn excessively tight, as this can distort the corner.
The center ring does not close properly
Likely cause: The starting tail may be too short or the chain ring may have been joined incorrectly.
Solution: Leave a useful tail when beginning. After the first round, gently pull the tail to close the center ring, then weave it in securely.
The color joins look bulky
Likely cause: The yarn tails may have been knotted or woven into the same small area.
Solution: Avoid bulky knots and weave each end into several nearby stitches, changing direction once to help secure it.
The sides are uneven
Likely cause: Some side spaces may have been skipped, or the tension may vary between clusters.
Solution: Check that every chain-1 side space receives one granny cluster. Use the same hook and yarn throughout.
Different squares finish at different sizes
Likely cause: Changes in tension, yarn, hook size, or round count can affect the dimensions.
Solution: Use the same materials and repeat the same number of rounds. Measure each square before joining and block them when appropriate for the yarn.
The border distorts the square
Likely cause: Too many or too few stitches may have been added along the edges, or the border tension may be too tight.
Solution: Keep the border even, place three single crochet stitches in each corner space as a starting point, and adjust the side stitches as needed to keep the square flat.
13. Frequently Asked Questions
Is a vintage granny square suitable for beginners?
Yes. This pattern uses basic chain stitches, double crochet stitches, and slip stitches. The most important skill is recognizing the corner spaces and keeping the four corners consistent.
Can I use leftover yarn?
Absolutely. Granny squares are an excellent way to use leftover yarn. Make sure the yarns have compatible weights and textures so the finished squares remain similar in size.
How do I make all my squares the same size?
Use the same hook, yarn weight, stitch pattern, and number of rounds. Measure the squares as you finish them and block them when appropriate.
How many rounds should I crochet?
Four rounds make a useful small motif, approximately 5–6 inches across with suitable medium-weight yarn, although actual dimensions vary. Add more rounds if you want larger squares.
How can I change colors without leaving many loose ends?
You can carry a color only when the design and distance make it practical, but for clearly separated rounds, fastening off and weaving in the ends is often neater. Secure each tail through several stitches rather than tying bulky knots.
Why are my corners curling?
Your tension may be too tight, or the corner spaces may not have enough room. Check the chain-2 spaces and make sure each corner contains two clusters separated by chain 2.
What is the easiest way to join granny squares?
Single-crochet joining is easy to understand and creates a visible seam. Slip-stitch joining produces a flatter seam. Choose one method and use it consistently throughout the project.
Can I use this pattern for a blanket or cardigan?
Yes. Make multiple squares, keep them consistent in size, and join them in the arrangement you prefer. For garments, check the dimensions and plan the placement of the squares before joining.
Can I make the square in one color?
Yes. A single-color granny square highlights the texture of the clusters and gives the motif a classic appearance.
14. Quick Pattern Summary
Materials
- Medium-weight yarn in one or more colors
- Approximately 25–40 yards per square
- 5 mm crochet hook, adjusted as needed
- Scissors
- Yarn needle
- Optional stitch marker and measuring tape
Abbreviations
- ch: chain
- sl st: slip stitch
- dc: double crochet
- st or sts: stitch or stitches
- sp: space
- ch-sp: chain space
- rep: repeat
- rnd: round
Center ring
Chain 4 and join with a slip stitch to form a ring.
Round 1
Chain 3, work 2 dc into the ring, then chain 2. Repeat the group of 3 dc followed by chain 2 until you have four groups and four chain-2 spaces. Join with a slip stitch into the first actual dc stitch.
Round 2
Move to a corner space. At each of the four corners, work 3 dc, chain 2, and 3 dc in the same space. Chain 1 between corners. Join with a slip stitch into the first actual dc stitch.
Round 3
Work the same corner sequence in each chain-2 corner space. Work 3 dc into each chain-1 side space, using chain 1 between clusters. Join with a slip stitch into the first actual dc stitch.
Additional rounds
Repeat the established structure. Work two clusters separated by chain 2 in each corner space, and one cluster into every chain-1 side space. Chain 1 between side clusters and join each round in the same way.
Color changes
Finish the joining slip stitch of a round with the new color, or fasten off and attach the next color in the appropriate space. Weave in all ends securely.
Finishing
Fasten off, weave in loose ends, and optionally add a single-crochet border. Block the square if the yarn fiber and care instructions allow it.
Conclusion
A vintage granny square is a wonderful project for learning the rhythm of crochet while creating something useful and beautiful. Its traditional double crochet clusters, clear corners, and endless color possibilities make it suitable for everything from small accessories to cozy blankets.
Start with one square, practice keeping the corner spaces consistent, and experiment with colors that suit your style. Once you are comfortable with the pattern, you can create a collection of matching motifs and turn them into a handmade project to enjoy for years to come.
Leave a Comment