
ADVERTISEMENT
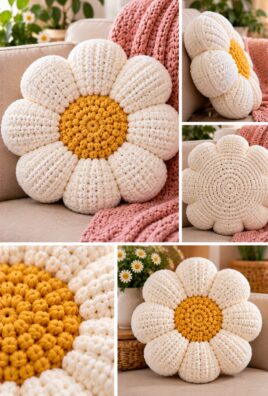
A crochet flower pillow is a cheerful way to add handmade charm to a living room, bedroom, reading nook, or nursery. Its rounded center and soft, scalloped petals create a decorative flower shape that looks lovely on a sofa or chair. Choose a single color for a subtle design, or combine a contrasting center with colorful petals to make your pillow stand out.
This beginner-friendly tutorial explains how to crochet the flower front, create a matching back panel, assemble the pieces, and add stuffing for a soft, comfortable finish. You will practice working in rounds, increasing stitches, shaping petals, and joining curved edges. The pattern uses a consistent construction method and US crochet terminology, with stitch counts to help you keep track as you work.
Project Overview
- Skill level: Confident beginner
- Approximate finished dimensions: 14–16 inches across the widest petal tips
- Approximate completion time: 6–10 hours
- Construction: One flower-shaped front panel and one matching flower-shaped back panel
- Main techniques: Magic ring, double crochet, single crochet, increases, working in rounds, joining panels, and stuffing
- Yarn: Medium-weight yarn, category 4
- Recommended hook: 5 mm, or the size needed to achieve a firm, flexible fabric
- Petals: 8 rounded petals
- Filling: Polyester fiberfill or a compatible round pillow insert, if its shape suits the flower construction
The measurements and working time are approximate. Your finished pillow size will depend on yarn, hook size, tension, petal shaping, and how firmly you stuff the pillow.
ADVERTISEMENT
Materials and Tools
Gather the following supplies:
- Approximately 250–350 yards of medium-weight yarn in total
- A 5 mm crochet hook, or a hook that creates a fabric with small, even gaps
- Polyester fiberfill for stuffing, or a suitable pillow insert
- Yarn needle
- Scissors
- Stitch markers
- Measuring tape
Choosing yarn
Acrylic yarn is a practical choice for a decorative pillow because it is widely available in many colors. Cotton creates clear stitch definition and a firmer fabric, while some soft acrylic or blended yarns produce a more cushioned surface.
Choose yarns of the same weight if you use more than one color. Different yarn thicknesses can make the front and back panels vary in size.
Suggested color combinations
- Classic flower: Yellow center with cream or white petals
- Pastel flower: Pale pink center with lavender or mint petals
- Bright flower: Orange center with pink, turquoise, or purple petals
- Modern neutral: Beige center with cream petals and a contrasting edge
For the main sample, use one color for the center and another for the petals. Use the center color or a coordinating shade for the back panel.
Crochet Abbreviations and Stitch Guide
All stitch names use US crochet terminology.
| Abbreviation | Meaning |
|---|---|
| ch | Chain |
| sl st | Slip stitch |
| sc | Single crochet |
| dc | Double crochet |
| inc | Increase: work 2 stitches into the same stitch |
| st | Stitch |
| sts | Stitches |
| rep | Repeat |
| rnd | Round |
| rnds | Rounds |
Magic ring
Make a loop with the yarn, insert your hook through the loop, and pull up a loop of working yarn. Chain once to secure it if needed. Work the required stitches into the ring, then pull the yarn tail to close the center.
Alternative: Chain 4 and join the ends with a slip stitch to make a small ring. Work the first round into the center of this ring.
Single crochet
Insert your hook into the indicated stitch, yarn over, and pull up a loop. Yarn over again and pull through both loops on your hook.
Double crochet
Yarn over and insert your hook into the indicated stitch. Yarn over and pull up a loop, leaving three loops on the hook. Yarn over and pull through two loops, then yarn over and pull through the remaining two loops.
Increase
Work two stitches into the same stitch. This adds one stitch to the round.
Working in joined rounds
At the end of each round, join with a slip stitch to the first stitch specified in the instructions. The starting chain in this pattern does not count as a stitch unless the instructions say otherwise.
Flower petal shaping
Each petal in this pattern is formed by working several double crochets into one designated stitch, then using single crochet to separate the petals. This creates a rounded, scalloped edge. Eight evenly spaced attachment stitches form the eight petals.
Finished Size, Gauge, and Design Planning
The sample pillow uses two matching flower panels, each with a small circular center and eight rounded petals. The petals are crocheted directly onto the center, so there is no need to make or sew individual petals.
The finished pillow is approximately 12–14 inches across, measured from one petal tip to the opposite tip. This is an estimate, not a guaranteed dimension.
Check your gauge
Because this is a decorative pillow, exact gauge is less important than making two panels that match.
- Crochet the center rounds using your chosen yarn and hook.
- Measure the center across its widest point.
- Complete the petal round and measure the full flower.
- If the fabric is too loose and stuffing shows through, try a smaller hook.
- If the fabric is too stiff or difficult to work, try a larger hook.
- Make both panels with the same yarn, hook, and tension.
The center should lie flat, and the petals should form a regular scalloped outline. If the front and back are different sizes, they may not align neatly during assembly.
Complete Step-by-Step Crochet Flower Pillow Pattern
This pattern creates one flower-shaped front panel and one matching flower-shaped back panel. Each panel has a circular center and eight petals. The two panels are joined around the outer edge, stuffed, and closed.
Part A: Crochet the Flower Center
Make two identical centers: one for the front and one for the back.
Use the center color.
Round 1
- Make a magic ring.
- Ch 1. This does not count as a stitch.
- Work 8 sc into the ring.
- Pull the ring closed.
- Join with a sl st to the first sc.
Stitch count: 8 sc.
Round 2
- Ch 1. This does not count as a stitch.
- Work 2 dc into each sc around.
- Join with a sl st to the first dc.
You will work two double crochets into each of the 8 stitches from Round 1.
Stitch count: 16 dc.
Fasten off the center color, leaving a tail long enough to weave in. Keep the center flat rather than pulling it into a tight cup.
Part B: Crochet the Eight Flower Petals
Use the petal color. Complete this round on each center panel.
Each petal is worked into one stitch from Round 2. The next stitch is used as the valley between petals.
Petal sequence: Work 1 sc, 1 hdc, 3 dc, 1 hdc, and 1 sc all into the same stitch.
This creates seven stitches in one anchor stitch and forms a rounded fan-shaped petal.
Round 3
- Attach the petal color in any stitch from Round 2.
- Ch 1. This does not count as a stitch.
- Sl st into the first stitch to form the first valley.
- In the next stitch, work the complete petal sequence: 1 sc, 1 hdc, 3 dc, 1 hdc, and 1 sc.
- Sl st into the next stitch to form the next valley.
- In the following stitch, work another complete petal sequence.
- Continue alternating one slip-stitch valley and one petal sequence around the center.
- You will make 8 petals, using all 16 stitches from Round 2.
- After the final petal, join with a sl st at the first valley.
Stitch count: 8 petals, each containing 7 stitches, and 8 valley slip stitches.
The petal round is complete when you have eight evenly spaced petals and no unused stitches from Round 2.
Keep the petals even: Work all seven stitches of each petal into one anchor stitch. Avoid accidentally splitting the petal across two stitches, as this can make the petals uneven.
Part C: Shape and Finish the Flower Front
After completing the petal round:
- Lay the flower on a flat surface.
- Gently spread the petals so they sit evenly around the center.
- Check that the center lies flat and that all eight petals are approximately the same size.
- Weave in the color-change tails on the wrong side.
- Repeat the same process for the back panel.
No additional outer round is required for the sample design. The scalloped petal round forms the finished edge.
If the center curls, check your tension and make sure Round 2 contains 16 double crochets. If the petals ripple excessively, check that each petal has the correct stitch sequence and that each valley is made with one slip stitch.
Part D: Crochet the Back Panel
Make a second flower panel by repeating Rounds 1–3 exactly.
Use the same yarn weight, hook size, center color, and petal color as the front panel. Matching the stitch counts and construction helps the panels align during assembly.
Before joining, compare the two panels:
- Both centers should contain 8 single crochets in Round 1.
- Both centers should contain 16 double crochets in Round 2.
- Both flower edges should have 8 petals and 8 valleys.
- Both panels should be approximately the same width and height.
Lay the panels together with their wrong sides facing each other so the right sides face outward. Turn the petals so each front petal aligns with the corresponding back petal.
If one panel is larger, check the hook size and tension before proceeding. Do not stretch one panel to force it to match the other.
Part E: Assemble the Pillow
You will join the two flower panels around their scalloped edges. Use a yarn needle and a length of matching yarn, or use a crochet hook and slip stitches. The sample uses a slip-stitch join.
Step 1: Align the panels
- Place the two flower panels together with their wrong sides facing each other.
- Match the centers and arrange the eight petals so each front petal lines up with a back petal.
- Use stitch markers to secure the petals and valleys at several points around the flower.
- Check that the outer edges line up without stretching either panel.
Step 2: Join the outer edges
- Attach the joining yarn at a valley between two petals.
- Insert your hook through the corresponding stitch on the front panel and the matching stitch on the back panel.
- Make a slip stitch through both layers.
- Continue around the edge, joining corresponding stitches one by one.
- At each petal tip, make sure the matching front and back stitches are aligned.
- At each valley, keep the join snug enough to hold the edges together but not so tight that the flower becomes puckered.
Each panel has 8 petals with 7 stitches per petal, plus 8 valley slip stitches. This gives 64 edge positions per panel for matching during assembly. The exact appearance of the seam depends on how the slip stitches are worked, so focus on matching each corresponding stitch and keeping the tension consistent.
Step 3: Leave an opening
Continue joining until you have joined most of the flower, leaving an opening of approximately 4 inches between two adjacent petals. This opening should be large enough to insert stuffing comfortably.
Secure the joining yarn temporarily so it does not unravel while you fill the pillow.
If you plan to use a removable pillow insert instead of loose fiberfill, check that the insert fits the flower shape. A standard round insert may not fill the petal tips evenly, so a soft insert shaped for the flower may be more suitable.
Part F: Stuffing and Final Finishing
Add the stuffing
- Pull small amounts of polyester fiberfill apart so it is fluffy rather than packed into dense lumps.
- Fill the center first, distributing the stuffing evenly.
- Add small amounts to each petal, working toward the tips.
- Check the pillow from both sides as you fill it.
- Add or remove stuffing until the pillow has a soft, even shape.
- Avoid overfilling the petals, which can stretch the stitches and make the seam difficult to close.
For a softer pillow, use less stuffing. For a firmer decorative pillow, add more gradually while checking that the stitches do not stretch open.
Close the opening
- Continue the slip-stitch join across the remaining open edge.
- Check that every corresponding stitch is joined and that no gap remains.
- Secure the yarn and weave the tail through several stitches on the wrong side of the seam.
- Trim the remaining tail only after confirming the join is secure.
Final shaping
- Gently shape the center into a smooth circle.
- Spread each petal with your hands.
- Check the eight petals for even fullness.
- Inspect the seam for loose stitches.
- Weave in any remaining yarn ends.
Follow the care instructions for both the yarn and the stuffing. If the pillow is not designed with a removable cover, check whether the materials can be cleaned together before washing.
Troubleshooting
| Problem | Likely cause | Solution |
|---|---|---|
| The flower center curls upward | The stitches are too tight or the center is pulled too firmly | Check Round 1 and Round 2 counts, relax your tension, and try a larger hook if needed. |
| The petals curl or become wavy | Petal stitches are too tight or too loose | Keep your tension consistent and check that every petal uses the same stitch sequence. |
| The petals are uneven | Stitches were worked into the wrong anchor stitches | Work each petal into one stitch, with one slip-stitch valley between petals. |
| Gaps appear between petals | The valley stitches are loose or the petal bases are misaligned | Check the alternating valley-and-petal sequence and secure the joining yarn tails. |
| The front and back panels do not align | The panels have different tension or stitch counts | Compare the round counts and dimensions before joining. Remake a panel if the difference is substantial. |
| The pillow looks lumpy after stuffing | Fiberfill is packed unevenly | Remove some stuffing, loosen it, and distribute small amounts into the center and each petal. |
| The joining seam pulls too tightly | Slip stitches are too tight | Relax the joining tension and check that the flower lies flat as you work. |
| The finished pillow is smaller than expected | Your gauge is tighter or your yarn is thinner | Try a larger hook or a thicker yarn, and make both panels with the same materials. |
| The finished pillow is larger than expected | Your gauge is looser or your yarn is thicker | Try a smaller hook or a finer yarn, ensuring the fabric remains dense enough to hold the stuffing. |
Customization Ideas
Change the colors
Use a contrasting center and petal color for a classic flower look, or choose several shades for a playful design. If you use multiple colors, keep the same color sequence on the front and back panels so they match when joined.
Make a smaller or larger pillow
The simplest way to change the size is to adjust the center and petal proportions. A smaller center and shorter petals will produce a smaller flower, while a larger center or taller petal stitches can increase the overall dimensions.
Any change to the center stitch count may also require adjusting the number of petal attachment points. For this sample, keep the 16-stitch second round if you want to retain the eight-petal design exactly as written.
Larger pillows generally need more yarn and stuffing. Make both panels with the same adjustments so they remain compatible.
Add decorative details
- Use a contrasting border or joining yarn.
- Add embroidered details to the center.
- Try surface crochet for subtle texture.
- Choose a soft yarn for a cozy decorative finish.
- Use a removable insert if you can find one that fits the flower shape and the opening can accommodate it.
Remember that different yarns, hook sizes, and embellishments can change the pillow’s dimensions, texture, and care requirements.
Frequently Asked Questions
1. Is this crochet flower pillow suitable for beginners?
Yes. The pattern uses basic stitches and a repeating sequence to form eight petals. Beginners should be comfortable with single crochet, double crochet, increases, and joining rounds.
2. Which yarn works best for a decorative pillow?
Medium-weight acrylic, cotton, or suitable blends can work well. Acrylic can produce a soft finish, while cotton often gives more defined stitches. Choose yarns of the same weight for both panels.
3. Can I make the pillow in different sizes?
Yes. Adjust the center and petal proportions while maintaining matching front and back panels. Changing the number of petal attachment points requires a corresponding change to the center construction.
4. How can I keep the flower petals flat and evenly shaped?
Use the same seven-stitch petal sequence for every petal and keep one slip-stitch valley between them. Consistent tension helps the scalloped edge remain balanced.
5. Can I use a ready-made pillow insert?
Yes, if its shape fits the flower. A standard round insert may not fill the petals evenly. A removable insert shaped for the flower may provide a better fit, provided it can pass through the opening.
6. How do I wash and care for the finished pillow?
Follow the yarn and stuffing care labels. If the pillow has no removable cover, confirm that all materials can be cleaned together before washing. Reshape the petals after cleaning if needed.
7. How can I make the pillow firmer or softer?
Use more stuffing for a firmer pillow and less for a softer one. Add stuffing gradually and distribute it evenly so the center and petals have a consistent shape.
Conclusion
Your crochet flower pillow brings a cheerful handmade touch to your home with its rounded center and eight decorative petals. By making two matching panels, joining the edges carefully, and distributing the stuffing evenly, you can create a flower-shaped cushion that suits your favorite colors and décor.
Experiment with different yarn shades, adjust the size to suit your space, and enjoy the process of turning simple crochet stitches into a decorative flower.
Which colors would you choose for your flower pillow: a classic yellow-and-white combination, soft pastels, or bright contrasting shades?
Leave a Comment