
Learning how to make a crochet foundation chain is one of the first steps toward creating beautiful handmade projects. The foundation chain forms the starting edge for many crochet patterns, including scarves, blankets, dishcloths, garments, and other flat pieces. Once you understand how to create chain stitches with consistent tension, you will have a solid foundation for learning more crochet techniques.
This beginner-friendly tutorial explains each step, from making your first slip knot to counting your stitches and checking your finished chain.
1. Project Overview
- Skill level: Beginner
- Project type: Basic crochet technique
- Estimated practice time: Approximately 10–20 minutes
- Main technique: Making chain stitches
- Crochet terminology: US terms
- Expected result: A neat, flexible chain made of evenly sized stitches
The practice time is an estimate. If you are new to crochet, you may need additional time to become comfortable holding the hook and yarn.
2. Materials and Tools
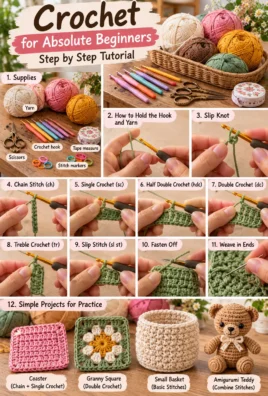
You only need a few basic supplies to practice your foundation chain.
- Smooth, medium-weight yarn: Choose a light color so you can see each stitch clearly.
- Crochet hook: Use a hook size recommended on your yarn label.
- Scissors: For cutting the yarn when you finish practicing.
- Measuring tape or yarn label: Optional, if you want to measure your chain or check the recommended hook size.
Smooth acrylic or cotton yarn is a good choice for beginners. Avoid very dark yarn, fuzzy yarn, and highly textured yarn while learning because the stitches can be difficult to see.
Choose a hook that allows the yarn to slide comfortably without snagging. If your chain repeatedly feels too tight, you may need to adjust your tension or try a slightly larger hook.
3. Essential Crochet Terms and Abbreviations
Before beginning, familiarize yourself with these basic terms.
- ch — Chain: A crochet stitch made by pulling a loop of yarn through the loop on your hook.
- st — Stitch: One completed crochet stitch.
- Slip knot: The adjustable knot used to place the first loop on your hook.
- Working yarn: The yarn connected to the ball or skein.
- Yarn tail: The short loose end left after making the slip knot.
- Foundation chain: A row of connected chain stitches that forms the starting point of a crochet project.
- Live loop: The active loop that remains on your hook while you crochet.
The working yarn and yarn tail have different purposes. You use the working yarn to make your stitches, while the yarn tail is simply the loose end that remains near the starting knot.
Remember that the slip knot is not counted as a chain stitch, and the live loop on the hook is not counted either.
4. Before You Begin
How to hold your crochet hook
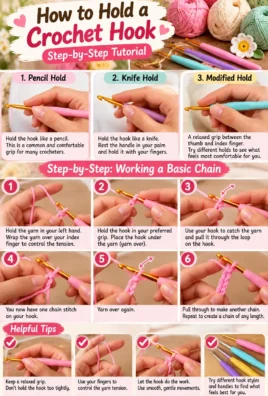
Hold the hook in your dominant hand. You can use either of these common grips:
- Pencil grip: Hold the hook similarly to a pencil.
- Knife grip: Hold the hook similarly to a table knife.
Neither grip is mandatory. Choose the one that feels natural and allows your wrist and fingers to move comfortably.
How to hold your yarn
Hold the working yarn with your other hand. Use your fingers to guide the yarn toward the hook and maintain gentle tension.
Some crocheters wrap the yarn around one or more fingers to control its movement. Others guide it loosely between their fingers. Both methods can work.
The important thing is to keep the yarn steady without pulling it too tightly. Your hook should move through the active loop easily, and the stitches should slide along the hook without excessive force.
5. Step-by-Step Instructions
Step 1: Make a slip knot
The slip knot creates the first loop that goes onto your crochet hook.
- Hold the yarn a short distance from its end.
- Cross the working yarn over the yarn tail to form a loop.
- Reach through the loop and pull a small section of the working yarn through it.
- Gently pull the yarn tail to shape the knot.
- Place the new loop onto your crochet hook.
- Pull the working yarn gently until the loop fits comfortably around the hook.
The loop should not be so tight that it prevents the hook from moving. It should also not be so loose that it slips off easily.
Important: The slip knot is only the starting loop. It does not count as the first chain stitch.
Step 2: Hold the hook and yarn
Hold the hook with the slip knot on it in your dominant hand.
Use your other hand to hold the working yarn and guide it toward the hook. Keep the yarn tail out of the way.
Position the hook so you can catch the working yarn with a small, controlled movement. You do not need to grip the hook tightly or pull the yarn hard.
Take a moment to relax your fingers. Comfortable hands make it easier to create consistent stitches.
Step 3: Yarn over
A yarn over means bringing the working yarn over the hook so the hook can catch it.
- Keep the active loop on your hook.
- Guide the working yarn over the hook from back to front, or rotate the hook underneath the yarn so it catches the strand.
- Make sure the hook has caught the working yarn rather than the short yarn tail.
You should now have the original loop on the hook and the working yarn caught by the hook, ready to pull through.
Try rotating the hook slightly downward as you pull through the loop. This helps prevent the hook from snagging the yarn.
Step 4: Make the first chain stitch
Now you will turn the slip knot into your first completed chain stitch.
- Make a yarn over, catching the working yarn with your hook.
- Gently draw the caught yarn through the loop already on your hook.
- Allow the old loop to pass completely over the hook head.
- Leave the newly formed loop on the hook.
You have now made your first chain stitch.
The completed chain stitch sits directly below the live loop. The live loop stays on the hook so you can continue crocheting.
Do not count the original slip knot as a chain stitch.
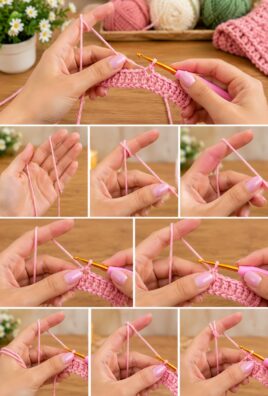
Step 5: Continue making chain stitches
To make more chain stitches, repeat the same movement.
- Catch the working yarn with the hook.
- Pull it through the live loop.
- Leave the new loop on the hook.
- Repeat until you have the number of stitches you need.
Each completed chain stitch creates a small V-shaped link below the hook.
Work slowly at first. You do not need to crochet quickly. Concentrate on making each loop similar in size and keeping the working yarn at a comfortable tension.
If the hook catches the yarn or struggles to pass through a loop, pause and loosen your tension slightly.
Step 6: Count the chain stitches correctly
Counting your stitches accurately is important because many crochet patterns begin with a specific number of chains.
To count your foundation chain:
- Lay the chain on a flat surface.
- Look for the small V-shaped links along the chain.
- Count each completed V-shaped link, starting from the stitch closest to the slip knot.
- Do not count the slip knot.
- Do not count the live loop currently on the hook.
Practice example: Make a slip knot and then work 10 chain stitches. Lay the chain flat and count the 10 completed V-shaped links below the hook. You should have ten chain stitches, plus the live loop remaining on your hook.
If your count is incorrect, look carefully at the chain before continuing. It is easier to correct a small mistake now than after crocheting several rows.
Step 7: Check your foundation chain
Before using your chain in a project, check its appearance and flexibility.
A good foundation chain should:
- Have clearly visible V-shaped stitches.
- Feel flexible rather than stiff.
- Have loops that are reasonably similar in size.
- Lie naturally without twisting into tight knots.
- Allow the hook to move comfortably through the loops.
Small differences in tension are normal when you are learning. If some stitches are tighter than others, practice making another short chain and focus on keeping the active loop at a consistent size.
You do not need every stitch to look perfect immediately. Repetition will help you develop a more even rhythm.
6. How to Make the Foundation Chain the Correct Length
The correct number of chains depends on the crochet pattern you are following.
A scarf may require a different starting chain from a dishcloth, blanket, garment, or decorative square. Some patterns also require additional chains for turning or to establish a particular stitch pattern.
Follow the chain count specified in your pattern rather than choosing a number at random.
Making a chain with a specific stitch count
- Make your slip knot.
- Work the number of chain stitches required by the pattern.
- Count the completed V-shaped links, excluding the slip knot and live loop.
- Check your count before starting the next row.
For example, if your pattern instructs you to chain 25, make 25 completed chain stitches after the slip knot. Do not include the live loop on the hook in your count.
Measuring the chain
If your pattern specifies an approximate starting width, lay your chain flat and measure it gently with a measuring tape. Avoid stretching it while measuring.
Keep in mind that the chain’s length may change slightly when you work the first row. The type of stitch, your tension, and the location where you insert your hook can all affect the finished width.
If the pattern gives both a stitch count and a measurement, use the stitch count as your primary guide unless the pattern specifically instructs you otherwise.
7. Common Mistakes and How to Fix Them
| Common mistake | Why it happens and how to fix it |
|---|---|
| The chain is too tight. | You may be pulling the yarn too firmly after each stitch. Keep the active loop comfortable on the hook and relax your fingers. A slightly larger hook may help. |
| The chain is too loose. | Your active loops may be too large or your tension inconsistent. Try keeping the loops a similar size as you work. |
| You accidentally skip or add stitches. | You may lose track while crocheting. Count every few stitches instead of waiting until the end. |
| You count the slip knot as a stitch. | The slip knot is only the starting loop. Begin counting completed chain stitches after pulling the first yarn over through it. |
| You count the live loop on the hook. | The live loop is not a completed stitch. Count only the finished V-shaped links below the hook. |
| You catch only part of the yarn during a yarn over. | The hook may be turned away from the working strand. Check that the hook catches the full yarn strand before pulling through. |
| Your chain twists. | You may be turning the chain repeatedly while working. Let the completed stitches hang naturally and check their orientation as you go. |
| Your hook makes the stitches difficult to form. | The hook may be too small for the yarn, or the yarn may be difficult to handle. Check the yarn label and try a suitable hook size. |
| You pull the yarn so tightly that the hook cannot move. | Your hands may be gripping too firmly. Loosen your grip and allow the working yarn to slide through your fingers. |
8. Tips for Beginners
- Choose light-colored yarn. It makes the V-shaped links easier to see.
- Use a suitable hook. Start with the size recommended on your yarn label.
- Keep the active loop comfortable. Do not pull each stitch tightly against the hook.
- Count regularly. Check your stitch count every few chains.
- Practice with short chains. Make several small samples before starting a long foundation chain.
- Relax your hands. Take short breaks if your fingers feel tense.
- Focus on consistency rather than speed. Even stitches are more useful than fast stitches.
- Consider a larger hook if needed. A larger hook may make the foundation chain more flexible, but it can change the appearance of the starting edge. Use this approach only if it suits the pattern.
If you use a larger hook for the foundation chain and switch to a smaller hook for the next row, check that the transition looks neat. Some patterns recommend this technique, while others work best with the same hook throughout.
9. Practice Exercise
Use this simple exercise to become more comfortable making chain stitches.
- Make a slip knot and place it on your hook.
- Work 10 chain stitches.
- Count the completed V-shaped links.
- Lay the chain flat and check that it is not twisted.
- Make another chain of 15 stitches.
- Compare the two chains. Check whether the stitches are similar in size and flexibility.
- Repeat the exercise until the movements feel comfortable.
Do not worry if your first chain has uneven stitches. Look for gradual improvement rather than perfection. The goal is to develop a comfortable grip, consistent tension, and confidence in counting your stitches.
10. What Comes After the Foundation Chain?
Once your foundation chain is complete, the next step depends on the pattern.
For example, a pattern may instruct you to insert the hook into the second chain from the hook and work a single crochet stitch. Another pattern may begin in the third chain or use a different stitch.
Patterns also vary in the number of turning chains required before starting a new row. Some turning chains count as stitches, while others do not.
Always follow the instructions for your specific project. Do not assume that every crochet pattern begins in the same chain or uses the same number of turning chains.
11. Frequently Asked Questions
1. What is a crochet foundation chain?
A crochet foundation chain is a series of connected chain stitches that forms the starting edge of many crochet projects. It provides the base for working the first row.
2. Does the slip knot count as the first chain stitch?
No. The slip knot creates the starting loop on your hook. Your first chain stitch is made when you pull a yarn over through that loop.
3. Do I count the loop on the hook?
No. The live loop is the active loop used to make your next stitch. Count only completed V-shaped chain stitches below it.
4. Why is my foundation chain too tight?
You may be pulling the working yarn too firmly or making each loop too small. Relax your grip, avoid tightening each chain against the hook, and consider trying a slightly larger hook if the pattern allows it.
5. How many chains should I make for a crochet project?
Use the number specified in your pattern. Different projects and stitch patterns require different starting counts, and some patterns include extra chains for turning or pattern repeats.
6. How can I tell which side of the chain I should work into?
A completed chain has small V-shaped links along its upper edge and bumps along the opposite side. Many patterns tell you exactly where to insert the hook, such as under the top loops or into the back bump. Follow the method stated in your pattern.
7. Can I use a larger hook for the foundation chain?
Yes, some crocheters use a larger hook to create a more flexible starting edge. However, this can change the appearance and width of the edge. Check whether the technique suits your pattern before using it.
8. Why does my foundation chain twist?
The chain may turn as you handle it, especially when you are new to crochet. Let it hang naturally, avoid rotating it unnecessarily, and lay it flat occasionally to check its orientation.
9. How can I keep my chain stitches the same size?
Maintain a comfortable loop size on the hook and use gentle, consistent tension. Practice slowly and compare your stitches every few chains rather than trying to correct everything at the end.
10. What should I do if I make too many or too few chains?
If you notice the mistake before starting the next row, undo the extra chains or add the missing ones. Count again before continuing. If you have already started crocheting into the chain, you may need to undo the affected stitches to correct the count.
12. Conclusion
The crochet foundation chain is a simple but essential skill that opens the door to many crochet projects. Once you understand how to make a slip knot, create chain stitches, count them accurately, and maintain gentle tension, you will be ready to begin your first rows with greater confidence.
Practice with short chains, focus on keeping the stitches consistent, and give yourself time to develop a comfortable rhythm. With patience and repetition, making a neat foundation chain will soon feel natural.
Leave a Comment