
A flower granny square combines the beauty of a crochet flower with the classic shape of a granny square. With a colorful center, clearly defined petals, and a neat square border, this versatile motif is perfect for blankets, cushion covers, bags, cardigans, tops, and other handmade projects.
In this beginner-friendly tutorial, you will work from the center outward, create eight flower petals, and form four balanced corners. Once you learn the basic construction, you can experiment with different colors and make matching squares for larger projects.
1. Project Overview
- Skill level: Beginner to confident beginner
- Project type: Crochet motif
- Construction: Worked in joined rounds from the center outward
- Terminology: US crochet terms
- Estimated completion time: Approximately 45–90 minutes per square
- Estimated finished size: Approximately 5–6 inches
- Main techniques: Magic ring, chain stitches, double crochet, slip stitches, working into chain spaces, changing colors, and forming square corners
These measurements and completion times are estimates. Your finished square may be larger or smaller depending on your yarn, hook size, stitch tension, and the number of rounds you work.
2. Materials and Tools
Gather the following supplies before beginning:
- Color A: Yarn for the flower center
- Color B: Yarn for the flower petals
- Color C: Yarn for the background and square
- Optional Color D: Yarn for a decorative border
- Crochet hook suitable for your yarn
- Scissors
- Tapestry needle for weaving in yarn ends
- Measuring tape, optional
Smooth, medium-weight yarn is a good choice for beginners because it makes stitches and chain spaces easier to identify. Choose colors that contrast clearly so the flower remains visible against the square background.
Use the same yarn weight and hook size throughout the motif whenever possible. If you plan to make several squares for a blanket or garment, consistent materials will help the finished pieces match.
3. Crochet Abbreviations and Special Stitches
This pattern uses US crochet terminology.
- ch: Chain
- sl st: Slip stitch
- sc: Single crochet
- hdc: Half double crochet
- dc: Double crochet
- st: Stitch
- sp: Space
- ch-sp: Chain space
- rep: Repeat
- rnd: Round
Starting chains do not count as stitches unless specifically stated otherwise. Join each completed round with a slip stitch into the designated stitch or space.
A chain space is the opening created by chain stitches. When instructions tell you to work into a chain space, insert your hook through the opening rather than into the top of a stitch.
How to make a magic ring
- Form a loop with the yarn, leaving a short tail.
- Insert your hook through the loop and pull up a loop of working yarn.
- Chain one to secure the loop.
- Work the required stitches into the ring.
- Pull the yarn tail to close the center.
If you prefer not to use a magic ring, chain four and join with a slip stitch to form a small ring. You can then work the first round into that ring.
4. Before You Begin
Maintain consistent tension
Keep the yarn moving comfortably through your fingers. Avoid pulling your stitches too tightly, because a tight center can curl or pucker. If your stitches are very loose, the flower may look uneven and the background may have large gaps.
Join rounds neatly
At the end of a round, insert the hook into the stitch or space specified in the instructions and make a slip stitch. Do not accidentally join into a chain space unless the pattern directs you to do so.
Change colors cleanly
For a neat color change, finish the final stitch of the current round until two loops remain on the hook. Draw the new color through those loops to complete the stitch. If the round ends with a slip stitch, attach the new color at the designated joining point.
Fasten off colors that will not be used in the next round and weave in the ends when convenient.
5. Step-by-Step Flower Granny Square Pattern
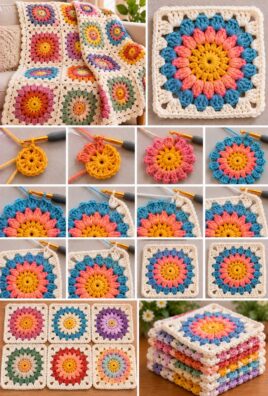
This design uses eight petals around a circular center. A transition round creates eight spaces around the flower, and the next round forms four corners and four sides.
Round 1: Create the Flower Center
Use Color A.
- Make a magic ring.
- Chain one. This chain does not count as a stitch.
- Work 16 double crochet stitches into the ring.
- Pull the yarn tail to close the center.
- Join with a slip stitch into the first double crochet.
End of Round 1: You should have 16 double crochet stitches.
Fasten off Color A, leaving a tail long enough to weave in securely.
Round 2: Form the Flower Petals
Use Color B.
This round creates eight petals. Each petal uses two neighboring center stitches, so all sixteen center stitches are used evenly.
Attach Color B with a slip stitch into the first double crochet of Round 1.
For each petal, follow this sequence:
- Work one single crochet into the first designated center stitch.
- Work one half double crochet into the next center stitch.
- Chain three to create the rounded outer tip.
- Work one half double crochet into the same center stitch as the previous half double crochet.
- Work one single crochet into the next center stitch.
- Slip stitch into the following center stitch to secure the petal base.
For the next petal, move to the next unused pair of center stitches and repeat the same sequence. Continue around until you have made eight petals.
Join at the base of the first petal with a slip stitch, then fasten off Color B.
Petal check: You should have eight petals spaced around the center. Keep the chain-three tips similar in size, and avoid pulling them too tightly.
Round 3: Create the Background Around the Flower
Use Color C.
This round creates a chain space at each petal base and prepares the motif for its square border.
- Attach Color C with a slip stitch at the base of any petal.
- Chain one. This does not count as a stitch.
- Work one single crochet into the base of the first petal.
- Chain three.
- Work one single crochet into the base of the next petal.
- Chain three again.
- Continue around, working one single crochet at each petal base and chaining three between neighboring petal bases.
- Join with a slip stitch into the first single crochet.
End of Round 3: You should have eight single crochet stitches and eight chain-three spaces.
The chain spaces are openings, not stitches. They provide room for the square-forming round to extend outward without pulling the petals together.
Check that the spaces are reasonably even. If the flower begins to curl inward, try relaxing your tension or using a slightly larger hook for this round.
Round 4: Form the Four Corners
Keep Color C attached.
The eight chain-three spaces from Round 3 alternate between four corner spaces and four side spaces. Work a corner group into every other space, with one side group in each space between the corners.
A corner group consists of three double crochet stitches, chain two, and three more double crochet stitches in the same space.
A side group consists of three double crochet stitches worked into one chain-three space.
Follow these steps:
- Slip stitch into the next chain-three space to position your hook.
- Chain three. This counts as the first double crochet of the round.
- Work two double crochet stitches into the same space.
- Chain two.
- Work three more double crochet stitches into the same space. This forms the first corner.
- Work three double crochet stitches into the next chain-three space. This forms the first side group.
- Work a corner group into the next chain-three space: three double crochet stitches, chain two, and three more double crochet stitches.
- Work three double crochet stitches into the next chain-three space.
- Repeat the same corner and side sequence around the remaining spaces.
- After using all eight chain spaces, join with a slip stitch to the top of the beginning chain-three.
End of Round 4: You should have four corner groups, each with a chain-two corner space, and four side groups of three double crochet stitches.
The four chain-two spaces are the corners of your square. The groups of three double crochet stitches between them form the sides.
Lay the motif flat and check that the corners are evenly spaced. If the sides pull inward, your tension may be too tight. If the sides ripple, check that you have not added extra stitches to the side groups.
Round 5: Expand the Square, If Needed
The motif may be large enough after Round 4. If you want a bigger square, add another round using Color C or a new coordinating color.
- Slip stitch across the next two double crochet stitches to reach the first corner chain-two space.
- Chain three. This counts as the first double crochet.
- Work two double crochet stitches into the same corner space.
- Chain two.
- Work three more double crochet stitches into the same corner space.
- Work three double crochet stitches into the first gap between neighboring double crochet groups along the side.
- Continue along the side, working three double crochet stitches into every gap between groups until you reach the next corner.
- In the next corner chain-two space, work three double crochet stitches, chain two, and three more double crochet stitches.
- Repeat the side groups and corner groups around the square.
- Join with a slip stitch to the top of the beginning chain-three.
For every additional round, keep the same corner structure: three double crochet stitches, chain two, and three more double crochet stitches in each corner space. Along the sides, work three double crochet stitches into each gap between neighboring groups.
Each new round adds another side group between the existing corner groups. Keep your tension consistent so the square remains flat.
Optional Additional Border
To add a simple finishing border, attach a contrasting or matching color at any corner.
- Work single crochet stitches along the side, placing them evenly around the double crochet groups.
- At each corner chain-two space, work two single crochet stitches, chain two, and two more single crochet stitches into the same space.
- Continue around all four sides.
- Join with a slip stitch to the first single crochet.
- Fasten off and weave in the ends.
If your border pulls inward, loosen your tension or add a few more evenly spaced single crochet stitches along each side. If it becomes wavy, reduce the number of stitches along the sides while keeping the corner increases consistent.
6. Complete Written Pattern Summary
Use this compact summary as a reference while crocheting.
Round 1 — Center: With Color A, make a magic ring, ch 1, work 16 dc into the ring, close the ring, and join with a sl st to the first dc. Fasten off.
Round 2 — Petals: With Color B, attach at the first center stitch. For each of eight petals, work sc into the first designated center stitch, hdc into the next stitch, ch 3, hdc into the same stitch as the previous hdc, sc into the next stitch, and sl st into the following center stitch to secure the base. Repeat evenly around and join at the first petal base. Fasten off.
Round 3 — Transition: With Color C, attach at a petal base. Ch 1, sc at the base of the first petal, ch 3, then sc at the base of each remaining petal, chaining 3 between bases. Join to the first sc. There should be eight sc stitches and eight chain-three spaces.
Round 4 — Square: Work a corner group of three dc, ch 2, and three dc into every other chain-three space. Work three dc into each intervening space. Join with a sl st to the top of the beginning ch 3. There should be four corners and four side groups.
Optional Round 5 — Enlargement: Work three dc, ch 2, and three dc into each corner chain space. Work three dc into every gap between neighboring groups along the sides. Join, fasten off, and weave in the ends.
Optional border: Work sc stitches evenly around the sides. At each corner, work two sc, ch 2, and two more sc into the same corner space.
7. How to Keep the Square Flat and Even
The square curls upward
A tight center or overly firm tension can cause curling. Check your stitch placement and try a slightly larger hook if necessary. Blocking may help with minor curling, but it will not correct a major stitch-count error.
The sides are wavy
Too many stitches or overly loose tension can create ripples. Count the side groups and make sure you are working only into the intended spaces.
The corners are uneven
Make sure each corner group is placed in a designated corner space and uses the same sequence. Use stitch markers in the four corner spaces if you find it difficult to identify them.
The flower center puckers
Your center may be too tight, or the ring may not have been closed evenly. Keep the first round relaxed and adjust your hook size if needed.
The petals look different in size
Make the same stitch sequence for all eight petals. Pay attention to the height of the half double crochet stitches and the length of each chain-three tip.
One side is wider than another
Check that the corner groups alternate with the side groups consistently. Count the groups on opposite sides and compare the motif while it lies flat.
The gaps are too large or too small
The transition round controls the spaces around the petals. Make each chain-three space similar in length, and avoid pulling the single crochet stitches too tightly at the petal bases.
Blocking can help improve a slightly uneven motif, but it cannot replace correct stitch placement and balanced corner construction.
8. Finishing and Weaving in Ends
When you have finished the final round:
- Join the round with a slip stitch as instructed.
- Cut the yarn, leaving a tail of approximately 6 inches.
- Pull the tail through the final loop to fasten off.
- Thread the tail onto a tapestry needle.
- Weave it through the backs of several stitches.
- Change direction and weave through a few more stitches to help secure the end.
- Trim any excess yarn without cutting into the crochet fabric.
Repeat for all loose ends. Avoid pulling the tails too tightly, as this can distort the square.
If the square needs shaping, use a blocking method appropriate for your yarn fiber. Gently arrange the sides and corners, allow the motif to dry completely, and check that it remains flat before joining it to other squares.
9. Sizing and Customization
There are several ways to customize your flower granny square.
- Change the yarn weight: Thicker yarn generally creates a larger motif, while finer yarn creates a smaller one.
- Choose a different hook size: A larger hook can make a looser fabric; a smaller hook usually creates a denser fabric.
- Add more rounds: Continue the established square pattern to increase the motif’s size while preserving the four corners.
- Change the colors: Try a contrasting center, bright petals, and a neutral background.
- Make coordinated sets: Use the same center and background colors across several squares, varying only the petal colors.
- Add a border: Use a contrasting shade to frame the motif.
Changing yarn weight, hook size, or tension affects the final dimensions. If you add rounds, keep the four corner spaces clearly defined and maintain consistent side groups.
10. Joining Flower Granny Squares
You can join completed flower granny squares into blankets, cushion covers, bags, garments, and other projects.
Common joining methods include:
- Slip-stitch joining: Creates a visible seam that can be relatively flat when worked loosely.
- Single-crochet joining: Creates a sturdier, slightly raised ridge between squares.
- Sewing with a tapestry needle: Allows you to control the seam and can create a flatter join.
Before joining, measure the squares and make sure they have the same number of rounds and similar dimensions. If you block your motifs, block them consistently so their edges align more easily.
Arrange the squares in your desired order before joining them. Match the corners first, then work along the edges without pulling the squares out of shape.
11. Frequently Asked Questions
1. What is a flower granny square?
A flower granny square is a crochet motif with a floral center surrounded by a square-shaped border. It is often made in joined rounds and can be used alone or combined with other squares.
2. Is a flower granny square suitable for beginners?
Yes. This pattern uses basic stitches and repeated instructions. The main skills to practice are working into chain spaces and recognizing the four corner groups.
3. How many colors do I need?
Three colors are enough for the center, petals, and background. A fourth color is optional for a decorative border.
4. Can I make the square with leftover yarn?
Yes. Small amounts of leftover yarn are useful for the flower center and petals. Try to use yarns of similar weight so the motif remains balanced.
5. Why does my flower center curl?
Your tension may be too tight, or the center may not have enough room to lie flat. Try loosening your stitches or using a slightly larger hook.
6. Why are my square’s corners uneven?
The corner groups may be placed inconsistently, or the chain-two spaces may be difficult to identify. Mark the four corner spaces and use the same stitch sequence at each one.
7. How do I keep every square the same size?
Use the same yarn, hook, pattern, and number of rounds. Measure each square flat and compare the dimensions before joining.
8. Can I make the flower granny square larger?
Yes. Add more square rounds, keeping the corner structure consistent and working three double crochet stitches into each side gap between groups.
9. Do I need to block each square?
Not always. If the motif lies flat and the corners are even, blocking may not be necessary. Blocking can help with minor unevenness, but it will not fix major construction errors.
10. What projects can I make with flower granny squares?
You can use them to create blankets, cushion covers, bags, cardigans, tops, scarves, and decorative home accessories.
12. Conclusion
Flower granny squares are a lovely way to combine color, texture, and classic crochet construction. With evenly spaced petals, a balanced transition round, and four clearly formed corners, you can create motifs that look beautiful on their own or as part of a larger project.
Practice the rounds with one sample square before making a full set. Once you are comfortable with the construction, experiment with color combinations and additional rounds to create your own collection of handmade floral motifs.
Leave a Comment