
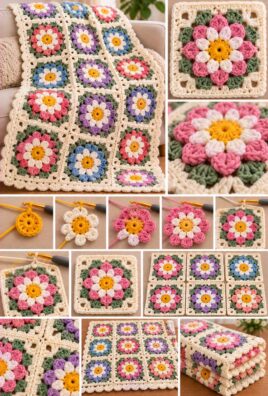
A crochet African Flower blanket brings together colorful floral motifs to create a beautiful, textured design. Each motif features a contrasting flower center, rounded petals, and a geometric outer edge. When the motifs are joined together, they form a decorative blanket that looks lovely on a sofa, across a bed, or as a handmade gift.
This tutorial uses hexagonal African Flower motifs with six petals and a simple, consistent construction method. You will crochet the motifs individually, arrange them into a planned layout, join the edges, and finish the blanket with a neat border.
The final size and appearance depend on your yarn, hook, color choices, tension, and joining method. Work one complete motif first and measure it before making the rest.
1. Project Overview
- Skill level: Confident beginner to intermediate
- Project type: Motif-based crochet blanket
- Construction method: Individual hexagonal African Flower motifs joined together
- Crochet terminology: US terms
- Approximate finished blanket size: 40 × 48 inches (102 × 122 cm)
- Approximate motif size: 6 inches (15 cm) from flat edge to flat edge
- Approximate completion time: 25–40 hours
- Main techniques: Magic ring, chain stitches, single crochet, double crochet, treble crochet, joined rounds, color changes, motif joining, and border finishing
All dimensions and completion times are estimates. Your actual results will vary with yarn weight, hook size, stitch tension, the number of motifs, and your crochet experience.
2. Materials and Tools
Gather the following supplies:
- Medium-weight yarn in three or four coordinating colors
- A crochet hook suitable for your yarn, often around 5 mm for medium-weight yarn
- Scissors
- Tapestry needle for weaving in ends and sewing motifs together
- Measuring tape
- Stitch markers, if helpful for marking corners or matching joining points
A useful color plan is:
- Color A: Flower center
- Color B: Petals
- Color C: Background and geometric shaping
- Color D: Optional final blanket border
Smooth yarn with clear stitch definition makes it easier to see the petal groups and chain spaces. Contrasting colors help the flower shape stand out.
Different yarn weights and hook sizes change the motif dimensions and the drape of the finished blanket. Use the same yarn weight and hook for all motifs if you want them to fit together evenly.
3. US Crochet Abbreviations
| Abbreviation | Meaning |
|---|---|
| ch | Chain |
| sl st | Slip stitch |
| sc | Single crochet |
| hdc | Half double crochet |
| dc | Double crochet |
| tr | Treble crochet |
| st | Stitch |
| sp | Space |
| ch-sp | Chain space |
| rep | Repeat |
| rnd | Round |
| FO | Fasten off |
Special stitch: Petal group
Each petal is made by working a group of double crochet and treble crochet stitches into one chain space. The stitches share the same space, creating a rounded, raised petal.
In this pattern, the rounds are joined with a slip stitch. The starting chains do not count as stitches unless specifically stated.
4. Before You Begin
Make a magic ring
Wrap the yarn into a loop, insert the hook, and pull up a loop of working yarn. Chain 1 to secure the working loop if needed, then work the required stitches into the ring. Pull the yarn tail to close the center.
Work into a ring
When instructed to crochet into the ring, insert the hook through the center opening rather than into an individual stitch. This creates a compact flower center.
Join rounds neatly
At the end of a round, insert the hook into the first actual stitch and make a slip stitch. Avoid joining into the starting chain unless the instructions specifically tell you to do so.
Change colors
To change colors cleanly, work the final pull-through of the last stitch in the old color with the new color. Continue the next round with the new yarn. Secure the unused color and weave in its tail later.
Keep the motif flat
Count each group as you work. If the motif begins to curl or ruffle, check your stitch counts and tension before continuing. Consistent tension is especially important when making several motifs for one blanket.
5. Step-by-Step African Flower Motif Pattern
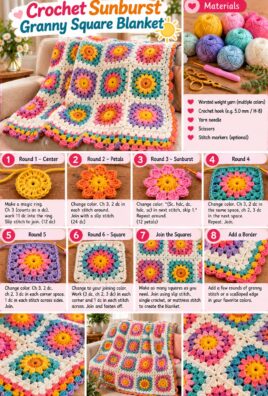
This pattern creates a six-petal flower inside a hexagonal motif. Each motif uses five rounds: a center, a petal foundation, the petals, a background round, and a final geometric edge.
Use the same stitch counts for every motif. You can change colors between rounds to create different combinations while keeping the construction identical.
Round 1: Create the flower center
Use Color A.
Rnd 1: Make a magic ring and ch 2. Work 12 dc into the ring. Join with a sl st into the first dc, not into the starting chain. Pull the ring closed. (12 dc)
The center should form a small, flat circle. Make sure the magic ring is tightened enough to close the hole.
Fasten off Color A if you want a different color for the petal foundation. Otherwise, keep the yarn attached and continue with the same color.
Round 2: Create the petal foundation
Join Color B in any dc from Round 1.
Rnd 2: Ch 1. Sc in the same stitch, ch 2, sk the next dc. Repeat the sequence of sc in the next dc, ch 2, sk the next dc around. Join with a sl st into the first sc. (6 sc and 6 ch-2 spaces)
You should have six evenly spaced chain spaces. Each space will hold one flower petal in the next round.
The chain spaces are created between single crochet stitches, with one center stitch skipped between them. Check that there are exactly six spaces before continuing.
FO Color B if you are changing colors for the petals.
Round 3: Crochet the six flower petals
Join your petal color in any ch-2 space from Round 2.
Rnd 3: Ch 2. In the same ch-2 space, work 3 dc, 1 tr, and 3 dc. This completes the first petal. Work 7 stitches into each of the remaining five ch-2 spaces: 3 dc, 1 tr, and 3 dc. Join with a sl st into the first dc of the first petal. (42 stitches total: 6 groups of 7 stitches)
Each petal has seven stitches, with the treble crochet forming its raised center. The group of stitches creates a rounded petal shape.
Check that every petal has the same stitch sequence. If one petal looks smaller, check whether you missed a double crochet or worked into the wrong space.
FO the petal color if you want a contrasting background.
Round 4: Add the background around the flower
Join Color C in the treble crochet at the center of any petal. This round creates six corner spaces and small valleys between adjacent petals.
Rnd 4: Ch 1. Work the following sequence around each petal:
- Sc in the first 2 dc of the petal.
- Hdc in the third dc.
- In the tr at the center of the petal, work 1 dc, ch 2, and 1 dc. This creates a corner space.
- Hdc in the first dc after the tr.
- Sc in the last 2 dc of the petal.
- Sl st into the space between this petal and the next petal.
Repeat the complete sequence for all six petals. Join with a sl st into the first sc of the round.
Each petal has one corner space, giving the motif six corner spaces in total. The slip stitches between petals form the valleys of the flower.
FO Color C if you want a separate color for the final edge.
Round 5: Form the outer hexagon
Join the outer-edge color in any ch-2 corner space from Round 4.
Rnd 5: Ch 2. Work 2 dc, ch 2, and 2 dc in the same corner space. This completes the first corner group.
Sc in each of the next 7 stitches along the side. In the next ch-2 corner space, work 2 dc, ch 2, and 2 dc.
Repeat the sequence of 7 sc along the side followed by a corner group of 2 dc, ch 2, and 2 dc until all six corner spaces have been worked. Join with a sl st into the first dc of the round.
The completed round has six corner groups, each separated by seven single crochet stitches. The chain-2 spaces at the corners define the hexagonal shape.
FO and weave in the ends with a tapestry needle.
Check the completed motif
Lay the motif on a flat surface and gently smooth it into shape. The six corners should be evenly spaced, with the flower centered inside the hexagon.
The motif may need light blocking if the edges curl slightly. If it is strongly wavy or distorted, check the stitch counts and tension before blocking.
6. Complete Written Motif Summary
Use this compact version while crocheting each flower.
- Rnd 1, Color A: MR, ch 2, 12 dc into ring. Join to first dc. (12 dc)
- Rnd 2, Color B: Ch 1, sc in same st, ch 2, sk next st; repeat around. Join to first sc. (6 sc and 6 ch-2 spaces)
- Rnd 3, petal color: Ch 2, then work 3 dc, 1 tr, and 3 dc in each ch-2 space. Join to first dc. (42 stitches)
- Rnd 4, Color C: For each petal, sc in first 2 dc, hdc in third dc, work dc, ch 2, dc in the tr, hdc in next dc, sc in last 2 dc, then sl st between petals. Repeat six times and join to first sc.
- Rnd 5, outer-edge color: In each corner space, work 2 dc, ch 2, 2 dc. Work 7 sc along each side between corner spaces. Repeat around all six corners and join to first dc.
- Finish: FO and weave in ends securely.
Each motif has six petals and six corner spaces. Use the same construction for every motif, changing only the colors if desired.
7. Plan the Blanket Layout
For this project, make 37 hexagonal motifs and arrange them into one larger hexagonal blanket. This layout creates a decorative throw without requiring half motifs or special edge pieces.
A practical layout uses four concentric groups:
- 1 motif in the center
- 6 motifs around the center
- 12 motifs in the next ring
- 18 motifs in the outer ring
That gives you 37 motifs in total.
With motifs measuring approximately 6 inches from flat edge to flat edge, the finished blanket may measure roughly 40–48 inches across, depending on how the motifs fit together, the joining seams, and the final border. The overall outline will be hexagonal rather than rectangular.
Arrange the motifs before joining
Lay all the motifs on a flat surface before sewing them together. Start with one motif in the center and arrange six around it. Continue adding motifs in rings until you have used all 37.
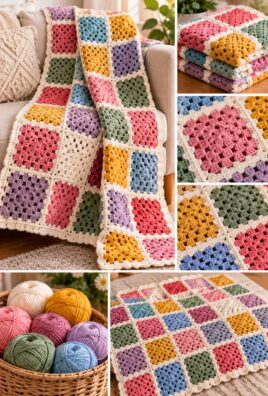
Rotate the motifs so their edges align. The flower colors can be arranged randomly for a colorful patchwork look, or planned in repeating groups for a more coordinated design.
Take a photograph or make a simple written color plan if you want to preserve the layout while joining.
8. Keep All Motifs the Same Size
Consistent motifs make the blanket easier to assemble and help prevent an uneven outline.
- Use the same yarn weight and hook size throughout.
- Follow the same stitch counts in every round.
- Keep your tension as consistent as possible.
- Measure the motifs after completing them.
- Block the motifs consistently if the yarn allows it.
- Check that all six corners and six sides are clearly formed.
Measure each motif from flat edge to flat edge. If one is noticeably larger or smaller, check its stitch counts and tension before joining it.
Blocking can help even out small differences, but it will not correct major stitch-count errors. Avoid forcing a motif into shape if doing so would distort the stitches.
9. Joining the African Flower Motifs
This tutorial uses a whipstitch seam with a tapestry needle. It is a straightforward method that allows the motifs to retain their individual flower shapes.
Step 1: Position two motifs
Place two motifs side by side with their right sides facing upward. Align the corresponding sides and corner spaces.
Each side has seven single crochet stitches from Round 5. Match the seven stitches on one motif with the seven stitches on the neighboring motif.
Step 2: Sew the edges together
Thread a length of yarn onto your tapestry needle. Use the background color or another coordinating shade.
- Insert the needle under the corresponding edge loops of the first motif.
- Pass the needle through the matching edge loops of the second motif.
- Continue along the side, matching one stitch on each motif.
- Keep the stitches evenly spaced and snug without pulling the edges together too tightly.
- Secure the yarn at the end of the seam and weave in the tail.
For the neatest finish, use the same joining yarn throughout the blanket. A matching background color helps the seams blend into the motifs.
Step 3: Join the blanket in sections
Begin by joining the motifs within small groups. Work outward from the center, checking that each new motif fits the surrounding edges.
Join the motifs ring by ring, then connect the rings together. This approach helps maintain the planned hexagonal layout and makes it easier to correct alignment before too many seams are completed.
At corners, align the chain-2 spaces carefully. Avoid sewing the corner spaces so tightly that the motif becomes distorted.
Step 4: Check the seams
After joining a section, lay it flat and check for gaps, bulky seams, or edges that pull inward. Adjust the tension or redo a seam if needed.
Weave in the joining yarn ends securely. Try not to leave long tails or thick knots at the intersections, where several motifs meet.
10. Adding the Final Blanket Border
A simple single crochet border provides a clean finish without overpowering the flowers.
Because this blanket is made from hexagonal motifs, crochet around the outer outline of the assembled blanket, not around the internal edges between motifs.
Border Round 1
Join your chosen border color at an outer corner of the blanket.
Ch 1. Work single crochet stitches along the outside edge, placing one sc in each available edge stitch. Where the outer outline passes over a joining seam, work into the exposed edge stitches so the border remains even.
At each of the six outer points of the blanket, work 3 sc into the corner space to help the border turn neatly.
Continue around the entire outside edge. Join with a sl st into the first sc.
Border Round 2
Ch 1 and work sc in each stitch around. At each outer corner, work 3 sc into the middle stitch of the previous round’s group of 3 sc.
Join with a sl st into the first sc.
FO and weave in the yarn tail.
Keep the border even
If the border curls inward, you may need more stitches around some sections of the outside edge. If it becomes wavy, there may be too many stitches or inconsistent spacing.
Check the outer corners first. The three-stitch groups should be centered at the six points of the hexagonal outline. Keep your tension relaxed enough for the blanket to lie flat.
11. Finishing and Care
Before considering the blanket complete, inspect the motifs and seams.
- Fasten off securely: Weave in all loose yarn ends using a tapestry needle.
- Check the joins: Look for gaps, loose stitches, or bulky intersections.
- Shape the blanket: Lay it flat and smooth the motifs gently into alignment.
- Block when appropriate: Follow the yarn’s care instructions. Blocking can improve the alignment of motifs, but it cannot correct major construction errors.
- Wash carefully: Use the washing method recommended on the yarn label.
- Dry thoroughly: Let the blanket dry completely before folding or storing it.
For a blanket made from multiple colors, check that the yarns have compatible care requirements. If you are unsure how the colors will behave, test a small swatch before washing the finished project.
12. Customization Ideas
You can personalize your African Flower blanket while keeping the main motif construction consistent.
- Change the flower colors: Use a bright center, contrasting petals, and a neutral background.
- Create a coordinated palette: Choose three or four colors that complement one another.
- Use leftover yarn: Make each flower different while using the same yarn weight and hook.
- Adjust the motif size: Change the yarn weight and hook size together, then measure a complete motif before making the rest.
- Make a larger blanket: Add another ring of motifs, ensuring that the layout continues to fit together.
- Choose a contrasting border: A darker or lighter edge can frame the blanket.
- Create a square layout instead: A square African Flower blanket is possible, but it requires a different outer-round construction. Do not combine square-corner instructions with the hexagonal motif pattern above.
Changing yarn weight, hook size, motif count, or joining method will affect the finished dimensions and drape. Make one complete motif first so you can plan the final size accurately.
13. Troubleshooting
The flower center curls
Likely cause: The stitches are too tight, or the ring and first round have been pulled too firmly.
Correction: Check the tension and make sure all 12 double crochet stitches are worked into the ring. If needed, try a slightly larger hook.
The petals look uneven
Likely cause: Some petal groups may have missing or extra stitches.
Correction: Check that each petal contains 3 dc, 1 tr, and 3 dc in one chain space. Count the six petals before starting the background round.
The motif becomes wavy
Likely cause: Extra stitches, incorrect placement, or inconsistent tension may have distorted the outer edge.
Correction: Verify the stitch counts and corner placement in Rounds 4 and 5. Correct the construction before attempting to block the motif flat.
The outer shape does not form correctly
Likely cause: A corner space may have been missed, or a side may have too many or too few stitches.
Correction: Check that Round 4 creates six corner spaces and Round 5 places a corner group in each one, with seven sc along every side.
Some motifs are larger than others
Likely cause: The yarn, hook, tension, or stitch counts differ.
Correction: Compare the motifs before joining them. Correct missed stitches, and block them consistently if appropriate for the yarn.
The joins look bulky
Likely cause: The joining yarn may be too thick, the sewing stitches may be too tight, or too many yarn ends may be gathered at one point.
Correction: Use a tapestry needle and evenly spaced whipstitches. Avoid pulling the seam tightly, and weave in the ends without creating thick knots.
Gaps appear between motifs
Likely cause: The corresponding edge stitches or corners may not have been matched correctly.
Correction: Align all seven edge stitches before sewing. At intersections, check that the corner spaces sit next to one another and that the seam does not leave open gaps.
The assembled blanket has an uneven outline
Likely cause: The motifs may not be aligned properly, or some motifs may be a different size.
Correction: Lay the blanket flat and check the outside edges before adding the border. Undo and adjust any seam that pulls one section out of alignment.
The final border curls or becomes wavy
Likely cause: The number of stitches around the outside edge may be too high or too low.
Correction: Work the border evenly along the exposed outer stitches and place 3 sc at each of the six outer points. Adjust the side-edge placement if the fabric does not lie flat.
14. Frequently Asked Questions
What is an African Flower crochet motif?
It is a floral crochet motif with a contrasting center, rounded petals, and a geometric outer edge. Individual motifs can be joined together to create blankets, cushions, and other decorative projects.
Is an African Flower blanket suitable for beginners?
It is best suited to confident beginners who understand basic stitches, joined rounds, and color changes. Joining many motifs neatly requires patience and careful alignment.
How many colors are needed for each motif?
Three colors are enough for the center, petals, and background. You can use a fourth color for the outer edge or use different combinations for a patchwork effect.
How many motifs are needed for a blanket?
This example uses 37 hexagonal motifs arranged in a larger hexagon. The total you need will depend on your motif size and the finished dimensions you want.
Can I use leftover yarn?
Yes. Leftover yarn is useful for creating colorful flower centers and petals. For the most consistent results, use compatible yarn weights and the same hook size throughout.
How do I keep every motif the same size?
Use the same yarn and hook, follow the stitch counts, maintain consistent tension, and measure each motif. Block the motifs consistently if the yarn allows it.
What is the easiest way to join African Flower motifs?
A whipstitch seam with a tapestry needle is a straightforward option. Match corresponding edge stitches and sew with small, even stitches without pulling the seam too tightly.
Can I make a rectangular blanket with hexagonal motifs?
Yes, but a rectangular outline may require half motifs or other edge pieces. This tutorial uses a hexagonal arrangement of 37 complete motifs to avoid those additional pieces.
Should I block the motifs before joining?
Blocking can help the motifs lie flat and make their edges easier to align. Follow the yarn care instructions, and correct any major stitch-count errors before blocking.
How do I wash and care for the finished blanket?
Follow the yarn label for washing and drying. Weave in all ends securely, inspect the joins periodically, and store the blanket clean and dry.
Conclusion
A crochet African Flower blanket is a rewarding project that transforms individual floral motifs into a colorful, coordinated design. By keeping the six petals consistent, checking the hexagonal corners, and joining the motifs carefully, you can create a beautiful handmade throw.
Complete one motif first and check its size and shape before making the rest. With consistent stitch counts, tidy seams, and a simple finishing border, your African Flower blanket can become a distinctive addition to your home or a thoughtful handmade gift.
Leave a Comment