
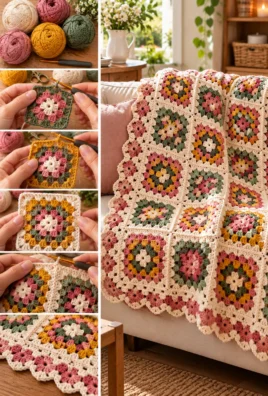
A granny square blanket is a timeless crochet project made by creating individual square motifs and joining them into a larger, cozy blanket. This method is especially practical because you can work on one square at a time, carry a small project in your bag, and assemble the blanket when all the motifs are ready.
This tutorial uses a classic granny square with a solid, four-corner structure, a coordinated four-color palette, and a neat single-crochet join. The finished design has a balanced, traditional appearance with clearly defined squares and a simple border that frames the blanket without overwhelming its texture.
The instructions use US crochet terminology throughout. The stitch counts and dimensions are calculated design targets rather than physically tested results. Your final measurements and yarn consumption will depend on your yarn, hook, tension, and joining technique.
1. Project overview
Classic Four-Color Granny Square Blanket
Traditional motifs · Beginner-friendly construction · Text-only pattern
Finished size target
Approx. 45 × 57 in
114 × 145 cm
Square count
48 squares
6 across × 8 down
Skill level
Beginner to intermediate
Estimated working time
35–55 hours
Varies with experience and finishing speed
| Project detail | Specification |
|---|---|
| Construction | Individual granny squares joined into rows |
| Square target | 7 × 7 in (17.8 × 17.8 cm), before joining |
| Yarn | Medium-weight, category 4 |
| Fiber recommendation | Acrylic, washable wool blend, or cotton-acrylic blend |
| Hook | 5 mm (US H-8), adjusted to suit your tension |
| Main stitches | Chain, double crochet, slip stitch |
| Joining method | Single-crochet join |
| Border | Two rounds of single crochet |
| Color scheme | Cream, sage green, dusty blue, and muted terracotta |
| Turning chains | Not used; rounds are joined and worked from the same side |
| Yarn estimate | Approximately 2,000–2,400 yd (1,830–2,195 m) total |
The finished-size target includes the border and assumes that the squares measure approximately 7 inches before joining. Since joining seams occupy a small amount of space and the border adds width, the assembled blanket may differ from the estimate.
2. Materials and tools
Essential supplies
Choose a smooth, medium-weight yarn with good stitch definition. A yarn that is too fuzzy can make it harder to identify the chain spaces and corners, especially while learning.
The following quantities are planning estimates for 48 squares and a two-round border.
| Color | Suggested role | Estimated weight | Estimated length |
|---|---|---|---|
| A — Cream | Center and joining yarn | 450 g | 820 yd (750 m) |
| B — Sage green | Inner rounds | 400 g | 730 yd (667 m) |
| C — Dusty blue | Middle rounds | 400 g | 730 yd (667 m) |
| D — Muted terracotta | Outer rounds and accents | 450 g | 820 yd (750 m) |
| Border reserve | Preferably cream, from Color A | Included above if sufficient | Included above if sufficient |
Important: The quantities above are approximate planning amounts, not measured consumption. They total 1,700 g and 3,100 yd, which is a deliberately generous starting allowance for a blanket of this size. Actual use could be lower or higher depending on the yarn’s length per gram, stitch density, square size, and border. For purchasing, check the yarn label’s yardage and buy enough of the same dye lot, including a reserve for joining and finishing.
For example, if a skein contains 200 g and 360 yd, a 400 g allowance represents two skeins, while an 800 g allowance represents four. Always calculate the number of skeins from the actual label rather than relying on weight alone.
Also prepare:
- A 5 mm crochet hook, with a 4.5 mm or 5.5 mm alternative if needed.
- Sharp scissors.
- A blunt tapestry needle for weaving in ends.
- A measuring tape or ruler.
- Stitch markers, especially for marking the first corner.
- Optional rustproof blocking pins and a blocking mat.
- Optional removable labels or small bags for organizing completed squares.
Choosing the right yarn
Acrylic yarn is often an economical choice for blankets. It is widely available in many colors and may be machine washable, depending on the label. It can feel lighter than some natural fibers, but very soft or loosely spun varieties may split while crocheting.
Cotton yarn provides clear stitch definition and a firm fabric. However, it can be heavier and less elastic, and a large cotton blanket may feel weighty.
Wool or wool blends can provide warmth and elasticity. Some fibers require gentle hand washing or careful drying, so check the manufacturer’s instructions before choosing them.
Cotton-acrylic blends can be a useful middle ground between softness, structure, and ease of care.
For this project, choose one yarn line in all four colors whenever possible. Different yarn brands can vary in thickness even when their labels show the same category. Mixing them may produce squares of different sizes or a blanket with uneven drape.
3. Crochet terminology and abbreviations
The pattern uses US terminology.
| Abbreviation | Meaning | Explanation |
|---|---|---|
| MR | Magic ring | An adjustable loop that closes the center |
| ch | Chain | A basic crochet stitch used to create chains and spaces |
| sl st | Slip stitch | A short stitch used to join rounds |
| sc | Single crochet | A compact stitch used for joining and borders |
| dc | Double crochet | The main stitch used in the granny square |
| st / sts | Stitch / stitches | Individual crochet stitches |
| sp / sps | Space / spaces | Open areas created by chains or gaps |
| ch-sp | Chain space | An opening beneath a chain or chain group |
| rep | Repeat | Work the specified sequence again |
| sk | Skip | Pass over a stitch or space without working into it |
| FO | Fasten off | Secure the yarn after completing the work |
Stitches versus spaces
A stitch is the top of a completed crochet stitch. When working into a double crochet, you normally insert your hook beneath the two top loops.
A chain space is the opening beneath one or more chains. In this granny square pattern, most of the clusters are worked into the open spaces between previous clusters, not into the tops of the individual double crochet stitches.
The corner spaces are the larger openings created by the chain-2 sections at the four corners. Each corner space receives a corner group on every subsequent round.
The smaller spaces along the sides are created by chain stitches between double-crochet groups. These spaces receive side clusters as the square grows.
Turning chains are not used in this pattern. At the beginning of a new round, slip stitch to the designated corner space and make the starting chain specified in that round. The starting chain does not count as a double crochet stitch. Each cluster contains the explicitly stated number of double crochet stitches.
4. Essential techniques for beginners
4.1 Making a magic ring
- Leave a yarn tail approximately 6 inches (15 cm) long.
- Form a loop with the working yarn crossing over the tail.
- Insert your hook through the loop, catch the working yarn, and pull up a loop.
- Chain 1 to secure the working loop.
- Work the required stitches around the loop, inserting the hook through the center and over the loop strands as directed.
- After the first round is complete, pull the yarn tail to close the center.
The magic ring should close neatly without leaving a large hole. Do not pull so tightly that the center becomes difficult to crochet into or the stitches distort.
4.2 Using a chain-ring alternative
If the magic ring feels difficult, chain 4 and slip stitch into the first chain to form a ring. Work the first round into the center of that ring.
This method is easier for some beginners, although it can leave a small opening. Weave in the tail securely after tightening the center.
4.3 Making a chain stitch
- Place the working loop on the hook.
- Wrap the yarn over the hook from back to front.
- Draw the yarn through the loop already on the hook.
One new chain is formed. Keep chains loose enough for your hook to pass through them easily, but not so loose that the square’s corners become floppy.
4.4 Making a double crochet stitch
- Yarn over.
- Insert the hook into the designated stitch or space.
- Yarn over again and pull up a loop. You now have three loops on the hook.
- Yarn over and draw through the first two loops.
- Yarn over again and draw through the remaining two loops.
One double crochet is complete. A granny cluster in this pattern is a group of three double crochet stitches worked into the same space.
4.5 Making a slip stitch
Insert the hook into the specified stitch or space, yarn over, and pull the yarn through the space and the loop on your hook in one movement.
Slip stitches are used to join rounds and move the working loop to the next position without adding height.
4.6 Working into chain spaces
Locate the opening beneath the chain stitches rather than inserting the hook into the top of a nearby double crochet. Insert the hook through the opening, yarn over, and work the specified stitches.
Working all three double crochets into the same space produces a recognizable cluster and leaves the stitch tops free.
4.7 Forming a corner
The corners in this design use:
3 dc, ch 2, 3 dc in the same corner space.
The chain-2 section creates the turning space. The two clusters sit on either side of it, allowing the work to turn while remaining square.
On later rounds, identify the corner space by its position between the two clusters that form the corner. Do not confuse it with the smaller chain-1 spaces along the sides.
4.8 Identifying the beginning of a round
After joining a round, place a stitch marker in the corner space you will use as the start of the next round. This helps prevent accidentally skipping a corner or working twice into the same space.
This pattern begins each new round in a corner space. If your joining slip stitch leaves the working loop in a nearby position, slip stitch across to the corner space before making the starting chain.
4.9 Changing colors neatly
Finish the current round with a slip stitch as instructed. Cut the yarn, leaving a tail of approximately 6 inches (15 cm), and pull the tail through the loop to fasten off.
Join the new color in the designated corner space with a slip knot on the hook. Make the starting chain and begin the first cluster. Avoid tying bulky knots at the color change; the yarn ends will be woven in later.
4.10 Joining yarn in the middle of a project
If you run out of yarn, finish the current stitch if possible, then secure the old yarn and join the new strand in a suitable space. Leave tails long enough to weave in securely.
For a blanket with many squares, avoid placing all yarn joins in one corner. Distributing them across the work can reduce bulky areas.
4.11 Fastening off and weaving in ends
Cut the yarn with a tail approximately 6 inches (15 cm) long. Pull the tail through the final loop and tighten gently.
Thread the tail onto a tapestry needle. Weave it through the backs of several stitches in one direction, then change direction and weave through a few more. Avoid pulling so tightly that the square puckers. Trim the excess only after the tail is secure.
4.12 Maintaining consistent tension
Hold the yarn in a comfortable way and keep the size of the working loop consistent. If your stitches become tighter as you work, pause and relax your grip before continuing.
The most important measure is not how tightly you crochet, but whether all 48 squares are consistent in size and drape.
4.13 Measuring a square
Lay the square flat without stretching it. Measure from the outside edge of one side to the opposite edge, then measure at a right angle.
Record both measurements. A square that measures 7 inches wide but 7.5 inches tall should be corrected before you make dozens of matching motifs.
4.14 Joining squares
Place two squares with their corresponding edges aligned. Work the chosen joining stitches through the matching edge loops or stitches, following the joining method described later. Keep the tension even, and check the seam after every few inches.
5. Design specifications and finished dimensions
The primary design uses 48 five-round granny squares arranged in six columns and eight rows. Each square has four clearly defined corners, three-double-crochet clusters, and chain spaces that allow the motif to grow evenly.
The target square size is 7 × 7 inches (17.8 × 17.8 cm) before joining. This is a design target, not a guaranteed result; make a sample square before committing to the full quantity.
| Measurement | Design target |
|---|---|
| Squares across | 6 |
| Squares down | 8 |
| Total squares | 48 |
| Individual square | 7 × 7 in (17.8 × 17.8 cm) |
| Width before joining | 42 in (106.7 cm) |
| Length before joining | 56 in (142.2 cm) |
| Estimated width after joining | 43–44 in (109–112 cm) |
| Estimated length after joining | 57–58 in (145–147 cm) |
| Border contribution | Approximately 0.5 in (1.3 cm) per side |
| Overall finished target | Approximately 45 × 59 in (114 × 150 cm) |
The assembled dimensions are estimates. The seam width, how the squares are joined, and the border tension can all change the final size. The border is intended to be approximately half an inch wide on each side.
Target gauge
For planning purposes, aim for a five-round square measuring approximately 7 inches (17.8 cm) across. Granny squares are made in clusters and chain spaces, so the dimensions of a completed square are more useful than a conventional gauge based only on individual stitches.
If your sample is too small, try a larger hook. If it is too large, try a smaller hook. Change only one variable at a time, and make another sample before continuing.
6. Gauge and square consistency
Consistency matters because every square must fit its neighbors. Even a small difference repeated across six columns can make the blanket visibly wider or narrower in some areas.
How to check your sample
- Crochet one complete five-round square using the planned colors and hook.
- Fasten off and weave in the ends.
- Lay it flat without stretching.
- Measure the width through the center and the height from one edge to the opposite edge.
- Check whether all four sides are approximately equal.
- Compare the result with the 7-inch target.
- Adjust the hook size if needed, then make a second sample.
Count the rounds by identifying the outer edge of each completed round. A color change can help distinguish rounds, but you should still be able to identify each round by its cluster groups and chain spaces.
Keeping all 48 squares the same size
- Use the same hook for every square unless you deliberately change the pattern.
- Keep the same number of rounds and the same color sequence.
- Avoid tightening the slip stitch at the end of each round excessively.
- Measure the first few squares before making the remaining motifs.
- Compare each completed square against a reference square.
- Block squares consistently if blocking is appropriate for the yarn.
If one square is slightly larger, gently reshape it during blocking if the fiber allows. If it is substantially different, remake it rather than stretching it aggressively. Stretching can distort the corners and make the fabric unstable.
Recalculating the blanket size
Use the following planning formula:
- Width before joining: square width × number of columns.
- Length before joining: square height × number of rows.
- Finished width: width before joining + seam allowance + twice the border width.
- Finished length: length before joining + seam allowance + twice the border width.
The seam allowance is the total change in dimension caused by your joining method. Measure a short sample seam if you want a more precise estimate.
7. Construction overview
Complete the project in this order:
- Choose the yarn colors and hook.
- Crochet one test square.
- Check its dimensions and adjust your tension or hook if necessary.
- Make the remaining squares using the same pattern.
- Fasten off and weave in the ends.
- Measure and, if suitable, block the squares.
- Arrange all 48 squares in six columns and eight rows.
- Join the squares row by row.
- Join the completed rows to form the blanket.
- Work the two-round single-crochet border.
- Inspect the seams, weave in any remaining ends, and measure the finished blanket.
Work carefully at the measuring and assembly stages. Correcting a size mismatch before joining is easier than trying to force mismatched squares into a straight blanket later.
8. Complete round-by-round granny square pattern
The square uses four corner spaces and three-double-crochet clusters. The pattern is worked in joined rounds, without turning.
Color plan for each square
Each square follows the same five-round sequence:
| Round | Color | Main purpose |
|---|---|---|
| 1 | A — Cream | Create the center |
| 2 | B — Sage green | Establish the first corners |
| 3 | C — Dusty blue | Add side clusters |
| 4 | D — Muted terracotta | Expand the square |
| 5 | A — Cream | Complete the outer round |
This color sequence creates a cream center, green and blue middle rounds, a terracotta accent, and a cream outer edge. The cream outer round also creates a consistent edge for joining.
Pattern conventions: The starting chain of 2 does not count as a stitch. All clusters consist of three double crochet stitches. Each corner is made with 3 dc, ch 2, 3 dc in the same corner space. The chain-1 spaces between corner groups are side spaces; chain-2 spaces are corners.
Round 1 — Create the center
With Color A, make a magic ring.
- Ch 2.
- Work 3 dc into the ring.
- Ch 2 to create the first corner.
- Repeat the following sequence three times:
3 dc into the ring, ch 2. - Pull the magic ring closed.
- Sl st into the first dc to join.
Round 1 check:
- Four clusters of 3 dc.
- Twelve dc stitches in total.
- Four ch-2 corner spaces.
- No side ch-1 spaces yet.
The first round should form four groups around the center, separated by four corner spaces. Pull the center closed gently so the hole is small without puckering the stitches.
If using the chain-ring alternative, ch 4 and sl st into the first chain to make a ring. Work the same four clusters into the ring, then close the round as instructed.
Round 2 — Establish the corners
Join Color B in any corner ch-2 space. Sl st into the space if needed to position the working loop.
- Ch 2.
- Work
3 dc, ch 2, 3 dcinto the same corner space. - Ch 1.
- Repeat the following sequence three times:
3 dc, ch 2, 3 dcin the next corner space, then ch 1. - Sl st into the first dc to join.
Round 2 check:
- Eight clusters of 3 dc.
- Twenty-four dc stitches in total.
- Four ch-2 corner spaces.
- Four ch-1 side spaces.
Each original corner now contains two clusters with a chain-2 opening between them. The chain-1 spaces made between corner groups provide openings for the next round’s side clusters.
Round 3 — Add the first side clusters
Join Color C in any corner ch-2 space.
- Ch 2.
- Work
3 dc, ch 2, 3 dcinto the same corner space. - Ch 1.
- Work 3 dc into the next ch-1 side space.
- Ch 1.
- Repeat the following sequence three times:
3 dc, ch 2, 3 dcin the next corner space, ch 1, 3 dc in the next side space, ch 1. - Sl st into the first dc to join.
Round 3 check:
- Twelve clusters of 3 dc.
- Thirty-six dc stitches in total.
- Four ch-2 corner spaces.
- Eight ch-1 side spaces: one on each side of each corner cluster group, counting the spaces between side clusters and corners.
The square should now show one side cluster along each side between the two corner formations. If the fabric begins to cup, check whether the chain-1 spaces were skipped or the clusters were worked into the wrong openings.
Round 4 — Expand the sides
Join Color D in any corner ch-2 space.
- Ch 2.
- Work
3 dc, ch 2, 3 dcinto the same corner space. - Ch 1.
- Work 3 dc into the next ch-1 side space.
- Ch 1.
- Work 3 dc into the next ch-1 side space.
- Ch 1.
- Repeat the following sequence three times:
3 dc, ch 2, 3 dcin the next corner space, then ch 1, 3 dc in each of the next two side spaces with ch 1 between the groups. - Sl st into the first dc to join.
Round 4 check:
- Sixteen clusters of 3 dc.
- Forty-eight dc stitches in total.
- Four ch-2 corner spaces.
- Twelve ch-1 side spaces.
At the end of this round, each side has two side clusters between its corner groups. The square should grow evenly on all four sides.
Round 5 — Complete the square
Join Color A in any corner ch-2 space.
- Ch 2.
- Work
3 dc, ch 2, 3 dcinto the same corner space. - Ch 1.
- Work 3 dc into the next ch-1 side space.
- Ch 1.
- Work 3 dc into the next ch-1 side space.
- Ch 1.
- Work 3 dc into the next ch-1 side space.
- Ch 1.
- Repeat the following sequence three times:
3 dc, ch 2, 3 dcin the next corner space, then ch 1 and 3 dc in each of the next three side spaces, with ch 1 between the groups. - Sl st into the first dc to join.
- Fasten off, leaving a tail long enough to weave in securely.
Round 5 check:
- Twenty clusters of 3 dc.
- Sixty dc stitches in total.
- Four ch-2 corner spaces.
- Sixteen ch-1 side spaces.
This completes the five-round square. Lay it flat and measure its width and height. The target is approximately 7 × 7 inches (17.8 × 17.8 cm).
How the square grows
The corner spaces remain in the same four positions, while each new round adds one additional side cluster along each side.
| Round | Color | Total clusters | Total dc stitches | Side clusters per side |
|---|---|---|---|---|
| 1 | Cream | 4 | 12 | 0 |
| 2 | Sage green | 8 | 24 | 0 |
| 3 | Dusty blue | 12 | 36 | 1 |
| 4 | Terracotta | 16 | 48 | 2 |
| 5 | Cream | 20 | 60 | 3 |
The side clusters per side count the clusters worked into side spaces, not the corner clusters. The four corner spaces are preserved throughout the pattern.
Technical counting note
The counts above verify the number of three-double-crochet clusters and double crochet stitches. For the corners, count four ch-2 spaces at the end of every round. For the sides, check that each additional round creates one more side cluster per side.
The written pattern is designed around the standard granny-square structure, but the final physical size and how flat the square lies still depend on yarn, hook, and tension. If the motif does not remain square, stop and correct the issue before making the full set.
9. Stitch counts and mathematical validation
Use the following checks to verify each square before fastening off.
| Round | Clusters | Double crochet stitches | Corner spaces |
|---|---|---|---|
| 1 | 4 | 12 | 4 |
| 2 | 8 | 24 | 4 |
| 3 | 12 | 36 | 4 |
| 4 | 16 | 48 | 4 |
| 5 | 20 | 60 | 4 |
Each cluster contains three double crochet stitches, so the total number of double crochet stitches is three times the number of clusters. This provides a simple mathematical check.
The number of side clusters increases by one per side with each round after the initial center and corner-building rounds. The four corner spaces must remain present throughout.
If your counts differ, inspect the round before continuing. The most common causes are skipping a side space, accidentally working twice into one space, or missing a corner’s second cluster.
These counts are calculated from the written pattern; they do not establish that the pattern has been physically tested. The square’s actual dimensions must be checked with a sample.
10. Color planning and color changes
Each square uses the same color order, making it easier to join the motifs without having to follow a complicated placement scheme.
| Square round | Color | Instructions |
|---|---|---|
| 1 | Cream | Work the center and first four clusters |
| 2 | Sage green | Join at a corner and complete the round |
| 3 | Dusty blue | Join at a corner and complete the round |
| 4 | Muted terracotta | Join at a corner and complete the round |
| 5 | Cream | Complete the outer edge and fasten off |
For all 48 squares, repeat this sequence. This creates a consistent look while still allowing the four colors to interact across the blanket.
Changing colors without bulky knots
- Complete the final cluster of the round.
- Join the round with a slip stitch.
- Cut the yarn, leaving a tail of about 6 inches (15 cm).
- Pull the tail through the loop and tighten gently.
- Join the next color in a corner space.
- Begin the new round according to the pattern.
- Weave in the tails along the backs of the stitches after the square is finished.
Do not pull the new color so tightly that the corner becomes smaller than the other three corners. Keep the chain-2 spaces consistent.
Optional color variations
The core pattern does not change if you prefer a different palette. You can use a single color throughout, alternate two colors, or use a different color for every round. However, if you change the color sequence, use the same sequence for every square unless you deliberately plan a mixed-color layout.
11. Making the complete set of squares
You need 48 squares in total:
- 6 squares across.
- 8 squares down.
- 48 squares overall.
Make the squares in batches rather than finishing one motif completely before starting the next. For example, crochet Round 1 in all the squares, then Round 2 in all the squares, and continue through Round 5. This can help you maintain a consistent rhythm and notice tension differences early.
Before assembly, verify that each square:
- Has five complete rounds.
- Has four corner spaces.
- Follows the correct color sequence.
- Measures close to the target size.
- Lies reasonably flat.
- Has securely woven-in yarn ends.
Arranging the squares
Because every square uses the same color sequence, you do not need different square types or a complicated color chart. Place the motifs in six columns and eight rows, with the outer cream round facing the joining seams.
Before joining, lay out all the squares and check the overall arrangement. If some squares are slightly warmer or cooler in color because of dye-lot differences, distribute them across the blanket rather than placing all of them together.
Label the rows mentally or with removable paper labels so that the arrangement does not change while you assemble it.
12. Blocking and preparing the squares
Blocking can help square the motifs and make their edges easier to join. It is not essential for every yarn, and the manufacturer’s care instructions should always take priority.
How to block a square
- Check the yarn label to determine whether wet blocking or another method is suitable.
- Lay the square flat on a suitable blocking surface.
- Gently shape it into a square without pulling the corners too far.
- Measure the sides and adjust them toward the 7-inch (17.8 cm) target.
- Align the corners and keep the sides straight.
- If wet blocking is appropriate, allow the square to dry completely before removing it from the surface.
Avoid applying excessive heat to acrylic yarn or other fibers that may be damaged by heat. Do not stretch the fabric aggressively to force a small square to match the target.
When blocking is useful
Blocking is especially useful when some squares have slightly uneven edges or corners. It may be unnecessary if the squares already lie flat and have consistent dimensions.
If one square is much larger than the others, do not rely on blocking alone to fix it. Check your stitch count and tension, then remake the square if necessary.
13. Complete square-joining instructions
The main joining method for this blanket is a single-crochet join using Color A, cream. It creates a defined seam and a little texture between the motifs.
This method is relatively sturdy, but the seam may be more prominent than a nearly invisible sewn join. Keep the tension relaxed so the blanket remains flexible.
Step 1: Arrange the squares
Lay out the 48 squares in six columns and eight rows. Confirm that all squares face the same way and that the outer cream rounds are aligned.
Step 2: Join squares across each row
- Place the first two squares together with their wrong sides facing each other and their edges aligned. This places the joining ridge on the front of the blanket.
- Attach Color A at the matching corner spaces.
- Insert the hook through the corresponding edge loops of both squares.
- Yarn over and pull up a loop through both layers.
- Yarn over again and draw through both loops to complete one single crochet.
- Continue with corresponding stitches and spaces along the entire edge, maintaining even spacing.
- At the end, fasten off securely or carry the joining yarn only if doing so will not create an overly tight seam.
- Add the next square to the row, repeating the process until the row contains six squares.
For a neat seam, work through matching loops along the edges rather than catching random strands. If the edge includes chain spaces, make sure both squares are aligned at those spaces.
Step 3: Join the remaining rows
Repeat the same joining method to connect the squares within each row. Once all eight rows are joined horizontally, you will have eight strips of six squares.
Step 4: Join the rows together
- Place the first two completed rows together, aligning the vertical seams and the corners of every square.
- Join the long edges using the same single-crochet method.
- Continue joining the remaining rows until all eight strips form one blanket.
- Check the intersections where four squares meet. These points should align without large gaps or bulky knots.
Step 5: Finish the seams
Weave in the joining yarn ends with a tapestry needle. Secure each tail through several stitches, changing direction once or twice without pulling the seam too tightly.
Tips for a neat single-crochet join
- Use the same hook size as the squares, or a slightly larger hook if the seam feels too tight.
- Check the work after each few inches.
- Do not pull the yarn hard after every stitch.
- Keep corners and seam intersections aligned.
- If the blanket begins to buckle, undo the last section and check that the corresponding edges have the same number of stitches and spaces.
How the join affects the finished blanket
The single-crochet join creates a visible ridge and can make the blanket feel a little firmer. A whip stitch or mattress stitch may produce a flatter seam, but these methods require sewing rather than crocheting the edges together. For this project, use the single-crochet join consistently.
14. Complete blanket border
The blanket uses two rounds of single crochet in Color A, cream. This simple border frames the squares and provides a clean outer edge without competing with the granny clusters.
Before starting
Lay the joined blanket flat and check the outer perimeter. Confirm that all corners are square and that the joining seams are secure.
Border Round 1
- Join Color A in a corner of the blanket.
- Ch 1; this chain does not count as a stitch.
- Work 3 sc into the corner space.
- Along the edge, work 1 sc into each available double-crochet stitch and 1 sc into each chain-1 space, distributing stitches evenly.
- At the next corner, work 3 sc into the corner space.
- Repeat the edge-and-corner sequence around all four sides.
- Sl st into the first sc to join.
When working along an edge that includes joining seams, keep the stitches evenly spaced. Avoid placing too many stitches into a short section or too few into a long section. The exact count can vary with the joining method and the edge’s actual structure.
Border Round 2
- Ch 1; this chain does not count as a stitch.
- Work 1 sc into each sc around the blanket.
- At each corner’s middle stitch from the previous round, work 3 sc into that stitch.
- Continue around all four sides.
- Sl st into the first sc to join.
- Fasten off and weave in the yarn tail.
The middle stitch of each three-single-crochet corner group is the corner stitch. Marking it can help you locate the correct stitch for the next round.
Preventing a wavy or tight border
If the border ruffles, it may contain too many stitches along the edges. If it pulls the blanket inward, it may contain too few stitches or have overly tight tension.
The blanket should lie flat after each round. If the edge waves or curls noticeably, undo the affected section and adjust stitch spacing before proceeding.
15. Finishing and final inspection
Once the border is complete, inspect the entire blanket carefully.
- Weave in any remaining yarn ends.
- Check the seams for loose stitches and gaps.
- Confirm that the corners are aligned.
- Look for squares that buckle or pull against neighboring squares.
- Check that the border is even and that all four corners lie flat.
- Measure the width and length without stretching the fabric.
- Block or reshape the blanket if the yarn permits it and the edges need correction.
Care instructions
Follow the yarn manufacturer’s washing and drying instructions. If the yarn is machine washable, use the recommended cycle and temperature. If it requires hand washing, handle the blanket gently and avoid twisting or wringing it.
Support the blanket’s weight when lifting it wet, since wet fibers may stretch. Dry it flat when recommended, reshape the corners gently, and avoid hanging it in a way that places all its weight on one edge.
Store the blanket clean and fully dry. Check the joining seams occasionally, particularly after washing, and repair loose ends before they unravel further.
16. Common mistakes and troubleshooting
| Problem | Likely cause | Solution | Prevention |
|---|---|---|---|
| Squares curl upward | Tension is too tight or corners are missing chain spaces | Check the corners and loosen the tension; remake the square if needed | Count four corner spaces after every round |
| Squares become wavy | Stitches or chains are too loose, or extra stitches were added | Check the stitch groups and adjust the hook or tension | Use the same hook and consistent tension |
| Corners look uneven | One corner has a missing cluster or incorrect chain count | Undo the affected section and repeat the corner correctly | Check each corner before moving to the next |
| Incorrect number of clusters | A side space or corner space was skipped or worked twice | Count the clusters and correct the round before continuing | Use a stitch marker and check every round |
| Squares have different dimensions | Tension, yarn thickness, or hook size varies | Adjust the hook or remake the outlying squares | Measure early squares before making all 48 |
| Joining seams are bulky | Too many strands were caught or the joining tension is too tight | Undo the bulky section and work through corresponding edge loops | Keep the joining yarn relaxed and consistent |
| Gaps appear between squares | Edges are not aligned or the joining stitches are too far apart | Rejoin the affected edge, matching stitches and spaces | Align corners before starting each seam |
| Blanket is distorted after joining | Square sizes differ or seams are uneven | Undo and rejoin the affected rows; block only if suitable | Compare row lengths before joining them together |
| Border ruffles | Too many single crochets were worked along an edge | Undo the affected section and reduce the stitch distribution | Space stitches evenly and check the blanket after each round |
| Border pulls inward | Too few stitches or excessive tension | Undo and redistribute the border stitches | Keep the border tension similar to the blanket |
| Color changes look knotted | Yarn tails were tied in bulky knots | Remove bulky knots where possible and weave in the ends securely | Join colors neatly and leave sufficient tails |
| Yarn ends loosen | Tails were too short or woven in only one direction | Reweave the end through several stitches, changing direction | Leave approximately 6-inch tails for finishing |
What to do if a square will not lie flat
First, check the corner spaces. A missing chain-2 space can pull a corner inward, while an incorrect cluster may cause the edge to expand unevenly. Next, count the side clusters and verify that they match the round instructions.
If the stitch structure is correct but the square still cups, your tension may be too tight for the chosen hook. Try a larger hook on a new sample rather than forcing the completed square to lie flat.
17. Customization and size variations
The five-round square pattern can be adapted to many blanket sizes. The easiest way to change the finished dimensions is to keep the square pattern consistent and change the number of columns and rows.
Making smaller or larger squares
To make smaller squares, use a smaller hook or lighter yarn, then check the resulting dimensions with a sample. To make larger squares, use a larger hook or thicker yarn, or add more rounds.
If you add rounds, continue the same granny-square principle: each corner receives 3 dc, ch 2, 3 dc, and each existing side chain-1 space receives a three-double-crochet cluster, with chain-1 spaces between clusters. Add the new color round only after deciding how the color sequence will continue.
Because different yarns and hook sizes change the dimensions, make a new sample whenever you change the yarn weight or add rounds.
Increasing or decreasing the blanket size
Use this formula for a rough estimate:
For example, using 7-inch squares:
- A 4 × 6 layout uses 24 squares.
- A 6 × 8 layout uses 48 squares.
- An 8 × 10 layout uses 80 squares.
These are layout calculations, not guaranteed finished measurements. The actual dimensions depend on the seam width and border.
Changing the color arrangement
You can keep the five-round sequence and change the palette to suit your room or recipient.
- Single-color blanket: Use one color for every round and the border.
- Two-color blanket: Alternate two colors between rounds.
- Pastel blanket: Use cream, pale pink, soft lavender, and light sage.
- Earth-tone blanket: Use oatmeal, rust, olive, and brown.
- Scrap-yarn blanket: Use compatible yarns in different colors, while keeping their thickness and fiber behavior as consistent as possible.
For a multicolor arrangement, spread similar shades across the blanket to avoid large unplanned blocks of one color.
Changing the border
The main pattern uses two single-crochet rounds. You can make the border wider by adding another round of single crochet, but you should recalculate the yarn allowance and check that the extra round does not distort the edges.
A decorative shell border is another possible variation, but it requires a different stitch sequence and spacing. If you choose a more elaborate border, test it on a small sample edge first.
Changing the joining method
The single-crochet join gives the blanket a raised seam. A whip-stitch join can be flatter and uses a tapestry needle, while a slip-stitch join creates a crocheted seam with a different texture.
Changing the joining method can affect the blanket’s width, flexibility, and appearance. Make a sample seam before deciding which method to use for the entire blanket.
Beginner-friendly and advanced versions
Beginner version: Use one color throughout, make all 48 squares with the five-round pattern, and use the single-crochet join and simple border. This reduces the number of color changes and makes it easier to focus on counting.
Advanced version: Experiment with a carefully planned color arrangement, contrasting joining yarn, or a more elaborate border. Keep the core square structure consistent so the motifs remain compatible.
18. Care and maintenance
The best care method depends on the yarn. Always follow the care label for the actual yarn used.
- Washing: Use the recommended washing temperature and cycle. If the yarn requires hand washing, handle the blanket gently.
- Drying: Dry flat when recommended, supporting the blanket’s weight so it does not stretch.
- Storage: Store the blanket clean and completely dry. Avoid compressing it so tightly that the corners become misshapen.
- Maintenance: Inspect seams and yarn ends after washing. Repair loose areas before they become larger gaps.
- Reshaping: Smooth the blanket into shape while damp only if the fiber’s care instructions allow it.
A large granny square blanket can become heavy when wet. Avoid lifting it by one corner while saturated, as this may stretch the joins or distort the fabric.
19. Beginner and advanced tips
Beginner tips
- Count clusters rather than every stitch first. Each cluster contains three double crochet stitches, making groups easier to recognize.
- Mark the corners. A stitch marker in the active corner space helps prevent skipped corners.
- Check every round. Verify four corner spaces before continuing.
- Measure early. Check your first square before producing the remaining 47.
- Keep yarn tails long enough. Leaving about 6 inches gives you room to weave the ends securely.
- Practice joining on two spare squares. This lets you test your tension and learn how to match the edges before joining the whole blanket.
- Correct mistakes early. Undoing a short section is usually easier than trying to disguise a missing cluster later.
Advanced tips
- Plan color transitions deliberately. Repeat the same color sequence across all motifs for a coordinated finish.
- Refine seam tension. The join should hold the squares together without drawing the edges inward.
- Compare yarn behavior. Even similar yarn weights can produce different square dimensions. Test substitutions before committing to a large quantity.
- Check intersections. Where four squares meet, make sure the seams align and avoid creating a thick knot of joining yarn.
- Recalculate the border. A different join or larger square may change how many stitches are needed along the outer perimeter.
- Use blocking consistently. If you block the squares, apply the same method and target dimensions to every motif.
20. Final project checklist
Use this checklist before considering the blanket complete.
Blanket completion checklist
0 of 12All 48 squares are completeEvery square has five rounds and four corner spaces per roundSquare dimensions are reasonably consistentThe color sequence is correctAll square yarn ends are securely woven inThe squares are arranged in six columns and eight rowsAll joining seams are secure and evenly tensionedThe blanket lies flat without major bucklingAll four outer corners are shaped correctlyBoth border rounds are completeThe finished dimensions have been measuredThe blanket has been finished and cared for according to the yarn label
Reset checklist
21. Frequently asked questions
1. Is a granny square blanket suitable for beginners?
Yes. The pattern uses a small set of stitches, repeated clusters, and four corner spaces. Beginners should practice the magic ring, double crochet, and chain spaces before making all the squares.
2. How many squares are needed for this blanket?
This design uses 48 squares arranged in six columns and eight rows. Each square has a target size of 7 × 7 inches (17.8 × 17.8 cm) before joining.
3. How much yarn is required?
The project estimate is approximately 2,000–2,400 yards (1,830–2,195 meters), with the materials plan allowing a generous starting quantity. Actual consumption depends on the yarn’s yardage, square size, hook, tension, joining method, and border. Make a sample square and seam to improve your estimate before buying all the yarn.
4. How can I make all the squares the same size?
Use the same yarn, hook, round count, and tension. Measure the first few squares before making the rest, then compare each new square against a reference. Block them consistently if the yarn permits it.
5. Which joining method is used in this tutorial?
The primary method is a single-crochet join using Color A, cream. It produces a visible ridge and a slightly firmer seam. Work through corresponding edge stitches and spaces while maintaining relaxed, even tension.
6. How can I prevent granny squares from curling?
Check that every corner has the correct 3 dc, ch 2, 3 dc structure and that no side spaces are skipped. If the stitch counts are correct but the square still cups, try a larger hook on a new sample.
7. Should granny squares be blocked before joining?
Blocking can help align the edges, especially when some squares are slightly uneven. It is optional when the squares already lie flat. Follow the yarn manufacturer’s care instructions and avoid excessive heat or stretching.
8. Can I use different yarn weights?
Yes, but the finished squares will likely have different dimensions and drape. Make a new sample and adjust the hook as necessary. If mixing yarns, choose ones with compatible thickness, care requirements, and fiber behavior.
9. How can I change the blanket dimensions?
Change the number of squares across and down. Multiply the square width by the number of columns and the square height by the number of rows, then allow for the joining seams and border. For larger or smaller squares, recalculate the dimensions and yarn needs using a new sample.
10. How should I wash the finished blanket?
Follow the care instructions for the selected yarn. Wash and dry it according to the label, support the blanket’s weight when wet, and inspect the joining seams after washing. Dry it flat when recommended to help preserve its shape.
Leave a Comment