
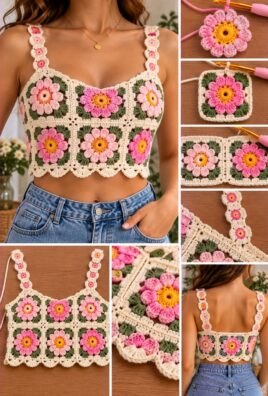
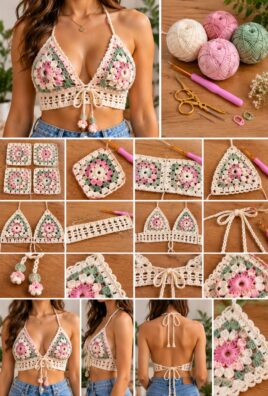
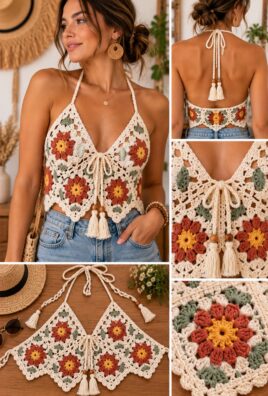
A crochet floral crop top is a lovely way to bring handmade charm to a summer wardrobe. By combining small flower motifs, coordinating colors, and airy crochet stitches, you can create a top that feels personal, stylish, and lightweight. Wear it with high-waisted jeans, a skirt, or shorts, or layer it over a camisole for a more covered look.
This beginner-friendly pattern uses individual crochet flower motifs joined into front and back panels, with simple shoulder straps and neat edging. Because flower motifs can vary in size and openwork fabric may stretch, measuring as you work is essential for achieving a comfortable fit.
1. Project Overview
- Skill level: Confident beginner to intermediate
- Project type: Crochet clothing
- Construction method: Separate floral hexagon motifs joined into front and back panels
- Crochet terminology: US terms
- Sample size: Approximately a small, designed for a close-fitting crop top
- Approximate finished bust circumference: 32–34 inches, depending on motif size and joining tension
- Approximate finished length: 15–17 inches from the top of the shoulder to the lower hem
- Approximate completion time: 10–16 hours
- Main techniques: Magic ring, chain stitches, single crochet, half double crochet, double crochet, treble crochet, slip-stitch joining, and sewing in yarn ends
These measurements and the completion time are estimates, not guaranteed results. Adjust the number of motifs and strap length to your own measurements before permanently joining the garment.
The sample uses 12 floral motifs: six across the front and six across the back, arranged in two rows of three motifs per panel. Each motif is a small hexagon. The finished width depends on the width of the hexagons and how closely you join them.
2. Materials and Tools
- Lightweight cotton or cotton-blend yarn suitable for clothing
- A crochet hook appropriate for your yarn, usually around 3.5–4 mm for lightweight cotton
- Scissors
- Tapestry needle
- Measuring tape
- Stitch markers
- Optional removable markers or pins for positioning motifs before joining
Choosing your yarn
Cotton is a useful choice for a warm-weather top because it is breathable and gives flower stitches clear definition. A cotton blend may offer a little more softness or flexibility.
Choose a yarn that feels comfortable against your skin. Very heavy yarn can make the top thick and warm, while very fine yarn produces smaller motifs and may require more of them. Different yarns can also stretch differently, so do not assume that the same hook and stitch counts will always create the same dimensions.
3. US Crochet Abbreviations
| Abbreviation | Meaning |
|---|---|
| ch | Chain |
| sl st | Slip stitch |
| sc | Single crochet |
| hdc | Half double crochet |
| dc | Double crochet |
| tr | Treble crochet |
| st | Stitch |
| sp | Space |
| ch-sp | Chain space |
| inc | Increase |
| dec | Decrease |
| rep | Repeat |
| RS | Right side |
| WS | Wrong side |
| FO | Fasten off |
Special note: In this pattern, a flower petal is made with a group of double crochet and treble crochet stitches worked into one chain space. A hexagon corner is formed by working double crochet stitches with a chain-two space between them.
4. Measurements, Fit, and Gauge
Before crocheting, measure your body and decide how you want the top to fit.
Take your measurements
- Bust circumference: Measure around the fullest part of your bust while keeping the tape level.
- Desired crop-top length: Measure from the shoulder or underarm area to the point where you want the hem to sit.
- Upper chest or underbust: Measure around the area where the top should sit securely.
- Shoulder or strap length: Estimate the distance from the front strap attachment point, over your shoulder, to the back attachment point.
- Neckline width and depth: Decide how wide you want the opening and how low you want it to sit.
Understanding ease
Ease is the difference between your body measurement and the finished garment measurement.
- Negative ease means the top is smaller than your body measurement and stretches to fit. This can work with flexible crochet fabric, but cotton may have limited recovery.
- Positive ease means the top is larger than your body measurement, creating a looser fit.
For this motif-based design, aim for a comfortable fit without relying on excessive stretch. Arrange the motifs against your body or a garment that fits well before joining them.
Make a gauge motif
Crochet one complete flower motif using the hook and yarn you plan to use. Lay it flat without pulling the corners outward, then measure its widest point and its height.
For the sample layout, each finished motif should be approximately 5–5.5 inches across. This is only a planning estimate; your actual motif size depends on yarn, hook, and tension.
If your motif is too large, try a smaller hook. If it is too small, try a larger hook. Keep your hook and tension consistent for all 12 motifs.
Plan the panel dimensions
Each panel has three motifs across and two motifs down. With motifs approximately 5–5.5 inches wide, the unjoined panel will be roughly 15–16.5 inches wide before allowing for the way the hexagons fit together. The actual joined panel width may be smaller or shaped differently, so measure the assembled panel rather than relying on arithmetic alone.
The two rows provide the body length. If the top needs to be longer, use larger motifs or add another row, then reassess the neckline, armholes, and overall proportions.
5. Design and Construction Plan
The top is made from two separate panels. Each panel contains six floral hexagons arranged in two rows of three. The panels are joined at the shoulders and sides, leaving openings for the neckline and armholes. Two crocheted straps connect the front and back over the shoulders.
The flowers form part of the garment itself, so no extra flower appliqués are required.
Before joining, lay the motifs out in the arrangement you prefer. Keep the flower centers facing the same direction and alternate colors to create a balanced pattern. If the motifs have a distinct right side, make sure all of them face outward.
Because hexagons have angled edges, the finished panel outline will not be perfectly rectangular. The neckline, armholes, and lower edge will need a simple crochet edging to make them comfortable and tidy.
6. Step-by-Step Crochet Flower Hexagon Motif
Make 12 matching motifs for the sample top. You can use one color for each entire motif or change colors between the flower center, petals, and background.
Round 1: Create the flower center
- Make a magic ring.
- Ch 1, then work 6 sc into the ring.
- Pull the ring closed.
- Sl st into the first sc to join.
You should have 6 sc.
If you prefer not to use a magic ring, ch 2 and work 6 sc into the second chain from the hook, then join with a sl st.
Round 2: Form six flower petals
- Sl st into the first sc if needed to position your yarn.
- In the next sc, work the following group: sl st, ch 2, 3 dc, ch 2, sl st.
- Repeat the same group in each of the remaining five sc stitches.
- Join with a sl st at the base of the first petal. FO if changing colors.
You will have 6 petals. Each petal has a chain-two space at its tip. These spaces will form the six outer points of the hexagon.
If you are changing colors, join the new color at the base of any petal with a sl st.
Round 3: Create the hexagon background
This round forms the six corners and connects the petals into a wearable motif. Work around the flower without pulling the stitches tightly.
- Join the background color at the tip chain-two space of any petal.
- Ch 3; this counts as the first dc.
- In the same tip space, work 1 dc, ch 2, and 2 dc. This creates the first corner.
- Work 1 dc into each of the next 3 dc stitches along the petal side.
- Work 1 dc into the sl-stitch valley between this petal and the next petal.
- Work 1 dc into each of the next 3 dc stitches along the next petal side.
- In the next petal-tip ch-2 space, work 2 dc, ch 2, and 2 dc to make the next corner.
- Repeat steps 4–7 around the flower until all six corners are formed.
- Join with a sl st to the top of the beginning ch 3.
You should have six corner chain-two spaces, one at each flower tip. Each side of the hexagon runs between two neighboring corner spaces and crosses the outer edges of two petals and the valley between them.
Check your motif: Lay it flat and gently shape it into a hexagon. The six corners should be evenly spaced. If the edges curl, check that you have not skipped a stitch or tightened the joining stitches excessively.
FO and weave in the ends. Measure the motif from corner to corner and across its widest points. Make all 12 motifs to the same size before assembling the top.
Motif summary
- Round 1: 6 sc in a magic ring; join.
- Round 2: Six petals, each made with sl st, ch 2, 3 dc, ch 2, sl st in one center stitch.
- Round 3: Background round with 2 dc, ch 2, 2 dc at each of six petal tips, plus dc stitches along the petal edges and valleys to connect the corners.
7. Construct the Front Panel
The front panel uses six floral hexagons arranged in two rows of three.
Arrange the motifs
Lay out three motifs across the top row and three across the bottom row. Position them so that neighboring hexagons can be joined along their matching edges. Alternate colors if desired, but keep the same orientation for all motifs.
Use removable markers to hold the pieces in place. Check that the width is suitable for your bust and that the height matches your desired crop-top length.
Join the motifs
Use a tapestry needle and a length of matching yarn to sew the motifs together.
- Place two motifs with their right sides facing up and their edges touching.
- Thread the tapestry needle with a length of yarn.
- Sew through corresponding loops along the shared edges, taking one small stitch from each motif at a time.
- Keep the seam even and avoid pulling so tightly that the fabric puckers.
- Continue until the three motifs in the top row are joined.
- Join the three motifs in the bottom row in the same way.
- Place the two rows together and sew their touching edges.
- Weave in all joining ends securely on the wrong side.
The exact edge length can vary with your tension. Match the stitches and spaces visually rather than forcing one edge to fit another. If the edges do not line up, check that both motifs have the same number of stitches along the joining edge.
Check the front panel
Lay the joined panel flat and measure its width and height. Hold it against your body or a well-fitting top to check whether it covers the front comfortably.
Do not cut or reshape the motifs to create the neckline at this stage. The neckline will be formed by the natural upper outline of the hexagons and finished with edging. If the opening is too deep or too wide for your preference, rearrange the motifs before sewing them permanently.
8. Construct the Back Panel
Make the back panel in the same way as the front:
- Arrange six matching motifs in two rows of three.
- Join the motifs using the same sewn seam method.
- Weave in the ends.
- Measure the width and height.
- Compare it with the front panel.
For the sample design, the back panel matches the front in size and motif arrangement. This makes the shoulder and side seams easier to align.
If you prefer a higher back neckline, you can change the motif arrangement, but doing so may require additional edging or shaping to create a smooth neckline. For the simplest beginner version, keep both panels the same.
9. Join the Front and Back Panels
Before sewing the garment together, place the panels with their right sides facing each other. Align the side edges and shoulder areas, then use stitch markers to mark the intended openings.
Sew the side seams
- Match the side edges of the front and back panels.
- Starting at the lower hem, sew upward along the side edge.
- Stop before reaching the area where the armhole should begin.
- Repeat on the opposite side, using the same seam length.
- Try the top on carefully or hold it against your body to check the fit.
Leave enough space at the top for the armholes. The precise opening depends on your body measurements and the height of your panels. Do not sew the entire side edge closed if it prevents comfortable arm movement.
Sew the shoulder seams
- Position the front and back panels so the neckline openings face the same direction.
- Align the outer upper edges where the straps will attach.
- Sew a short shoulder section at each side, if the panels have matching shoulder edges.
- Leave the central neckline and armhole areas open.
- Secure the seam ends and weave in the yarn.
If the motif layout leaves no natural shoulder section, use the straps to connect the front and back instead of forcing a bulky shoulder seam. The straps should attach securely to reinforced points on both panels.
Check the top’s width and openings before finishing the edges. If the top feels too tight or too loose, adjust the seams now rather than after the edging is complete.
10. Crochet and Attach the Straps
The top has two shoulder straps, one on each side. Make them from simple rows of single crochet so they are sturdy and easy to adjust.
Make the first strap
- Ch 7.
- Sc in the second ch from the hook and in each remaining chain. You should have 6 sc.
- Ch 1 and turn.
- Sc in each stitch across.
- Repeat the last row until the strap reaches the approximate length needed to connect the front and back over your shoulder.
For the sample, begin with a strap around 7–9 inches long, but treat this only as a starting estimate. The correct length depends on your shoulder measurement and the position of the attachment points.
FO, leaving a long tail for sewing.
Make the second strap
Repeat the same instructions, making the second strap the same length as the first. Count the rows or measure both straps side by side before attaching them.
Attach the straps
- Try the top on or hold it against your body to locate the comfortable strap positions.
- Mark corresponding points near the outer neckline edges on the front and back.
- Sew one end of each strap securely to the front panel and the other end to the back panel.
- Reinforce each attachment by sewing through several stitches of the strap and the garment.
- Weave in the ends on the wrong side.
Avoid placing the straps too close to the center of the neckline, where they may pull the opening inward, or too close to the outer edge, where they may slip off your shoulders. Cotton and openwork crochet can stretch with wear, so check the fit before trimming the sewing tails.
11. Shape and Finish the Neckline and Armholes
The motif arrangement creates the basic neckline and armhole openings. A simple single-crochet edging helps smooth the edges and gives them a more finished appearance.
Work the neckline edging
- With the right side facing you, join yarn at the back of the neckline.
- Ch 1.
- Work sc evenly around the neckline opening.
- Along straight sections, work approximately one sc in each available stitch.
- Along angled motif edges, distribute the sc stitches evenly, working into suitable stitches or spaces without stretching the fabric.
- At a sharp inward turn, work 2 sc together only if needed to keep the edge flat.
- At an outward corner, work 2 sc into the same location if needed to prevent the edging from pulling.
- Join with a sl st to the first sc.
Try the top on before adding another round. If the neckline is comfortable and lies flat, fasten off. If you want a firmer edge, work one additional round of sc, keeping the tension relaxed.
Work the armhole edging
Repeat the same process around each armhole. Work evenly around the curved and angled sections, and make sure both armholes have a similar number of stitches and the same number of edging rounds.
Avoid adding too many stitches, which can make the edge wave. Too few stitches can pull the fabric inward and make the opening uncomfortable. If an edge looks uneven, undo the edging and redistribute the stitches before continuing.
12. Keep the Floral Details Neat
The flower motifs are already part of the garment, so additional appliqués are optional rather than necessary.
For a neat finish:
- Weave in all color-change ends and motif tails with a tapestry needle.
- Secure ends on the wrong side without pulling the fabric out of shape.
- Keep seams away from the flower centers when possible.
- Check that the straps and seams do not distort the motifs.
- Avoid adding bulky decorations where the top needs to flex or stretch.
If you want a more colorful design, use different colors for the flower centers, petals, and background. Plan the color arrangement before joining the motifs so the finished top looks balanced.
13. Finish the Hem
The lower edge can be finished with one or two rounds of single crochet.
- Join yarn at a side seam along the lower edge.
- Ch 1.
- Work sc evenly across the entire hem, placing stitches into available stitches and spaces.
- At an outward point, work 2 sc in the same location if needed to keep the edge flat.
- At an inward angle, work 2 sc together if the fabric begins to flare.
- Join with a sl st to the first sc.
For a slightly firmer hem, work a second round of sc. Keep your tension consistent and avoid pulling the stitches tightly.
The edging may add a little length and weight to the garment. Measure the top again after finishing and allow it to rest flat before making your final fit assessment.
14. Complete Pattern Summary
- Flower motif: Round 1 uses 6 sc in a magic ring. Round 2 creates six petals with chain spaces. Round 3 adds a background border and six corners.
- Motif quantity: 12 motifs for the sample.
- Front panel: Six motifs arranged in two rows of three, joined with a sewn seam.
- Back panel: Six motifs arranged in the same way as the front.
- Panel joining: Sew the motif edges together, then join the front and back at the side seams while leaving the armholes open.
- Shoulder connection: Join matching shoulder edges where practical; use two crocheted straps to connect the front and back securely.
- Straps: Ch 7, work 6 sc across, then repeat rows until the desired length is reached.
- Neckline and armholes: Work an even round of sc around each opening, adjusting stitch placement to keep the edges flat.
- Hem: Work one or two rounds of sc around the lower edge.
- Finishing: Secure all seams, weave in ends, check the measurements, and make final adjustments before wearing.
Before treating the garment as complete, confirm that the motif edges, panel dimensions, and strap positions match your intended fit. Your finished measurements will depend on the actual motif size and the way the pieces are joined.
Important motif consistency clarification
For the six-corner hexagon and panel joining instructions to work consistently, use the following corrected petal and border rounds in place of the earlier Round 2 and Round 3 descriptions. This version creates exactly six corner spaces and six stitches along each side between neighboring corners.
Corrected Round 2: Six flower petals
In each of the 6 sc from Round 1, work 3 dc, ch 2, and 3 dc in the same stitch. Repeat in all six stitches and join with a sl st to the first dc. Each petal has one chain-two space at its center, giving you six spaces for the hexagon corners.
Corrected Round 3: Hexagon border
Join the background color in any ch-2 space. Ch 3 (counts as the first dc), then work 1 dc, ch 2, and 2 dc in the same space to form the first corner. Work 1 dc in each of the next 6 dc stitches. In the next ch-2 space, work 2 dc, ch 2, and 2 dc to form the next corner. Repeat the sequence of 6 dc along each side and a corner group in each chain space until you have completed all six sides. Join with a sl st to the top of the beginning ch 3.
Each corner contains 4 dc separated by ch 2, and each side has 6 dc between corner spaces. This gives a repeatable hexagon edge for sewing motifs together. Use this corrected version consistently for all 12 motifs.
15. Sizing and Customization
You can adapt the floral crop top to suit your measurements, style, and yarn.
Adjust the width
The sample uses three motifs across each panel. If the joined panels are too narrow, try larger motifs or add another motif across each panel. If you change the number of motifs, arrange the pieces and measure the new panel before joining the front and back.
Do not assume that adding a motif will increase the finished width by its full corner-to-corner measurement. The joined edges and hexagon arrangement affect the final dimensions.
Adjust the length
The sample uses two rows of motifs. For a longer top, add a row to both panels or use larger motifs. For a shorter top, choose smaller motifs or reconsider the arrangement before sewing. Keep the front and back compatible so the side seams align.
Choose your colors
Try a single-color top for a subtle look, two colors for contrasting petals and background, or several coordinated shades for a cheerful summer design. Lay all motifs out before joining so the color placement looks intentional.
Adjust the straps
Make the straps longer or shorter after checking the top against your body. Wider straps can be made by increasing the starting chain and working more stitches across each row. Make both straps the same width and length.
Change the neckline
A higher neckline may be achieved by adjusting the upper motif arrangement or adding more edging rounds, while a lower neckline may require changing the panel layout. Check the opening before sewing the straps permanently.
Use a different yarn weight
A different yarn weight will change motif size, drape, and garment weight. Make a new motif swatch and measure it before deciding how many motifs you need. Always check the assembled panels against your body measurements before completing the seams.
16. Care and Wear
Follow the care instructions on the yarn label. Cotton and cotton-blend yarns can respond differently to washing and drying, so test your chosen care method on a small swatch if you are unsure.
- Wash gently according to the yarn label.
- Avoid twisting or wringing the garment.
- Support the top while lifting it when wet.
- Reshape it flat and allow it to dry as directed by the yarn label.
- Store it folded rather than hanging if hanging causes the straps or body to stretch.
Crochet fabric can change shape with wear, especially when it contains open spaces or is made from cotton. Check the top’s shape after washing and allow it to dry in its intended dimensions.
17. Troubleshooting
| Problem | Likely cause | How to fix it |
|---|---|---|
| Flower motifs are different sizes | Tension, hook size, or yarn varies | Use the same hook and yarn throughout. Measure each motif and adjust your tension before making the remaining pieces. |
| The front panel is too narrow | Motifs are smaller than expected or the layout is too narrow | Try larger motifs or add a motif across the panel. Recheck the fit before joining the back. |
| The top is too long or too short | Motif size, number of rows, or hem edging changes the length | Measure the panels before joining. Adjust the motif arrangement or edging before final assembly. |
| The neckline is too wide | The upper motif arrangement or strap positions leave too much space | Reposition the straps and check the opening before sewing. If necessary, revise the panel layout. |
| The neckline is too tight | Edging stitches are too tight or too few | Undo the edging and work it again with relaxed tension and more evenly distributed stitches. |
| The armholes are uncomfortable | Side seams extend too high or the openings are too small | Unpick part of the side seams and leave a larger armhole opening. Add edging after checking the fit. |
| The straps stretch or slip | The straps are too long, too narrow, or made from stretchy fabric | Shorten them to fit, reinforce the attachment points, or make them wider with additional stitches. |
| Joining seams look bulky | Too much yarn or uneven sewing tension | Use a matching yarn and small, consistent stitches. Avoid pulling the seam tightly. |
| The hem curls or waves | The edging has too few or too many stitches | Undo the hem round and redistribute the stitches. Add stitches where the fabric pulls and reduce them where it flares. |
| Flowers distort the fabric | Motifs were joined under tension or differ in size | Undo the affected seam, align the motifs without stretching, and rejoin them evenly. |
| The finished top does not match the intended measurements | Motif size, joining tension, or yarn behavior differs from the estimate | Measure the actual panels and try the garment on before final assembly. Adjust seams or remake motifs if necessary. |
18. Frequently Asked Questions
Is a crochet floral crop top suitable for beginners?
Yes, if you already understand basic crochet stitches. The individual motifs are manageable, but joining them neatly and achieving a comfortable fit require patience. Practice the flower and border rounds before making all the motifs.
Which yarn is best for a summer crochet top?
Lightweight cotton or a suitable cotton blend is a good starting point. These yarns can provide breathability and clear stitch definition. Choose a yarn that feels comfortable against your skin and check its care instructions.
How many flower motifs will I need?
This sample uses 12 motifs: six for the front and six for the back. Larger sizes may need more motifs or larger motifs. Measure your completed motif and plan the panel arrangement before making the entire set.
How do I make the crop top fit my bust measurement?
Measure your bust, then compare it with the width of the joined front and back panels. Arrange the motifs to provide the fit you want, accounting for whether the fabric stretches. Check the top against your body before sewing the panels together.
Can I make the top longer?
Yes. Add another row of motifs to both panels or use larger motifs. Recheck the armholes, neckline, and side seams because extra length may change how the garment sits.
How do I keep the motifs the same size?
Use the same yarn, hook, and stitch tension for every motif. Measure each one after completing the border. If one motif is noticeably larger or smaller, adjust it before joining.
How can I prevent straps from stretching?
Choose a sturdy yarn, make the straps wide enough for support, and avoid making them longer than necessary. Check their length while the garment is positioned on your body, and reinforce the attachment points.
Do I need to block the motifs before joining?
Blocking can help motifs lie flat and become more uniform. Follow the yarn label’s care guidance, and let the motifs dry completely before joining. Avoid stretching them beyond their intended dimensions.
How should I wash the finished top?
Follow the yarn label’s washing and drying instructions. Handle the garment gently, support it when wet, and reshape it flat if the care instructions permit.
Can I use a different flower design?
Yes, but the replacement flower must have compatible dimensions and edges for joining. Make a complete sample motif first and confirm that its shape and size suit the planned panel layout.
19. Conclusion
A handmade crochet floral crop top combines decorative flowers with a wearable summer design. With consistent motifs, careful joining, comfortable straps, and neat edging, you can create a top that reflects your own color preferences and style.
Take time to check your gauge, measure the panels as you work, and test the fit before completing the final seams. Small adjustments along the way will help you create a more comfortable and polished garment.
Leave a Comment