
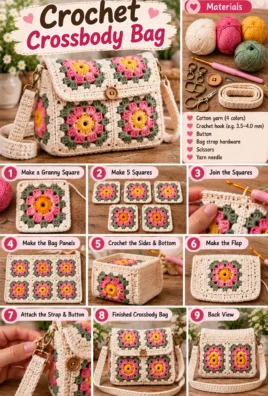
A handmade crochet crossbody bag is a practical, stylish accessory that lets you carry everyday essentials while adding a personal touch to your outfit. With a compact body, a secure flap, and a comfortable strap, this design is ideal for carrying your phone, keys, cards, and a small wallet.
This step-by-step tutorial walks you through the entire project, from crocheting the rectangular base and bag body to making the flap, creating the strap, adding a closure, and finishing the seams. You can keep the design simple with one color or customize it with stripes, a contrasting flap, or a fabric lining.
The sample bag has an estimated body size of 20 cm wide by 16 cm tall, excluding the flap and strap. Actual dimensions will depend on your yarn, hook, stitch tension, and finishing choices.
1. Project overview
Skill level
Confident beginner to intermediate
Construction
Separate base, body, flap, and strap
Recommended yarn
Durable medium-weight yarn
Suggested hook
4.0 mm, adjusted to yarn
Estimated body size
20 × 16 cm
Estimated completion time
6–10 hours
Estimated yarn requirement
200–300 g
These are planning estimates, not guaranteed measurements. A wider or longer strap, a larger bag, a dense stitch pattern, or a fabric lining can change the amount of material required.
2. Materials and tools
- Yarn: Choose durable medium-weight yarn that produces a reasonably firm fabric. Cotton is useful for clear stitch definition, while suitable acrylic or blended yarns may offer different softness, weight, and care requirements.
- Crochet hook: Start with a 4.0 mm hook if suitable for your yarn, then adjust after making a gauge swatch.
- Scissors: For cutting yarn.
- Yarn needle: For joining the pieces and weaving in ends.
- Stitch markers: To mark the first and last stitches or important attachment points.
- Measuring tape: To check the body, flap, and strap dimensions.
- Optional lining fabric: Helps keep small items from slipping through gaps and can reduce stretching.
- Optional sewing needle and thread: For attaching the lining.
- Optional button or magnetic snap: For securing the flap.
- Optional strap rings: Useful if you want a detachable or adjustable strap.
- Optional interfacing: Can add structure to a fabric lining if compatible with the fabric and intended care method.
For this sample, plan on approximately 200–300 g of yarn for the base, body, flap, strap, and optional edging. The quantity varies with yarn thickness, hook size, stitch density, and strap length. A larger bag or a wide, dense strap may require more.
Secure any closure or strap hardware firmly. Check that metal edges and attachment points cannot snag or cut the yarn or lining.
3. US crochet terminology and abbreviations
| Abbreviation | Meaning |
|---|---|
| ch | Chain |
| sl st | Slip stitch |
| sc | Single crochet |
| hdc | Half double crochet |
| dc | Double crochet |
| st | Stitch |
| sts | Stitches |
| sk | Skip |
| rep | Repeat |
| RS | Right side |
| WS | Wrong side |
| FO | Fasten off |
| BLO | Back loop only |
| FLO | Front loop only |
Essential stitches
Chain (ch): Yarn over and pull through the loop on the hook. Repeat to make the required number of chains.
Slip stitch (sl st): Insert the hook into the indicated stitch, yarn over, and pull through both the stitch and the loop on the hook.
Single crochet (sc): Insert the hook into the stitch, yarn over and pull up a loop, then yarn over and pull through both loops.
Half double crochet (hdc): Yarn over, insert the hook into the stitch, yarn over and pull up a loop, then yarn over and pull through all three loops.
Double crochet (dc): Yarn over, insert the hook, yarn over and pull up a loop, yarn over and pull through two loops, then yarn over and pull through the remaining two loops.
Back loop only (BLO): Work the stitch through only the loop farthest from you. This can create a subtle ridge.
Fasten off (FO): Cut the yarn, leaving a tail, and pull the tail through the final loop to secure it.
Pattern conventions
The main body is worked as a flat rectangular panel in rows. The turning chain is not counted as a stitch. Work the first stitch into the first actual stitch of the previous row, and work the last stitch into the last actual stitch. This keeps the edges straight.
The base is crocheted separately, then sewn to the lower edge of the body panel. The panel is folded and sewn at the sides to form the bag. The flap and strap are made separately and attached during assembly.
4. Design and construction plan
The bag is made from four main components:
- Rectangular base: Approximately 20 cm wide and 5 cm deep.
- Front and back panels: Two matching rectangles, each approximately 20 cm wide and 16 cm tall.
- Flap: A rectangular panel that attaches to the back and folds over the opening.
- Crossbody strap: A long, firm strip with a target length selected to suit the wearer.
The front and back panels are sewn to the long edges of the base, then sewn together along their side edges. This construction creates a compact bag with a flat bottom. The flap is attached to the back panel, and the strap is secured at the upper sides.
The intended body dimensions are approximately 20 cm wide, 16 cm tall, and 5 cm deep. The flap overlaps the front of the bag, while the strap length is adjusted according to where you prefer the bag to sit.
5. Crochet gauge and size planning
Gauge describes how many stitches and rows fit into a measured area. It affects the bag’s dimensions, firmness, and strap length.
Make a small gauge swatch
- With your chosen yarn and hook, ch 17.
- Sc in the second ch from the hook and in each remaining ch. You should have 16 sc.
- Ch 1, turn, and sc across for several rows.
- Measure the width and height of the swatch without stretching it.
For example, if 16 stitches measure about 8 cm, the average width is about 0.5 cm per stitch. To estimate the number of stitches for a 20 cm width, divide 20 cm by 0.5 cm. This suggests approximately 40 stitches, although your actual swatch is the better guide.
The pattern below uses 42 sc across as a practical starting point. If your gauge is significantly different, adjust the foundation chain and repeat the same stitch count consistently across the front, back, and base.
6. Complete pattern: rectangular base
The base is worked in rows as a flat rectangle, then sewn to the front and back panels. This makes the bag approximately 5 cm deep.
Base pattern
Foundation: Ch 43.
| Row | Instructions | Total |
|---|---|---|
| 1 | Sc in the 2nd ch from hook and in each remaining ch | 42 sc |
| 2 | Ch 1, turn, sc across | 42 sc |
| 3–10 | Ch 1, turn, sc across | 42 sc each |
FO, leaving a long tail for sewing.
The base should measure approximately 20 cm wide and 5 cm deep if your gauge matches the sample target. If it is too wide or narrow, adjust the foundation chain before making the body panels.
Keeping the base flat
- Count 42 stitches at the end of every row.
- Work the first and last stitches carefully so the edges stay straight.
- Keep your turning chain loose enough to turn comfortably, but do not work into it.
- If the base curls, check your tension and confirm that no edge stitches have been skipped.
7. Complete pattern: bag body
Make two identical panels for the front and back. Each panel is worked in rows using single crochet for a firm fabric.
Front and back panels
Foundation: Ch 43.
| Row | Instructions | Total |
|---|---|---|
| 1 | Sc in the 2nd ch from hook and in each remaining ch | 42 sc |
| 2 | Ch 1, turn, sc across | 42 sc |
| 3–34 | Ch 1, turn, sc across | 42 sc each |
FO the first panel. For the second panel, repeat the instructions and leave a long tail for sewing if desired.
Each panel should measure approximately 20 cm wide and 16 cm tall. If 34 rows produce a different height with your yarn, measure the panel and adjust the row count of both panels equally. Keep the stitch count at 42 across.
Optional decorative ridge
For a subtle texture, work every fourth row in BLO:
- Rows 1–3: regular sc.
- Row 4: sc across in BLO.
- Repeat this sequence, keeping the same 42-stitch count.
This adds horizontal ridges without changing the overall construction. It may make the fabric slightly thicker or less flexible, so check the panel dimensions as you work. For the simplest version, use regular sc throughout.
Finishing the top edges
Do not sew the top edges of the panels together. These edges form the opening of the bag. If the top edge looks uneven, work one additional row of sc across each panel, keeping the stitch count unchanged. Finish off and weave in the ends.
8. Optional textured body variation
If you prefer a slightly more varied surface, alternate single crochet and half double crochet rows.
Make the foundation and first row as described in the main panel pattern. Then repeat:
- Texture Row A: Ch 1, turn, sc across 42 stitches.
- Texture Row B: Ch 1, turn, hdc across 42 stitches.
Repeat Rows A and B until the panel reaches approximately 16 cm in height. Measure as you go, since hdc rows are usually taller than sc rows. Use the same stitch pattern for both panels and keep the count at 42 stitches in every row.
This variation creates a more visible horizontal texture and a slightly more flexible fabric. The regular single crochet version remains the recommended choice if you want a simple, firm bag.
9. Complete pattern: bag flap
The flap covers the top opening and folds over the front of the bag. This version is rectangular, simple to make, and wide enough to match the 42-stitch body panels.
Flap pattern
Use the main color or a contrasting shade.
Foundation: Ch 43.
| Row | Instructions | Total |
|---|---|---|
| 1 | Sc in the 2nd ch from hook and in each remaining ch | 42 sc |
| 2 | Ch 1, turn, sc across | 42 sc |
| 3–18 | Ch 1, turn, sc across | 42 sc each |
FO, leaving a long sewing tail.
The flap should measure approximately 20 cm wide and 8–10 cm tall, depending on your row gauge. If you want a longer flap, add rows equally until it overlaps the front by your preferred amount. Keep the width at 42 stitches.
Neat flap edge
For a clean finish, attach the yarn at one corner and work sc evenly along both sides and the lower edge. Along row ends, distribute the stitches evenly instead of forcing one stitch into every row if doing so makes the edge ruffle. At each lower corner, work 2 sc into the corner area to help the border turn. Join with a sl st and FO.
Attaching the flap
Center the flap along the back panel’s top edge, with the right side facing outward. Align the flap’s top edge with the back panel’s top edge. Pin it in place and sew across the full width using small, even stitches. Leave the sides and lower edge free so the flap can fold over the opening.
The flap should overlap the front panel enough to cover the opening and allow room for a closure.
No-flap alternative
If you prefer an open-top bag, omit the flap. Work one round of sc around the top edge of the assembled body, placing stitches evenly along the front, back, and side edges. Join with a sl st, FO, and weave in the end. You can add a small crocheted loop or another suitable closure if desired.
10. Complete pattern: crossbody strap
A firm single crochet strap is simple to make and can be adjusted to the wearer’s preferred length. The sample strap is approximately 3–4 cm wide and 110–130 cm long, but this is only a starting range.
Strap pattern
Foundation: Ch 9.
| Row | Instructions | Total |
|---|---|---|
| 1 | Sc in the 2nd ch from hook and in each remaining ch | 8 sc |
| 2 | Ch 1, turn, sc across | 8 sc |
| 3 onward | Ch 1, turn, sc across | 8 sc each |
Continue until the strap reaches your desired length. Measure it without stretching it. As a starting estimate, you may need around 220–260 rows for a 110–130 cm strap if your row gauge is about two rows per centimeter. Your actual row count will depend on the yarn, hook, and tension, so measuring the strap is more reliable than using a fixed count.
For a comfortable fit:
- Place the bag at the position where you would like it to sit.
- Measure the path of the strap from one attachment point, over your shoulder and across your body, to the other attachment point.
- Add a little extra length for comfort and adjustment.
- Finish the strap when it reaches that measured length.
FO, leaving a long tail at each end for attachment. The strap should lie flat without twisting. If you want it wider, begin with a longer foundation chain and keep the stitch count consistent throughout.
Reinforcing the strap
The strap bears the weight of the bag, so its attachment points need particular care.
- Attach each end across several stitches rather than at one small point.
- Sew through the strap and the bag fabric several times, using firm, evenly spaced stitches.
- Weave the sewing yarn through the attachment area before trimming.
- Avoid carrying excessive weight, especially if the strap is made from a stretchy yarn.
Crochet fabric can lengthen during use. A firm stitch, consistent tension, and optional lining can reduce some stretching, but the finished strap should be checked periodically.
11. Optional adjustable strap
If you want an adjustable strap, use suitable strap rings and an adjustable slider designed for the strap width.
You will need two secure attachment rings, a compatible slider, and a strap long enough to form the adjustable section.
- Sew the first strap end securely to one ring.
- Pass the other end through the slider according to the hardware manufacturer’s intended threading method.
- Pass the strap through the second ring and back through the slider as required by that design.
- Secure the free end with several rows of stitching so it cannot slip back through the slider.
- Adjust the strap to the preferred length and test the adjustment gently before use.
Hardware designs vary, so follow the instructions supplied with the actual slider and rings. Make sure the hardware has smooth edges and cannot cut or snag the yarn. Protect the crochet fabric at contact points and check the strap regularly for slipping or wear.
The fixed-length strap in the main pattern is a complete option if you prefer to avoid hardware.
12. Optional inner lining
A fabric lining can help the bag retain its shape, reduce stretching, and keep small items from slipping through the crochet stitches. Lining is optional; the bag can be completed without it.
Making the lining
- Measure the finished bag. Measure the inside width and height of the body and the depth of the base.
- Plan the shape. For a simple lining, cut a front and back rectangle and a bottom panel, or cut one long piece that forms the front, base, and back.
- Add seam allowance. Add approximately 1 cm around edges that will be sewn together.
- Cut the fabric. Use fabric that suits the bag’s intended use and care requirements.
- Sew the lining. Join the side seams and base seams to match the bag’s interior shape.
- Test the fit. Place the lining inside the bag before attaching it. It should fit smoothly without pulling the crochet body inward or bunching excessively.
- Attach the lining. Fold the top edge inward and hand-sew it discreetly to the inside of the bag’s top edge.
- Secure the stitching. Use small stitches and avoid pulling the crochet fabric out of shape.
If the bag has a flap, keep the lining seam below the flap attachment area so it does not interfere with the fold. If you plan to use a magnetic snap, install it according to its instructions before closing the lining, and make sure the hardware is supported securely.
13. Optional internal pocket
A small pocket can help organize cards or other small items. It should be attached to the lining before the lining is sewn into the bag.
Pocket pattern
Foundation: Ch 17.
| Row | Instructions | Total |
|---|---|---|
| 1 | Sc in the 2nd ch from hook and in each remaining ch | 16 sc |
| 2 | Ch 1, turn, sc across | 16 sc |
| 3–10 | Ch 1, turn, sc across | 16 sc each |
FO and weave in the ends. This creates a small rectangular pocket; adjust the number of rows if you prefer it taller.
Attaching the pocket
- Place the pocket on the lining’s front or back panel before sewing the lining together.
- Center it horizontally and position it far enough below the top edge that it will not interfere with the flap or closure.
- Pin the pocket in place.
- Sew along the two sides and bottom edge, leaving the top edge open.
- Secure the ends and check that the pocket lies flat.
Skip the pocket if you do not need it. It does not change the main crochet pattern.
14. Assembly: putting the bag together
Lay out the base, two body panels, flap, and strap before sewing. Check their measurements and make sure the front and back panels match.
Step 1: Attach the base to the body panels
- Place the base flat.
- Align one long edge of the base with the lower edge of the front panel.
- Pin the pieces together, matching the corners and distributing the stitches evenly.
- Use the yarn tail and a yarn needle to sew the base edge to the panel’s lower edge.
- Repeat with the opposite long edge of the base and the back panel.
Use small, even stitches and catch the corresponding edge loops. Keep the base flat while sewing so it does not twist or gather.
Step 2: Sew the side seams
- Bring the front and back panels together with their right sides facing each other.
- Align the side edges from the top opening down to the base corners.
- Pin the edges together.
- Sew each side seam from the top toward the base using small, even stitches.
- Secure the yarn and weave in the ends.
Turn the bag right side out. Check that both side seams are secure and that the base sits evenly. If a corner looks bulky, adjust the seam allowance and redistribute the stitches rather than pulling the yarn too tightly.
Step 3: Attach the flap
Center the flap across the back panel’s top edge. Pin its top edge in line with the back panel’s top edge, then sew it firmly across the width. Fold it over the opening to check that it overlaps the front panel evenly.
Step 4: Attach the strap
Place one strap end against the upper side of the bag, below the top edge. Position it so that it does not interfere with the flap or closure. Sew the strap end across several stitches and reinforce the area with additional passes.
Repeat on the opposite side, taking care that the strap is not twisted. If using rings, sew the rings securely to reinforced attachment areas and attach the strap to the rings as appropriate for your hardware.
Step 5: Install the lining and pocket
If you made a pocket, attach it to the lining first. Place the lining inside the bag, align the top edges, fold the lining edge inward, and sew it discreetly to the bag’s inside edge. Keep the lining smooth without stretching the crochet fabric.
Step 6: Check the finished structure
Confirm that the base is flat, the side seams are closed, the flap folds freely, and the strap sits evenly. Check all yarn ends and attachment points before using the bag.
15. Closures and decorative finishing
The main tutorial uses a crocheted loop and button because it is simple to make and does not require specialized hardware.
Crocheted loop
- Attach the yarn to the center of the flap’s lower edge.
- Ch enough stitches to make a loop that fits around your chosen button. For a small button, you might start with ch 8, but measure the loop against the actual button.
- Sl st back into the same attachment area to form the loop.
- Work a few small stitches around the base of the loop to reinforce it.
- FO and weave in the end securely.
Sew the button to the front panel where the loop naturally meets it when the flap is closed. Use firm stitching, secure the yarn ends, and check that the button does not pull the crochet fabric out of shape.
Other optional closures include:
- Magnetic snap: Attach according to the manufacturer’s instructions, ensuring that the surrounding fabric or lining supports the snap.
- Sewn buttonhole: Make a buttonhole in the flap using a chain opening or a suitable buttonhole technique, then reinforce the edges.
- Zipper: Sew a compatible zipper to the top opening if you are comfortable sewing one into crochet fabric.
Optional decorative edging
For a simple finish, attach yarn at a flap corner and work sc evenly around the two sides and lower edge. Work 2 sc at each corner to help the edging turn. Join with a sl st and FO. Avoid adding so many stitches that the flap curls or becomes too tight to fold.
16. Shaping, structure, and durability
A useful everyday bag needs a firm fabric and secure attachment points.
- Choose suitable yarn: A durable yarn with clear stitch definition can help the bag retain its shape.
- Use an appropriate hook: A hook that is too large can create open stitches and a floppy fabric.
- Keep tension consistent: Uneven tension can cause the panels to differ in size.
- Reinforce the strap: Distribute the stitching across several stitches rather than concentrating the load at one point.
- Secure the seams: Check the base corners and side seams for gaps.
- Consider a lining: A well-fitted lining can reduce stretching and help keep small items inside.
- Avoid excessive weight: The bag’s carrying capacity depends on the yarn, stitch structure, seams, and strap attachments. Do not assume it can carry heavy items without testing the finished construction.
- Inspect closures and hardware: Check for loose stitches, slipping rings, damaged yarn, or sharp edges.
A crochet bag can stretch under the weight of its contents, particularly when made with loose stitches or elastic yarn. A firmer stitch pattern, careful construction, and optional lining can help limit some of that stretching.
17. Troubleshooting common problems
| Problem | Likely cause | How to fix it |
|---|---|---|
| The base curls or becomes wavy | Tension is uneven, or stitches have been skipped or added | Count the stitches, check the first and last stitches, and maintain consistent tension. Remake the base if the edges remain distorted. |
| The body is wider at the top than at the bottom | Edge stitches are being added accidentally, or the turning chain is being counted as a stitch | Remember that the turning chain does not count. Work into the first and last actual stitches and keep 42 sc in every row. |
| The side seams look uneven | The panels were not aligned or the sewing tension varies | Pin the panels before sewing, match the row edges, and use small, even stitches. |
| The bag is too floppy | The yarn or hook creates a loose fabric, or the panels need more structure | Try a smaller hook, use a firmer stitch, or add a suitable lining. |
| The fabric has large holes | The hook is too large or the yarn is too thin for the chosen hook | Use a smaller hook or a more suitable yarn. Check the fabric before making all the panels. |
| The strap stretches too much | The stitches are loose or the yarn is elastic | Use a firmer stitch, crochet with consistent tension, and consider a suitable lining or a more stable strap construction. |
| The strap attachment feels weak | The strap is sewn to too few stitches or the seam is loose | Reinforce the end across a wider area, use several secure passes, and avoid carrying heavy contents. |
| The flap does not align with the closure | The flap or button is off-center, or the overlap is too short | Pin the flap closed, mark where the loop naturally falls, and reposition the button before sewing it permanently. |
| The bag body is too small or too large | Gauge differs from the example | Measure your panels and adjust the foundation chain or row count. Keep the front and back identical. |
| The lining bunches inside the bag | The lining is too large or its seams do not match the bag’s shape | Remove the lining and adjust its width, height, or base depth before reattaching it. |
| The corners become bulky | Too much yarn is gathered at the base corners or side seams | Use smaller stitches, distribute the seam stitches more evenly, and avoid tight knots. |
| The finished bag looks asymmetrical | Panels differ in size, or the flap and strap are not centered | Compare measurements, pin all parts before sewing, and correct the placement before finishing the seams. |
18. Customization ideas
Make the bag your own by adjusting its colors, texture, dimensions, and finishing details.
- Classic neutrals: Choose cream, beige, gray, or brown for a versatile everyday accessory.
- Color blocking: Use one color for the body and another for the flap or strap.
- Stripes: Change colors after selected rows, fastening off securely and weaving in each end.
- Textured body: Use the alternating sc and hdc variation for a more pronounced surface.
- Wider strap: Add more foundation chains and maintain the same stitch count across all strap rows.
- Shorter or longer strap: Measure the strap against your preferred carrying position and adjust the number of rows.
- Crocheted flower: Add a small flower only if it can be firmly attached and will not snag easily.
- Fabric lining: Choose a lining color that complements the yarn and provides a smooth interior.
- Internal pocket: Add a pocket to keep small items organized.
- Different closure: Replace the button loop with a suitable snap or zipper if desired.
Changing yarn weight or hook size affects the finished dimensions and fabric density. If you change the yarn, make a swatch first. If you make the body wider or taller, adjust the base to match the new width and depth, and make the flap the same width as the body.
19. Care instructions
Care depends on the yarn, lining fabric, closure, and strap hardware.
- Check the yarn label: Follow the manufacturer’s recommendations for cleaning and drying.
- Spot clean when appropriate: Use a suitable gentle cleaning method for small marks, testing an inconspicuous area first.
- Wash only when suitable: Some yarns and linings can be washed, while certain hardware or materials may require a different method.
- Dry in shape: Support the bag while drying and reshape the panels and base gently.
- Avoid unsuitable heat: Heat can damage some fibers, lining materials, and hardware.
- Protect the stitches: Keep the bag away from sharp objects that can snag the crochet fabric.
- Inspect the structure: Check the side seams, base corners, strap attachments, closure, and lining periodically.
Do not assume the bag is machine-washable unless all the materials and hardware support that method. If the bag becomes misshapen, remove its contents and reshape it gently rather than pulling on the strap or seams.
20. Frequently asked questions
Is a crochet crossbody bag suitable for beginners?
Yes, if you are comfortable with basic stitches and sewing crochet pieces together. The single crochet panels are repetitive, while the assembly and strap reinforcement require extra care.
What yarn is best for a durable crochet bag?
A durable medium-weight yarn that creates a firm fabric is a practical choice. Cotton offers clear stitch definition, while suitable acrylic yarns and blends have different weights, softness, and care requirements.
Which hook size should I use?
A 4.0 mm hook is a starting point for some medium-weight yarns. Make a swatch and choose a hook that produces a firm fabric without making the stitches uncomfortably tight.
How do I stop the bag from stretching?
Use a firm stitch, maintain consistent tension, reinforce the strap attachment points, and consider adding a well-fitted lining. Avoid carrying excessive weight.
How long should the crossbody strap be?
The ideal length depends on your height and where you want the bag to sit. Measure the strap along your preferred path across the shoulder and body, then adjust it before attaching both ends permanently.
Can I make the bag without a lining?
Yes. The lining is optional. However, it can help the bag hold its shape and keep small items from slipping through the crochet fabric.
What is the easiest closure to attach?
A crocheted loop and sewn button is a straightforward option. Make sure the loop fits the button and that both are securely attached.
How do I make the bag larger or smaller?
Adjust the foundation chain and row count of the body panels, then make the base to match the new width and depth. Make the flap the same width as the body, and recalculate the yarn requirement.
Why does my bag curl at the base?
The tension may be uneven, or stitches may have been missed or added at the edges. Count each row carefully and check that the first and last stitches are placed correctly.
How do I reinforce the strap?
Sew each end across several stitches of the bag, using multiple firm passes. Keep the attachment area flat and inspect it regularly for wear.
Can I use leftover yarn?
Yes, provided the yarns have compatible thickness, care requirements, and durability. Different yarns may create different fabric densities, so make a swatch before combining them.
How should I clean and maintain the finished bag?
Follow the yarn and lining care instructions. Spot clean when appropriate, wash only if the materials allow it, dry the bag in a suitable shape, and inspect seams and hardware regularly.
Leave a Comment