
ADVERTISEMENT
A handmade granny square blanket is a lovely way to turn simple crochet stitches into something meaningful. Each square is a small project of its own, and when the squares are joined together, they create a cozy blanket that can be customized with soft colors, classic neutrals, or cheerful pastels.
This step-by-step tutorial teaches you how to crochet classic granny squares, keep them consistent in size, arrange them into a rectangular blanket, join the squares neatly, and finish the edges with a simple border. You can work on a few squares at a time, making this project convenient to pick up whenever you have a little time for crochet.
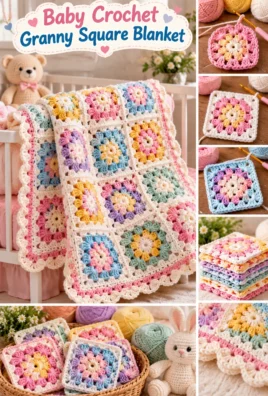
The example uses 20 granny squares arranged in four columns and five rows. The dimensions are estimates, so you can adjust the square size or layout to suit your needs.
ADVERTISEMENT
1. Project overview
Skill level
Confident beginner
Construction
20 joined granny squares
Yarn weight
Light or medium-weight yarn
Suggested hook
4.0 mm, adjusted to yarn
Estimated finished size
About 75 × 95 cm
Estimated time
15–25 hours
Techniques
Chains, double crochet, slip stitches, sewing
The finished size depends on the yarn, hook, tension, square dimensions, joining method, and border. The 75 × 95 cm target is illustrative rather than guaranteed.
2. Materials and tools
- Soft, washable yarn: Choose a smooth yarn suitable for frequent cleaning. A soft acrylic yarn or washable cotton blend can be practical.
- Crochet hook: Start with the size recommended for your yarn, then adjust if the fabric is too stiff or too open.
- Scissors: For cutting yarn cleanly.
- Yarn needle: For weaving in ends and sewing the squares together.
- Measuring tape or ruler: To measure the sample square and check consistency.
- Stitch markers: Optional, but useful for marking corners or keeping track of the layout.
- Blocking tools: Optional, provided they are suitable for the yarn fiber.
Smooth acrylic yarn is often easy to care for and gives clear stitch definition. Cotton blends can provide a firm, breathable fabric, although some cotton yarns feel heavier and less elastic. Other fibers may be suitable if their care requirements match the intended use.
For the example blanket, allow approximately 700–1,000 g of yarn in total as an initial planning estimate, including the squares, joining, and border. Actual use may be lower or higher depending on the yarn, square size, colors, tension, and border width. Make and weigh one sample square if you want a more reliable estimate before buying all the yarn.
3. Baby blanket safety considerations
Because this project is intended for use around babies, prioritize a secure, simple construction.
- Weave all yarn ends in firmly and inspect them for loose strands.
- Secure every seam and check for gaps between squares.
- Avoid beads, buttons, detachable appliqués, pom-poms, long decorative ties, and other small or loose embellishments.
- Inspect the blanket regularly for damaged yarn, unraveling ends, loose seams, or openings that could catch fingers.
- Follow the yarn manufacturer’s care instructions.
A crocheted blanket is not a substitute for safe infant-sleep practices. Do not place a loose blanket in an infant’s sleep space. Follow current safe-sleep guidance from qualified pediatric health authorities, and use the blanket appropriately under adult supervision. No yarn choice or stitch pattern alone guarantees that a blanket is safe for every age or situation.
4. US crochet terminology and abbreviations
| Abbreviation | Meaning |
|---|---|
| ch | Chain |
| sl st | Slip stitch |
| sc | Single crochet |
| hdc | Half double crochet |
| dc | Double crochet |
| st | Stitch |
| sts | Stitches |
| sp | Space |
| ch-sp | Chain space |
| rnd | Round |
| rep | Repeat |
| FO | Fasten off |
| MR | Magic ring |
A stitch is one completed crochet stitch, such as a double crochet. A chain space is the opening created by working chain stitches between groups. In this granny square pattern, most clusters are worked into chain spaces rather than into individual stitches.
A standard granny cluster consists of three double crochet stitches worked into the same space.
5. Techniques before starting
Making a magic ring
- Form a loop with the yarn, leaving a tail long enough to pull.
- Insert the hook through the loop and pull up a working loop.
- Chain 3 if the pattern calls for it.
- Work the required stitches around the ring.
- Pull the yarn tail to tighten the center.
If the magic ring feels difficult, chain 4 and join the ends with a slip stitch to make a ring. Work the first round into the center of that ring.
Making a chain
Yarn over and pull the yarn through the loop on your hook. Repeat to make the required number of chains. Count the completed chain links, not the active loop on the hook.
Making a double crochet
- Yarn over.
- Insert the hook into the specified stitch or chain space.
- Yarn over and pull up a loop. You now have three loops on the hook.
- Yarn over and pull through the first two loops.
- Yarn over again and pull through the remaining two loops.
One double crochet is complete.
Making a granny cluster
Work three double crochet stitches into the same designated chain space. Each stitch is completed individually, but all three use the same space.
Joining with a slip stitch
Insert the hook into the specified stitch, yarn over, and pull the yarn through the stitch and the loop already on the hook. Use the slip stitch only to close the round or move to a new position; it does not count as a granny cluster.
Weaving in yarn ends
Thread the yarn tail onto a yarn needle. Pass it through several stitches on the wrong side of the work, change direction, and pass it through another group of stitches. Trim the excess without cutting the crocheted fabric.
How the squares are worked
The squares are worked in joined rounds without turning. The beginning chain 3 counts as one double crochet. At the end of each round, join with a slip stitch to the top of that beginning chain 3. The joining slip stitch does not count as a cluster.
Each corner uses this group:
3 dc, ch 2, 3 dc in the same corner space.
Along the sides, clusters are separated by ch-1 spaces. As the square grows, each side gains one additional cluster per round.
6. Complete granny square pattern
This classic granny square begins with four clusters in the center and expands outward. The instructions provide five complete rounds. For the example blanket, continue adding rounds until each square measures approximately 18 cm across.
Round 1: Create the center
- Make a magic ring.
- Ch 3. This counts as the first dc.
- Work 2 dc into the ring to complete the first cluster.
- Ch 2.
- Work 3 dc into the ring, then ch 2.
- Repeat Step 5 two more times.
- Join with a sl st to the top of the beginning ch 3.
- Pull the magic ring closed securely.
Round 1 check: 4 clusters, 4 corner spaces, and 12 dc stitches, counting the beginning ch 3 as one dc.
Round 2: Form the four corners
- From the joining point, sl st across the next 2 dc and into the first ch-2 corner space.
- Ch 3, then work 2 dc into that same corner space.
- Ch 2, then work 3 dc into the same corner space. The corner is now complete.
- Ch 1.
- In the next corner space, work 3 dc, ch 2, and 3 dc.
- Ch 1.
- Repeat Steps 5–6 for the remaining two corners.
- Join with a sl st to the top of the beginning ch 3.
Round 2 check: 8 clusters, 4 corner spaces, and 4 side ch-1 spaces.
Round 3: Add the first side clusters
- Sl st across the next 2 dc and into the first corner space.
- Ch 3, work 2 dc into the same corner space, ch 2, and work 3 dc into that space.
- Ch 1.
- Work 3 dc into the next side ch-1 space, then ch 1.
- Work the corner group of 3 dc, ch 2, and 3 dc into the next corner space.
- Ch 1, work 3 dc into the next side ch-1 space, and ch 1.
- Repeat this corner-and-side sequence until all four corners have been completed.
- Join with a sl st to the top of the beginning ch 3.
Round 3 check: 12 clusters, 4 corner spaces, and 8 side ch-1 spaces.
Round 4: Expand the square
- Sl st across the next 2 dc and into the first corner space.
- Ch 3, work 2 dc into that space, ch 2, and work 3 dc into the same space.
- Ch 1.
- Work 3 dc into each side ch-1 space, working ch 1 between consecutive clusters.
- At the next corner, work 3 dc, ch 2, and 3 dc into the corner space.
- Ch 1, then work 3 dc into each remaining side space, with ch 1 between clusters.
- Repeat the corner group at each of the four corners.
- Join with a sl st to the top of the beginning ch 3.
Round 4 check: 16 clusters, 4 corner spaces, and 12 side ch-1 spaces.
Round 5: Continue the pattern
- Sl st across the next 2 dc and into the first corner space.
- Ch 3, work 2 dc into the same corner space, ch 2, and work 3 dc into that space.
- Ch 1.
- Work 3 dc into every side ch-1 space, with ch 1 between consecutive clusters.
- At each corner, work 3 dc, ch 2, and 3 dc into the corner space.
- Continue around the square, keeping the corner groups and side spaces consistent.
- Join with a sl st to the top of the beginning ch 3.
Round 5 check: 20 clusters, 4 corner spaces, and 16 side ch-1 spaces.
Continuing beyond Round 5
To make the square larger, repeat the same construction method:
- Work the corner group of 3 dc, ch 2, and 3 dc in each corner space.
- Work 3 dc into every side ch-1 space.
- Work ch 1 between consecutive clusters along each side.
- Join with a sl st to the top of the beginning ch 3.
- Move to the next corner space with slip stitches before beginning the following round.
Each additional round adds one cluster to every side. The total number of clusters increases by four per round, while the square keeps four corner spaces.
For the example blanket, measure your square after Round 5. Continue until it reaches approximately 18 cm per side, or until it matches the size needed for your planned layout.
7. Making all squares consistent in size
Consistent square dimensions make joining easier and help the blanket lie flat.
- Make one sample square first. Complete the first five rounds and measure from one outer edge to the opposite edge.
- Choose the target size. For this example, aim for approximately 18 cm per side.
- Continue rounds as needed. Different yarns and hooks produce different square sizes, so the number of rounds needed may vary.
- Use the same yarn and hook. Whenever possible, use the same yarn weight, hook size, and tension for every square.
- Measure regularly. Check the sample after additional rounds rather than waiting until all 20 squares are finished.
- Compare every square. Lay completed squares flat and compare their widths and heights before joining.
- Block if appropriate. Gentle blocking may help bring slightly uneven squares closer to the same dimensions.
Color changes do not automatically change square size, but switching to a different yarn or crocheting with different tension can affect the finished measurements.
If a square is noticeably too small, you can add another round if its construction allows. If it is too large, consider removing a round or remaking it with a suitable hook. Avoid stretching a square aggressively to force it into place.
8. Color planning for a baby blanket
A coordinated color plan makes the finished blanket feel intentional. Here are three possible palettes.
Soft neutral shades
Cream, warm beige, and muted sage.
Pastel garden
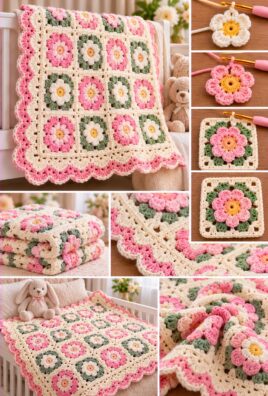
Soft pink, cream, and sage green.
Calm blue and ivory
Light blue, ivory, and warm beige.
You can keep every square in one color or use different colors for the center, middle rounds, and final round. For example, make the first round a pastel shade, use cream for the next two rounds, and finish with a contrasting color.
For 20 squares arranged in four columns and five rows, try this simple placement strategy:
- Arrange the squares on a clean, flat surface.
- Spread each color evenly instead of grouping all matching squares together.
- Check the top, bottom, and sides for visual balance.
- Swap squares until the arrangement looks coordinated.
- Keep the layout unchanged while you join the squares.
9. Weaving in yarn ends
Finish each square neatly before joining it to the others.
- Cut the yarn, leaving a tail long enough to weave in comfortably.
- Thread the tail onto a yarn needle.
- On the wrong side of the square, pass the needle under several stitches of the same color.
- Change direction and pass the yarn under another group of stitches.
- Gently pull the tail so it lies flat without puckering the fabric.
- Trim the remaining yarn close to the fabric without cutting any stitches.
When working with multiple colors, weave each tail into stitches of the matching color where possible. Avoid gathering several bulky ends into one corner. A neat finish helps the blanket remain comfortable and reduces the chance of ends working loose during use.
10. Joining the granny squares
This tutorial uses a mattress-style sewn join. It creates a relatively flat seam and lets you control the alignment of the squares. Use the same joining method throughout the blanket.
Step 1: Arrange the squares
Lay out all 20 squares in four columns and five rows. Check the color placement, rotate squares if necessary, and keep the arrangement consistent.
Step 2: Align the first pair
Place two squares next to each other with their right sides facing up. Bring the edges together so the corner chain spaces and outer stitches line up. Pin the edges if it helps.
Step 3: Sew the seam
- Cut a length of yarn in a coordinating color and thread it onto the yarn needle.
- Secure the yarn at the beginning of the seam without making a bulky knot.
- Catch the corresponding edge loops on the first square, then the matching edge loops on the second square.
- Continue alternating between the two squares, making small, even stitches along the edges.
- Keep the yarn tension consistent. Pull the seam closed enough to bring the squares together, but not so tightly that the edges gather.
- Secure the yarn at the end of the seam and weave in the tail.
Use corresponding loops along each edge, and catch the corner stitches carefully. Do not skip large sections of the edge, as this can leave gaps.
Step 4: Join the squares into strips
Join the four squares in the first row into one horizontal strip. Repeat for each of the five rows. After completing each strip, check that the seams are secure and that the strip lies flat.
Step 5: Join the strips together
- Place two completed strips next to each other.
- Align the seams between their squares so the corners meet.
- Pin the strips together at the corners and at several points along the edge.
- Sew the long edges together using the same mattress-style method.
- Repeat until all five strips are joined.
Step 6: Check the blanket
Lay the assembled blanket flat. Check that the rows remain straight, the corners line up, and the fabric does not bunch around the seams. Correct any uneven joins before adding the border.
Tip: If you prefer a visible ridge, a slip-stitch crochet join is another option. It produces a different texture and can make the seams more prominent. Choose one method and use it consistently throughout the project.
11. Planning the blanket dimensions
The finished size depends on the dimensions of each square, the number of rows and columns, the joining method, and the border.
For the example, use 20 squares arranged in four columns and five rows. Aim for squares approximately 17.5 cm wide and tall.
- Width before seams and border: 17.5 cm × 4 columns = 70 cm.
- Length before seams and border: 17.5 cm × 5 rows = 87.5 cm.
- Add a small allowance for the seams, depending on how the squares are joined.
- Add the width of the border on both outer sides.
With a relatively flat sewn join and a border approximately 2 cm wide on each side, the finished blanket may measure close to 75 × 95 cm. This is an estimate; measure your own squares and assembled blanket to calculate a more reliable result.
If your squares measure 18 cm instead, the layout starts at 72 cm wide and 90 cm long before seams and border. The finished blanket will therefore be somewhat larger.
To calculate a different size, multiply the square width by the number of columns for the starting width, and multiply the square height by the number of rows for the starting length. Then allow for seams and the border. Add columns to make the blanket wider or rows to make it longer.
12. Adding a simple single crochet border
A simple single crochet border gives the blanket a neat outer edge without adding large loops or loose decorations.
Border Round 1
- Choose a border color and attach the yarn with a slip stitch in a corner space.
- Ch 1. Work 3 sc into that same corner space to establish the corner.
- Work sc evenly along the first side of the blanket.
- At each outer corner, work 3 sc into the corner area.
- Continue around all four sides, distributing the stitches evenly so the border lies flat.
- Join with a sl st to the first sc of the round.
How to space the stitches: Along a side made of joined squares, work approximately one sc for each suitable edge stitch or seam section. Along a vertical edge of a square, you may need to place stitches around the ends of the rows or clusters. The exact placement depends on your square construction and joining seam, so distribute the stitches evenly rather than forcing a fixed count onto every edge.
At each corner, the 3 sc group gives the border room to turn. If the corner begins to curl or pull, add a little more room at that corner. If the border ruffles, reduce the number of stitches along the edge.
Optional Border Round 2
For a slightly wider finish:
- Ch 1 after joining Round 1.
- Work 1 sc into each stitch around.
- At each corner group, work 3 sc into the middle stitch of the previous corner’s 3 sc.
- Join with a sl st to the first sc.
- FO and weave in the yarn end.
This creates a simple two-round border. You can use one color for both rounds or use a contrasting shade for the final round.
How to keep the border flat
- Too tight: If the blanket pulls inward, the border has too few stitches or the tension is too firm. Undo the border and distribute more stitches evenly.
- Too wavy: If the edge ripples, there may be too many stitches. Undo the affected section and reduce the stitch count.
- Uneven corners: Check that each corner has enough stitches to turn comfortably, and keep the corner treatment consistent.
13. Blocking and final shaping
Blocking can help squares align more evenly, especially when some edges curl or the finished dimensions differ slightly. It is optional and must be suitable for the yarn fiber.
Blocking individual squares
- Check the yarn label to determine whether wet blocking or another method is appropriate.
- Gently shape each square to the intended dimensions without stretching it excessively.
- Use suitable blocking mats or a clean, flat surface.
- If wet blocking is appropriate, allow each square to dry fully before joining.
- Measure the squares again and compare their dimensions.
Avoid direct high heat or steam unless the yarn manufacturer confirms that the fiber can tolerate it. Heat can damage some synthetic fibers and may alter the texture of others.
Shaping the assembled blanket
If the blanket has already been joined, lay it flat and smooth it gently into a rectangle. Do not pull hard on the seams to force the blanket into shape. If the border or seams prevent the blanket from lying flat, correct the tension or stitch placement instead of stretching the fabric.
14. Finishing and quality checklist
Before using or gifting the blanket, check each item:
- All 20 squares are approximately the same size.
- All yarn ends are securely woven in.
- Seams are secure and even.
- Corners line up correctly.
- The blanket lies reasonably flat.
- The border is consistent and does not pull inward.
- No loose decorative pieces or detachable components are present.
- No damaged yarn or open seams remain.
- The finished blanket has been checked for loose loops and gaps.
If you find a loose seam, secure it with matching yarn and a yarn needle. If one edge is uneven, check the join and border tension before attempting to reshape the entire blanket. Repair any damaged yarn before use.
15. Troubleshooting common problems
| Problem | Likely cause | Solution |
|---|---|---|
| Granny squares curl inward | Tension is too tight, or the corner spaces are too small | Check the corner chain spaces and work with a slightly looser, consistent tension. |
| Squares have wavy edges | Tension varies or the stitch placement is uneven | Count the clusters and check that side clusters are placed only in the designated ch-1 spaces. |
| Corners look rounded or unclear | The corner space is difficult to identify or the corner group is incomplete | Make sure each corner has 3 dc, ch 2, and 3 dc in the same corner space. |
| Some squares are larger than others | Tension, yarn, hook size, or round count differs | Compare the squares and remake or adjust noticeably different ones before joining. |
| The blanket does not lie flat after joining | Seams are too tight or squares are not aligned | Check the seams, correct any gathered areas, and join with consistent tension. |
| Seams look bulky | Too much yarn is used in the join, or several tails are concentrated together | Use smaller stitches and weave ends into separate areas rather than one corner. |
| Corners do not line up | Edges were not aligned before sewing | Unpick the affected seam, align the corner spaces, pin the edges, and sew again. |
| The border pulls the blanket inward | Too few stitches or overly tight tension | Undo the border and add stitches evenly along the affected edges. |
| The border ruffles | Too many stitches were added along the edge | Remove the border and reduce the number of stitches while keeping the corners consistent. |
| Gaps appear between joined squares | The seam skips edge stitches or is too loose | Close the gaps with small, secure stitches, catching matching edge loops. |
| Yarn ends keep coming loose | The tails were not woven through enough stitches or directions | Reweave each tail through several stitches, change direction, and trim carefully. |
| Finished dimensions differ from the estimate | Square sizes, seams, or border width differ from the example | Measure the assembled blanket and adjust the border or square layout for future projects. |
16. Customization and practical tips
You can change the look and size of the blanket without changing the basic granny square construction.
- Single-color blanket: Use the same yarn throughout for a classic, coordinated finish.
- Pastel arrangement: Alternate soft pink, cream, sage, and pale yellow.
- Neutral design: Combine ivory, beige, gray, and muted brown.
- Contrasting border: Use a darker or brighter color around the outside to frame the squares.
- Larger squares: Continue the same granny square pattern for more rounds, then use fewer squares to cover the same area.
- Smaller squares: Use finer yarn and a compatible hook, or make fewer rounds and increase the number of squares in the layout.
- Larger blanket: Add columns for more width and rows for more length.
Changing the yarn weight affects the dimensions, drape, and overall weight of the blanket. A larger hook can produce a more open fabric, while a smaller hook usually produces a denser fabric. Choose a combination that gives you a comfortable, even fabric without large gaps.
For a larger project, make a sample square and calculate the approximate layout before crocheting all the motifs. This helps you estimate the amount of yarn needed and avoid making more squares than the final design requires.
17. Care instructions
Care depends on the yarn fiber and the manufacturer’s recommendations.
- Check the yarn label: Confirm whether the yarn can be machine washed, hand washed, or only cleaned in another way.
- Wash appropriately: Use a gentle washing method that suits the yarn and construction. Avoid assuming every acrylic, cotton, or blended yarn behaves the same way.
- Dry carefully: Avoid twisting or wringing the blanket. Reshape it gently and dry it according to the yarn’s care instructions.
- Avoid unsuitable heat: High heat may damage some fibers or alter the fabric.
- Inspect regularly: Check the seams, border, yarn ends, and fabric for damage or unraveling.
- Repair early: Secure loose seams and weave in escaping ends before the damage spreads.
Store the blanket in a clean, dry place. Before using it around a baby, check it carefully for loose yarn, open seams, damaged fabric, or other potential hazards.
18. Frequently asked questions
Is a granny square baby blanket suitable for beginners?
Yes. Confident beginners can learn the repeated granny square pattern and work on one square at a time. Joining and finishing require patience, but the individual motifs are repetitive and manageable.
What yarn is best for a baby blanket?
Smooth, soft yarn that suits the intended washing and care routine is a practical choice. Washable acrylic and cotton blends are common options, but check the specific yarn label before deciding.
What crochet hook size should I use?
Choose a hook suitable for your yarn and adjust it to create a consistent fabric. A 4.0 mm hook is a reasonable starting point for some yarns, but it is not suitable for every weight or fiber.
How many granny squares do I need?
The example uses 20 squares in four columns and five rows. You can make a smaller blanket with fewer squares or a larger blanket by adding columns and rows.
How do I make all my squares the same size?
Use the same yarn, hook, tension, and number of rounds. Measure a sample square first and compare each completed motif before joining.
What is the easiest way to join granny squares?
A mattress-style sewn join is beginner-friendly because it allows you to align the edges and control the seam. A slip-stitch crochet join is another option if you prefer a visible ridge.
Should I block the squares before joining?
Blocking is optional. It can help even out small differences in size, but only use a blocking method suitable for your yarn fiber.
Why does my blanket ripple around the edges?
The border may contain too many stitches, or the tension may be uneven. Undo the affected section and redistribute the stitches so the edge lies flat.
How do I calculate the finished blanket size?
Multiply the square width by the number of columns to estimate the starting width, and multiply the square height by the number of rows to estimate the starting length. Then allow for seams and the border.
How can I make the blanket larger?
Add more rows or columns of squares, or make each square larger by continuing the established granny square pattern. Recalculate the yarn requirement after measuring a sample.
What is a suitable border for a baby blanket?
A simple single crochet border is a neat, understated choice. It creates a finished edge without large loops or unnecessary detachable decorations.
How should I wash and care for the finished blanket?
Follow the yarn manufacturer’s care instructions. Use an appropriate washing method, avoid unsuitable heat, reshape gently if needed, and check the seams and yarn ends regularly.
What safety considerations matter when making a blanket for a baby?
Use a secure fabric structure, weave in all ends, avoid detachable decorations, and inspect the seams regularly. A loose blanket should not be placed in an infant’s sleep space; follow appropriate safe-sleep guidance.
Leave a Comment