
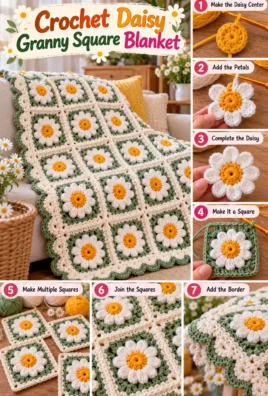
Create a cheerful floral blanket with bright yellow daisy centers, soft white petals, and classic square borders. This beginner-friendly pattern explains how to crochet each part of the motif, transform the flower into a square, make matching squares, join them into a blanket, and finish everything with a neat border.
The tutorial uses US crochet terminology throughout. Measurements and yarn quantities are estimates, so make one complete sample square before committing to the full blanket.
1. Introduction
A daisy granny square blanket brings the charm of handmade flowers into a practical crochet project. Each square features a rounded yellow center surrounded by eight white or cream petals, with a crocheted frame that turns the flower into a square. Once the motifs are joined, they create a lovely patchwork of daisies.
The design works beautifully as a bed throw, sofa blanket, nursery decoration, handmade gift, or seasonal home accessory. You can use a cream background for a soft, classic look, pastel pink for a playful finish, or sage green for a fresh botanical style.
This tutorial takes you through the entire process: crocheting the center, forming eight petals, building the square, making consistent motifs, arranging the colors, joining the squares, and adding a simple border. You can follow the sample design or adapt the colors and dimensions to suit your home.
2. Project Overview
Skill level
Confident beginner to intermediate
Construction
Individual squares, joined together
Yarn
Worsted-weight yarn
Suggested hook
5 mm (H-8)
Sample layout
20 squares: 4 columns × 5 rows
Design target
Approximately 80 × 100 cm
Estimated time: 20–35 hours, depending on experience, yarn, motif size, and joining method.
Main stitches include chain, slip stitch, single crochet, half double crochet, double crochet, and treble crochet.
Planning the sample size
For a blanket measuring approximately 80 cm wide by 100 cm long, aim for squares measuring about 19 cm by 19 cm before joining. Four squares across and five squares down would give a basic layout of approximately 76 cm by 95 cm. A narrow seam and a border can bring the finished dimensions closer to the target.
The final measurements depend on yarn weight, hook size, tension, the exact square dimensions, the joining method, and the border width.
3. Materials and Tools
- Yarn in yellow: For the daisy center.
- Yarn in white or cream: For the eight petals.
- Background yarn: Cream, pink, sage green, or another color for the square frame.
- Optional green yarn: For decorative details or separate leaf motifs.
- Crochet hook: Start with a 5 mm hook for medium-weight yarn, then adjust if your fabric is too tight or too loose.
- Scissors: For cutting yarn neatly.
- Yarn needle: For weaving in ends and sewing the squares together if desired.
- Measuring tape or ruler: For checking the square dimensions.
- Stitch markers: Optional, but helpful for identifying corners.
- Blocking tools: Optional, provided they are suitable for the yarn.
Smooth yarn is especially helpful for beginners because individual stitches are easier to see. Using yarns of similar weight and texture across all squares helps keep the motifs consistent and makes joining easier.
A washable acrylic yarn is often practical for everyday blankets, while cotton may suit lighter blankets and wool blends may provide additional warmth. Always check the yarn label for washing and drying instructions.
Estimated yarn quantity
For a 20-square blanket with squares approximately 19 cm across, allow roughly 900–1,300 g of yarn in total as an initial planning estimate. You might begin with approximately:
- Yellow: 50–100 g
- White or cream for petals: 150–250 g
- Background yarn: 500–750 g
- Joining yarn and border: 200–300 g
These quantities are not guaranteed and may overlap depending on how the colors are distributed. Buy extra yarn if possible, especially for the background and border, because those areas usually consume more yarn than the small flower centers.
4. US Crochet Terminology and Abbreviations
This pattern uses US crochet terminology. UK terminology uses different names for several stitches, so follow the definitions below rather than substituting UK stitch names.
| Abbreviation | Meaning |
|---|---|
| ch | Chain |
| sl st | Slip stitch |
| sc | Single crochet |
| hdc | Half double crochet |
| dc | Double crochet |
| tr | Treble crochet |
| st / sts | Stitch / stitches |
| sp | Space |
| ch-sp | Chain space |
| rnd | Round |
| rep | Repeat |
| FO | Fasten off |
| MR | Magic ring |
How to make the stitches
Chain (ch): Make a slip knot and place it on the hook. Yarn over and pull the yarn through the loop on the hook. Each pull-through creates one chain.
Slip stitch (sl st): Insert the hook into the indicated stitch or space, yarn over, and pull the yarn through both the stitch and the loop already on the hook. Slip stitches are useful for joining rounds.
Single crochet (sc): Insert the hook into the stitch, yarn over and pull up a loop, then yarn over and pull through both loops on the hook.
Half double crochet (hdc): Yarn over, insert the hook, yarn over and pull up a loop, then yarn over and pull through all three loops on the hook.
Double crochet (dc): Yarn over, insert the hook, yarn over and pull up a loop. Yarn over and pull through two loops, then yarn over and pull through the remaining two loops.
Treble crochet (tr): Yarn over twice, insert the hook, yarn over and pull up a loop. Yarn over and pull through two loops three times, working through two loops at a time until one loop remains.
Magic ring (MR): Form an adjustable loop with the yarn, work the required stitches into the loop, then pull the yarn tail to close the center. If you prefer not to use a magic ring, chain 4 and join with a slip stitch to make a small ring.
Understanding clusters
A three-dc granny cluster consists of three double crochet stitches worked into the same space. The chain spaces between clusters create the openings that allow the square to expand.
In this pattern, the initial daisy is made separately, and the square frame is built around the flower using clearly identified spaces between the petals.
5. Understanding the Daisy Granny Square
Each motif has four main parts:
- A yellow circular center.
- Eight white or cream petals worked around the center.
- A background round that creates four corners and straight sides.
- Additional granny-square rounds that enlarge the motif.
The center and petals form a flower first. The background round then establishes the four corners, and each subsequent round adds space along the sides while keeping those corners in position.
The yellow center is worked in joined rounds. The petals are worked into designated stitches around the center, and the square frame is attached around the outer bases of the petals. This separates the flower construction from the square construction, making the motif easier to understand and adjust.
6. Complete Pattern: Daisy Center
Use yellow yarn and a 5 mm hook.
Round 1: Create the center
- Make a magic ring, leaving a yarn tail of approximately 10–15 cm.
- Ch 1. This starting chain does not count as a stitch.
- Work 8 sc into the ring.
- Pull the yarn tail firmly to close the center.
- Join with a sl st to the first sc.
Stitch count: 8 sc.
The center should be a small, compact circle with eight clearly identifiable stitches. These eight stitches will provide the attachment points for the eight petals and the first square-forming round.
If you prefer a chain ring, ch 4 and join with a sl st to the first chain. Work the 8 sc into the ring and join in the same way.
Finishing the center
Do not fasten off if you want to continue directly into the petals. You can switch to white or cream yarn at the start of the next round.
If the center has a hole, pull the magic-ring tail tighter before weaving it in. Secure the tail by threading it through several stitches on the wrong side, changing direction once or twice, and trimming the excess.
7. Complete Pattern: Eight Daisy Petals
The petals are worked individually around the eight stitches of the yellow center. Each petal uses one center stitch as its base.
Switch to white or cream yarn.
Round 2: Make the petals
- Join the white or cream yarn to any one of the 8 center stitches with a sl st.
- In that same stitch, work the following sequence:
- Ch 3.
- Work 2 tr.
- Ch 3.
- Sl st into the same center stitch.
- You have completed one petal.
- Move to the next center stitch and repeat the same sequence.
- Continue until all 8 center stitches have one petal each.
- After completing the eighth petal, secure the yarn and fasten off.
Petal sequence: Sl st in the base stitch, ch 3, 2 tr in the same stitch, ch 3, sl st in the same stitch.
Verification: The finished flower has exactly 8 petals, one attached to each of the 8 stitches in the yellow center.
How to keep the petals even
- Use the same number of chains and stitches for every petal.
- Keep the chain loops relaxed enough to form rounded petal tips.
- Avoid pulling the slip stitches too tightly, as this can make the flower cup inward.
- Spread the petals gently with your fingers before beginning the square frame.
- If the petals overlap heavily, check your tension and consider using a slightly larger hook for the petal round.
The petals should fan outward from the center. Their tips may touch slightly, but they should remain distinguishable.
8. Complete Pattern: Turn the Daisy into a Square
The square-forming round uses the eight original center stitches as its anchor points. Four alternating stitches become the corners, and the four stitches between them become the side anchors. This creates a square around the flower without relying on vague instructions to “square off” the motif.
Use the background color, such as cream, pastel pink, or sage green.
Round 3: Create four corners
Lay the flower flat with the petals facing upward. Identify the 8 yellow center stitches beneath the petals.
For clarity, number the center stitches mentally from 1 to 8, moving clockwise. The first stitch can be any center stitch. Use stitches 1, 3, 5, and 7 as the four corner anchors, and stitches 2, 4, 6, and 8 as the side anchors.
- Join the background yarn to center stitch 1, inserting the hook into the yellow stitch beneath the petal base.
- Ch 3. This counts as the first dc.
- Work 2 dc into the same center stitch.
- Ch 2 to form the first corner space.
- Work 3 dc into center stitch 1 again. The corner is now complete.
- Move to center stitch 2 and work 3 dc into that stitch. This forms the first side group.
- Move to center stitch 3. Work 3 dc, ch 2, then 3 dc into that same stitch to create the second corner.
- Work 3 dc into center stitch 4.
- Work 3 dc, ch 2, 3 dc into center stitch 5 for the third corner.
- Work 3 dc into center stitch 6.
- Work 3 dc, ch 2, 3 dc into center stitch 7 for the fourth corner.
- Work 3 dc into center stitch 8.
- Join with a sl st to the top of the beginning ch 3.
Round 3 verification:
- Four corner groups, each containing 6 dc and a ch-2 corner space.
- Four side groups, each containing 3 dc.
- Total dc stitches: 36.
- Total corner spaces: 4.
The first ch 3 counts as one of the 36 dc stitches. It is not an extra stitch.
This round passes through the center stitches beneath the petal bases, so insert the hook carefully. Avoid catching the white petal loops themselves. The petals should remain visible on top of the square frame.
Round 4: Expand the square
Continue using the background yarn.
- Sl st across the stitches as needed to reach the first ch-2 corner space.
- Ch 3, then work 2 dc into that corner space.
- Ch 2, then work 3 dc into the same corner space. This completes the first corner.
- Work 3 dc into the gap between the two groups along the first side.
- Work 3 dc into the next corner space, ch 2, then 3 dc into the same space.
- Repeat the side-group and corner sequence around the remaining three sides.
- Join with a sl st to the top of the beginning ch 3.
For this round, treat the space between the original corner group and the adjacent side group as the first side gap. Continue placing one 3-dc cluster into each side gap. Do not work into the individual dc stitches of the previous round.
Round 4 verification: Each of the four corners contains two 3-dc clusters separated by ch 2. Each side gains one additional cluster in the gap between the original corner and side groups. The four corners remain aligned.
Round 5: Add another square round
- Sl st across the stitches as needed to reach a corner ch-2 space.
- Ch 3, work 2 dc into the corner space, ch 2, then work 3 dc into the same corner space.
- Work 3 dc into each side gap between adjacent clusters until you reach the next corner.
- In the next corner space, work 3 dc, ch 2, and 3 dc.
- Continue around the square, working a 3-dc cluster into every side gap and the standard corner group into each corner space.
- Join with a sl st to the top of the beginning ch 3.
Round 5 verification: The square has four corner spaces. Each side gains one cluster in every gap created between clusters on the previous round. The number of side clusters increases by one per side with each additional round.
How to make the square larger
Continue repeating the Round 5 method for additional rounds:
- Work 3 dc, ch 2, 3 dc in every corner space.
- Work one 3-dc cluster into every side gap.
- Join at the end of each round.
- Count the four corner spaces before moving to the next round.
Each new round expands the square outward while preserving its four corners. The square’s actual size depends on the yarn, hook, tension, and number of rounds.
9. Pattern Accuracy and Stitch-Count Verification
The pattern uses an eight-stitch center, eight petals, and four alternating corner anchors.
| Section | Verification |
|---|---|
| Yellow center | 8 sc in Round 1 |
| Daisy petals | 8 petals, one per center stitch |
| First square round | 4 corner spaces and 4 side groups |
| First square round stitch total | 36 dc, plus 4 ch-2 corner spaces |
| Additional square rounds | 4 corner spaces maintained in every round |
The four corner anchors are spaced evenly because every second center stitch is used as a corner. The intervening stitches form the four side anchors.
During the first square round, the background stitches are worked into the center stitches beneath the petal bases. This intentionally shares those anchor stitches with the flower construction. Work carefully so that the white petals remain visible and the square frame does not pull them inward.
In later rounds, clusters are worked into the gaps between groups rather than into individual dc stitches. This keeps the corners defined and allows the square to grow evenly.
10. Make All Squares the Same Size
Consistency is essential when making a blanket from individual motifs. Squares that differ significantly in size can cause the finished blanket to twist, ripple, or pull at the seams.
Follow these steps:
- Complete one sample square. Make the center, all eight petals, the square-forming round, and enough outer rounds to reach your intended size.
- Measure the square. Measure from edge to edge across the widest horizontal and vertical points.
- Choose a target dimension. For the sample blanket, aim for approximately 19 cm per square before joining.
- Use the same yarn weight and hook. Different yarns and hook sizes can produce noticeably different motifs.
- Keep your tension consistent. Avoid making the center tight and the outer rounds unusually loose.
- Compare each completed square. Measure motifs as you finish them rather than waiting until all 20 are complete.
- Adjust outer rounds if necessary. If a motif is slightly smaller, an extra round may help, provided the shape and design remain consistent. Do not add rounds randomly if doing so changes the square’s proportions.
- Block when appropriate. Gentle blocking can help motifs align, provided the yarn fiber tolerates the chosen method.
Changing only the background color does not necessarily change a square’s size. Changing the yarn, hook, or tension can.
Make all your squares to the same target measurement before joining them.
11. Color Planning and Layout
The flower center and petals create the main contrast in each square. A carefully chosen background helps the daisies stand out and gives the finished blanket a coordinated appearance.
Three color schemes
Classic cream daisy
Yellow centers, white petals, and a warm cream background. This palette creates a soft, timeless floral look.
Pastel pink garden
Golden centers, white petals, and pastel pink backgrounds. This combination works well for a cheerful nursery or spring-inspired throw.
Natural sage garden
Mustard centers, cream petals, and sage-green backgrounds. The muted colors give the blanket a botanical, understated style.
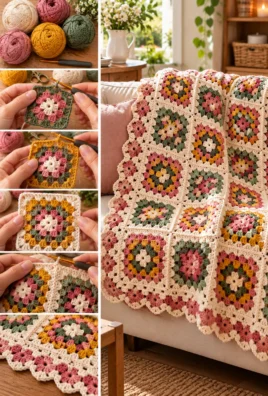
All three schemes are optional. You can also alternate two background colors or use leftover yarn for a colorful patchwork effect.
Plan a 20-square layout
For the sample blanket, arrange 20 squares in four columns and five rows.
Before joining, lay out all completed squares on a flat surface. Move the colors around until the overall arrangement looks balanced. Avoid placing all the same background colors in one corner unless you want a deliberate color block.
A simple arrangement might use:
- Row 1: cream, pink, sage, cream
- Row 2: pink, sage, cream, pink
- Row 3: sage, cream, pink, sage
- Row 4: cream, sage, cream, pink
- Row 5: pink, cream, sage, cream
This is only an example. Rearrange the motifs as you prefer, and take a note of the final order before joining.
12. Weaving in Ends and Preparing the Motifs
Finishing each square neatly before assembly makes the blanket easier to join and reduces the chance of loose yarn tails appearing later.
For each color change:
- Cut the yarn, leaving a tail approximately 10–15 cm long.
- Pull the cut end through the final loop to secure it.
- Thread the tail through a yarn needle.
- On the wrong side of the square, weave the needle through the backs of several stitches in the same color.
- Change direction and weave through another short section of stitches.
- Trim the excess yarn carefully without cutting the crochet fabric.
Avoid tying bulky knots at the back of the flower. Instead, weave the ends through several stitches and change direction to help secure them.
Check the yellow center, all eight petal bases, the square frame, and the final round. Make sure no loose tails remain before setting the square aside.
13. Joining the Daisy Granny Squares
A slip-stitch crochet join is a beginner-friendly method that creates a visible, slightly raised seam. It is suitable when you want the joining lines to form part of the blanket’s design.
Step 1: Arrange the squares
Lay out all 20 motifs in your chosen order. Check that the petals face the same way and that the corners align.
Step 2: Align two edges
Place two squares next to each other with the wrong sides facing together and the right sides facing outward. This makes the seam visible on the front. If you prefer a less prominent seam, place the right sides together and work from the wrong side instead.
Step 3: Identify the edge stitches
Along each square edge, identify the outer loops of the stitches in the final round. Use the same loop choice throughout the project. Working through the corresponding edge loops of both squares helps the seam stay aligned.
Step 4: Secure the joining yarn
Attach the background or joining yarn at one end of the aligned edges. Ch 1 to secure the working loop; do not count this as a seam stitch.
Step 5: Work the slip-stitch seam
- Insert the hook through the chosen edge loop of the first square and the corresponding edge loop of the second square.
- Yarn over and pull through both edge loops.
- Pull the new loop through the loop already on the hook to complete one sl st.
- Repeat along the edge, matching one stitch position from each square at a time.
- Keep the tension even. The seam should hold the squares together without drawing their edges inward.
Step 6: Finish the seam
At the end of the edge, secure the yarn, cut it, and weave in the end. Check that the corners remain aligned and the seam does not pull the fabric out of shape.
Step 7: Join the horizontal strips
Join the squares across each row first. For four squares in a row, join the first pair, then attach the third square, followed by the fourth, keeping the sequence consistent.
Step 8: Join the strips
Place the completed horizontal strips side by side. Use the same slip-stitch method to join the long edges of the strips. Match every corner intersection carefully.
Step 9: Check the blanket
Lay the joined blanket flat. Smooth the fabric with your hands and check for gaps, puckering, or bulky intersections where four corners meet.
Other joining options
- Sewn mattress-style seam: Creates a relatively flat join and can be useful when you want the motifs to look closely connected.
- Single crochet join: Creates a more pronounced ridge than a slip-stitch join and can add texture.
- Slip-stitch join: Makes a visible line and is relatively quick once you become comfortable with matching edge stitches.
A loose seam can leave gaps, while a tight seam may cause the blanket to pucker. At intersections, weave in the ends carefully rather than tying several bulky knots together.
14. Planning the Finished Blanket Dimensions
Estimate the blanket size before making all the squares. The calculation depends on the number of columns, number of rows, square size, joining method, and border width.
Use these plain-English formulas:
Estimated blanket width ≈ square width multiplied by the number of columns, plus extra width from seams and the two side borders.
Estimated blanket length ≈ square height multiplied by the number of rows, plus extra height from seams and the top and bottom borders.
Worked example
Suppose each square measures 19 cm by 19 cm, with four columns and five rows.
- Width before seams and border: 19 cm × 4 = 76 cm.
- Length before seams and border: 19 cm × 5 = 95 cm.
- If the joining seams add approximately 1 cm across the width and 1.5 cm across the length, the assembled blanket measures about 77 cm wide by 96.5 cm long before edging.
- If the border adds approximately 1.5 cm on each side, the finished blanket measures about 80 cm wide by 100 cm long.
These are design estimates, not guaranteed measurements. The seams may add less or more than assumed, and the border may change the dimensions depending on its stitch count and tension.
Measure the assembled blanket before working the border. If it is already larger than expected, choose a narrow edging. If it is smaller, a wider border may help, provided it does not pull the edges inward.
15. Complete Pattern: Blanket Border
A simple single crochet border frames the daisies without competing with the flower design.
Use the background color for a subtle finish, or choose a contrasting color to create a stronger outline.
Border Round 1: Single crochet
- Lay the assembled blanket flat with the right side facing you.
- Attach the border yarn at a corner.
- Ch 1. This chain does not count as a stitch.
- Work 3 sc into the corner point to establish the corner increase.
- Continue along the first edge, placing sc stitches evenly along the side.
- At joined square edges, work into the available edge stitches or spaces, keeping the number of stitches consistent with the surrounding fabric.
- At the next corner, work 3 sc into the corner point.
- Continue around all four sides, working 3 sc into each corner.
- Join with a sl st to the first sc.
- Fasten off and weave in the end, or continue directly into an optional second round.
How to space stitches along the edges
Along horizontal edges, work into the visible stitches of the final square round. Along vertical edges, the number of available spaces may not match the number of stitches across a horizontal edge.
Rather than placing a stitch into every row-end automatically, distribute the sc stitches evenly. If the border begins to flare, reduce the number of stitches slightly along that edge. If it pulls inward, add a few stitches where needed.
The aim is a flat edge without ripples or curling.
Optional Border Round 2: A neat finishing edge
- Ch 1 after the first round, without counting it as a stitch.
- Work 1 sc into each sc around.
- At each corner, work 3 sc into the middle sc of the previous corner group.
- Join with a sl st to the first sc.
- Fasten off and weave in the ends.
This second round creates a slightly wider frame while remaining simple. You can omit it if you prefer a narrow border.
Check the border tension
- If the blanket curls inward, the border may be too tight or have too few stitches. Undo the affected section and add stitches where needed.
- If the edge ripples, the border may have too many stitches. Remove the affected section and work fewer stitches.
- If the corners look rounded, make sure the three corner sc stitches are placed into the same corner point in every round.
The border should lie flat when the blanket is placed on a table.
16. Blocking and Final Shaping
Blocking is the process of gently shaping crochet fabric and allowing it to dry in the desired form. It can help the square edges align and make joining easier, but it is optional.
Before joining
- Check the yarn label to identify a suitable blocking method.
- Place the square on a clean, flat surface or suitable blocking mat.
- Gently shape the four corners and straighten the sides until the motif reaches its intended dimensions.
- Avoid pulling the flower center or stretching the petals excessively.
- If wet blocking is suitable for the yarn, dampen the square according to the fiber’s care requirements and let it dry completely in shape.
- Recheck the dimensions after drying.
Do not apply direct high heat or steam to fibers that may be damaged by it. Some synthetic yarns can melt or lose their texture under excessive heat.
After joining
If the blanket is already assembled, lay it flat and gently smooth the squares and seams into position. Use a fiber-appropriate method if further blocking is necessary. Avoid stretching the joined edges or pulling the blanket hard at the corners.
17. Troubleshooting Common Problems
| Problem | Likely cause and solution |
|---|---|
| The daisy center is too loose. | The magic ring may not be tightened enough. Pull the tail firmly and weave it securely through the back of the center. |
| The center is not circular. | The stitches may be uneven or the ring may be too tight on one side. Check that Round 1 contains exactly 8 sc and spread the stitches evenly before joining. |
| Petals look uneven. | Different stitch heights or tension can change their shape. Repeat the same petal sequence in every center stitch and keep the chains consistent. |
| Petals overlap too much. | The petals may be too large for the center or your tension may be loose. Try a slightly smaller hook for the petal round or tighten the chains gently. |
| Large gaps appear between petals. | The petals may be pulled too tightly at their bases. Check that each petal is worked into the intended center stitch and that the slip stitches are not excessively tight. |
| The square-forming round pulls the flower out of shape. | The background stitches may be too tight or inserted incorrectly. Work into the center anchor stitches beneath the petal bases and loosen your tension. |
| The corners are not clearly defined. | The corner groups may have been placed in the wrong stitches. Use alternating center stitches as the four corner anchors and work ch 2 at each corner. |
| Some squares are larger than others. | Tension, hook size, yarn, or round count may differ. Measure each motif and make the remaining squares using the same yarn, hook, and target dimensions. |
| The blanket ripples after joining. | The seams may be too loose or the edges may not be matched evenly. Undo the affected seam, align the edges, and join with consistent tension. |
| Seams look bulky. | Several ends or too many loops may have been caught in the join. Use the same edge-loop method throughout and weave in ends separately. |
| The border pulls the blanket inward. | The border may be too tight or contain too few stitches. Undo the affected section and distribute more stitches along the edge. |
| The blanket is larger or smaller than expected. | Actual square size, seams, and border width differ from the estimates. Measure the assembled blanket and adjust the edging rather than relying only on planned dimensions. |
| Yarn ends keep coming loose. | The tails may be too short or woven in only one direction. Re-secure them by weaving through several stitches, changing direction, and trimming only after checking that the tail is secure. |
18. Customization Ideas
Once you understand the basic motif, you can personalize the blanket without changing its overall construction.
- Change the daisy colors: Use pale yellow centers, golden centers, or even colored petals for a playful design.
- Try neutral backgrounds: Beige, ivory, taupe, and soft gray make the flowers the main focus.
- Change the flower-center size: A larger center changes the proportions of the petals and may require a revised square-forming round.
- Make larger squares: Add outer granny-square rounds to increase each motif’s dimensions.
- Make smaller squares: Stop after fewer outer rounds, provided all motifs remain the same size.
- Use contrasting joining yarn: A darker seam can emphasize the patchwork layout.
- Add a simple textured border: A second round of single crochet or a subtle ribbed edging can add detail without overwhelming the flowers.
- Alternate floral and solid squares: Solid squares can break up the pattern and make the blanket more varied.
Adjusting size and yarn quantities
Changing the yarn weight or hook size affects the motif’s size, texture, drape, and yarn consumption. Thicker yarn usually creates a larger, heavier square, while finer yarn usually produces a smaller, lighter motif.
Use a completed sample to estimate the final dimensions. For example, if your finished square is 18 cm wide rather than 19 cm, four columns will measure about 72 cm before seams and borders, rather than 76 cm.
For yarn planning, make one complete square, note the approximate amount of each color consumed, and multiply that estimate by 20. Add extra yarn for joining and the border. This is more reliable than calculating from square dimensions alone.
19. Care Instructions
The best care method depends on the fiber and the yarn manufacturer’s instructions.
- Check the yarn label: Follow its recommended washing and drying method.
- Wash gently: Use a suitable cycle or hand-washing method if recommended for the fiber.
- Avoid unsuitable heat: High temperatures can damage some synthetic fibers and may shrink or felt certain animal fibers.
- Dry carefully: Support the blanket’s weight when lifting it wet, and reshape it gently on a flat surface if necessary.
- Store clean and dry: Avoid damp storage and excessive pressure that could flatten the petals.
- Inspect the seams: Check the joining stitches and woven-in ends periodically, especially if the blanket is used frequently.
Do not assume the blanket is machine-washable simply because the yarn feels soft. Check the specific yarn label before washing.
20. Frequently Asked Questions
1. Is a daisy granny square blanket suitable for beginners?
Yes, if you are comfortable with basic crochet stitches. The main challenge is placing the eight petals evenly and identifying the correct corner anchors when forming the square.
2. What yarn is best for a daisy blanket?
Smooth, washable yarn is a practical choice. Acrylic is often convenient for everyday use, cotton can create a lighter fabric, and suitable wool blends can add warmth. Choose a fiber based on the intended use and care requirements.
3. Which crochet hook size should I use?
A 5 mm hook is a reasonable starting point for many worsted-weight yarns. Adjust the hook if your stitches are too tight or loose, and check the finished square dimensions before making all the motifs.
4. How many squares do I need?
The sample design uses 20 squares arranged in four columns and five rows. A smaller throw can use fewer squares, while a larger blanket can use more rows or columns.
5. How do I make all the squares the same size?
Use the same yarn weight, hook size, stitch sequence, and tension. Measure each square after completing it, and adjust the outer rounds consistently to meet your target dimensions.
6. How do I turn a flower into a square?
The flower’s eight center stitches provide four alternating corner anchors and four side anchors. The first square-forming round works background clusters into these anchor stitches, creating four corner spaces and four sides.
7. Why are my daisy petals uneven?
Uneven petals usually come from inconsistent tension, different stitch heights, or chains that are pulled too tightly. Check each petal against the same stitch sequence and make sure there is one petal for each center stitch.
8. What is the easiest way to join the squares?
A slip-stitch crochet join is a straightforward option. Align the corresponding edge stitches, work through the chosen loops on both squares, and maintain even tension along the seam.
9. Should I block the squares before joining?
Blocking is optional. It can help square up motifs and make their edges easier to align, but use only a method suitable for the chosen yarn.
10. How do I calculate the finished blanket size?
Multiply the square width by the number of columns and the square height by the number of rows. Then allow for any extra width or length from the seams and border.
11. What border works well with floral granny squares?
A single crochet border complements the daisies without making the blanket look too busy. A second single crochet round can add a little extra width.
12. How should I wash and care for the blanket?
Follow the care instructions on the yarn label. Wash and dry the blanket using a fiber-appropriate method, avoid unsuitable heat, and check the seams and woven-in ends regularly.
13. Can I make the daisy squares larger?
Yes. Add more outer granny-square rounds, keeping the same corner construction and working a cluster into each side gap. Make a sample first to check the resulting dimensions.
14. Can I use different colors for every square?
Yes. Different background colors can create a cheerful patchwork effect. Lay out all the motifs before joining so the colors are distributed in a way you like.
15. Why does my blanket curl after adding the border?
The border may be too tight or may have too few stitches along the edges. Undo the affected section, distribute the stitches more evenly, and check that the blanket lies flat before continuing.
Leave a Comment