
The classic granny square is an enduring staple in crochet, admired for its versatility, meditative repetition, and modular design. When worked in a curated palette of pastel tones—such as mint green, buttercream yellow, blush pink, lavender, and soft sky blue—this timeless motif transforms into an elegant, airy piece ideal for spring throws, baby blankets, tote bags, cardigans, and home accents.
This comprehensive guide breaks down every exact round, stitch count, corner turn, and yarn-changing technique, providing clear guidance for beginners alongside technical nuances for seasoned makers.
Hero Preview
1. Project Overview
All measurements and times are approximate:
- Skill level: Beginner to Intermediate (approachable foundation with precision colorwork)
- Completion time: 20–35 minutes per square
- Finished size: Approximately 5.5 × 5.5 inches (14 × 14 cm) across 5 rounds
- Construction: Worked in the round starting from a central loop, building outward into a square using 3-dc clusters (“shells”) separated by corner and side spaces
- Main stitches: Magic ring (or chain loop), slip stitch, chain, and double crochet
- Suggested uses: Baby blankets, lightweight cardigans, market bags, bucket hats, cushion covers, and patchwork throws
The final dimensions will depend on yarn weight, hook size, and personal stitch tension.
2. Materials and Supplies
- Yarn:
- Light worsted / DK weight yarn (Category 3) or Medium worsted (Category 4) in smooth cotton or soft acrylic:
- Color A: Soft Buttercream / Cream (Center)
- Color B: Mint Green
- Color C: Blush Pink
- Color D: Lavender / Lilac
- Color E: Pale Sky Blue or Bright Cream (Outer border)
- Light worsted / DK weight yarn (Category 3) or Medium worsted (Category 4) in smooth cotton or soft acrylic:
- Crochet hook: 3.75 mm (US F/5) or 4.0 mm (US G/6) for DK yarn; 4.5 mm (US 7) for worsted weight
- Tapestry needle: Blunt-ended yarn needle for neat tapestry joins and weaving tails securely
- Scissors: Sharp embroidery snips for crisp color breaks
- Stitch marker: Helpful for marking corner spaces or the initial slip stitch joins
- Blocking board & rust-proof T-pins: Essential for squaring corners and opening up lace clusters
3. US Crochet Abbreviations
| Abbreviation | Meaning |
| ch | Chain stitch |
| sl st | Slip stitch |
| sc | Single crochet |
| dc | Double crochet |
| sp | Space (refers to chain spaces between stitch groups) |
| ch-sp | Chain space (e.g., ch-2 sp) |
| st(s) | Stitch(es) |
| MR | Magic ring |
| FO | Fasten off |
| Cluster / Shell | A group of 3 double crochet stitches worked into the exact same space |
Special Technique: Standing Double Crochet (Optional for Advanced Crafters)
Instead of starting a new color with a ch 3, hold a slip knot on your hook, yarn over, insert the hook into any corner space, yarn over, pull up a loop, and complete a normal double crochet (yarn over, draw through 2 loops twice). This produces a cleaner, more uniform edge than a chain-3 turning chain.
4. Skills to Know Before Starting
- Double Crochet (dc): Yarn over, insert hook into indicated stitch/space, yarn over and pull up a loop (3 loops on hook). Yarn over, draw through first 2 loops; yarn over, draw through remaining 2 loops.
- Granny Cluster: The fundamental building block consisting of 3 double crochets grouped together in one opening.
- Corner Formation: Working
(3 dc, ch 2, 3 dc)into a single corner space to create crisp 90-degree angles. - Turning vs. Same-Side Working: Rotating your square on each round balances diagonal torque, preventing your granny square from spiraling or twisting off-center.
- Weaving Ends As You Go: Crocheting over yarn tails locks in colors and cuts down on finishing time.
5. Understanding the Granny Square Geometry
A classic granny square expands symmetrically round by round:
- Round 1 (Center): 4 clusters of 3 dc, separated by 4 corner spaces = 4 clusters total.
- Round 2: 2 clusters worked into each of the 4 corners = 8 clusters total.
- Round 3: 4 corners
(2 clusters each)+ 4 straight sides(1 cluster each)= 12 clusters total. - Round 4: 4 corners
(2 clusters each)+ 8 straight sides(2 clusters per side)= 16 clusters total. - Round 5: 4 corners
(2 clusters each)+ 12 straight sides(3 clusters per side)= 20 clusters total.
Every subsequent round adds exactly 4 clusters across the entire perimeter (1 cluster per side).
In-Progress Crafting
6. Gauge and Structural Alignment
While exact gauge is not vital for a standalone decorative piece, keeping consistent tension across multiple squares ensures smooth assembly when piecing a blanket or garment together.
- A 3-round square in DK yarn with a 4.0 mm hook should measure roughly 3.25 to 3.5 inches across.
- If your square curls inward like a shallow bowl, your tension is too tight or your corner chains are insufficient; loosen your grip or switch to
ch 3in corners. - If your square ripples or ruffles, you are placing too many chains between side clusters; eliminate side chains and work directly into side spaces.
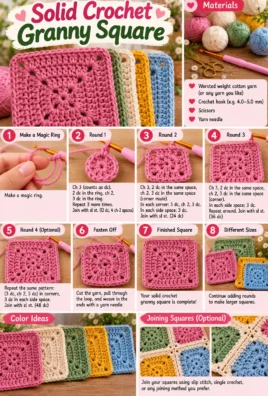
7. Complete Step-by-Step Crochet Pattern
Round 1: The Floral Center (Color A – Buttercream)
- Foundation: Form a Magic Ring (or
ch 4, sl st into the first ch to form a ring). - First cluster:
Ch 3(counts as first dc throughout), work 2 dc into the ring. - Corner 1:
Ch 2. - Second cluster: Work 3 dc into the ring.
- Corner 2:
Ch 2. - Third cluster: Work 3 dc into the ring.
- Corner 3:
Ch 2. - Fourth cluster: Work 3 dc into the ring.
- Corner 4:
Ch 2. - Join: Sl st into the top of the initial
ch 3to close. Fasten off Color A.(Total: 4 clusters of 3-dc, 4 ch-2 corner spaces)
Round 2: The Inner Frame (Color B – Mint Green)
- Turn work to wrong side (optional for advanced squaring, or keep right side facing).
- Join: Join Color B with a sl st (or standing dc) in any
ch-2corner space. - First corner half:
Ch 3, work 2 dc,ch 2, 3 dc into the same corner space. Ch 1(optional: omitch 1across straight edges for a denser, tighter granny look).- Remaining corners: Work
(3 dc, ch 2, 3 dc)into each of the next three corner spaces, chaining 1 between corners. - Join: Sl st into the top of the beginning
ch 3. Fasten off Color B.(Total: 8 clusters, 4 ch-2 corner spaces, 4 ch-1 side spaces)
Round 3: The Blossom Tier (Color C – Blush Pink)
- Turn work. Join Color C into any
ch-2corner space. - Corner 1:
Ch 3, 2 dc,ch 2, 3 dc in the same corner space. - Side 1:
Ch 1, skip to the nextch-1side space, work 3 dc into that space. - Corner 2:
Ch 1, work(3 dc, ch 2, 3 dc)into the corner space. - Repeat steps 3 and 4 around the remaining two edges.
- End with
ch 1, join with a sl st to the top of the startingch 3. Fasten off Color C.(Total: 12 clusters [2 per corner + 1 per side], 4 corner spaces)
Round 4: The Twilight Round (Color D – Lavender)
- Turn work. Join Color D into any
ch-2corner space. - Corner 1:
Ch 3, 2 dc,ch 2, 3 dc in the corner space. - Side 1:
Ch 1, 3 dc into the first side space,ch 1, 3 dc into the second side space. - Corner 2:
Ch 1, work(3 dc, ch 2, 3 dc)into the next corner space. - Repeat the side-and-corner sequence around the square.
- End with
ch 1, sl st to the third chain of the startingch 3. Fasten off Color D.(Total: 16 clusters [2 per corner + 2 per side], 4 corner spaces)
Round 5: Outer Edge / Border (Color E – Sky Blue or Crisp Cream)
- Turn work. Join Color E into any
ch-2corner space. - Corner 1:
Ch 3, 2 dc,ch 2, 3 dc in the corner space. - Side 1:
*Ch 1, 3 dc in next side space; rep from *across the side (3 side clusters). - Work
(3 dc, ch 2, 3 dc)in each corner, and 3 dc in each side space across all remaining sides. - End with
ch 1, sl st into the top of the initialch 3(or execute an invisible needle join). - FO, leaving a clean 6-inch tail for needle finishing.(Total: 20 clusters [2 per corner + 3 per side], 4 corner spaces)
Finished Keepsake Display
8. Construction and Reference Specifications
| Round | Color Suggestion | Cluster Distribution | Total Clusters | Approximate Width |
| Round 1 | Buttercream Yellow | 4 corners (1 cluster each) | 4 clusters | ~1.5 inches (3.8 cm) |
| Round 2 | Mint Green | 4 corners (2 clusters each) | 8 clusters | ~2.5 inches (6.4 cm) |
| Round 3 | Blush Pink | 4 corners + 4 sides (1 each) | 12 clusters | ~3.5 inches (8.9 cm) |
| Round 4 | Soft Lavender | 4 corners + 8 sides (2 each) | 16 clusters | ~4.5 inches (11.4 cm) |
| Round 5 | Sky Blue / Crisp Cream | 4 corners + 12 sides (3 each) | 20 clusters | ~5.5 inches (14.0 cm) |
9. Color Strategies and Variations
- Concentric Pastels: Start with the warmest pastel tone (yellow or peach) in the center, cooling down to sage green, lavender, and sky blue toward the rim.
- Monochromatic Fade: Work Round 1 in a whisper of pale pink, deepening gradually toward a rich rose border.
- Solid Field with Cream Frame: Use a single pastel color throughout Rounds 1–4, and encase it with crisp cream or off-white on Round 5 for a clean quilt aesthetic.
- Random Scrap Pastels: Vary the sequence across multiple squares; joining them with an identical neutral border creates effortless artistic balance.
10. Finishing, Blocking, and Assembly
- Weave Ends Thoroughly: Thread yarn ends through the dense bases of the 3-dc clusters, working back and forth in three opposing directions to lock fibers in place.
- Wet/Steam Blocking:
- Pin each square onto a foam blocking mat using rust-proof T-pins at all four corner chain spaces.
- For natural fibers (cotton, bamboo, wool): spritz lightly with clean water and allow to dry completely.
- For acrylic yarns: hold a handheld garment steamer 2 inches away from the pinned square; avoid pressing the hot soleplate directly onto the fibers.
- Joining Techniques:
- Invisible Mattress Stitch: Gives a smooth, flat join on the wrong side.
- Slip Stitch Join (Back Loops Only): Adds an elegant, slightly raised structural seam.
- Join-As-You-Go (JAYGO): Connects squares during Round 5 using slip stitches in corner and side chain spaces, eliminating final needle seaming.
11. Troubleshooting Common Problems
- The square twists into a spiral: Working in the same direction round after round pulls the stitches sideways. Turn your square over after every round to counteract this twist.
- The center hole is gaping: If using a Magic Ring, pull the starting tail firmly until the circle closes tight, then knot and thread the tail through several stitches to keep it secured.
- Wobbly or rounded corners: Ensure you are placing a full
ch 2(orch 3for tighter crocheters) between the two 3-dc clusters in every corner, and verify that both clusters enter the exact same space. - Ruffled edges: If your edges wave, omit the
ch 1between side clusters and work straight from one 3-dc group into the next.
12. Frequently Asked Questions
1. Is a magic ring mandatory for Round 1?
No. If you find the magic ring tricky, chain 4 and join with a slip stitch to form a ring. Work all of Round 1’s clusters directly into the center of that ring.
2. Can I make this square larger than 5 rounds?
Yes. Continue repeating the sequence established in Rounds 3–5: work (3 dc, ch 2, 3 dc) in each corner, and 3 dc into every side space along the edges. Each added round expands the square by about 1 inch.
3. What is the best yarn for pastel baby blankets?
A high-quality anti-pilling acrylic or a cotton-acrylic blend (50/50) offers softness, crisp stitch definition, and machine-washable durability.
4. How do I switch yarn colors without bulky knots?
Fasten off the old color with an invisible join, then start the next round in a fresh corner space using a standing double crochet or slip knot join. Weave in the tails along the cluster bases to avoid lumps.
13. Conclusion
The pastel granny square pairs timeless crochet architecture with a tranquil, modern color palette. Whether made individually for coasters and accents or joined into a full blanket, its balanced construction makes it a soothing, rewarding project for both beginners and experienced crafters.
Leave a Comment