
A turning chain is one of the most fundamental techniques in crochet. It serves as the bridge between rows, bringing your yarn up to the correct height for the next row of stitches while keeping your edges straight and even.
This comprehensive guide covers everything you need to know to master turning chains, complete with clear instructions and zero tables.
1. Project Overview
All measurements and times are approximate:
- Skill level: Absolute Beginner
- Completion time: 5 to 10 minutes of practice
- Finished size: Varies depending on swatch practice
- Main stitches: Slip knot, chain stitch, single crochet, half double crochet, double crochet, and treble crochet
- Suggested uses: Essential foundation technique for flat rows in blankets, scarves, garments, and dishcloths
2. Materials and Supplies
- Yarn: Any scrap medium worsted weight yarn (Category 4) in a smooth light color so your stitches are easy to see.
- Crochet hook: 5.0 mm (H/8) or 5.5 mm (I/9) hook that matches your chosen yarn.
- Scissors: Small craft scissors for trimming practice yarn.
- Stitch markers: Optional, but helpful for marking the turning chain so you know where to place your final stitch of the next row.
3. US Crochet Abbreviations & Stitch Meanings
- ch: Chain stitch
- tch: Turning chain
- sc: Single crochet
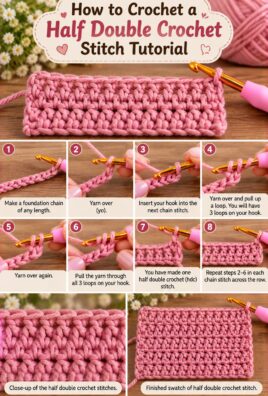
- hdc: Half double crochet
- dc: Double crochet
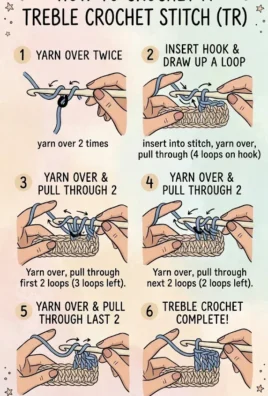
- tr: Treble crochet
- st(s): Stitch or stitches
- FO: Fasten off
4. Understanding the Turning Chain
When you finish working across a row of crochet, your working loop sits at the very edge of the fabric. Because different stitches have different heights, you cannot simply start crocheting the next row horizontally; doing so would bunch up the fabric and cause the edges to slant inward.
The turning chain achieves two goals:
- It adds the exact amount of vertical height needed for the specific stitch height of the upcoming row.
- It acts as the first stitch of the new row (for taller stitches like double crochet) or acts as a stepping-stone spacer (for shorter stitches like single crochet).
5. Turning Chain Height Guide by Stitch Type
Different stitches require a specific number of chain stitches to reach their proper height:
- Single Crochet (sc): Requires 1 chain. This turning chain does not count as a stitch; you will work your first single crochet directly into the very first stitch of the new row.
- Half Double Crochet (hdc): Requires 2 chains. Depending on the pattern, this counts as a stitch or acts purely as a spacer. Check your pattern instructions.
- Double Crochet (dc): Requires 3 chains. In most standard patterns, this 3-chain turning chain counts as the first double crochet of the row.
- Treble Crochet (tr): Requires 4 chains to match its tall structure, usually counting as the first treble crochet.
6. Complete Step-by-Step Tutorial: How to Make and Use a Turning Chain
Step 1: Finish Your Current Row
Work your final stitch of the current row all the way to the edge. Your working loop is now resting at the top corner of the fabric.
Step 2: Create the Turning Chains
Without turning your work yet, yarn over your hook and pull through the loop to make a chain stitch (ch 1). Repeat this for the required height of your next row (e.g., chain 3 if you are starting a row of double crochets).
Step 3: Turn Your Work
Rotate your entire piece of fabric horizontally like turning the page of a book. Traditionally, you turn your work clockwise so that the working yarn stays organized across the back of the work.
Step 4: Identify Where to Place Your First Stitch
- For Single Crochet Rows: Because a single crochet turning chain (
ch 1) does not count as a stitch, skip the chain and work your firstscinto the very first stitch right at the base of the turning chain. - For Double Crochet Rows: Because a double crochet turning chain (
ch 3) counts as your firstdc, you must skip the first stitch at the base of the chain (since the chain itself occupies that space) and work your next double crochet into the second stitch.
Step 5: Working the End of the Row
When you reach the end of the new row, look closely at the top of the turning chain from the previous row. Work your final stitch directly into the top turning chain space to keep your vertical edge completely straight.
7. Troubleshooting Common Problems
- Your work is shrinking or narrowing: You are likely skipping the turning chain at the end of rows or accidentally working into the turning chain as if it were a regular stitch. Always count your stitches at the end of every row.
- Your edges look jagged or wavy: You may be pulling your turning chains too tightly or too loosely. Keep your tension on the turning chain consistent with the rest of your stitches.
- There is a large, unsightly gap at the start of your double crochet rows: Instead of a traditional
ch 3, try practicing a Stack Single Crochet (Stacked DC) or a Standing Double Crochet, which mimics the exact thickness of a double crochet post without leaving loose chain gaps.
8. Frequently Asked Questions
1. Does a turning chain always count as a stitch?
No. Single crochet turning chains (ch 1) never count as a stitch. For double crochet and treble crochet, turning chains usually count as the first stitch unless your specific pattern states otherwise.
2. What happens if I forget to make a turning chain?
Your next row will pull tight, pinch inward, and eventually slant or curl because the hook does not have enough vertical clearance to start the row smoothly.
3. How do I keep my side edges straight?
Always use a stitch marker in the top chain of your turning chain at the end of a row. This ensures you can easily find where to insert your final stitch on your way back.
Mastering the turning chain guarantees neat, professional-looking edges and helps maintain uniform dimensions across all your flat crochet projects!
Leave a Comment