
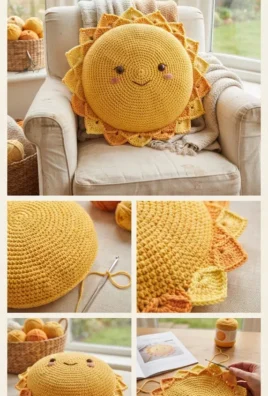
A handmade crochet sun pillow is a cheerful, whimsical, and heartwarming home accessory that brings bright sunshine energy, cozy comfort, and delightful texture to any armchair, bed, or nursery. Featuring a large rounded golden face with sleepy-sweet safety eyes, rosy cheeks, a friendly embroidered smile, and a radiant ring of textured sun rays, this cushion is as fun to craft as it is to display.
Following your preferred style, this pattern is completely text-based with zero images and zero tables, providing clear, descriptive, and structured instructions in English from start to finish.
1. Project Overview
All measurements and times are approximate:
- Skill level: Intermediate
- Completion time: 10 to 14 hours
- Finished size: Approximately 16 inches in diameter across the sun face and rays
- Construction: Worked in two large circular pillow panels (front and back) for the main sun body, surrounded by a border of individual sun-ray points or petals, stuffed firmly with fiberfill, and seamed together
- Main stitches: Magic ring, chain, slip stitch, single crochet, half double crochet, double crochet, and increases
- Suggested uses: Nursery throw pillow, reading nook cushion, decorative bed pillow, children’s bedroom accent, and a special handmade gift
The final dimensions will depend on your yarn weight, hook size, and personal stitch tension.
2. Materials and Supplies
- Yarn: Soft medium worsted weight yarn (Category 4) or bulky acrylic/cotton yarn:
- Color A (Main Sun Face & Body): Bright Sunshine Yellow (approx. 250 g)
- Color B (Sun Rays / Outer Points): Golden Yellow, Amber, and Soft Orange scraps (approx. 100 g)
- Color C (Rosy Cheeks): Pastel Pink yarn or cosmetic blush (small scrap)
- Color D (Smile Embroidery): Dark Brown embroidery floss or yarn (small scrap)
- Crochet hook: 4.5 mm (US 7) or 5.0 mm (US H/8) to keep stitches dense while maintaining a plush drape
- Safety eyes: One pair of 10 mm or 12 mm black plastic safety eyes with secure backings
- Stuffing: Premium polyester fiberfill (approx. 350 g)
- Tapestry needle: Blunt-ended yarn needle for assembly and weaving in tails
- Stitch marker: Essential for tracking round beginnings on the circular panels
- Scissors & straight pins: For cleanly trimming ends and holding sun-ray points in place before seaming
3. US Crochet Abbreviations & Stitch Meanings
- ch: Chain stitch
- sl st: Slip stitch
- sc: Single crochet
- hdc: Half double crochet
- dc: Double crochet
- inc: Single crochet increase (work 2 single crochets into the same stitch)
- st(s): Stitch or stitches
- sp: Space
- ch-sp: Chain space
- MR: Magic ring
- FO: Fasten off
Special Technique: The Sun Ray Points
The radiant sun rays framing the pillow are created by working triangular cluster points or small matching squares around the outer perimeter of the front and back circles, creating a continuous starburst edge.
4. Skills to Know Before Starting
- Working in Expanding Circles: Keeping uniform increases across round-based circles so the front and back panels lie completely flat without warping.
- Placing Facial Features: Symmetrically positioning safety eyes and stitching a warm, friendly smile before stuffing the pillow.
- Seaming Round Panels: Aligning front and back panels and single crocheting around the outer perimeter while inserting fiberfill stuffing.
5. Complete Step-by-Step Crochet Pattern
Part A: The Sun Face and Back Panels (Make 2 Identical Circles in Sunshine Yellow / Color A)
- Round 1: Make a MR in Sunshine Yellow, work 6 sc into the ring [6 sts].
- Round 2: Work inc in each st around [12 sts].
- Round 3: Work (1 sc, inc) 6 times around [18 sts].
- Round 4: Work (2 sc, inc) 6 times around [24 sts].
- Round 5: Work (3 sc, inc) 6 times around [30 sts].
- Round 6: Work (4 sc, inc) 6 times around [36 sts].
- Round 7: Work (5 sc, inc) 6 times around [42 sts].
- Round 8: Work (6 sc, inc) 6 times around [48 sts].
- Round 9: Work (7 sc, inc) 6 times around [54 sts].
- Round 10: Work (8 sc, inc) 6 times around [60 sts].
- Rounds 11–25 (15 rounds): Continue the established increase pattern, adding 6 increases per round (
(9 sc, inc),(10 sc, inc), etc.) until the circle reaches approximately 14 inches in diameter. - Fasten off the back panel. Keep the front panel attached if working rays directly, or fasten off both.
Part B: Facial Details (On Front Panel)
- Eye Placement: Insert safety eyes between Rounds 15 and 16, spaced roughly 10 stitches apart. Secure the backings tightly.
- Smile Embroidery: Thread your tapestry needle with dark brown yarn or floss. Embroider a sweet, gentle curved smile centered halfway between the eyes and the lower edge of the circle.
- Cheeks: Stitch small oval spots of pastel pink yarn beneath each eye, or lightly dab powdered cosmetic blush onto the stitches for rosy cheeks.
Part C: Radiant Sun Rays (Outer Border)
- Ray Points: Using amber and golden yellow yarn, work triangular petal points or small motifs around the outer circumference of the front panel. Each ray consists of expanding double crochet rows worked into groups of stitches, tapering to a sharp peak.
- Alternatively, work a shell-and-point border around the perimeter: Work
[1 sc, 2 dc, ch 2, 2 dc, 1 sc]into skipped stitch intervals all the way around to form a ring of sun points.
6. Construction and Finishing Touches
- Aligning Panels: Place the decorated front sun panel and plain back panel back-to-back, matching their outer edges.
- Joining and Stuffing: Begin single crocheting the front and back panels together through both thicknesses around the outer edge. When you are halfway around, pause and pack the sun pillow firmly with polyester fiberfill to create a plump, comfortable cushion.
- Closing the Seam: Continue crocheting around the remaining opening until completely sealed. Fasten off and use your tapestry needle to bury all remaining yarn tails inside the pillow.
7. Troubleshooting Common Problems
- The circular panels cup or bowl inward: You are not adding enough increases per round. Ensure you add exactly 6 evenly spaced increases on every circular round.
- The pillow looks lumpy: Tear apart your fiberfill stuffing into smaller, fluffy clumps and distribute them evenly into the edges before sealing the final seam.
- The sun rays ripple: Your ray spacing is too crowded. Ensure you skip the correct number of stitches between ray peaks so they lay flat.
8. Frequently Asked Questions
1. Can I make the sun pillow larger or smaller?
Yes! Simply stop increasing earlier for a smaller accent cushion, or continue working additional rounds of circular increases to make a larger floor pillow.
2. How do I wash the finished sun pillow?
Spot clean minor stains with mild soap and water, or place the entire pillow inside a large mesh garment bag and machine wash on a delicate cycle in cool water, then lay flat to dry.
3. Is this pillow suitable for a child’s nursery?
Yes, it makes a wonderful and cheerful nursery decor piece. Just ensure safety eye backs are locked securely if intended for children.

Leave a Comment