
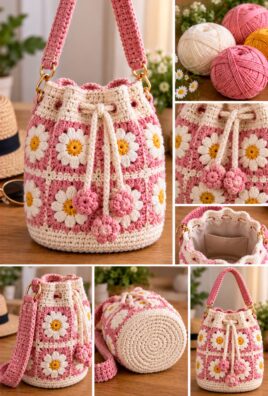
A crochet drawstring bag is a practical little project that combines useful storage with handmade charm. Its sturdy base, simple sides, and adjustable cord closure make it ideal for organizing small everyday essentials, carrying craft supplies, storing accessories, or wrapping a special gift.
This beginner-friendly pattern uses single crochet stitches to create a compact, close-knit fabric. The bag is worked from an oval base upward, with a simple channel at the top for a crocheted drawstring. You can keep the design minimal or customize it with stripes, a contrasting cord, or an optional lining.
1. Project Overview
- Skill level: Beginner
- Approximate completion time: 2–4 hours
- Approximate finished dimensions: 6 inches wide, 7 inches tall, and about 2 inches deep when filled lightly
- Construction method: Oval base worked in rounds, followed by joined rounds for the sides
- Main stitch: Single crochet
- Closure style: One continuous crocheted cord threaded through a chain-space channel
- Suggested uses: Small accessories, craft supplies, gift packaging, cosmetics, and everyday essentials
Finished dimensions and completion time are approximate. They depend on yarn weight, hook size, stitch tension, and how firmly you crochet.
2. Materials and Supplies
Gather the following materials before starting:
- Yarn: Approximately 100–150 yards of cotton or a durable cotton blend in a medium weight.
- Crochet hook: A 4 mm hook is a useful starting point for many medium-weight cotton yarns. Adjust to suit your yarn and tension.
- Scissors: For cutting the yarn.
- Tapestry needle: For weaving in ends.
- Stitch markers: Helpful for marking the beginning of rounds and the corners of the oval base.
- Measuring tape: To check the width and height.
- Optional contrasting yarn: For a decorative cord or striped body.
Cotton yarn often creates clearly defined stitches and a relatively firm fabric, making it a good choice for a small bag. Acrylic yarn can produce a softer, stretchier result, while other blends may have different levels of structure and durability.
The drawstring in this pattern is crocheted from the same yarn, so allow enough yarn for both the bag and the cord. You do not need beads, cord stoppers, or purchased hardware for the main design.
3. US Crochet Abbreviations
- ch: Chain
- sl st: Slip stitch
- sc: Single crochet
- st(s): Stitch(es)
- sp: Space
- rep: Repeat
- rnd: Round
- FO: Fasten off
A single crochet is made by inserting the hook into a stitch, yarning over and pulling up a loop, then yarning over and pulling through both loops on the hook.
An increase means working two single crochet stitches into the same stitch. In the oval base, increases at each end of the foundation chain help the base grow evenly.
4. Skills Needed Before Starting
This project uses several basic crochet skills:
- Making a slip knot.
- Crocheting a foundation chain.
- Working single crochet stitches.
- Working into both sides of a foundation chain.
- Increasing stitches at the ends of an oval.
- Joining rounds with a slip stitch.
- Making a chain cord.
- Fastening off and weaving in loose ends.
The base is worked around a foundation chain. You crochet along one side of the chain, turn around the end, and continue along the other side. This creates an oval without needing to sew a separate base onto the bag.
The body is worked in joined rounds. At the end of each round, use a slip stitch to join to the first single crochet. The chain 1 at the beginning of each body round does not count as a stitch.
The drawstring channel is formed by making evenly spaced chain spaces near the top edge. The cord passes through these openings so the bag can be pulled closed.
5. Design and Construction
This bag is built from the bottom upward in three main stages.
- Circular base: Six rounds of single crochet create a firm, flat base.
- Main body: Single crochet stitches worked in joined rounds create the bag’s sides. The first body round uses the back loops only to make a defined transition between the base and the sides.
- Drawstring channel: A round of chain spaces creates openings for the cord, followed by a finishing round that neatens the top edge.
The pattern uses 36 stitches around the base and maintains that count throughout the body. The circular base is easy for beginners to count and produces a compact pouch suitable for small accessories.
6. Complete Step-by-Step Crochet Pattern
Part A: Make the Circular Base
Use your main yarn and crochet hook.
Round 1: Start the circle
- Make a magic ring.
- Chain 1. This chain does not count as a stitch.
- Work 6 single crochet stitches into the ring.
- Pull the ring closed.
- Join with a slip stitch to the first single crochet.
Stitch count: 6 sc
If you prefer not to use a magic ring, chain 4 and join with a slip stitch to form a small ring. Work the six single crochet stitches into the center.
Round 2: Increase
- Chain 1.
- Work 2 single crochet stitches into each stitch around.
- Join with a slip stitch to the first single crochet.
Stitch count: 12 sc
Round 3: Increase evenly
- Chain 1.
- Repeat the following sequence 6 times: work 1 single crochet in the next stitch, then 2 single crochet stitches in the following stitch.
- Join with a slip stitch to the first single crochet.
Stitch count: 18 sc
Round 4: Expand the base
- Chain 1.
- Repeat the following sequence 6 times: work 1 single crochet in each of the next 2 stitches, then 2 single crochet stitches in the next stitch.
- Join with a slip stitch to the first single crochet.
Stitch count: 24 sc
Round 5: Continue increasing
- Chain 1.
- Repeat the following sequence 6 times: work 1 single crochet in each of the next 3 stitches, then 2 single crochet stitches in the next stitch.
- Join with a slip stitch to the first single crochet.
Stitch count: 30 sc
Round 6: Complete the base
- Chain 1.
- Repeat the following sequence 6 times: work 1 single crochet in each of the next 4 stitches, then 2 single crochet stitches in the next stitch.
- Join with a slip stitch to the first single crochet.
Stitch count: 36 sc
Your base should now be a flat circle with 36 stitches around the edge.
Check the Base Shape
Place the base on a flat surface.
- If it curls upward: Your tension may be too tight. Try a slightly larger hook or relax your stitches.
- If it develops waves: Check that each increase round has the correct stitch count. Extra increases can make the edge flare.
- If the circle looks uneven: Check that the increases are distributed evenly rather than clustered in one area.
A little natural movement is acceptable, but the base should lie reasonably flat before you begin the sides.
Part B: Build the Bag Body
The body is worked in joined rounds without increasing or decreasing. Each round contains 36 single crochet stitches.
Round 7: Turn the base upward
- Chain 1.
- Work 1 single crochet into the back loop only of each stitch around.
- Join with a slip stitch to the first single crochet.
Stitch count: 36 sc
Working through the back loops only creates a small ridge around the edge of the base. This helps define where the bottom ends and the sides begin.
Rounds 8–17: Work the sides
For each round:
- Chain 1.
- Work 1 single crochet into each stitch around, using both loops of each stitch.
- Join with a slip stitch to the first single crochet.
Stitch count: 36 sc per round
Repeat this instruction for all 10 rounds, keeping your tension consistent. The sides should rise evenly without flaring outward.
The body will measure approximately 4–5 inches tall above the base, depending on your yarn and tension. If you prefer a taller bag, add more plain rounds before beginning the drawstring channel.
How to keep the sides straight
- Count 36 stitches after each round.
- Do not work into the joining slip stitch from the previous round.
- Remember that the beginning chain does not count as a stitch.
- Keep the joining slip stitch loose enough that the top of the round does not pull inward.
- Use a stitch marker in the first single crochet if the round beginning is difficult to identify.
Part C: Prepare the Top Edge
After Round 17, check the height of the bag.
The top edge should be even and wide enough for the drawstring to pass through easily. If you want a taller pouch, add more plain single crochet rounds now.
Do not decrease stitches before the channel. The opening needs to remain wide enough for the bag to close smoothly.
Part D: Crochet the Drawstring Channel
The channel is made with chain spaces around the top. These openings allow one continuous cord to travel around the bag.
Round 18: Create the openings
- Chain 1.
- Work 1 single crochet in the next stitch.
- Chain 1 and skip the next stitch.
- Repeat the previous two steps around the entire bag.
- Join with a slip stitch to the first single crochet.
Repeat this sequence 18 times.
Stitch count: 18 sc and 18 chain-1 spaces
The chain spaces create 18 openings around the bag. Each opening is separated from the next by a single crochet stitch, helping the channel remain evenly spaced.
Make the chain stitches loose enough for the cord to pass through. If your cord is thick, you may need a larger hook for this round.
Round 19: Finish the upper edge
- Chain 1.
- Work 1 single crochet into the first single crochet of the previous round.
- Work 1 single crochet into the next chain-1 space.
- Continue alternating between the single crochet stitches and chain spaces around the bag.
- Join with a slip stitch to the first single crochet.
Stitch count: 36 sc
This final round creates a neat upper edge above the drawstring openings. Do not work into the chain spaces in a way that closes the openings below them; the cord must remain free to travel through the channel.
Fasten off and weave in the yarn end away from the drawstring openings.
Part E: Make the Drawstring
Use the same yarn or a contrasting color.
For this bag, make one continuous chain cord approximately 28–32 inches long.
- Make a slip knot.
- Chain until the cord reaches the approximate length.
- Lay the chain flat and check that it is long enough to pass around the bag and leave enough length for pulling and tying.
- Fasten off, leaving a short tail.
- Weave the tail into the end of the cord to secure it.
The finished length depends on your yarn, hook, and tension. If you want a more substantial cord, you can make a narrow slip-stitch cord instead, but a simple chain is easier for beginners.
Part F: Thread and Finish the Closure
- Attach a safety pin or blunt yarn needle to one end of the cord.
- Insert the cord through a chain space in the channel.
- Pass it through the next opening, then continue alternating through the chain spaces around the bag.
- Continue until the cord has traveled all the way around the channel.
- Bring both ends out through the same starting area.
The cord should move freely through the openings without twisting or catching. Pull both ends gently to close the bag, then release them to reopen it.
If the cord catches, check that the chain spaces are large enough and that no loose yarn ends are blocking the channel.
You can leave the ends loose for tying or make small knots at their tips to help prevent fraying. Beads and cord stoppers are optional and are not required for this design.
7. Stitch Counts and Construction Reference
| Section | Instructions | Expected count |
|---|---|---|
| Base Round 1 | 6 sc in magic ring | 6 sc |
| Base Round 2 | Increase in every stitch | 12 sc |
| Base Round 3 | Repeat 1 sc, increase | 18 sc |
| Base Round 4 | Repeat 2 sc, increase | 24 sc |
| Base Round 5 | Repeat 3 sc, increase | 30 sc |
| Base Round 6 | Repeat 4 sc, increase | 36 sc |
| Body Round 7 | Back-loop-only sc | 36 sc |
| Body Rounds 8–17 | Sc around | 36 sc each |
| Channel Round 18 | Alternate sc and ch-1 space | 18 sc, 18 spaces |
| Top Round 19 | Sc in each sc and chain space | 36 sc |
| Drawstring | One continuous chain | Approximately 28–32 inches |
The base has six rounds and finishes with 36 stitches. The body retains 36 stitches per round. The channel round creates 18 openings, and the finishing round contains 36 single crochet stitches.
Approximate finished dimensions are 6 inches wide and 7 inches tall, depending on the yarn, hook, and tension.
8. Assembly and Finishing
The bag is assembled as you crochet it, so no separate base or side panels need to be sewn together. Once the cord is threaded, complete these finishing checks.
- Secure all yarn ends. Weave in loose ends with a tapestry needle, keeping them clear of the drawstring channel.
- Check the base. Lay the bag flat and ensure the bottom is not excessively curled or wavy.
- Inspect the sides. Make sure the body rises evenly and the stitch count has stayed consistent.
- Check the top edge. Confirm that the 18 chain spaces remain open and the finishing round is not too tight.
- Test the cord. Pull both ends to close the bag, then release them to open it.
- Shape the bag gently. Smooth the base and sides with your hands.
Optional lining
A fabric lining can help prevent small items from slipping through the crochet stitches. Cut the lining to fit the inside of the bag, sew its side and bottom seams, and attach it inside below the drawstring channel.
Keep the lining away from the cord path. It should not cover or block the 18 openings.
9. Customization Ideas
Once you are comfortable with the basic construction, try these variations:
- Small accessory pouch: Use finer yarn and a smaller hook, then reduce the number of base rounds.
- Medium everyday bag: Follow the main pattern and use a durable cotton yarn.
- Gift bag: Choose a festive color and finish the cord with small knots.
- Striped bag: Change colors after a few body rounds.
- Minimalist bag: Use one solid color and omit the optional lining.
- Contrasting drawstring: Make the cord in a different color from the bag.
- Decorative edging: Add a simple finishing detail above the channel, taking care not to close the cord openings.
To make the bag wider, add base increase rounds and keep the body stitch count consistent with the new base. To make it taller, add plain body rounds before the channel.
Remember that changing yarn weight or hook size affects the dimensions and flexibility. Larger crochet bags can stretch or sag under heavy contents, so choose a dense stitch pattern and durable yarn for the intended load.
10. Troubleshooting Common Problems
The base curls upward
Likely cause: Tight tension or insufficient increases.
Solution: Check the stitch counts for all six base rounds. Try a slightly larger hook or relax your tension.
The base becomes wavy
Likely cause: Too many stitches or uneven increase placement.
Solution: Count each round carefully and confirm that the final base round has 36 stitches. Spread the increases evenly around the circle.
The bag body flares outward
Likely cause: Extra stitches have been added to the body rounds.
Solution: Count 36 stitches in every body round. Do not work into the joining slip stitch or turning chain.
The sides lean or become uneven
Likely cause: Uneven tension or inconsistent joining.
Solution: Keep the joining slip stitch in the same position at the end of every round. Use a stitch marker and check your stitch count regularly.
The top edge is too tight
Likely cause: Tight chain stitches or a hook that is too small for the cord openings.
Solution: Use a slightly larger hook for the channel round or loosen your chain stitches. Test the cord before completing the finishing round.
The drawstring catches in the channel
Likely cause: The openings are too small or loose yarn ends are blocking them.
Solution: Make sure the cord can pass through each chain space freely. Trim or reweave any loose ends that obstruct the path.
The cord is too short
Likely cause: The chain was measured before fastening off or was made too tightly.
Solution: Make a longer cord. Aim for approximately 28–32 inches, then check that it travels around the channel and leaves enough length to pull.
The opening does not close evenly
Likely cause: The cord is twisted, the openings are uneven, or the cord is too stiff.
Solution: Re-thread the cord without twisting it and check that it passes through all 18 chain spaces. Use a flexible cord that slides smoothly.
The fabric stretches excessively
Likely cause: The yarn is too stretchy or the hook creates a loose fabric.
Solution: Try cotton yarn, a smaller hook, or a firmer tension. Avoid carrying heavy items in a bag that stretches significantly under weight.
The drawstring channel becomes loose
Likely cause: The channel stitches or chain spaces are too loose.
Solution: Use consistent tension and make sure the finishing round is secure. If the openings are too large, redo the channel with a smaller hook while ensuring the cord still fits.
11. Compact Written Pattern
Materials: Medium-weight cotton yarn, suitable crochet hook, scissors, tapestry needle, stitch marker, and measuring tape.
Base:
- Rnd 1: 6 sc in MR. (6)
- Rnd 2: Inc around. (12)
- Rnd 3: Rep 1 sc, inc around. (18)
- Rnd 4: Rep 2 sc, inc around. (24)
- Rnd 5: Rep 3 sc, inc around. (30)
- Rnd 6: Rep 4 sc, inc around. (36)
Join each round with a slip stitch. The beginning chain does not count as a stitch.
Body:
- Rnd 7: Ch 1, sc in back loop only around. Join. (36)
- Rnds 8–17: Ch 1, sc in each stitch around. Join. (36 each)
Drawstring channel:
- Rnd 18: Ch 1, sc in next stitch, ch 1, skip next stitch. Repeat 18 times and join. (18 sc, 18 chain spaces)
- Rnd 19: Ch 1, sc in each sc and each chain space around. Join. (36 sc)
Fasten off and weave in ends.
Cord:
- Chain until the cord measures approximately 28–32 inches.
- Fasten off and secure the ends.
- Thread through all 18 chain spaces, passing through each opening in sequence until both ends emerge at the starting area.
Finishing:
- Check the base and sides.
- Test that the drawstring opens and closes smoothly.
- Add an optional lining without blocking the channel.
12. Frequently Asked Questions
1. Is a crochet drawstring bag suitable for beginners?
Yes. This pattern uses basic single crochet stitches, simple increases, joined rounds, and a chain cord. Counting the stitches carefully is the main skill to practice.
2. Which yarn is best for a sturdy bag?
Cotton or a durable cotton blend is a good choice because it creates clearly defined stitches and often provides a relatively firm fabric. The best option depends on the contents and desired flexibility.
3. Can I make the bag larger or smaller?
Yes. Adjust the base dimensions to change the width and add or remove body rounds to change the height. If you change the number of base rounds, recalculate the stitch count so the sides remain even.
4. How do I stop the base from curling?
Check that you have followed the increase pattern and finished Round 6 with 36 stitches. If the base still curls, try a larger hook or a looser tension.
5. How do I make a drawstring channel?
This pattern creates a channel using alternating single crochet stitches and chain spaces. The cord passes through the openings, and a finishing round creates a neat upper edge.
6. How long should the drawstring be?
For this bag, approximately 28–32 inches is a useful starting estimate. The ideal length depends on your tension, the size of the bag, and how much cord you want available for pulling or tying.
7. Can I use a purchased cord instead of a crochet cord?
Yes. Choose a flexible cord that fits through the 18 chain spaces. Check that it moves smoothly and does not catch on the stitches.
8. Does the bag need a lining?
No. The bag works without a lining. A lining is optional if you want to keep very small items from slipping through the crochet stitches.
9. How can I make the bag less stretchy?
Use a suitable cotton yarn, a hook that creates a close fabric, and consistent tension. Avoid carrying heavy items that could stretch the bag out of shape.
10. How should I wash and care for the finished bag?
Follow the yarn manufacturer’s care instructions. Remove any optional accessories that are not washable, if possible, and check the seams, cord, and fabric for wear before using the bag again.
Conclusion
Your crochet drawstring bag is a practical project that combines a simple circular base, neat sides, and an easy pull-cord closure. Once you master the basic pattern, you can make matching pouches for gifts, accessories, craft supplies, and everyday organization.
Experiment with colors, adjust the height, or add a lining to suit your needs. Keep your stitch counts consistent and make sure the cord moves freely, and you will have a handmade bag with a clean, useful finish.
Leave a Comment