
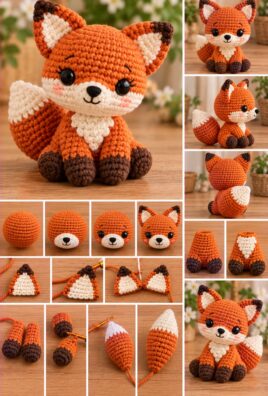
This adorable little fox amigurumi is a charming handmade project with a rounded head, pointed ears, a compact body, tiny arms and legs, and a bushy tail with a contrasting cream tip. Its sweet embroidered face and warm orange colors make it lovely for decorating a shelf, displaying in a nursery, giving as a handmade gift, or adding to an amigurumi collection.
The fox is crocheted mainly in continuous rounds, with separate pieces sewn together at the end. If you are a confident beginner, take your time with stitch counting, shaping, and assembly. Working carefully through each step will help you create a neat little fox with balanced proportions.
1. Project Overview
- Skill level: Confident beginner
- Project type: Amigurumi animal
- Construction method: Mostly continuous rounds, with separate pieces sewn together
- Crochet terminology: US terms
- Approximate finished height: 6–8 inches (15–20 cm), depending on yarn and tension
- Approximate completion time: 4–6 hours
- Main techniques: Magic ring, single crochet, increases, invisible decreases, color changes, stuffing, embroidery, and sewing pieces together
Finished dimensions and completion time are estimates. Your results will depend on your yarn weight, hook size, stitch tension, and crochet experience.
2. Materials and Tools
Gather the following supplies before beginning:
- Orange or rust-colored yarn for the head, body, outer ears, arms, legs, and main tail
- Cream or white yarn for the muzzle, inner ears, chest patch, and tail tip
- Black or dark brown yarn for the nose, mouth, and optional eyebrows
- A crochet hook suitable for tight amigurumi fabric, usually smaller than the hook recommended for ordinary crochet with the same yarn
- Polyester fiberfill stuffing
- Tapestry needle
- Stitch marker
- Scissors
- Optional safety eyes, approximately 6 mm, if appropriate for the intended recipient
Choose a smooth yarn that allows you to see your stitches clearly. Medium-weight yarn works well for a small fox, although lighter or heavier yarn can also be used.
Important safety note: The stitches should be tight enough to prevent stuffing from showing through the fabric. Safety eyes and other small attachments can pose choking hazards. For toys intended for babies or young children, use securely embroidered eyes and facial details instead. No handmade toy should be assumed completely safe for every age group.
3. US Crochet Abbreviations and Techniques
Abbreviations
| Abbreviation | Meaning |
|---|---|
| MR | Magic ring |
| sc | Single crochet |
| inc | Increase: 2 sc in the same stitch |
| dec | Decrease: combine 2 stitches into 1 |
| inv dec | Invisible decrease |
| sl st | Slip stitch |
| ch | Chain |
| st | Stitch |
| rnd | Round |
| rep | Repeat |
| FO | Fasten off |
Numbers in parentheses at the end of a round indicate the total number of stitches after completing that round.
How to make a magic ring
- Make a loop with the yarn, leaving a short tail.
- Insert the hook through the loop and pull up a loop of working yarn.
- Chain 1 to secure the loop if needed for your preferred method.
- Work the required single crochet stitches into the ring.
- Pull the yarn tail to close the center tightly.
The starting chain does not count as a stitch unless an instruction specifically says otherwise.
How to crochet in continuous rounds
Work each stitch into the next stitch around the piece without joining the round with a slip stitch. Place a stitch marker in the first stitch of each round and move it upward as you progress.
Count your stitches at the end of every round. If you lose track, stop and count before continuing.
How to increase
Work 2 single crochet stitches into the same stitch. Each increase adds one stitch to the round.
For example, a round of 6 single crochet stitches becomes 12 stitches when you work an increase in every stitch.
How to make an invisible decrease
Insert the hook into the front loop of the next stitch, then into the front loop of the following stitch. Yarn over and pull through both front loops. Yarn over again and pull through the two loops on the hook.
This combines two stitches into one while keeping the outside of the amigurumi smooth.
How to change colors neatly
When working the final single crochet before a color change, insert the hook into the stitch and pull up a loop with the old color. Yarn over with the new color and pull through both loops. Continue with the new color.
This method makes the transition cleaner and does not change the stitch count.
4. Color Planning and Construction
This fox uses a simple, coordinated color scheme:
- Orange or rust: Head, body, outer ears, arms, legs, and main tail
- Cream or white: Muzzle, inner ears, chest patch, and tail tip
- Black or dark brown: Nose, mouth, and optional eyebrows
The head and body are crocheted separately. This makes it easier to adjust the fox’s expression and sitting position before sewing the pieces together.
The ears, arms, legs, muzzle, chest patch, and tail are also made separately. Each piece is attached during the assembly stage.
5. Step-by-Step Crochet Pattern
Part A: Crochet the Head
Use orange or rust-colored yarn. The head is worked from the top downward, beginning with a magic ring and gradually increasing to form a rounded shape.
Head pattern
Rnd 1: Make a MR and work 6 sc into the ring. Pull the ring closed. (6 sts)
Rnd 2: Inc in each st around. (12 sts)
Rnd 3: Sc in the next st, inc in the next st; rep around. (18 sts)
Rnd 4: Sc in the next 2 sts, inc in the next st; rep around. (24 sts)
Rnd 5: Sc in the next 3 sts, inc in the next st; rep around. (30 sts)
Rnd 6: Sc in the next 4 sts, inc in the next st; rep around. (36 sts)
Rnd 7: Sc in the next 5 sts, inc in the next st; rep around. (42 sts)
Rnd 8–13: Sc in each st around. (42 sts per round)
Rnd 14: Sc in the next 5 sts, inv dec; rep around. (36 sts)
Rnd 15: Sc in the next 4 sts, inv dec; rep around. (30 sts)
Rnd 16: Sc in the next 3 sts, inv dec; rep around. (24 sts)
Rnd 17: Sc in the next 2 sts, inv dec; rep around. (18 sts)
Rnd 18: Sc in the next st, inv dec; rep around. (12 sts)
Fasten off, leaving a long tail for sewing the head to the body.
Adding the eyes and stuffing
If you are using safety eyes, place them between Rounds 10 and 11, with approximately 7–8 stitches between them. Adjust the spacing to suit your desired expression. Install the eyes before closing the head, following the manufacturer’s instructions.
For toys intended for young children, embroider the eyes instead. Use dark yarn and small, secure stitches.
Begin adding stuffing when the head opening is still large enough to reach inside comfortably. Distribute the fiberfill evenly, paying attention to the sides and top of the head. Add small amounts at a time so the head remains rounded rather than lumpy.
When the head is firm but still slightly flexible, leave the final opening available for assembly. You can add a little more stuffing before attaching it to the body.
Part B: Crochet the Muzzle
Use cream or white yarn to create a small oval muzzle. The muzzle is worked around a starting chain.
Muzzle pattern
Ch 5.
Rnd 1: Sc in the second ch from the hook, sc in the next 2 ch, work 3 sc in the last ch. Working along the opposite side of the chain, sc in the next 2 available loops, then work 2 sc in the final available loop. (10 sts)
Rnd 2: Inc in the next st, sc in the next 2 sts, inc in each of the next 3 sts, sc in the next 2 sts, inc in each of the next 2 sts. (16 sts)
Rnd 3: Sc in each st around. (16 sts)
Sl st into the next st and FO, leaving a long sewing tail.
Sewing the muzzle
Place the muzzle on the lower front of the head, centered beneath the eyes. Its upper edge should sit below the eye line without covering the eyes.
Pin it in place and check the position from the front before sewing. Use the long yarn tail and a tapestry needle to sew around the edge with small, even stitches.
Add a small amount of fiberfill behind the muzzle before closing the final few stitches if you want it to look slightly raised. Do not overstuff it, because a very bulky muzzle can hide the fox’s facial features.
Embroidering the nose and mouth
Use black or dark brown yarn.
- Stitch a small triangular or horizontal nose near the upper center of the muzzle.
- Bring the yarn down from the nose to create a short vertical line.
- Add two tiny angled stitches to form a simple smiling mouth.
- Secure the ends inside the head and trim any excess yarn only after the knots and stitches are secure.
Keep the embroidered features small and neat so the fox retains a gentle expression.
Part C: Crochet the Body
Use orange or rust-colored yarn. The body is worked from the bottom upward, with a rounded base and a narrower neck opening.
Body pattern
Rnd 1: Make a MR and work 6 sc into the ring. Pull closed. (6 sts)
Rnd 2: Inc in each st around. (12 sts)
Rnd 3: Sc in the next st, inc in the next st; rep around. (18 sts)
Rnd 4: Sc in the next 2 sts, inc in the next st; rep around. (24 sts)
Rnd 5: Sc in the next 3 sts, inc in the next st; rep around. (30 sts)
Rnd 6–10: Sc in each st around. (30 sts per round)
Rnd 11: Sc in the next 3 sts, inv dec; rep around. (24 sts)
Rnd 12–13: Sc in each st around. (24 sts per round)
Rnd 14: Sc in the next 2 sts, inv dec; rep around. (18 sts)
Rnd 15: Sc in each st around. (18 sts)
FO, leaving a long tail for sewing the body to the head.
Stuffing the body
Begin stuffing after Round 10. Add fiberfill gradually, filling the rounded base and sides first. Continue shaping the body as you add stuffing.
Keep the upper opening relatively narrow and slightly flexible so the head can be positioned securely. Avoid making the neck opening too soft or too loose, because it needs to support the head.
Part D: Crochet the Two Ears
Make two matching orange ears. Each ear is crocheted in rows to form a small triangle, then folded slightly at the base for attachment.
Outer ear pattern
Make 2 using orange or rust-colored yarn.
Row 1: Ch 2, work 2 sc in the second ch from the hook. Ch 1 and turn. (2 sts)
Row 2: Inc in the first st, sc in the next st. Ch 1 and turn. (3 sts)
Row 3: Inc in the first st, sc in the next st, inc in the last st. Ch 1 and turn. (5 sts)
Row 4: Sc in each st across. Ch 1 and turn. (5 sts)
Row 5: Sc in the first st, inc in the next st, sc in the next st, inc in the next st, sc in the last st. Ch 1 and turn. (7 sts)
Row 6: Sc in each st across. (7 sts)
FO, leaving a long sewing tail.
Inner ear detail
Make 2 using cream yarn.
Row 1: Ch 2, work 2 sc in the second ch from the hook. Ch 1 and turn. (2 sts)
Row 2: Inc in the first st, sc in the next st. Ch 1 and turn. (3 sts)
Row 3: Inc in the first st, sc in the next st, inc in the last st. (5 sts)
FO, leaving a sewing tail.
Sew one cream triangle onto the center of each orange ear. Keep the cream piece slightly below the outer edge so the orange border remains visible.
Shaping and attaching the ears
Fold the bottom of each ear inward slightly and sew a few stitches through the base to create a gentle curve. Position the ears on top of the head, with a small gap between them.
Check that both ears angle outward by a similar amount. Pin them temporarily before sewing. Use the long tails to attach the ears securely to the head.
Part E: Crochet the Two Arms
Make two matching arms using orange or rust-colored yarn. The arms are worked in continuous rounds and lightly stuffed near the lower end.
Arm pattern
Make 2.
Rnd 1: Make a MR and work 6 sc into the ring. Pull closed. (6 sts)
Rnd 2–6: Sc in each st around. (6 sts per round)
FO, leaving a long sewing tail.
Do not stuff the arms heavily. A small pinch of fiberfill near the rounded end is enough to give them a little shape. Keeping the upper part flexible makes the arms easier to sew against the body.
Optional cream paw tips
If you want cream paws, make the color change after Round 4:
- Work Rounds 1–4 in orange.
- Join cream yarn and work Rounds 5–6 in cream.
The stitch count remains 6 stitches in each round.
Part F: Crochet the Two Legs
Make two short legs using orange or rust-colored yarn. The legs are worked in continuous rounds and lightly stuffed to help the fox sit upright.
Leg pattern
Make 2.
Rnd 1: Make a MR and work 6 sc into the ring. Pull closed. (6 sts)
Rnd 2: Inc in each st around. (12 sts)
Rnd 3–4: Sc in each st around. (12 sts per round)
Rnd 5: Sc in the next 2 sts, inv dec; rep around. (9 sts)
Rnd 6: Sc in each st around. (9 sts)
FO, leaving a long sewing tail.
Optional cream feet
For cream feet, work Rounds 1–2 in cream and change to orange at the start of Round 3. Continue the rest of the leg pattern in orange.
Stuff each leg lightly, focusing on the rounded foot. Leave the upper part flexible enough to flatten slightly during sewing.
Positioning the legs
Place the legs at the lower front of the body, with the rounded feet pointing forward. The legs should be spaced evenly on either side of the center line.
Before sewing, sit the fox on a flat surface and check that both feet touch the surface. Adjust the angle of the legs if needed so the fox does not lean to one side.
Part G: Crochet the Bushy Tail
The tail is worked from the cream tip toward the orange base. It begins narrow, widens through the middle, and decreases toward the base to create a softly tapered, bushy shape.
Tail pattern
Begin with cream yarn.
Rnd 1: Make a MR and work 6 sc into the ring. Pull closed. (6 sts)
Rnd 2: Sc in each st around. (6 sts)
Change to orange or rust-colored yarn.
Rnd 3: Inc in each st around. (12 sts)
Rnd 4: Sc in the next st, inc in the next st; rep around. (18 sts)
Rnd 5–7: Sc in each st around. (18 sts per round)
Rnd 8: Sc in the next st, inv dec; rep around. (12 sts)
Rnd 9–10: Sc in each st around. (12 sts per round)
Rnd 11: Sc in the next 2 sts, inv dec; rep around. (9 sts)
Rnd 12: Sc in each st around. (9 sts)
FO, leaving a long sewing tail.
Stuffing and shaping the tail
Add a small amount of stuffing to the cream tip before the tail becomes too narrow to reach. Continue stuffing lightly through the wider orange section.
Keep the tail flexible rather than firm. A lightly stuffed tail is easier to curve against the fox’s body and is less likely to pull the fox backward.
Shape the tail into a gentle curve before attaching it. The cream tip should remain visible and face slightly outward.
Attaching the tail
Place the tail at the lower back of the body. Angle it to one side so it creates a recognizable fox silhouette without pulling the body off balance.
Pin it in place and test the fox on a flat surface. If the tail causes the fox to lean backward, reduce the stuffing or change the angle before sewing.
Use the long yarn tail to sew the base securely to the body with small, close stitches.
Part H: Crochet the Cream Chest Patch
The chest patch is an optional cream oval sewn to the front of the body. It adds contrast without requiring color changes in the body itself.
Chest patch pattern
Use cream or white yarn.
Ch 7.
Rnd 1: Sc in the second ch from the hook, sc in the next 4 ch, work 3 sc in the last ch. Working along the opposite side of the chain, sc in the next 4 available loops, then work 2 sc in the final available loop. (14 sts)
Rnd 2: Inc in the next st, sc in the next 4 sts, inc in each of the next 3 sts, sc in the next 4 sts, inc in each of the next 2 sts. (20 sts)
Sl st into the next st and FO, leaving a long sewing tail.
Attaching the chest patch
Center the patch on the front of the body, with the narrower end toward the neck. It should cover the upper front without reaching all the way around the body.
Pin it in place before sewing. Use small stitches around the edge and keep the patch flat. Avoid pulling the yarn too tightly, which can cause the oval to curl.
6. Stitch Count Verification
Use the following totals to check the main pieces as you crochet.
| Component | Key stitch counts |
|---|---|
| Head | 6, 12, 18, 24, 30, 36, 42, then 42 through Round 13; decreases to 36, 30, 24, 18, and 12 |
| Body | 6, 12, 18, 24, 30, then 30 through Round 10; decreases to 24 and then 18 |
| Each outer ear | 2, 3, 5, 5, 7, 7 stitches by row |
| Each inner ear | 2, 3, 5 stitches by row |
| Each arm | 6 stitches throughout |
| Each leg | 6, 12, 12, 12, 9, 9 stitches |
| Tail | 6, 6, 12, 18, 18, 18, 18, 12, 12, 12, 9, 9 stitches |
| Muzzle | 10, 16, 16 stitches |
| Chest patch | 14, 20 stitches |
The increase rounds add the number of stitches indicated by each increase. The decrease rounds combine stitches, reducing the total. Even rounds preserve the stitch count.
Color changes do not add or remove stitches. When changing colors, work the final pull-through of the preceding stitch with the new color and continue using the same stitch sequence.
If your stitch count does not match the stated total, pause and recount before continuing. Correcting a missed increase or decrease immediately is easier than trying to compensate in a later round.
7. Stuffing and Assembly
Before sewing the parts together, lay out all the components and check that both ears, arms, and legs are similar in size.
Follow this assembly order for a balanced result.
Step 1: Finish hidden ends
Weave in the short ends inside each piece where possible. Keep the long sewing tails available for attaching the components.
Step 2: Attach the muzzle and embroider the face
Sew the muzzle to the lower front of the head. Add the nose and mouth, and make sure the facial details are centered.
If you are using embroidered eyes, add them before closing the head completely so the ends can be secured inside.
Step 3: Attach the ears
Position the ears on the top of the head, with equal spacing from the center. Pin them in place and check the front and side views before sewing.
Step 4: Attach the head to the body
Place the head on the body opening and center it carefully. The head opening has 12 stitches at the end of the pattern, while the body opening has 18 stitches.
Because these openings have different stitch counts, align the centers and distribute the head stitches evenly around the body opening. Use small stitches, working around the entire seam so the head is supported without bunching the fabric. Add a little more stuffing to the neck area if necessary before closing the seam.
Keep the head upright and facing forward as you sew. Check the position frequently rather than completing the entire seam before inspecting it.
Step 5: Sew on the legs
Place the legs low on the front of the body, spaced evenly on either side of the center. Position the feet forward and slightly outward if needed for stability.
Pin both legs and sit the fox on a flat surface to check its balance before sewing.
Step 6: Attach the arms
Position the arms on the sides of the upper body, just below the head. Make sure they sit at approximately the same height and angle.
Sew around the upper ends using the long yarn tails and small, secure stitches.
Step 7: Attach the tail
Sew the tail onto the lower back. Angle it to one side so the cream tip remains visible and the tail follows the fox’s silhouette.
Check the fox’s balance again before securing the final stitches.
Step 8: Check all seams
Inspect the seams around the head, ears, arms, legs, and tail. Reinforce any area that looks loose, and weave in the remaining ends securely.
Stuffing tips
- Add stuffing in small amounts instead of inserting one large clump.
- Use the blunt end of your crochet hook or a stuffing tool to move fiberfill into narrow areas.
- Keep the head and body firm enough to hold their shape, but not so firm that stitches stretch open.
- Use less stuffing in the arms and tail to preserve flexibility.
- Shape the head and body with your hands as you stuff so the fiberfill is distributed evenly.
8. Embroidering the Fox’s Face
A few simple embroidered details help make the fox recognizable.
Nose and mouth
Use black or dark brown yarn to embroider a small nose near the top center of the cream muzzle. A compact triangle or short horizontal stitch works well.
Bring a short line down from the nose and add two angled stitches to form a tiny mouth. Keep the stitches snug against the fabric.
Eyes
If you are not using safety eyes, embroider two small eyes with dark yarn. Place them at equal distances from the center of the head, above the muzzle.
Use short satin stitches or small horizontal stitches. Make sure both eyes are similar in size and height.
Optional eyebrows
Add two short, subtle stitches above the eyes if you want the fox to have a more expressive face. Keep them small so they do not overpower the other features.
For toys intended for young children, use securely embroidered facial details instead of detachable eyes or other small attachments. Secure all yarn ends inside the toy, and avoid long loose strands.
9. Finishing and Quality Checks
Before considering your fox complete, take a few minutes to inspect the finished toy.
- Weave in loose ends: Secure yarn ends inside the relevant pieces so they do not work loose.
- Check the seams: Make sure the head, ears, arms, legs, and tail are attached firmly.
- Adjust the stuffing: Gently redistribute fiberfill if the head or body looks uneven.
- Correct crooked parts: If an ear or limb looks noticeably out of place, carefully remove the affected stitches and reposition it before finishing.
- Inspect the fabric: Check for visible gaps where stuffing shows through. If necessary, use a smaller hook for future pieces or maintain a tighter, more consistent tension.
- Shape the tail: Gently curve the tail into position and check that it does not pull the fox backward.
- Keep the surface neat: Smooth the yarn with your fingers. Brush it gently only if the yarn type and design allow it.
Do not trim structural stitches or pull hard on attached parts to correct their shape. Small adjustments made carefully will help preserve the integrity of the toy.
10. Customization Ideas
Once you are comfortable with the basic pattern, you can personalize your little fox in several ways.
- Change the main color: Try soft orange, deep rust, caramel, or warm brown.
- Adjust the markings: Use cream or white yarn for the muzzle, chest, inner ears, and tail tip.
- Change the size: Use a different yarn weight and an appropriately sized hook together. A heavier yarn and larger hook usually produce a larger fox, while lighter yarn and a smaller hook usually produce a smaller one.
- Add a belly detail: Embroider a small decorative shape on the front of the body.
- Create a more curved tail: Use less stuffing and adjust the tail’s position when sewing it onto the body.
- Use contrasting paws: Work the feet or paw tips in cream for extra detail.
- Personalize the expression: Slightly change the embroidered eye shape or add tiny eyebrows.
Changing the yarn weight and hook size affects the finished dimensions and may also change the firmness of the fabric. Keep the hook small enough to maintain tight stitches, and follow the original stitch counts unless you intentionally redesign the pattern.
11. Troubleshooting
Stuffing shows through the stitches
Likely cause: The hook is too large, the tension is too loose, or the piece is overstuffed.
Correction: Use a smaller hook if needed, keep your stitches consistent, and reduce the stuffing slightly. The fabric should stretch as little as possible around the fiberfill.
The head looks too pointed or too flat
Likely cause: Increases or decreases may have been missed, or the stuffing may not be evenly distributed.
Correction: Check the stitch count and shape the head with your fingers. Redistribute the stuffing toward the sides if the head looks pointed. If the top looks too flat, check that the increase rounds were completed correctly.
Increases or decreases look uneven
Likely cause: A stitch may have been skipped, worked twice, or placed incorrectly.
Correction: Count the stitches after each round. Use a stitch marker and check the first stitch carefully when beginning a new round. An invisible decrease can help keep the surface smooth.
Gaps appear around color changes
Likely cause: The yarn change was made too loosely or the working loop became stretched.
Correction: Change colors during the final pull-through of the preceding stitch. Keep the first stitch in the new color snug without pulling it so tightly that the fabric puckers.
The muzzle looks crooked
Likely cause: The muzzle was sewn on before checking its position from the front.
Correction: Temporarily pin it in place and check that it is centered beneath the eyes. Remove a few sewing stitches and reposition it if necessary.
The ears do not match
Likely cause: The rows may have different stitch counts, or the ears may have been folded differently.
Correction: Compare both ears before sewing and check each row’s count. Pin them side by side and adjust their bases so the height and angle match.
The fox cannot sit upright
Likely cause: The legs are unevenly placed, the body is too soft, or the tail pulls the fox backward.
Correction: Reposition the legs so both feet rest on a flat surface. Add a little stuffing to the lower body if needed, and reduce or reposition the tail stuffing if it creates too much weight behind the fox.
The tail pulls the body backward
Likely cause: The tail is too heavily stuffed or attached at an angle that moves its weight away from the body.
Correction: Remove some stuffing if necessary and sew the tail closer to the lower back. Test the fox’s balance before finishing the seam.
Visible gaps appear where pieces are sewn together
Likely cause: The sewing stitches are too far apart, or the attached pieces are not aligned closely enough.
Correction: Use a tapestry needle to add small, evenly spaced stitches around the seam. Tighten the yarn gently, taking care not to distort the surrounding crochet fabric.
12. Frequently Asked Questions
Is this little fox suitable for beginners?
Yes, it is suitable for confident beginners who understand single crochet, increases, decreases, and working in continuous rounds. The separate pieces and assembly require patience, especially when positioning the facial features.
What yarn is best for amigurumi?
Smooth acrylic or cotton yarn is a good choice because the stitches are easy to see and the fabric holds its shape. Choose a yarn that produces a dense fabric with the hook you use.
How do I keep stuffing from showing?
Use a hook small enough to create tight stitches, maintain even tension, and avoid overstuffing. If the fabric stretches visibly when you add fiberfill, remove some stuffing or use a smaller hook.
Can I make the fox without safety eyes?
Yes. Embroidered eyes create a sweet expression and are a useful option when making toys for young children. Secure the embroidery carefully and hide the yarn ends inside the head.
How do I make the fox larger or smaller?
Change the yarn weight and hook size together. Thicker yarn and a larger suitable hook generally produce a larger toy, while finer yarn and a smaller hook generally produce a smaller toy. Keep the stitches tight enough to prevent stuffing from showing.
How firmly should I stuff the head and body?
Stuff the head and body firmly enough to hold their shape while remaining slightly flexible. Add small amounts gradually and check the shape as you work. The arms and tail should be stuffed more lightly.
How can I make the ears symmetrical?
Compare both ears before attaching them. Pin them to the head and check their height, spacing, and angle from the front. Adjust their placement before sewing permanently.
How do I sew the tail on securely?
Use the long sewing tail and a tapestry needle to make small stitches around the entire base. Attach the tail to the lower back and test the fox’s balance before finishing the seam.
Can I use leftover yarn for this project?
Yes. Small amounts of cream yarn are ideal for the muzzle, inner ears, chest patch, and tail tip. Make sure the yarn weights are compatible so the pieces fit together proportionately.
How do I keep the fox sitting upright?
Position the legs evenly, keep the body well shaped, and avoid overstuffing the tail. Before completing the assembly, place the fox on a flat surface and adjust the legs and tail until the toy sits as steadily as its design allows.
Conclusion
Your little fox amigurumi brings together a rounded head, pointed ears, tiny limbs, a contrasting muzzle, and a bushy tail to create a charming handmade companion. Careful stitch counting, gradual stuffing, and patient assembly will help you achieve a neat finish and balanced shape.
Experiment with different shades of orange, cream markings, and small embroidered details to make your fox unique. As long as you keep the main construction and stitch counts consistent, you can personalize the colors and expression while preserving the character of this adorable crochet animal.
Leave a Comment