
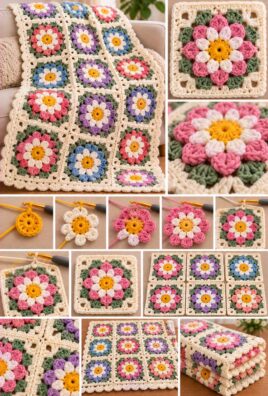
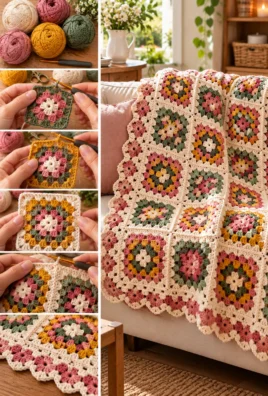
A crochet flower granny square blanket brings together colorful flowers and classic crochet squares to create a beautiful, cozy project. Each motif is crocheted separately, making it easy to work on one square at a time before joining everything into a larger blanket.
This beginner-friendly design features a small flower center, eight rounded petals, and a square border. Choose soft pastels for a gentle floral look or bright contrasting colors for a cheerful blanket suitable for a sofa, bed, reading nook, or handmade gift.
1. Project Overview
- Project name: Crochet Flower Granny Square Blanket
- Skill level: Beginner to confident beginner
- Construction: Individual eight-petal flower motifs, each turned into a square and joined together
- Approximate finished dimensions: About 36 by 42 inches for a blanket made with five squares across and six squares down
- Approximate completion time: 20–35 hours, depending on experience and the number of color changes
- Materials: Medium-weight yarn in coordinating colors, a suitable crochet hook, scissors, yarn needle, stitch markers, and measuring tape
- Main techniques: Chain stitches, single crochet, half double crochet, double crochet, treble crochet, working into spaces, joining rounds, and joining squares
- Suggested uses: A sofa throw, lap blanket, reading-nook blanket, bed accent, or handmade gift
All dimensions, yarn quantities, and completion times are approximate. Your final size will depend on yarn weight, hook size, tension, square dimensions, number of motifs, and border width.
2. Materials and Tools
Gather the following supplies:
- Medium-weight yarn: Approximately 1,200–1,600 yards for the example blanket, depending on the yarn, motif size, joining method, and border.
- Crochet hook: A 4.5 mm or 5 mm hook appropriate for your yarn and desired fabric.
- Scissors: For cutting yarn.
- Yarn needle: For weaving in ends and sewing seams.
- Stitch markers: Optional, but useful for identifying corner spaces.
- Measuring tape: To check the size of each square and the finished blanket.
Choosing your yarn colors
For each flower, choose three main colors:
- Center color: A contrasting shade for the middle of the flower.
- Petal color: A brighter or lighter color that makes the petals stand out.
- Square color: A coordinating color for the background and square outline.
You can also use a fourth color for the outer square round or border.
For the most consistent result, use the same yarn weight and preferably the same fiber type throughout the blanket. Cotton, acrylic, and suitable blends can all work, but they differ in softness, warmth, stretch, and care requirements. Mixing very different yarn types can make the squares vary in size and drape.
3. US Crochet Abbreviations
The pattern uses US crochet terminology.
| Abbreviation | Meaning |
|---|---|
| ch | Chain |
| sl st | Slip stitch |
| sc | Single crochet |
| hdc | Half double crochet |
| dc | Double crochet |
| tr | Treble crochet |
| st / sts | Stitch / stitches |
| sp | Space |
| rnd | Round |
| rep | Repeat |
| RS | Right side |
| WS | Wrong side |
Important pattern conventions
- The center, petal, transition, and square rounds are joined with a slip stitch unless instructed otherwise.
- The starting chains count as stitches only when the instructions explicitly say so.
- Chain spaces are gaps created by chain stitches; they are not counted as crochet stitches.
- A cluster in this pattern means three double crochet stitches worked into the same space.
- The flower petals are made from groups of stitches worked into the spaces around the center, rather than from separate sewn-on pieces.
4. Skills to Know Before Starting
Before beginning, make sure you can:
- Make a slip knot and chain stitches.
- Form a starting ring.
- Work single, half double, double, and treble crochet stitches.
- Join rounds with a slip stitch.
- Work multiple stitches into one space.
- Create corners using chain spaces.
- Change colors between rounds.
- Join crochet motifs with a yarn needle or crochet hook.
- Work a simple border around a blanket.
- Weave in yarn ends securely.
The project follows four main stages: crochet the flower center, make the petals, work the surrounding stitches into a square, and then join the finished squares into a blanket.
5. Gauge and Blanket Dimensions
Consistent gauge is important because all the flower squares need to fit together neatly. If some squares are larger than others, the seams may pucker or the finished blanket may twist.
For this example, aim for each completed flower square to measure approximately 8–8.5 inches across, including the square-forming round.
The sample blanket uses five squares across and six squares down. Arrange all 30 squares in a rectangle, with the flower centers facing the same direction. With squares of the target size, the finished blanket should be approximately 40–43 inches wide and 48–52 inches long after joining and adding a modest border.
To measure a square, lay it flat without stretching and measure from one outer edge to the opposite edge. Make one complete sample square before crocheting all the motifs. If your square is much smaller or larger than the target, adjust the hook size or yarn choice before continuing.
You can make a smaller blanket by using fewer rows or columns, or a larger one by adding rows and columns. Keep the squares consistent in size within the same blanket.
6. Step-by-Step Flower Granny Square Pattern
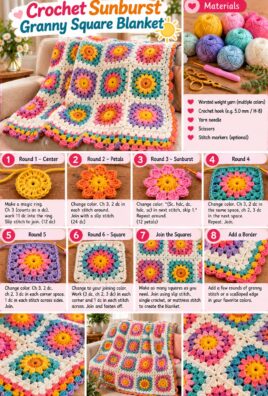
This design has four main stages: a small center, eight rounded petals, a transition round that creates spaces around the flower, and a square-forming round with four corners. An optional extra round can enlarge the square.
Use one color for the center, another for the petals, and a third color for the square. You can change colors at the end of each round.
A. Creating the Flower Center
Use your center color and chosen hook.
Round 1:
- Make a slip knot and chain 4.
- Join with a slip stitch to the first chain to form a ring.
- Chain 1. This chain does not count as a stitch.
- Work 8 sc into the center ring.
- Join with a slip stitch to the first sc.
You should have 8 single crochet stitches. The chain 1 is only used to begin the round and is not counted.
Fasten off if you want a different color for the petals. Pull the yarn tail gently to keep the center closed, then weave in the end or secure it for weaving in later.
B. Making Eight Flower Petals
Join the petal color into any single crochet stitch from Round 1. The petals are worked into the eight stitches around the center, creating eight evenly spaced loops.
Round 2:
Repeat the following sequence in each of the 8 sc stitches:
- Work 1 sl st into the stitch.
- Chain 4.
- Work 1 sl st into the same stitch to secure the chain loop.
Continue around the center, making one chain-4 loop in each single crochet stitch. Join with a slip stitch to the first slip stitch of the round.
You should have 8 chain-4 loops, one for each petal.
Round 3: Form the petals
Work into each chain-4 loop from Round 2. Repeat this sequence in every loop:
- Work 1 sc.
- Work 1 hdc.
- Work 3 dc.
- Work 1 hdc.
- Work 1 sc.
Each loop now contains 7 stitches, forming one rounded petal. Repeat in all 8 loops. Join with a slip stitch to the first sc of the round.
Fasten off the petal color if you want the surrounding square to be a different color.
Check that all eight petals are evenly spaced and face outward. If one petal looks smaller, check that all five types of stitches in the sequence were worked into its chain loop.
C. Adding the Surrounding Flower Round
The transition round creates eight spaces around the petals. These spaces will support the square-forming round.
Join the square color at the top center of any petal, inserting the hook into the middle of its three dc stitches.
Round 4:
- Chain 1; this does not count as a stitch.
- Work 1 sc into the middle dc of the first petal.
- Chain 3.
- Work 1 sc into the middle dc of the next petal.
- Chain 3.
- Repeat the sc-and-chain-3 sequence around all eight petals.
- Join with a slip stitch to the first sc.
You should have 8 sc stitches and 8 chain-3 spaces. Each chain-3 space sits between two petals, creating a stable foundation for the square outline.
Gently spread the petals so they sit around the center without overlapping too much. Keep the chain spaces loose enough to accommodate the next round.
D. Turning the Flower into a Square
The next round creates four corners by using every other chain-3 space as a corner space. The remaining four spaces form the middle of the square’s sides.
Before starting, identify the eight chain-3 spaces from Round 4. Choose four alternating spaces as corners, leaving one side space between each pair of corners.
Round 5:
- Join the square color in a chosen corner chain-3 space, or slip stitch into that space if your yarn is already attached.
- Chain 3. This counts as the first dc of the corner group.
- Work 2 dc into the same corner space.
- Chain 2.
- Work 3 dc into the same corner space. This completes the first corner.
- Move to the next chain-3 space along the flower and work 3 dc into that space. This creates a side cluster.
- Move to the next designated corner space and work 3 dc, chain 2, and 3 dc into that space.
- Continue around, alternating a side cluster of 3 dc in one space with a corner group of 3 dc, chain 2, and 3 dc in the next space.
- Join with a slip stitch to the top of the starting chain 3.
You should have four corners, each with two groups of 3 dc separated by a chain-2 space, and four side clusters between the corners. The square now has four clearly defined sides and four corner spaces.
Lay the square flat and gently shape the petals. If the square curls, check that each corner space contains the full corner group and that the chain-2 spaces are not too tight.
E. Adding Optional Square Rounds
If you want a larger motif, continue with additional granny-square rounds.
Round 6 and every following round:
- Slip stitch across the next two dc and into a corner chain-2 space.
- Chain 3, then work 2 dc into the same corner space.
- Chain 2, then work 3 dc into that same corner space.
- Work 3 dc into each side space along the edge, with chain 1 between clusters where a side space is present.
- At the next corner space, work 3 dc, chain 2, and 3 dc.
- Repeat around all four sides.
- Join with a slip stitch to the top of the starting chain 3.
Continue until the square reaches your desired size. Keep the same corner sequence in every round and work side clusters evenly so the sides remain straight.
For the sample blanket, aim for approximately 8–8.5 inches across each completed square. If you need more than one enlargement round to reach that size, repeat the same round consistently for every motif.
F. Finishing One Square
After the final round:
- Join the round neatly with a slip stitch.
- Fasten off, leaving a short tail for weaving in.
- Thread the tail through a yarn needle.
- Weave it through several stitches on the wrong side, changing direction once to help secure it.
- Lay the square flat and measure it from edge to edge.
- Check that the square is reasonably flat and its four sides are balanced.
Make one complete sample square before producing all the motifs. Confirm that you like the flower colors, the size of the petals, and the finished dimensions.
7. Complete Written Pattern Summary
Use this compact version as a quick reference while crocheting.
- Round 1 — Center: Ch 4 and join with a sl st to form a ring. Ch 1, then work 8 sc into the ring. Join to the first sc. (8 sc)
- Round 2 — Petal loops: In each sc, work sl st, ch 4, sl st into the same stitch. Repeat around. Join to the first sl st. (8 chain-4 loops)
- Round 3 — Petals: In each chain-4 loop, work 1 sc, 1 hdc, 3 dc, 1 hdc, and 1 sc. Repeat in all eight loops and join. (8 petals)
- Round 4 — Transition: Work 1 sc into the middle dc of each petal, with ch 3 between each sc. Join to the first sc. (8 sc, 8 chain-3 spaces)
- Round 5 — Square: Use four alternating chain-3 spaces as corners. In each corner space, work 3 dc, ch 2, 3 dc. In each of the four remaining spaces, work 3 dc, with ch 1 before and after each side cluster. Join to the starting chain 3.
- Optional enlargement rounds: In every corner space, work 3 dc, ch 2, 3 dc. Work 3 dc into each side chain-1 space, with ch 1 between clusters. Join each round with a sl st to the top of the starting ch 3.
- Finishing: Fasten off and weave in the ends. Flatten and measure each square before joining.
- Joining: Align matching edges and join using the same method throughout the blanket.
- Border: Work an even round of single crochet around the completed blanket, adding extra stitches at corners as needed to keep the edge flat.
8. Planning the Blanket Layout
For the sample blanket, make 30 flower granny squares and arrange them in five columns across and six rows down.
Before joining, place all the squares on a flat surface and decide where each color combination should go. This lets you adjust the arrangement without unpicking seams later.
Here are a few ways to plan the layout:
- Uniform flowers: Use the same center and petal colors for every square.
- Alternating petals: Alternate two petal colors from one square to the next.
- Repeating color sequence: Arrange the squares in a planned sequence, such as cream, pink, yellow, and lavender.
- Contrasting border: Use a deeper color for the outer square rounds and the blanket border.
- Consistent background: Keep the outer square color the same across all motifs for a unified appearance.
Keep the flowers facing the same direction, with the square corners aligned. Measure several squares before assembly to make sure they are similar in size.
9. Making Multiple Matching Squares
Making 30 motifs takes time, so a consistent routine will help you achieve an even blanket.
- Use the same yarn weight and hook size for every square.
- Follow the same number of rounds for all motifs.
- Keep your tension steady, especially in the chain spaces and corners.
- Change colors at the same points in each motif if you want a repeated design.
- Measure completed squares regularly instead of waiting until all 30 are finished.
- Weave in yarn ends before joining, so the wrong side stays neat.
- Compare the squares side by side and correct any significant size differences before assembly.
Small differences can become more noticeable across a large blanket. If a square is slightly smaller, check whether your tension was tighter or whether you missed a stitch or chain space. Blocking may help with minor differences, but it cannot reliably fix major stitch-count errors.
10. Joining the Flower Granny Squares
For this tutorial, use a single crochet join. It creates a defined ridge between motifs and can emphasize the square layout.
Joining two squares
- Place two squares side by side with their right sides facing outward.
- Align the corresponding edges and corner spaces.
- Insert the hook through the edge stitches or spaces of both squares.
- Join the yarn with a slip knot and chain 1.
- Work single crochet stitches through both layers, matching corresponding points along the edges.
- Keep the joining tension even. Avoid pulling so tightly that the squares pucker.
- At the end of the edge, fasten off and weave in the yarn ends.
If the edges do not match perfectly, distribute the joining stitches evenly rather than forcing the corners together. Use stitch markers at the ends and, if necessary, at the midpoint of long edges.
Joining the blanket in rows
- Join the first two squares along one edge.
- Continue adding squares until you have a row of five.
- Make six rows in total, each containing five squares.
- Align the rows and join them along their shared edges using the same single crochet method.
- Check the blanket after each row is attached to ensure that the flowers face the same direction and the edges remain aligned.
- Weave in all joining yarn ends.
Lay the blanket flat after joining. If it twists, check the alignment of the squares and the tension of the seams. A visible ridge is normal with this joining method and can become part of the blanket’s design.
11. Adding the Blanket Border
A simple single crochet border creates a neat finish and helps unify the blanket.
Basic single crochet border
- Join the border yarn at any outer corner.
- Chain 1; this does not count as a stitch.
- Work single crochet stitches evenly along the edge. Work into the available stitches and spaces, aiming for a consistent spacing.
- At each outer corner, work 3 sc into the corner point to help the border turn.
- Continue around all four sides.
- Join with a slip stitch to the first sc.
- Fasten off and weave in the yarn end.
If the border curls inward, it may be too tight or have too few stitches. If it waves, there may be too many stitches along the edges. Adjust the spacing on the next round or carefully undo and correct the uneven section.
Optional second border round
For a slightly wider border, work another round of sc into each stitch around, with 3 sc in each outer corner. Keep the tension relaxed and even.
You can use a contrasting color for this round, but make sure it complements the flower centers, petals, and square background.
12. Color and Design Variations
The same flower granny square can create many different blanket styles.
- Soft pastel flowers: Combine pale pink, lavender, mint, cream, and soft yellow.
- Bright contrasting petals: Use vivid petal colors against a neutral background.
- Different flower centers: Give each flower a different center color while keeping the petals consistent.
- One outer square color: Use the same shade for every square-forming round to create a unified look.
- Striped arrangement: Arrange the motifs in horizontal rows of repeating colors.
- Single-color blanket: Use one yarn color for the entire motif to emphasize texture rather than color contrast.
- Decorative border: Add a second round of single crochet in a contrasting color.
Plan your color changes before making all the squares. If you want a consistent layout, write down the color sequence for each motif so you can repeat it accurately.
13. Troubleshooting Guide
| Problem | Likely cause and solution |
|---|---|
| The flower petals are uneven. | You may have missed a stitch in one of the petal loops. Check that every loop contains 1 sc, 1 hdc, 3 dc, 1 hdc, and 1 sc. |
| The center is too tight or too loose. | Pull the starting ring closed firmly without distorting the stitches. If the center remains too tight, loosen your tension slightly when making the initial round. |
| The square curls upward. | Check that all four corners have the full corner sequence and that the chain spaces are not too tight. A slightly larger hook may help if your tension is consistently tight. |
| The edges become wavy. | Extra stitches or loose tension may be causing the edges to flare. Count the side clusters and keep the chain-1 spaces consistent. |
| The corners are not clearly defined. | Make sure the four designated corner spaces are alternating spaces from the transition round. Work 3 dc, ch 2, 3 dc in each of these four spaces. |
| The squares are different sizes. | The tension, yarn, or number of rounds may differ. Compare measurements and correct noticeable differences before joining. |
| The joining seams look bulky. | The joining stitches may be too tight or too large. Use smaller, even stitches through matching edge points. |
| The flowers face different directions. | The motifs may have been rotated during assembly. Arrange them all on a flat surface first and mark the top of each square if necessary. |
| The blanket becomes distorted after joining. | Uneven seams or mismatched square sizes may be pulling the fabric. Check alignment and avoid stretching one square to fit another. |
| The border pulls the edges inward. | The border may have too few stitches or overly tight tension. Undo the affected section and work the stitches more evenly. |
14. Care and Finishing
Once the blanket is assembled, take time to finish it carefully.
- Weave in all remaining yarn ends, securing them on the wrong side.
- Check every joining seam for gaps or loose stitches.
- Inspect the border to make sure it lies reasonably flat.
- Measure the blanket and check that its edges are straight.
- If appropriate for your yarn, gently block the squares or completed blanket to help align the edges.
Blocking may help with minor unevenness, but it cannot reliably correct major stitch-count mistakes or substantially different square sizes.
Always check the yarn label before washing. Some fibers tolerate gentle machine washing, while others require hand washing or different care. Dry the blanket according to the yarn manufacturer’s instructions and reshape it gently if needed.
15. Frequently Asked Questions
1. Is a flower granny square blanket suitable for beginners?
Yes. The project is suitable for beginners who know basic crochet stitches and are willing to practice joining rounds and working into spaces. Making one sample square first is especially helpful.
2. How many squares do I need for a blanket?
The example blanket uses 30 squares arranged in five columns and six rows. You can use fewer squares for a lap blanket or more for a larger blanket, provided the motifs remain consistent in size.
3. Which yarn is suitable for this project?
Medium-weight cotton, acrylic, or suitable blended yarn can work well. Choose a fiber that matches your desired softness, warmth, durability, and washing requirements. Using the same yarn weight throughout helps the squares remain similar in size.
4. How do I make all the squares the same size?
Use the same hook, yarn weight, number of rounds, and stitch pattern for every motif. Measure the squares as you go and correct significant differences before joining.
5. How do I turn a flower motif into a square?
After crocheting the center and petals, work a transition round that creates eight chain-3 spaces around the flower. Use four alternating spaces as corners and work the square-forming round into those spaces, leaving the other four spaces for the sides.
6. What is a good method for joining the squares?
This tutorial uses single crochet joining. It creates a visible ridge between motifs and provides a clearly defined seam. Keep the joining stitches even and match the edges carefully.
7. Can I make the blanket larger or smaller?
Yes. Change the number of rows and columns or adjust the size of each square. Keep all squares consistent within the blanket, and remember that larger motifs require more yarn.
8. How do I prevent the blanket from curling?
Check your stitch counts, corner sequences, and tension. Ensure that the corner spaces are not too tight and that the side clusters are worked consistently. Blocking may help with minor curling if the yarn is suitable.
9. Do I need to block the squares before joining?
Blocking is optional. It can help align the edges and improve the appearance of the motifs, especially if the squares vary slightly. However, it will not reliably fix major differences in stitch counts or size.
10. How can I create a coordinated color layout?
Choose your center, petal, and background colors before making the motifs. Repeat a planned color sequence or arrange the squares in rows of complementary colors. Keep the outer square color consistent if you want a more unified appearance.
16. Conclusion
A crochet flower granny square blanket is a lovely way to combine simple crochet motifs into a colorful, handmade piece. Consistent flower centers, evenly shaped petals, matching square dimensions, careful joining, and a neat border all contribute to a polished result.
Complete one sample square and check its size before making the remaining motifs. With a little planning and patient finishing, you can create a beautiful blanket tailored to your favorite colors and home decor.
Leave a Comment