
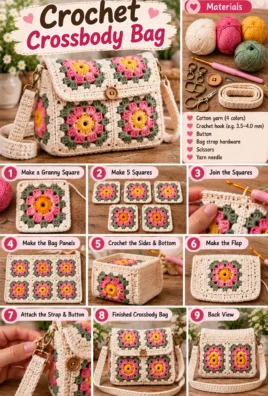
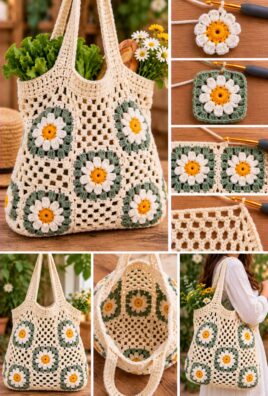
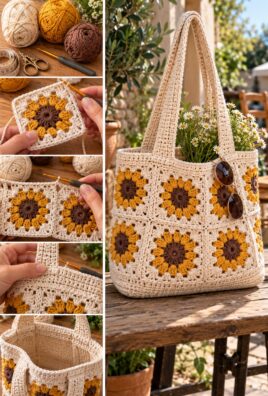
A crochet granny square bag is a versatile project that turns simple crochet motifs into a practical handmade tote. By making individual squares and joining them together, you can create a bag in your favorite colors for everyday essentials, books, craft supplies, or casual outings.
This beginner-friendly design uses six matching granny squares to create a medium-sized tote with a front panel, a back panel, a simple top border, and two reinforced crocheted handles. You can make the squares in one color or use different shades for a more colorful finish.
1. Project Overview
- Project: Crochet Granny Square Bag
- Skill level: Beginner to confident beginner
- Construction: Six granny squares joined into two three-square panels, then connected along the sides and bottom
- Approximate finished dimensions: About 12 inches wide and 12 inches tall, excluding the handles
- Approximate completion time: 6–10 hours
- Materials: Medium-weight yarn, crochet hooks, scissors, yarn needle, stitch markers, and measuring tape
- Main techniques: Chain stitches, double crochet clusters, granny-square corners, slip-stitch joining, single crochet, and sewing
- Suggested uses: Everyday essentials, lightweight books, yarn, small craft supplies, and casual outings
These dimensions and the completion time are estimates. The finished size depends on yarn weight, hook size, stitch tension, square dimensions, and handle length. A lining can affect the interior capacity, while longer handles change how the bag hangs when carried.
2. Materials and Tools
Gather the following supplies before you begin.
- Medium-weight yarn: Approximately 350–500 yards, depending on square size, handle length, and whether you use one or several colors.
- Crochet hook: A 4.5 mm or 5 mm hook suitable for your yarn.
- Smaller hook, optional: A 4 mm hook for tighter seams or a firmer top border.
- Scissors: For cutting yarn.
- Yarn needle: For joining and weaving in ends.
- Stitch markers: To mark corners and handle positions.
- Measuring tape: To check the square dimensions and finished bag.
- Fabric lining, optional: A lightweight but sturdy woven fabric.
- Sewing needle and thread, optional: For attaching a lining.
- Closure, optional: A suitable fabric loop, button, or securely fitted magnetic snap.
- Handles, optional alternative: Purchased handles designed to attach securely to crochet fabric.
A smooth, durable yarn is a practical choice for a bag. Cotton often provides good stitch definition and a relatively firm fabric, while some acrylic yarns are lighter and easier to care for. Choose a fiber appropriate for the bag’s intended use.
Very soft or stretchy yarn may allow the bag to sag when loaded. If your fabric feels too loose, try a smaller hook. The goal is a fabric with clearly defined stitches that holds its shape without becoming stiff.
A lining and closure are optional. If you add hardware, make sure it is compatible with the crochet fabric and securely installed.
3. US Crochet Abbreviations
The tutorial uses US crochet terminology throughout.
| Abbreviation | Meaning |
|---|---|
| ch | Chain |
| sl st | Slip stitch |
| sc | Single crochet |
| hdc | Half double crochet |
| dc | Double crochet |
| st / sts | Stitch / stitches |
| sp | Space |
| rnd | Round |
| rep | Repeat |
| RS | Right side |
| WS | Wrong side |
The pattern uses joined rounds for each granny square. The starting chain 3 counts as the first double crochet of the round. The slip stitch used to join a round does not count as a stitch.
When making a square, a cluster means three double crochet stitches worked into the same space. A corner space is the chain-2 space between the two halves of a corner. A side space is the chain-1 space between clusters along a side.
4. Skills to Know Before Starting
You will need a few basic crochet techniques.
- Slip knot: Make a loop with the yarn, pull a new loop through it, and tighten gently around your hook.
- Starting ring: Chain 4 and join with a slip stitch to make a ring. You will work the first round into this ring.
- Chain stitch: Yarn over and pull the yarn through the loop on your hook.
- Double crochet: Yarn over, insert the hook into the stitch or space, yarn over and pull up a loop, yarn over and pull through two loops, then yarn over and pull through the remaining two loops.
- Chain spaces and corners: Chain stitches create small gaps between clusters. The larger chain-2 spaces form the four corners.
- Joining rounds: Slip stitch to the top of the starting chain 3 at the end of each round.
- Changing colors: Finish the round, join the new color, and begin the next round with the new yarn. Keep color changes consistent across all six squares.
- Joining squares: Align the edges and connect corresponding stitches or spaces with a yarn needle or crochet hook.
- Sewing seams: Use small, evenly spaced stitches to join the panels and close the sides and bottom.
- Handles and finishing: Crochet matching handle strips, sew them to reinforced areas, and weave in all loose ends.
The project is made in stages: crochet six squares, assemble them into two panels, join the panels to form the bag body, add the top border, and attach the handles.
5. Gauge and Finished Dimensions
Gauge matters because the size of each square determines the dimensions of the finished bag.
For this example, aim for six squares measuring approximately 6 inches across. Arrange three squares side by side for the front and three side by side for the back. Each panel will measure approximately 18 inches wide before the bag is folded and seamed into its final shape. With the selected construction, the bag’s finished width and height will depend on how the panels are joined and folded; do not assume that the flat panel width is the same as the finished bag width.
To measure a square, lay it flat without stretching and measure from one outer edge to the opposite edge. Make all six squares the same size, with the same number of rounds and similar tension.
If your squares are larger or smaller than the example, the final bag dimensions will change. A lining may reduce the usable interior space slightly, and longer handles will make the bag hang lower when carried.
6. Step-by-Step Crochet Granny Square Bag Pattern
For a practical six-square design, each square will measure approximately 6 inches across. Arrange the squares to make a compact tote with two front squares, two back squares, and one square for each side. The four front-and-back squares create a bag approximately 12 inches wide and 6 inches tall, while the two side squares provide an approximate 6-inch depth. These are estimates, and the finished dimensions depend on the seams and tension.
This six-square arrangement makes a short, box-shaped tote rather than a tall 12-inch-high tote. If you prefer a taller bag, you can enlarge every square or add extra squares to the front and back.
A. Making the First Granny Square
Use your chosen yarn and the 4.5 mm or 5 mm hook. Work in joined rounds, with the right side facing you.
Round 1: Create the center
- Make a slip knot and chain 4.
- Join the chain with a slip stitch to the first chain to form a ring.
- Chain 3. This counts as the first double crochet.
- Work 2 dc into the center ring to complete the first cluster.
- Chain 2.
- Work 3 dc into the ring, then chain 2.
- Repeat the group of 3 dc followed by chain 2 two more times.
- Join with a slip stitch to the top of the starting chain 3.
You now have four clusters of 3 dc and four chain-2 spaces. The chain-2 spaces establish the four corners.
Round 2: Build the corners
- Slip stitch across the next two dc and into the first chain-2 corner space.
- Chain 3, then work 2 dc into the same corner space.
- Chain 2 and work 3 dc into the same corner space. This completes the first corner.
- Move to the next corner space and work 3 dc, chain 2, and 3 dc into that space.
- Repeat around the remaining two corners.
- Join with a slip stitch to the top of the starting chain 3.
You should have eight clusters of 3 dc, arranged as two clusters at each corner. There are four chain-2 corner spaces.
B. Expanding the Granny Square
From Round 3 onward, you will work clusters into the chain spaces along the sides and into the larger corner spaces.
A corner space is the chain-2 gap between the two clusters at a corner. A side space is a chain-1 gap between clusters along a side.
Round 3:
- Slip stitch across the next two dc and into the first corner space.
- Chain 3, work 2 dc into the same corner space, chain 2, then work 3 dc into that corner space.
- Chain 1.
- Work 3 dc into the next side space, then chain 1.
- At the next corner space, work 3 dc, chain 2, and 3 dc.
- Continue around the square, working chain 1 and 3 dc into each side space and the full corner sequence into each corner space.
- Join with a slip stitch to the top of the starting chain 3.
You should have two side clusters along each side between the corners, with four chain-2 corner spaces.
Round 4 and every following round:
- Slip stitch across the next two dc and into the first corner space.
- Chain 3, work 2 dc into the same corner space, chain 2, then work 3 dc into that corner space.
- Chain 1.
- Work 3 dc into every side space along the edge, chaining 1 between clusters.
- At the next corner space, work 3 dc, chain 2, and 3 dc.
- Repeat around all four sides.
- Join with a slip stitch to the top of the starting chain 3.
Every round adds one new cluster to each side. Continue until the square measures approximately 6 inches from edge to edge.
If the square is smaller than expected, continue for another round. If it is too large, use fewer rounds or a smaller hook. Keep all four sides the same length.
C. Making All Six Squares
Make six squares using the same pattern and number of rounds.
For a coordinated bag, you can use one color throughout or follow the same color sequence for every square. For example, use two rounds in cream and the remaining rounds in a contrasting color.
Before assembly:
- Lay all six squares flat.
- Measure each square across its widest points.
- Check that all corners and sides line up.
- Adjust any square that is noticeably larger or smaller before joining.
- Weave in the yarn ends using a yarn needle.
Consistent square dimensions are important. Uneven squares can cause the finished bag to twist or develop puckered seams.
D. Planning the Bag Layout
Arrange the six squares as follows:
- Front panel: Two squares side by side.
- Back panel: Two squares side by side.
- Left side panel: One square.
- Right side panel: One square.
Each front and back panel will measure approximately 12 inches wide and 6 inches tall. Each side panel will measure approximately 6 inches wide and 6 inches tall.
The front, back, and side panels form the walls of the bag. Their lower edges will be joined to form the bottom perimeter. The opening at the top remains unjoined.
Lay the squares with their right sides facing outward when assembled. Match corresponding corners and edges carefully. Use stitch markers to hold the squares in position before joining them.
E. Joining the Squares
Use a single crochet joining method for the main construction. This creates a defined seam that adds structure, although it may produce a slightly raised ridge.
To join two squares:
- Place the squares together with their right sides facing outward and their edges aligned.
- Insert the hook through corresponding stitches or spaces along both edges.
- Join the yarn with a slip knot and chain 1.
- Work 1 sc through both layers at each matching stitch or space along the edge.
- Keep the stitches even without pulling the edges too tightly.
- At the end of the seam, fasten off and weave in the yarn ends.
If the number of stitches along two edges differs, redistribute the joining stitches evenly instead of forcing several stitches into one area. The square edges should meet without puckering.
Assemble the front and back panels first.
Join two squares side by side for the front, then repeat for the back. These seams run vertically through the center of each panel.
Next, join one side square to each outer edge of the front panel. Attach the back panel to the opposite edges of the two side squares. You will now have a loop of four panels forming the bag’s walls.
Finally, join the lower edge of each wall to the adjacent lower edge around the base perimeter, bringing the front, back, and side panels together. Use the same single crochet joining method, taking care to match the corners. Leave the entire top edge open.
Reinforce the lower corners with a few additional stitches if necessary, then weave in all ends. Lay the bag flat and check that the sides are upright and the bottom sits evenly.
F. Adding an Optional Top Border
A single crochet border creates a neat, stable edge around the opening.
- Join the yarn at any point along the top edge.
- Chain 1; this does not count as a stitch.
- Work 1 sc into each available stitch or joining space around the opening.
- At the joins between panels, work into the available edge stitches without adding unnecessary extra stitches.
- Join with a slip stitch to the first sc.
- Fasten off and weave in the end.
If you want a slightly firmer opening, work a second round of single crochet. Keep the tension consistent so the top edge does not become wavy or tight.
You can skip the border if the opening already looks neat, but a border provides a more finished edge and a convenient foundation for the handles.
G. Making and Attaching the Handles
This design uses two crocheted handles made from reinforced rows of single crochet.
Use the same yarn as the bag or choose a contrasting color. The following instructions create handles approximately 14 inches long and 1 inch wide, before attachment.
Make the first handle:
- Chain 7.
- Work 1 sc in the second chain from the hook and 1 sc in each remaining chain. You will have 6 sc.
- Chain 1 and turn.
- Work 1 sc in each stitch across. (6 sc)
- Repeat the previous row until the strip measures approximately 14 inches.
- Fasten off, leaving a long tail for sewing.
Make a second handle in the same way. Lay both strips flat and compare their lengths before attaching them.
For extra strength, fold each strip lengthwise and sew the long edges together with a yarn needle, or leave the strip flat and use two rows of secure stitching when attaching it. The folded option creates a thicker handle.
Attach the handles:
- Lay the bag flat with the front panel facing you.
- Mark two attachment points along the top edge of the front panel, spaced evenly from the center seam and side edges.
- Position the first handle so that its ends overlap the top border by approximately 1 inch.
- Sew each handle end firmly to the top border and the fabric beneath it.
- Reinforce each attachment with several passes of matching yarn.
- Repeat on the back panel with the second handle, checking that both handles sit at matching positions.
Do not sew only through the outermost edge stitch. Include several rows or stitches of the bag fabric to distribute the pulling force. Avoid carrying excessive weight, because crochet fabric and yarn handles can stretch under load.
Purchased handles are an alternative if they are designed for crochet bags and can be attached securely to reinforced sections of the fabric.
7. Optional Lining and Closure
A fabric lining is not necessary for the basic bag, but it can help keep small items from slipping through the crochet stitches and reduce stretching.
Adding a simple lining
- Measure the bag interior. Measure the width, depth, and height of the assembled bag.
- Cut the fabric. Cut fabric panels to match the bag’s interior, allowing extra fabric for seams and the top hem.
- Sew the lining. With the fabric’s right sides together, sew the side and bottom seams. Leave the top open.
- Fit the lining. Turn the lining right side out and place it inside the bag. The seams should sit neatly against the bag’s interior.
- Finish the top edge. Fold the top fabric edge inward and press or pin it in place.
- Attach the lining. Hand-sew the folded edge to the inside of the crochet top border with small, even stitches.
Avoid pulling the lining so tightly that it distorts the bag. The lining should fit comfortably inside the crochet body.
Adding an optional closure
You can leave the bag open or add a simple closure.
A fabric loop sewn securely to one side of the opening can be paired with a button attached to the opposite side. A magnetic snap is another option if it can be installed securely without damaging the crochet fabric or lining.
Keep any closure compatible with the bag’s construction and intended use. Reinforce the surrounding fabric so the closure does not pull loose.
8. Complete Written Pattern Summary
Use this summary as a quick reference after reading the detailed instructions.
- Granny squares: Make six matching squares using joined rounds. Start with a ring of ch 4 joined with a sl st. Round 1 has four groups of 3 dc separated by ch-2 corner spaces. Round 2 places two 3-dc clusters in each corner space. From Round 3 onward, work 3 dc into every side space with ch 1 between clusters, and work 3 dc, ch 2, 3 dc in every corner space.
- Square size: Continue until each square measures approximately 6 inches across.
- Front panel: Join two squares side by side.
- Back panel: Join two squares side by side.
- Side panels: Use one square for each side.
- Joining method: Join edges with sc through corresponding stitches or spaces, keeping the seams even.
- Bag body: Connect the front, back, and side panels into a loop. Join the lower edges around the bottom perimeter. Leave the top opening unjoined.
- Optional top border: Work one round of sc around the opening, then join with a sl st.
- Handles: Make two strips, each beginning with ch 7 and 6 sc across. Repeat rows until each handle is approximately 14 inches long.
- Handle attachment: Sew each handle end to the reinforced top edge, using several passes of matching yarn.
- Optional lining: Cut and sew a fabric lining to fit the bag interior, then hand-sew it to the inside top edge.
- Optional closure: Add a securely attached fabric loop and button or a compatible magnetic snap.
- Finishing: Weave in all ends, reinforce the corners and handles, and check the seams before use.
9. Color and Design Variations
You can personalize the bag without changing the basic construction.
- One-color bag: Make all six squares in the same color for a simple, coordinated look.
- Different colors for each square: Use a different shade for each motif to create a colorful patchwork effect.
- Contrasting border: Add a border in a darker or brighter color to define the opening.
- Striped handles: Change colors every few rows of the handle to coordinate with the squares.
- Small crocheted motif: Add a flat flower or another securely attached crochet motif, avoiding heavy decorations that could distort the fabric.
- Larger bag: Increase the number of rounds in every square so all six remain the same size.
- Smaller bag: Make consistently smaller squares by using thinner yarn, a smaller hook, or fewer rounds.
If you change the square size, remeasure the panels and adjust the handle positions to keep them balanced. Larger squares also require more yarn and may make the finished bag heavier.
10. Durability and Shape
Crochet bags can stretch, particularly when carrying books or other heavy items. A few practical choices can help the bag hold its shape.
- Use consistent tension: Uniform squares fit together more neatly and distribute strain more evenly.
- Choose suitable yarn: A durable yarn with limited stretch is often a good choice for bags.
- Join squares carefully: Secure seams help prevent gaps and uneven stress points.
- Reinforce the bottom and sides: Check the lower corners and side seams, where strain can concentrate.
- Strengthen handle attachments: Sew through several stitches or rows of fabric and reinforce each handle end.
- Consider a lining: A suitable lining can reduce stretching and prevent small objects from slipping through the stitches, although it cannot eliminate all stretching.
- Avoid excessive weight: Carry only what the bag can reasonably support.
- Check after use: Inspect the seams and handles regularly for stretching or damage.
A granny square tote is best suited to everyday lightweight items rather than unusually heavy loads.
11. Troubleshooting Guide
| Problem | Likely cause and solution |
|---|---|
| The granny squares are different sizes. | The number of rounds or tension may differ. Compare the squares before joining and adjust them so all six are approximately the same size. |
| The squares curl instead of lying flat. | Your tension may be too tight, or the corner stitches may be incorrect. Check the corner sequence and try a slightly larger hook if needed. |
| The corners are not clearly defined. | The chain-2 corner spaces may have been missed. Mark each corner and work the full corner sequence into that space. |
| The joined seams look bulky. | The joining stitches may be too tight or too large. Use a consistent hook and smaller, evenly spaced stitches. |
| The bag twists after assembly. | The panels may not be aligned correctly. Lay the body flat before joining the final seams and check that all corners match. |
| The bottom seam feels weak. | The seam may not include enough fabric. Reinforce the bottom perimeter and corners with another pass of secure stitches. |
| The bag opening becomes wavy. | Too many border stitches may have been added. Work evenly around the opening and avoid adding extra stitches at panel joins. |
| The handles stretch too much. | The strips may be too loose or the load too heavy. Reinforce the handles, use a firmer stitch, and avoid carrying excessive weight. |
| The handles are not positioned evenly. | The attachment points may be uneven. Measure from the center seam and side edges before sewing the handles in place. |
| The finished bag looks too small or too large. | The squares may not match the intended dimensions. Measure before assembly; adjust the number of rounds consistently across all six squares. |
12. Care and Maintenance
The correct care method depends on the yarn and lining materials.
- Check the yarn label before washing.
- If the yarn permits washing, use a suitable gentle method and avoid excessive agitation.
- If the bag has a fabric lining or closure, follow the care instructions for those materials as well.
- Reshape the bag gently after cleaning and allow it to dry completely.
- Avoid hanging the bag by its handles while it is wet, as the added weight can stretch the fabric.
- Inspect the handle attachments, side seams, and bottom joins regularly.
- Repair loose stitches promptly and stop using the bag if a handle or seam becomes damaged.
Do not assume that the bag is machine washable simply because the yarn is washable. The lining, seams, and attached hardware may require a different approach.
13. Frequently Asked Questions
1. Is a crochet granny square bag suitable for beginners?
Yes. The pattern uses basic granny squares and straightforward joining techniques. Beginners should be comfortable with chain stitches, double crochet, joining rounds, and simple sewing.
2. How many granny squares do I need for this design?
You need six squares: two for the front, two for the back, and one for each side. The lower edges of the panels are joined to form the bottom perimeter, leaving the top open.
3. What yarn is best for a granny square bag?
A durable, reasonably firm yarn is a good choice. Cotton is often useful because it has clear stitch definition, while suitable acrylic yarns can provide a lighter option. Choose a fiber appropriate for the intended use and care requirements.
4. How do I make all the squares the same size?
Use the same yarn, hook, pattern, and number of rounds for every square. Measure each motif before joining and correct any noticeable size differences.
5. Which method is best for joining granny squares?
This tutorial uses single crochet joining. It creates a defined seam that can add structure to the bag. A yarn-needle seam can produce a flatter finish, but use one consistent method throughout the main construction.
6. Do I need to line my crochet bag?
No. A lining is optional. It can help keep small items inside and reduce stretching, but the basic bag can be completed without one.
7. How can I make the handles stronger?
Use consistent, firm stitches and sew the handle ends through several stitches or rows of the bag fabric. Reinforce each attachment point with multiple passes of yarn, and avoid carrying excessive weight.
8. Can I make the bag larger or smaller?
Yes. Change the size of all six squares consistently by adding or reducing rounds, changing yarn weight, or adjusting the hook. Remeasure the panels and reposition the handles to suit the new dimensions.
9. How do I prevent the bag from stretching?
Choose yarn with suitable durability, maintain even tension, reinforce the bottom and handles, and consider adding a lining. Avoid carrying excessive weight, since crochet fabric can stretch under load.
10. Can I use different colors for every square?
Yes. You can use different colors for individual squares or create a repeated color sequence. Weave in the ends carefully and check that all six squares remain the same size.
14. Conclusion
A crochet granny square bag is a rewarding project that turns simple motifs into a useful handmade accessory. By keeping the squares consistent, joining the seams securely, and reinforcing the handles, you can create a bag with a coordinated look and a practical shape.
Measure every square before assembly, check the bottom and side seams carefully, and avoid carrying excessive weight. With thoughtful finishing and a little creativity, your granny square tote can be customized to suit your favorite colors and everyday needs.
Leave a Comment