
A solid granny square is a versatile crochet motif that combines the familiar shape of a classic granny square with a denser fabric and fewer open gaps. Instead of relying on the large spaces often found in traditional granny squares, this design uses double crochet stitches worked closely together, with chain spaces reserved mainly for shaping the four corners.
This solid crochet granny square pattern is suitable for confident beginners who want to create a neat, square-shaped motif for blankets, cushion covers, tote bags, cardigans, scarves, and other handmade projects. You will start with a small center, build four distinct corners, and increase the sides evenly through joined rounds. Once you understand the construction, you can continue adding rounds to make larger squares or experiment with different colors. The key is to keep your corner increases consistent and your tension comfortable.
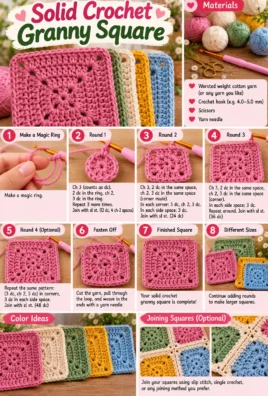
1. Finished Project Overview
Solid Crochet Granny Square
A dense, classic square with four corners and closely worked stitches.
Skill level
Confident beginner
Terminology
US crochet terms
Target size
About 5–6 inches
Working time
About 45–90 minutes
Yarn
Medium-weight yarn
Hook
About 5 mm, as suitable
Main stitches
Chain, double crochet, slip stitch
Colors
One or more
These measurements and the working time are estimates, not guarantees. Your finished square will depend on your yarn, hook size, tension, and the number of rounds you complete. The sample construction below provides a small center and four expanding rounds; you can add more rounds to increase the size.
2. Materials and Tools
Gather the following supplies before you begin:
- Medium-weight yarn: One color is enough for a classic solid square. You can use additional colors for stripes or contrasting rounds.
- Crochet hook: A 5 mm hook is a useful starting point for many medium-weight yarns. Follow the yarn label and adjust the hook if necessary.
- Scissors: For cutting the yarn.
- Yarn needle: For weaving in loose ends.
- Ruler or measuring tape: For checking the dimensions.
- Stitch markers: Optional, but helpful for marking the four corner spaces.
Approximate yarn requirements
For a small square measuring around 5–6 inches, allow approximately 10–20 g of medium-weight yarn as a starting estimate. Larger squares, extra rounds, heavier yarn, or looser tension may require more.
If you are making several squares for a blanket or cushion cover, it is useful to keep extra yarn from the same color lot so that the finished project looks consistent.
Choosing yarn
Cotton yarn usually gives clear stitch definition and a relatively stable fabric. It can be useful for decorative squares, bags, and projects where a defined shape matters.
Acrylic yarn is often lightweight, widely available, and easy to care for. It can work well for blankets and cushion covers, although the finished drape depends on the particular yarn and tension.
For your first square, choose a smooth yarn that makes the stitches easy to see. Very fuzzy or highly textured yarn can make it harder to identify the top loops and corner spaces.
3. Crochet Abbreviations
This tutorial uses US crochet terminology.
| Abbreviation | Meaning |
|---|---|
| ch | Chain |
| sl st | Slip stitch |
| sc | Single crochet |
| dc | Double crochet |
| st | Stitch |
| sts | Stitches |
| sp | Space |
| ch-sp | Chain space |
| rnd | Round |
| rep | Repeat |
| sk | Skip |
| beg | Beginning |
| FO | Fasten off |
The main square pattern uses chains, double crochet stitches, and slip stitch joins. Single crochet is included for reference in the finishing and troubleshooting sections but is not required for the main construction.
4. Understanding the Solid Granny Square
A solid granny square is built in joined rounds. Each new round increases the size of the motif while preserving four corners.
The construction has three main parts:
- Center: A small ring or chain ring provides the starting point.
- Corner spaces: Chain spaces establish the four corners and give the square room to expand.
- Side stitches: Double crochet stitches fill the sections between the corners, creating a denser fabric.
As the square grows, each side needs more stitches than the previous round. The corner spaces remain in the same four positions, while the side sections expand between them.
A solid granny square is not completely hole-free. The normal gaps between stitch tops and the chain spaces at the corners remain, but the closely worked double crochet stitches reduce the large open spaces commonly found in traditional granny-square designs.
The most important rule is to work the corner construction consistently. If you miss a corner space or accidentally add an extra one, the square may become uneven or start to look rounded.
5. Essential Stitches and Techniques
Learn these techniques before starting the round-by-round pattern.
Slip knot
A slip knot creates the adjustable loop that sits on your hook.
- Leave a yarn tail about 6 inches long.
- Make a loop by crossing the yarn over itself.
- Pull a small folded section of yarn through the loop to create a new loop.
- Place the new loop on your hook.
- Gently pull the working yarn and tail to adjust the knot around the hook.
The loop should fit around the hook without being so tight that it cannot move.
Chain stitch
A chain stitch creates a small link of yarn.
- Yarn over by wrapping the working yarn over the hook.
- Pull the yarn through the loop already on your hook.
- You have made one chain stitch.
Repeat as instructed. Keep the loop on the hook at a comfortable size rather than tightening it around the narrow throat.
Double crochet
A double crochet, abbreviated dc in US terminology, creates a taller stitch that forms the main fabric of this square.
- Yarn over.
- Insert the hook into the specified stitch or space.
- Yarn over again and pull up a loop. You should now have three loops on the hook.
- Yarn over and pull through the first two loops. Two loops remain on the hook.
- Yarn over and pull through the remaining two loops.
One double crochet stitch is complete.
Slip stitch join
A slip stitch join closes a round without adding the height of another stitch.
- Insert your hook into the top of the stitch specified at the end of the round.
- Yarn over and pull the yarn through that stitch.
- Pull the same loop through the loop already on your hook.
In this pattern, the beginning chain 3 counts as the first double crochet of a round when specified. Join to the top of that chain 3, not to a nearby chain space. This keeps the stitch count consistent.
Corner construction
Each corner in the main pattern is made with:
2 dc, ch 2, 2 dc in the same corner space.
The chain-2 space between the two pairs of double crochet stitches is the corner space. It remains the location where the next round’s corner is worked.
The side sections are worked into the tops of the double crochet stitches from the previous round, not into the corner spaces.
Working into stitches and spaces
A stitch has a top formed by loops that look like a small V. To work into the top of a double crochet, insert your hook under both top loops unless the instructions say otherwise.
A chain space is the opening formed by chain stitches. To work into a chain space, insert your hook into the opening itself rather than into the chain loops individually.
For this square, use the tops of the double crochet stitches for side stitches and use the chain-2 spaces only for the four corners.
6. Gauge and Finished Measurements
You do not need a formal gauge swatch for a small decorative square, but checking the size is helpful when you plan to make several matching motifs.
Use this simple method:
- Complete the first few rounds.
- Place the motif on a flat surface without stretching it.
- Measure from one edge to the opposite edge.
- Measure in the other direction and check whether both dimensions are equal.
- Compare each new square with the previous ones as you work.
The target for this sample is approximately 5–6 inches across, but the actual measurement will vary. If your square is much smaller than expected and the fabric feels stiff, try a larger hook. If it is too large or has loose, open stitches, try a smaller hook or adjust your tension.
For multiple squares, keep the yarn, hook, stitch construction, and number of rounds consistent. Blocking can help even out small differences, but it is better to maintain consistent tension than to rely on blocking to correct a large size difference.
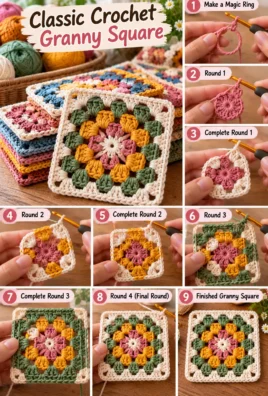
7. Complete Solid Granny Square Pattern
This pattern begins with a center ring and creates four corner spaces in the first square round. Each new round works double crochet stitches into the existing stitches and adds a consistent increase at each corner.
Important construction detail: The beginning chain 3 counts as the first double crochet whenever the instructions say it does. Each round is joined with a slip stitch to the top of that beginning chain 3. The chain-2 space at each corner remains the corner space for the next round.
Starting Round: Create the Center
Use a magic ring or a small chain ring to create the center.
Option A: Magic ring
- Make a magic ring and place your hook through the adjustable loop.
- Chain 3. These chains will count as the first double crochet of Round 1.
- Follow the Round 1 instructions below, working the required stitches around the ring.
- Pull the yarn tail to tighten the ring after the stitches have been made.
Option B: Chain ring
- Chain 4.
- Join the first chain to the last with a slip stitch to make a ring.
- Chain 3 to begin Round 1.
- Work the Round 1 stitches into the center of the ring, not into the individual chains.
The starting ring itself does not have a separate stitch count. The first square round creates the four corners.
Round 1: Establish the Four Corners
Purpose: Create four corner chain spaces and four groups of three double crochet stitches.
With the beginning chain 3 counting as the first dc:
- Chain 3. This counts as 1 dc.
- Work 2 dc into the center ring.
- Chain 2 to create the first corner space.
- Work 3 dc into the center ring.
- Chain 2.
- Repeat the sequence of 3 dc into the ring, then ch 2, two more times.
- Join with a sl st to the top of the beginning ch-3.
Pull the magic ring closed if you have not already done so.
End-of-round count:
- 4 groups of 3 dc, including the beginning ch-3 as the first dc of the first group.
- 4 corner ch-2 spaces.
- 12 dc in total, counting the beginning ch-3 as one dc.
Fasten off only if you want to change colors. Otherwise, continue with the same yarn.
Check the shape: You should see four groups of three double crochet stitches separated by four chain-2 spaces. The chain spaces are the corners. The square may look small at this stage, but the four corner positions should be clear.
Round 2: Expand the Square
Purpose: Build the first full round of corner increases and fill the sides.
Start in any corner ch-2 space. If necessary, slip stitch into the space before beginning.
- Chain 3; this counts as the first dc of the corner.
- Work 1 dc into the same corner space.
- Chain 2.
- Work 2 dc into the same corner space. The corner is now complete.
- Work 1 dc into each of the next 3 dc stitches along the side.
- In the next corner ch-2 space, work 2 dc, ch 2, and 2 dc.
- Work 1 dc into each of the next 3 dc stitches.
- Repeat the corner-and-side sequence until all four corner spaces have been worked.
- Join with a sl st to the top of the beginning ch-3.
End-of-round count:
- 4 corner ch-2 spaces.
- 7 dc along each side when counting the two dc on either side of the corner space as part of the side edge.
- 28 dc in total, counting the beginning ch-3 as one dc.
Keep the corner chain spaces open and avoid working into them as though they were ordinary stitches. The double crochet stitches along the sides go into the tops of the previous round’s stitches.
Round 3: Continue the Solid Construction
Purpose: Increase each side while maintaining four distinct corners.
Start in any corner ch-2 space. If needed, slip stitch into that space.
- Chain 3; this counts as the first dc of the corner.
- Work 1 dc into the same corner space.
- Chain 2.
- Work 2 dc into the same corner space.
- Work 1 dc into each stitch along the next side until you reach the next corner ch-2 space. There are 7 stitches to work into along this side.
- In the next corner space, work 2 dc, ch 2, and 2 dc.
- Continue working 1 dc into each stitch along the next side, then make the same corner construction in the next corner space.
- Repeat until all four corners and all four sides are complete.
- Join with a sl st to the top of the beginning ch-3.
End-of-round count:
- 4 corner ch-2 spaces.
- 11 dc along each side, including the stitches immediately beside the corner spaces.
- 44 dc in total, counting the beginning ch-3 as one dc.
The side sections should now look longer than in Round 2. Keep your tension consistent and work one double crochet into each stitch top along the sides. Do not skip the stitches next to the corners.
Round 4: Maintain the Square Shape
Purpose: Expand the square with another balanced round of increases.
Start in any corner ch-2 space.
- Chain 3; this counts as the first dc of the corner.
- Work 1 dc into the same corner space.
- Chain 2.
- Work 2 dc into the same corner space.
- Work 1 dc into each of the next 11 stitches along the side.
- In the next corner ch-2 space, work 2 dc, ch 2, and 2 dc.
- Work 1 dc into each of the next 11 stitches along the side.
- Repeat the same corner-and-side sequence until you have worked all four corners and all four sides.
- Join with a sl st to the top of the beginning ch-3.
End-of-round count:
- 4 corner ch-2 spaces.
- 15 dc along each side, including the stitches immediately beside the corner spaces.
- 60 dc in total, counting the beginning ch-3 as one dc.
The square should now have four clear corners and four balanced sides. If it starts to curl or wave, pause and check your stitch placement and tension before adding more rounds.
Additional Rounds: Making the Square Larger
You can continue beyond Round 4 by following the same corner construction and working into every stitch along each side.
For each additional round:
- Begin in a corner ch-2 space.
- Make the corner using 2 dc, ch 2, and 2 dc. The beginning ch-3 counts as the first dc of the first corner when you start the round.
- Work 1 dc into every stitch along the next side until you reach the next corner space.
- Repeat the same corner construction in that space.
- Continue around the square, keeping all four corners in their established positions.
- Join with a sl st to the top of the beginning ch-3.
Example: Round 5
At the end of Round 4, there are 15 dc along each side between the corner spaces, counting the stitches beside the corner spaces.
For Round 5:
- Start in a corner ch-2 space and work the corner construction: ch 3, 1 dc in the same space, ch 2, and 2 dc in the same space.
- Work 1 dc into each of the next 15 stitches along the side.
- Work 2 dc, ch 2, and 2 dc into the next corner space.
- Continue with 15 dc along each side and the same corner construction at each of the remaining corners.
- Join with a sl st to the top of the beginning ch-3.
End-of-round count: 4 corner ch-2 spaces and 19 dc along each side, counting the stitches immediately beside the corner spaces.
Each new round adds four double crochet stitches to the length of each side. After Round 4, the side length is 15 dc; after Round 5, it is 19 dc. Continue increasing the side section by four stitches per round.
Estimating the Number of Rounds
The number of rounds needed to reach your desired size depends on your yarn, hook, and tension. Work a few rounds, measure the square while it lies flat, and use that measurement to estimate how much larger each additional round will make it.
For a blanket, cushion cover, or bag, check the dimensions of the finished motifs before making a large batch. The target size of 5–6 inches is approximate; some squares will need more or fewer rounds.
8. Color Changes
A solid granny square can be made in one color or several colors. Changing colors is optional and does not alter the basic corner construction.
When to change colors
For a striped square, the easiest point to change color is at the end of a completed round. This keeps each color in a separate band.
- Finish the final double crochet of the round.
- Join the round with a slip stitch as instructed.
- Fasten off the current color, leaving a yarn tail.
- Attach the new color in a corner ch-2 space.
- Begin the next round using the same corner construction.
Alternatively, you can introduce the new color during the final pull-through of the last stitch or joining stitch, where appropriate. This can help create a cleaner transition, although the joining point may still be visible.
Keep color changes neat
- Leave a tail long enough to weave in securely.
- Avoid pulling the new yarn too tightly, as this may distort the corner.
- Weave in loose ends on the wrong side using a yarn needle.
- Avoid carrying unused yarn across the back if it would create visible strands or extra bulk.
- Keep the corner spaces consistent even when you change colors.
For a multicolor square, you can use a different color for every round, alternate two colors, or create a wider border in a contrasting shade.
9. Finishing the Square
Once you have reached your desired size, finish the motif carefully.
- Complete the final round. Work the four corner increases and all side stitches, then join with a slip stitch to the top of the beginning chain 3.
- Fasten off. Cut the yarn, leaving a tail of approximately 6 inches.
- Secure the yarn. Pull the tail through the final loop to secure it.
- Weave in loose ends. Thread the tail onto a yarn needle and weave it through several stitches on the wrong side. Change direction once or twice to help secure it.
- Shape the corners. Gently arrange the square so all four corners are clearly defined.
- Check the edges. Lay the square flat and make sure the sides are reasonably straight.
- Measure the motif. Measure across both directions without stretching the fabric.
- Block if needed. If the square is slightly uneven, gently shape it and allow it to dry according to the yarn’s care instructions.
Blocking different yarn types
- Cotton: Gentle wet blocking can help even out small irregularities. Shape the damp square on a flat surface and pin the corners if needed.
- Wool blends: Follow the yarn’s care instructions. Some blends respond well to gentle wet blocking, but avoid excessive agitation or sudden temperature changes.
- Acrylic: Washing and shaping may help, but avoid high heat unless the yarn manufacturer specifically recommends a suitable method. Excessive heat can permanently damage acrylic fibers.
Blocking can improve the appearance of minor irregularities, but it cannot correct major stitch-count errors or a missing corner increase. If the square is significantly uneven, check the stitches and construction first.
10. Troubleshooting Common Problems
| Problem | Likely Cause | Solution |
|---|---|---|
| The square curls inward. | Tension may be too tight, or stitches may have been missed. | Check that every side stitch is worked and every corner has the required increase. If the fabric feels stiff, try a larger hook. |
| The square waves or ruffles. | Tension may be too loose, or extra stitches may have been added. | Check the stitch count along each side and work only one dc into each existing stitch top. |
| The motif looks more like a circle than a square. | The four corner spaces may be difficult to identify, or corner increases may have been missed. | Mark the four corner spaces and work the same corner construction in each one. |
| The corners are not clearly defined. | The chain-2 spaces may be too tight, or the corner stitches may be worked into the wrong location. | Work 2 dc, ch 2, and 2 dc in each corner space. Keep the chain space open. |
| The sides are uneven. | Stitches may have been skipped, added accidentally, or worked with inconsistent tension. | Count the stitches along each side before starting the next round. Compare opposite sides as you work. |
| The center has a visible hole. | The magic ring may not be tightened enough. | Pull the starting tail to close the ring, then weave the tail securely into the wrong side. |
| Large unintended gaps appear between stitches. | The tension may be loose, or the hook may be too large for the yarn. | Try a smaller hook or guide the yarn more consistently. Remember that small gaps between stitch tops and at corners are normal. |
| The square becomes too tight. | Stitches or chains may be pulled too tightly, or the hook may be too small. | Relax your tension and consider using a larger hook. |
| The square becomes too large. | The hook may be too large, or tension may be too loose. | Try a smaller hook and check that you are not accidentally adding stitches. |
| The joining seam looks bulky. | The joining slip stitch may be too tight or worked in the wrong location. | Join to the top of the beginning chain 3 and keep the slip stitch relaxed. Weave in tails rather than leaving bulky knots. |
| Stitch counts do not match between rounds. | A stitch or corner space may have been missed, or the beginning chain may have been counted incorrectly. | Remember that the beginning ch-3 counts as one dc in this pattern. Check the four corners and recount the side stitches before continuing. |
| Multiple squares have different dimensions. | Yarn, hook, tension, or round counts may differ. | Use consistent materials and the same number of rounds. Measure and block the motifs to similar dimensions before joining. |
If a round does not match the expected count, it is usually easier to correct it immediately than to try to compensate in a later round.
11. Customization and Project Ideas
A solid granny square is easy to customize because the same corner construction can be repeated as the motif grows.
Single-color squares
Use one color throughout for a classic, uniform look. This works well for simple blankets, cushion covers, and projects where you want the texture of the stitches to stand out.
Two-color and multicolor squares
Change colors at the end of each round to create contrasting bands. You can use two colors in an alternating sequence or assign a different color to each round.
Striped rounds
Use the same color for two or more rounds, then introduce a new shade. This produces wider color bands without changing the structure of the square.
Larger blanket motifs
Continue adding rounds until the square reaches the dimensions required for your blanket. Check that each new round contains the correct number of side stitches and four corner spaces.
Pillow and cushion covers
Solid squares create a denser fabric that can help conceal the cushion insert more effectively than an open granny-square design. Choose yarn that suits the desired texture and care requirements.
Tote bags and accessories
For bags, consider yarn strength, stitch density, and the amount of stretching expected during use. A dense square is useful, but the finished bag may still need a lining or reinforcement depending on the project.
Cardigans and vests
Multiple squares can be joined to make garment panels. Check the dimensions and drape of the squares before assembling them, since a fabric that feels suitable for a blanket may behave differently in a garment.
Scarves and wraps
Join squares into long panels or arrange them in a larger grid. Consider how the yarn feels against the skin and whether you want a flexible or more structured fabric.
Contrasting borders
After assembling your squares, add a border in a complementary or contrasting color. A simple border can unify the edges of a blanket, pillow cover, or bag.
Changing yarn weight, hook size, and the number of rounds will affect the finished size and drape. For garments and bags, consider the dimensions and strength of the fabric before deciding how to use the motif.
12. Joining Multiple Solid Granny Squares
If you plan to make a larger project, prepare your squares before joining them. Consistent dimensions help prevent puckering and make the finished edges easier to align.
Prepare the squares
- Measure each motif in both directions.
- Check that each square has four corners and the same number of rounds.
- Compare stitch counts and tension.
- Block the squares to similar dimensions if needed.
- Arrange them in your desired color sequence before joining.
Choose a joining method
Slip-stitch join
A practical option for beginners that creates a defined seam. Align the edges and work slip stitches through corresponding edge loops. Keep the seam relaxed to avoid pulling the squares together.
Single-crochet join
Creates a more pronounced ridge and can add structure to a project. Work single crochet stitches through matching edge stitches, keeping the tension even.
Mattress-style seam
A sewing method that can create a flatter, less prominent join. Use a yarn needle and matching yarn to sew corresponding edge stitches together.
Finish the assembled project
Weave in yarn tails before joining if they are easier to access, or secure them after joining if that suits your construction. Once all the squares are assembled, you can add an optional border around the outside edge to unify the project.
Matching dimensions are more important than forcing every square into place. If one motif is noticeably larger, check its stitch count and tension before joining it to the others.
13. Frequently Asked Questions
1. What is a solid crochet granny square?
A solid crochet granny square is a square-shaped motif worked in joined rounds, using closely arranged stitches and four corner spaces to create a denser fabric with fewer large openings.
2. How is a solid granny square different from a traditional granny square?
A traditional granny square often uses groups of stitches separated by larger spaces, creating an open, airy fabric. A solid granny square works double crochet stitches across the sides, making the fabric denser while retaining the familiar four-corner shape.
3. Is this pattern suitable for beginners?
Yes, especially if you are comfortable with chains, double crochet stitches, and slip stitch joins. Take your time identifying the four corner spaces and counting the stitches along each side.
4. Which yarn is best for solid granny squares?
Smooth medium-weight cotton or acrylic yarn is a good starting point. Cotton often provides clear stitch definition, while acrylic is commonly used for blankets and other easy-care projects. Choose a yarn suitable for your intended finished item.
5. What hook size should I use?
A 5 mm hook is a reasonable starting point for many medium-weight yarns, but check the yarn label. If the square feels stiff, try a larger hook; if the stitches are too loose, try a smaller one.
6. Why does my solid granny square curl?
Curling may result from tight tension, skipped stitches, or incorrect corner placement. Check that you work into every side stitch and use the same corner construction in all four corner spaces. A larger hook may help if the fabric is particularly stiff.
7. How can I make my square larger?
Continue adding rounds. Work the established corner construction into each corner space and work one double crochet into every stitch along the sides. Each additional round increases the number of stitches along each side.
8. Can I use multiple colors?
Yes. Change colors between joined rounds to make stripes or contrasting borders. Color changes do not alter the basic corner construction, and you should maintain the same stitch placement in every round.
9. How do I make the corners look sharper?
Keep the four corner chain spaces open and work 2 dc, ch 2, and 2 dc into each one. Make sure you do not accidentally work into a nearby side stitch instead of the corner space.
10. Do solid granny squares need blocking?
Not always. If the square lies flat and has four clear corners, blocking may not be necessary. Gentle blocking can help even out minor irregularities, especially when preparing several motifs for joining.
11. What is the easiest way to join solid granny squares?
A slip-stitch join is a practical beginner-friendly choice and creates a visible seam. A single-crochet join creates a more pronounced ridge, while a mattress-style seam can create a flatter finish.
12. Can I use this pattern for a blanket or cushion cover?
Yes. Make multiple squares, measure them to ensure consistent dimensions, and join them using your preferred method. The denser fabric is useful when you want fewer large openings than a traditional granny-square design provides.
14. Conclusion
A solid granny square is a versatile crochet motif that offers a denser fabric, clean edges, and four recognizable corners. Once you understand how the corner spaces work and how to increase the side stitches evenly, you can continue expanding the square to suit a wide range of handmade projects.
Start with one square, check your stitch counts as you go, and experiment with colors once you feel comfortable with the basic construction. If you plan to make several motifs, consistent tension and measurements will help you achieve a neater finished project.
Which colors would you choose for your solid granny squares, and would you use them for a blanket, cushion cover, bag, or another crochet project? Share your favorite combination and project idea!
Leave a Comment