
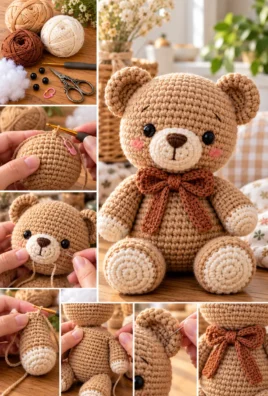
Create an adorable handmade teddy bear with a rounded head, soft muzzle, little ears, and cuddly arms and legs. This amigurumi crochet teddy bear pattern includes detailed round-by-round instructions, stitch counts, stuffing guidance, and assembly steps to help you create a charming plush toy from start to finish.
The design uses simple crochet stitches and separately crocheted components, making it suitable for confident beginners and experienced crocheters who enjoy creating classic stuffed animals.
1. Project Overview
| Feature | Details |
|---|---|
| Skill level | Advanced beginner |
| Estimated finished height | 15–18 cm (6–7 inches) |
| Yarn | DK or light-worsted yarn |
| Recommended hook | 2.5–3 mm |
| Main stitches | Single crochet, increases, invisible decreases |
| Construction | Separate pieces sewn together |
| Estimated yarn quantity | 35–50 g main color, 5–10 g contrast color |
| Estimated completion time | 5–9 hours |
| Facial details | Embroidered eyes, nose, and mouth |
| Intended use | Decorative toy or handmade gift |
The dimensions, yarn quantities, and completion time are estimates rather than physically verified measurements. The finished bear’s size will depend on yarn thickness, hook size, tension, and stuffing density.
2. Materials and Tools
Prepare the following supplies before beginning.
- Main yarn: Approximately 35–50 g of smooth DK or light-worsted yarn in brown, beige, cream, or your preferred color.
- Contrast yarn: Approximately 5–10 g of cream or beige yarn for the muzzle.
- Embroidery thread: Black or dark brown for the eyes, nose, and mouth.
- Crochet hook: A 2.5–3 mm hook, adjusted to produce dense stitches.
- Stuffing: Polyester toy filling or another suitable filling material.
- Stitch markers: To identify the beginning of each round.
- Tapestry needle: For joining the crocheted pieces and hiding yarn ends.
- Scissors: For cutting yarn.
- Measuring tape: To check the finished dimensions.
- Optional pins: For positioning components before sewing.
- Optional accessory yarn: A small amount for a bow or scarf.
Smooth cotton, acrylic, and suitable blended yarns are practical choices. Select a yarn that produces even stitches and is comfortable to crochet.
Choosing the correct hook
Amigurumi generally uses a smaller hook than ordinary crochet projects made with the same yarn. The resulting fabric should be dense enough to prevent stuffing from showing through.
If you see large holes between stitches, try a smaller hook. If crocheting becomes uncomfortably difficult or the fabric is excessively rigid, try a slightly larger hook while checking that the filling remains concealed.
3. Crochet Terminology and Abbreviations
This pattern uses US crochet terminology.
| Abbreviation | Meaning | Explanation |
|---|---|---|
| MR | Magic ring | Adjustable starting loop |
| ch | Chain | A basic crochet foundation stitch |
| sc | Single crochet | Insert hook, pull up a loop, yarn over, and pull through both loops |
| sl st | Slip stitch | Insert hook and pull the yarn through the stitch and loop on the hook |
| inc | Increase | Work two single crochets into one stitch |
| dec | Decrease | Combine two stitches into one |
| inv dec | Invisible decrease | Decrease using the front loops of two stitches |
| BLO | Back loop only | Work through the back loop of a stitch |
| st | Stitch | One crochet stitch |
| sts | Stitches | More than one crochet stitch |
| rnd | Round | One complete circular pass |
| rnds | Rounds | Multiple circular passes |
| FO | Fasten off | Cut the yarn and secure the final loop |
| rep | Repeat | Work the stated sequence again |
For example, (2 sc, inc) × 6 [24] means work two single crochets and then an increase, repeating the sequence six times to produce 24 stitches.
Continuous rounds
Most components are crocheted in continuous spiral rounds. Do not join the end of a round to its beginning with a slip stitch unless the instructions specifically require it.
Place a stitch marker in the first stitch of each round. When you complete the round, count the stitches and move the marker to the new first stitch.
Invisible decrease
To make an invisible decrease:
- Insert the hook beneath the front loop of the next stitch.
- Insert it beneath the front loop of the following stitch.
- Yarn over and pull through both front loops.
- Yarn over again and pull through the two loops on the hook.
This method creates a smoother decrease than a standard single-crochet decrease.
4. Essential Techniques for Beginners
Making a magic ring
- Form a loop with the yarn, leaving a tail of approximately 10–15 cm.
- Insert the hook through the loop.
- Catch the working yarn and pull up a loop.
- Chain once if needed to secure the starting loop.
- Work the required number of single crochets into the ring.
- Pull the yarn tail to close the center tightly.
If the magic ring is difficult, use a chain-based starting loop and close the center securely.
Making a single crochet
- Insert the hook into the indicated stitch.
- Yarn over and pull up a loop.
- Yarn over again.
- Pull through both loops on the hook.
One single crochet creates one stitch.
Increasing
Work two single crochets into the same stitch. This adds one stitch to the round.
Decreasing
Use the invisible decrease technique to combine two stitches into one. This reduces the stitch count by one.
Counting stitches
Count the stitches at the end of every round. Increases and decreases change the total, but ordinary single crochets do not.
If the count is incorrect, undo the affected section and correct the mistake before continuing.
Changing colors
To create a clean color change, begin the final yarn-over of the last stitch in the old color and complete it with the new color. Continue with the new yarn.
Stuffing a crocheted piece
Add small amounts of filling gradually. Distribute the stuffing with your fingers and rotate the piece to check its shape. Avoid overfilling, which can stretch the stitches.
Fastening off
Cut the yarn, leaving a tail long enough for sewing if the component will be attached to another piece. Pull the tail through the final loop and tighten gently.
For openings that must be closed, use a gathering stitch through the remaining front loops. For components that will be sewn together, keep the opening accessible until assembly.
5. Gauge and Finished Dimensions
Use a 2.5–3 mm hook as a starting point. Your goal is a firm, even fabric with no obvious gaps.
| Component | Approximate dimensions |
|---|---|
| Head | 7–8 cm wide |
| Muzzle | 3–4 cm wide |
| Each ear | 2–3 cm wide |
| Body | 5–6 cm tall |
| Each arm | 4–5 cm long |
| Each leg | 3–4 cm long |
| Complete bear | 15–18 cm tall |
These dimensions are design estimates. Actual measurements may differ depending on your yarn, tension, and stuffing.
If the stitches are too loose, reduce the hook size. If they are too tight, try a slightly larger hook. Keep the same yarn and hook for matching components so that the arms, legs, and ears remain consistent.
6. Construction Plan
The teddy bear consists of the following parts:
- One head.
- One contrasting muzzle.
- Two ears.
- One body.
- Two arms.
- Two legs.
- One optional tail.
- Embroidered facial features.
- One optional bow.
The head and body are worked separately, each with a 24-stitch opening. Their openings are sewn together stitch by stitch. The arms, legs, ears, and muzzle are also attached by sewing.
Complete the head first, then make the muzzle and ears. Crochet the body, arms, and legs before assembling the bear.
7. Complete Round-by-Round Crochet Pattern
A. Teddy Bear Head
The head is worked from the crown downward. Increase rounds create the rounded top, even rounds form the sides, and decrease rounds shape the lower portion.
Yarn: Main color.
| Round | Instructions | Stitch count |
|---|---|---|
| 1 | 6 sc in MR | 6 |
| 2 | inc in every st | 12 |
| 3 | (1 sc, inc) × 6 | 18 |
| 4 | (2 sc, inc) × 6 | 24 |
| 5 | (3 sc, inc) × 6 | 30 |
| 6 | (4 sc, inc) × 6 | 36 |
| 7 | (5 sc, inc) × 6 | 42 |
| 8 | (6 sc, inc) × 6 | 48 |
| 9 | 48 sc | 48 |
| 10 | 48 sc | 48 |
| 11 | 48 sc | 48 |
| 12 | 48 sc | 48 |
| 13 | 48 sc | 48 |
| 14 | 48 sc | 48 |
| 15 | 48 sc | 48 |
| 16 | 48 sc | 48 |
| 17 | (6 sc, dec) × 6 | 42 |
| 18 | (5 sc, dec) × 6 | 36 |
| 19 | (4 sc, dec) × 6 | 30 |
| 20 | (3 sc, dec) × 6 | 24 |
| 21 | 24 sc | 24 |
| 22 | 24 sc | 24 |
Finishing the head
- Fasten off, leaving a long sewing tail.
- Keep the 24-stitch opening unclosed.
- Add stuffing through the opening, beginning at the crown.
- Distribute the filling evenly around the sides.
- Shape the head into a smooth sphere or slightly oval form.
- Leave enough room to sew the head to the body.
The final opening contains 24 stitches, matching the body opening.
B. Contrasting Muzzle
The muzzle is worked around both sides of a foundation chain to create a small oval.
Yarn: Cream or beige.
1. Ch 7.
| Round | Instructions | Stitch count |
|---|---|---|
| 1 | 5 sc, 3 sc in the last ch, 4 sc along the opposite side of the chain, 2 sc in the remaining end stitch | 14 |
| 2 | inc, 4 sc, inc in each of the next 3 sts, 4 sc, inc in each of the next 2 sts | 20 |
| 3 | 20 sc | 20 |
For Round 1, crochet along one side of the chain, work around its end, and continue along the opposite side. This forms an oval rather than a flat rectangle.
Finishing the muzzle
- Fasten off, leaving a long sewing tail.
- Flatten the piece gently.
- Position it on the lower front of the head.
- Center it horizontally.
- Use the head’s Rounds 11–17 as a general placement area.
- Pin the muzzle in place before sewing.
- Sew around its perimeter, catching corresponding stitches on the head.
- Add a small amount of stuffing before closing the final section if a raised muzzle is desired.
The muzzle should remain centered beneath the eyes.
C. Ears — Make Two
Yarn: Main color.
| Round | Instructions | Stitch count |
|---|---|---|
| 1 | 6 sc in MR | 6 |
| 2 | inc in every st | 12 |
| 3 | (1 sc, inc) × 6 | 18 |
| 4 | 18 sc | 18 |
Make two matching ears.
Finishing the ears
- Fasten off each ear, leaving a sewing tail.
- Flatten the pieces in half.
- Leave them unstuffed or add only a tiny amount of filling.
- Position them symmetrically on the upper sides of the head.
- Use Head Rounds 5–7 as a starting placement guide.
- Pin both ears and compare their heights.
- Sew each flattened base securely to the head.
Angle the ears slightly outward for a classic teddy bear appearance.
D. Teddy Bear Body
The body is worked from the bottom upward, creating a rounded torso that narrows toward the neck.
Yarn: Main color.
| Round | Instructions | Stitch count |
|---|---|---|
| 1 | 6 sc in MR | 6 |
| 2 | inc in every st | 12 |
| 3 | (1 sc, inc) × 6 | 18 |
| 4 | (2 sc, inc) × 6 | 24 |
| 5 | (3 sc, inc) × 6 | 30 |
| 6 | (4 sc, inc) × 6 | 36 |
| 7 | 36 sc | 36 |
| 8 | 36 sc | 36 |
| 9 | 36 sc | 36 |
| 10 | 36 sc | 36 |
| 11 | 36 sc | 36 |
| 12 | (4 sc, dec) × 6 | 30 |
| 13 | 30 sc | 30 |
| 14 | (3 sc, dec) × 6 | 24 |
| 15 | 24 sc | 24 |
| 16 | 24 sc | 24 |
| 17 | 24 sc | 24 |
| 18 | 24 sc | 24 |
Finishing the body
- Fasten off, leaving a long sewing tail.
- Stuff the bottom first.
- Add filling gradually through the torso.
- Keep the neck area slightly less bulky than the lower body.
- Leave the 24-stitch opening unclosed.
The top opening is compatible with the head opening, allowing the pieces to be sewn together without changing their stitch counts.
E. Arms — Make Two
The arms begin with rounded paws and continue into narrow upper sections.
Yarn: Main color. For contrasting paws, use cream for Rounds 1–3.
| Round | Instructions | Stitch count |
|---|---|---|
| 1 | 6 sc in MR | 6 |
| 2 | inc in every st | 12 |
| 3 | (1 sc, inc) × 6 | 18 |
| 4 | 18 sc | 18 |
| 5 | 18 sc | 18 |
| 6 | (4 sc, dec) × 3 | 15 |
| 7 | 15 sc | 15 |
| 8 | 15 sc | 15 |
| 9 | 15 sc | 15 |
| 10 | 15 sc | 15 |
| 11 | 15 sc | 15 |
| 12 | (3 sc, dec) × 3 | 12 |
| 13 | 12 sc | 12 |
Finishing the arms
- Fasten off, leaving a sewing tail.
- Lightly stuff the paws and lower arms.
- Keep the upper sections flexible.
- Flatten the top openings for attachment.
- Repeat the same instructions for the second arm.
For contrasting paws, change to the main color in Round 4. Ensure both arms have the same color transition.
F. Legs and Feet — Make Two
The legs begin at the feet. Increases create rounded feet, while the remaining rounds form the short legs.
Yarn: Main color. For contrasting feet, use cream for Rounds 1–4.
| Round | Instructions | Stitch count |
|---|---|---|
| 1 | 6 sc in MR | 6 |
| 2 | inc in every st | 12 |
| 3 | (1 sc, inc) × 6 | 18 |
| 4 | (2 sc, inc) × 6 | 24 |
| 5 | 24 sc | 24 |
| 6 | 24 sc | 24 |
| 7 | (2 sc, dec) × 6 | 18 |
| 8 | 18 sc | 18 |
| 9 | 18 sc | 18 |
| 10 | 18 sc | 18 |
| 11 | (1 sc, dec) × 6 | 12 |
| 12 | 12 sc | 12 |
Finishing the legs
- Fasten off, leaving a sewing tail.
- Stuff the feet firmly enough to retain their rounded shape.
- Fill the legs more lightly.
- Flatten the top openings.
- Make the second leg using the same instructions.
For contrasting feet, change to the main color in Round 5.
G. Optional Tail
Yarn: Main color.
| Round | Instructions | Stitch count |
|---|---|---|
| 1 | 6 sc in MR | 6 |
| 2 | inc in every st | 12 |
| 3 | 12 sc | 12 |
Fasten off, leaving a sewing tail. Add a small amount of stuffing and close the opening if desired. Sew the tail to the lower center of the back, keeping it small enough not to interfere with sitting.
H. Optional Mini Bow
Yarn: A small amount of accent yarn.
- Ch 11.
- Row 1: sc in the second ch from the hook and in each remaining ch. Total: 10 sc.
- Ch 1 and turn.
- Rows 2–5: 10 sc in each row.
- Fasten off, leaving a long tail.
- Pinch the rectangle at the center to form a bow.
- Wrap yarn around the center several times.
- Secure the yarn at the back.
- Sew the bow to the neck or chest.
Keep the bow optional, particularly for toys intended for young children.
8. Stitch Count Validation
The round-by-round stitch counts are derived from the specified increases and decreases.
| Component | Stitch-count progression |
|---|---|
| Head | 6, 12, 18, 24, 30, 36, 42, 48; remain at 48 through R16; then 42, 36, 30, 24, 24 |
| Muzzle | 14, 20, 20 |
| Each ear | 6, 12, 18, 18 |
| Body | 6, 12, 18, 24, 30, 36; remain at 36 through R11; then 30, 30, 24, 24 |
| Each arm | 6, 12, 18, 18, 18, 15; remain at 15 through R11; then 12, 12 |
| Each leg | 6, 12, 18, 24, 24, 24, 18; remain at 18 through R10; then 12, 12 |
| Tail | 6, 12, 12 |
Each increase adds one stitch to the total. Each decrease removes one stitch.
For example, the head’s Round 5 repeats (3 sc, inc) six times. Each repeat works into four existing stitches and produces five stitches, increasing the total from 24 to 30.
The head and body openings both contain 24 stitches, allowing them to be joined stitch by stitch.
The pattern’s stitch counts have been mathematically checked against the written sequences. The pattern has not been physically tested, so the finished fit and proportions should be checked during construction.
9. Color Changes and Facial Features
Embroidering the eyes
- Identify the front center of the head.
- Position the eyes approximately around Head Rounds 10–12.
- Begin with a horizontal gap of about 7–9 stitches between the eyes.
- Mark the positions before embroidering.
- Check that the eyes are level and equally distant from the center of the muzzle.
- Use several small stitches of black or dark brown embroidery thread to create each eye.
- Secure the ends inside the head.
Adjust the placement to suit the finished head size.
Embroidering the nose and mouth
- Thread a tapestry needle with dark embroidery thread.
- Bring the needle out near the upper center of the muzzle.
- Make several closely spaced stitches to form a small triangular nose.
- Fill the triangle until the underlying yarn is mostly concealed.
- Add a short vertical stitch below the nose.
- Embroider a small curved or straight mouth.
- Secure the thread inside the head or muzzle.
Avoid pulling the embroidery so tightly that it distorts the muzzle.
Optional eyebrows
Add a few small stitches above the eyes for a more expressive face. Keep both eyebrows similar in length and angle.
For toys intended for babies or young children, embroidered facial features are preferable to detachable plastic components. If safety eyes are used for another intended purpose, install them according to the manufacturer’s instructions before closing the head.
10. Stuffing and Shaping
Stuffing the head
- Begin at the crown.
- Add small wisps of filling.
- Distribute the filling toward the sides.
- Rotate the head to check its shape.
- Add small amounts where the surface looks flat.
- Keep the opening clear for sewing.
The head should hold a rounded shape without stretching the stitches.
Stuffing the body
Fill the bottom first and work upward. Keep the lower torso rounded and avoid packing the neck too tightly.
For a sitting bear, the lower body and feet should provide support without becoming excessively rigid.
Stuffing the arms and legs
Stuff the paws and feet enough to retain their shapes, but leave the upper arms and legs softer. Use similar amounts of filling in matching limbs.
Preventing lumps and visible gaps
- Use a smaller hook if the fabric has large holes.
- Add stuffing gradually.
- Distribute filling with your fingers.
- Remove excess stuffing if stitches stretch.
- Check the shape before closing an opening.
- Correct tension problems before continuing with additional rounds.
11. Complete Assembly Instructions
Step 1: Attach the muzzle
Center the muzzle on the lower front of the head, using Head Rounds 11–17 as a general placement area. Pin it in place, sew around the perimeter, and secure the yarn inside the head.
Step 2: Attach the ears
Place the ears symmetrically around Head Rounds 5–7. Compare their height and angle before sewing along their flattened bases.
Step 3: Attach the head to the body
- Align the two 24-stitch openings.
- Match the head stitches with corresponding body stitches.
- Pin the front, back, and sides.
- Sew around the openings using the long sewing tail.
- Keep the seam snug without gathering the fabric.
- Adjust the stuffing before closing the final stitches.
- Secure and hide the yarn tail.
Step 4: Attach the legs
Position the legs at the lower front of the body, near the lower third of the torso. Angle the feet slightly forward.
Pin both legs and check that their feet sit at approximately the same height. Sew the flattened openings securely to the body.
Step 5: Attach the arms
Position the arms on either side of the torso, just below the head seam. Align their upper edges and angle them slightly forward or downward.
Pin, compare, and sew both arms securely.
Step 6: Attach the optional tail
Center the tail on the lower back. Sew it firmly in place and ensure it does not interfere with the bear’s sitting position.
Step 7: Attach the bow
Sew the bow to the neck or chest, securing its center and hiding the yarn ends.
Step 8: Check alignment
Inspect the bear from the front, sides, and back. Confirm that the head is centered, the ears are level, the muzzle is straight, and the limbs are balanced.
12. Common Mistakes and Troubleshooting
| Problem | Likely cause | Solution |
|---|---|---|
| Stuffing is visible | Loose stitches or large hook | Use a smaller hook and maintain consistent tension |
| Head is pointed | Uneven shaping | Check increase and decrease counts |
| Face is crooked | Features are misplaced | Pin the muzzle and mark eye positions before sewing |
| Ears do not match | Uneven tension or placement | Use the same hook and round counts |
| Arms differ in length | Missed stitches or inconsistent tension | Compare both arms before attaching |
| Legs differ in size | Incorrect stitch counts or unequal stuffing | Check rounds and use similar amounts of filling |
| Stitch count is wrong | Missed or extra stitch | Undo the affected section and correct it |
| Fabric is too tight | Hook is too small | Try a slightly larger hook |
| Head seam is visible | Misaligned openings or uneven sewing | Match corresponding stitches |
| Body is lumpy | Uneven stuffing | Redistribute the filling gradually |
| Bear cannot sit | Poor limb placement or overstuffing | Adjust the stuffing and reposition the legs |
| Embroidery is loose | Ends are not secured | Rework the detail and hide the ends inside |
| Opening is difficult to close | Uneven stitches or short yarn tail | Use a suitable sewing tail and close gradually |
13. Customization and Size Variations
Color combinations
Try brown with a cream muzzle, beige with a white muzzle, gray with a pale muzzle, or a single-color design.
Facial expressions
Experiment with eye spacing, nose size, eyebrow placement, and mouth shape. Pin or mark the positions before embroidering.
Different sizes
Thicker yarn and a suitable larger hook generally produce a larger bear. Finer yarn and a smaller hook produce a smaller bear.
For substantial size changes, reconsider the dimensions of the head, muzzle, body, ears, arms, and legs. You may also need to adjust the stuffing quantity and attachment proportions.
Accessories and textures
Add a scarf, sweater, bow, or embroidered decorative detail. Smooth yarn provides clear stitch definition, while plush yarn creates a softer surface but can make counting more difficult.
14. Finishing and Care
- Secure all yarn ends.
- Check every seam.
- Correct uneven stuffing.
- Ensure the face is aligned.
- Confirm that the limbs are attached securely.
- Measure the finished bear.
- Add optional accessories if desired.
Follow the care instructions for the selected yarn and stuffing. Some materials may be suitable for gentle hand washing, while others require different care. Reshape the bear after washing and allow it to dry completely.
Inspect toys intended for children regularly for loose seams, damaged fabric, and detached decorations.
15. Beginner and Advanced Tips
Beginner tips
- Use stitch markers in continuous rounds.
- Count stitches after every increase and decrease round.
- Keep matching components consistent.
- Stuff gradually rather than all at once.
- Pin components before sewing.
- Correct mistakes as soon as they appear.
- Embroider the face while the head remains accessible.
Advanced tips
- Use invisible decreases for smoother shaping.
- Keep increases and decreases consistent.
- Adjust stuffing to improve the head and body silhouette.
- Sew components with small, even stitches.
- Test facial placement before embroidering.
- Recalculate proportions for significant size variations.
- Maintain consistent tension during color changes.
16. Final Project Checklist
Use this checklist before finishing your teddy bear.
- Head is rounded and evenly stuffed.
- Muzzle is centered and securely attached.
- Both ears match.
- Body is evenly stuffed.
- Arms and legs have matching proportions.
- Head is securely attached to the body.
- All limbs are firmly sewn.
- Facial features are aligned and secure.
- All openings are closed.
- Yarn ends are hidden.
- Stuffing is not visible through the stitches.
- The bear rests in the intended position.
- Optional accessories are securely attached.
- Finished dimensions have been checked.
17. Frequently Asked Questions
Is this teddy bear suitable for beginners?
Yes. The pattern uses basic stitches, increases, decreases, continuous rounds, stuffing, and sewing. Beginners may need practice with the magic ring and invisible decrease.
What yarn is best for amigurumi?
Smooth DK or light-worsted cotton, acrylic, or suitable blended yarn is a practical starting point. Choose yarn that produces a dense fabric.
Why is a smaller hook recommended?
A smaller hook helps create tighter stitches, reducing the chance of stuffing showing through the fabric.
How can I prevent stuffing from showing?
Use an appropriate hook size, maintain even tension, and avoid overstuffing. Correct loose stitches before adding filling.
Can I make the bear bigger or smaller?
Yes. Change the yarn weight and hook size, but remember that significant size changes may require adjustments to component proportions.
How do I attach the head securely?
Match the head’s 24-stitch opening with the body’s 24-stitch opening and sew corresponding stitches together evenly.
Can I embroider the eyes?
Yes. Embroidered eyes allow you to customize the expression and are generally preferable for toys intended for babies and young children.
How can I make the arms and legs identical?
Use the same yarn, hook, round counts, tension, and stuffing technique for each matching pair.
How should I wash the bear?
Follow the care instructions for the yarn and filling. Reshape the bear after washing and allow it to dry completely.
What should I do if the stitch count is incorrect?
Stop, recount the stitches, and undo the incorrect section. Fixing the error early helps preserve the intended shape.
Leave a Comment